
How to Create a Web Service in SAP
Creating a web service in SAP ABAP lets you expose business logic built in a function module so that external systems can consume it over SOAP. This guide walks through the full process: creating a function group, building a function module, generating a web service definition, configuring the service binding in SOAMANAGER, exporting the WSDL, and testing the finished web service with SoapUI.
Video: Create configure and test sap web service using Function Module and soamanager by Zafar Karnalkar (2019). All credit for the demonstration goes to the creator; watch the original on YouTube. The written guide below was generated from this video by Docsie. Creator? Request a change or removal.
Creating a web service in SAP ABAP lets you expose business logic built in a function module so that external systems can consume it over SOAP. This guide walks through the full process: creating a function group, building a function module, generating a web service definition, configuring the service binding in SOAMANAGER, exporting the WSDL, and testing the finished web service with SoapUI.
Prerequisites
Before you begin, make sure you have:
- Access to the SAP GUI with developer authorizations (SE80, SE37, SOAMANAGER)
- A package to assign your objects to (for example,
zabap1orZABAP) - Access to the SOA Manager URL in a web browser
- SoapUI installed on your machine for testing the finished web service
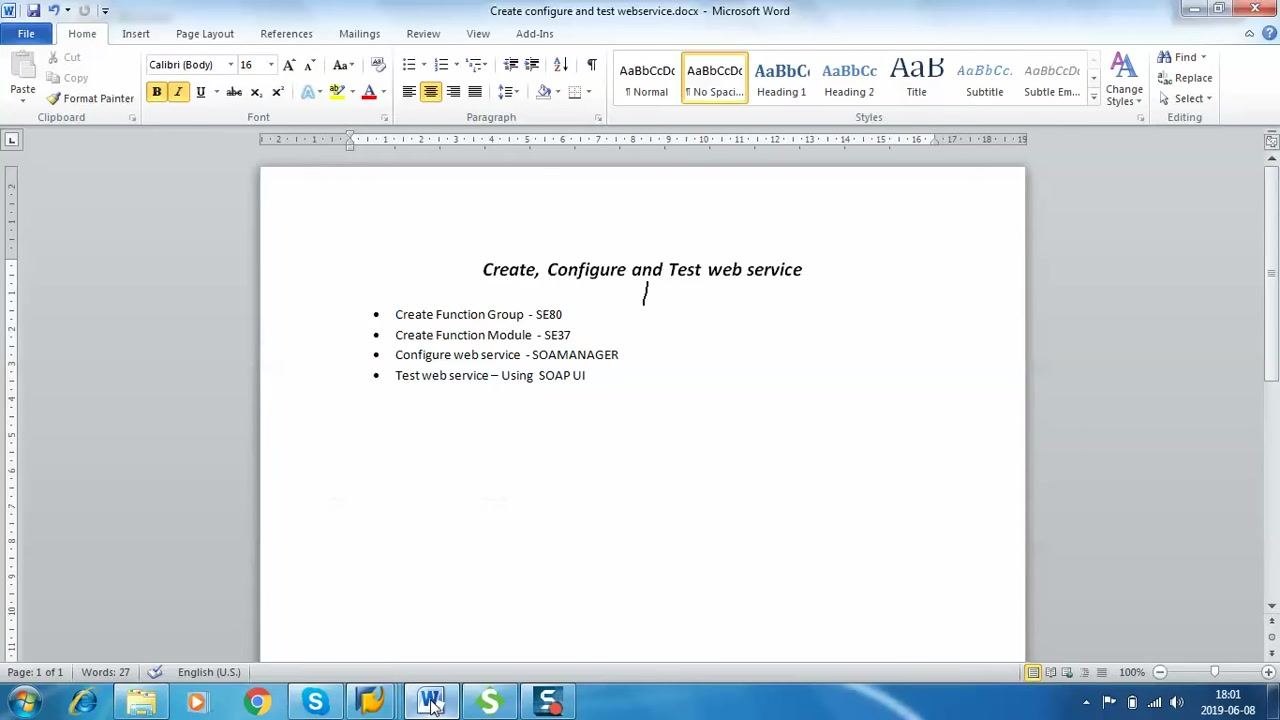
The overall process consists of four main stages: creating the function group in SE80, creating the function module in SE37, configuring the web service in SOAMANAGER, and testing the web service using SoapUI.
Create the function group
- Open the SAP GUI and navigate to the ABAP Development Workbench (SE80).
- In the left panel, select Function Group from the dropdown menu.
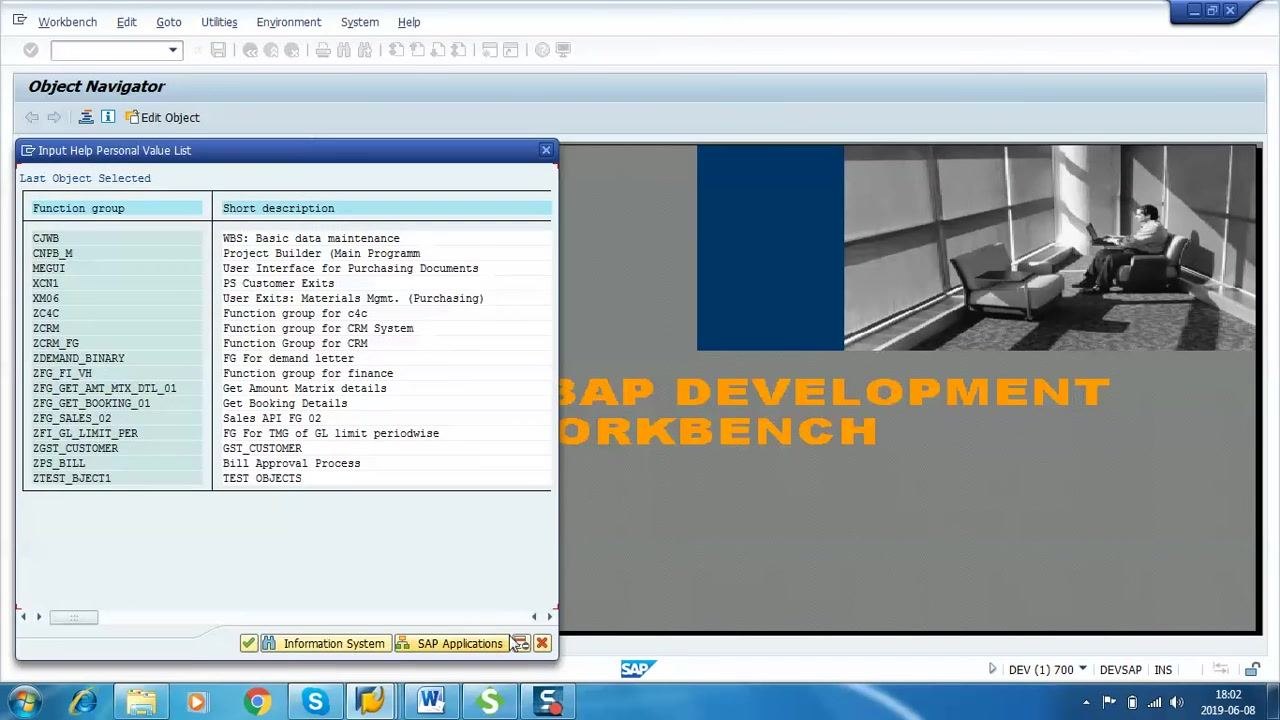
- Enter the name for the new function group. For example, enter
ZAFAR_FG. - Press Enter.
- If the function group does not exist, a prompt appears: "Function Group ZAFAR_FG does not exist. Create Object?" Click Yes to proceed.
In the Create Object Directory Entry dialog:
- Enter a short description, such as "Text for web service."
- For the package, enter
zabap1. - Set Person Responsible to
DEVELOPER1. - Confirm the original system and language as shown.
- Click Local Object, or assign the object to a package as needed.
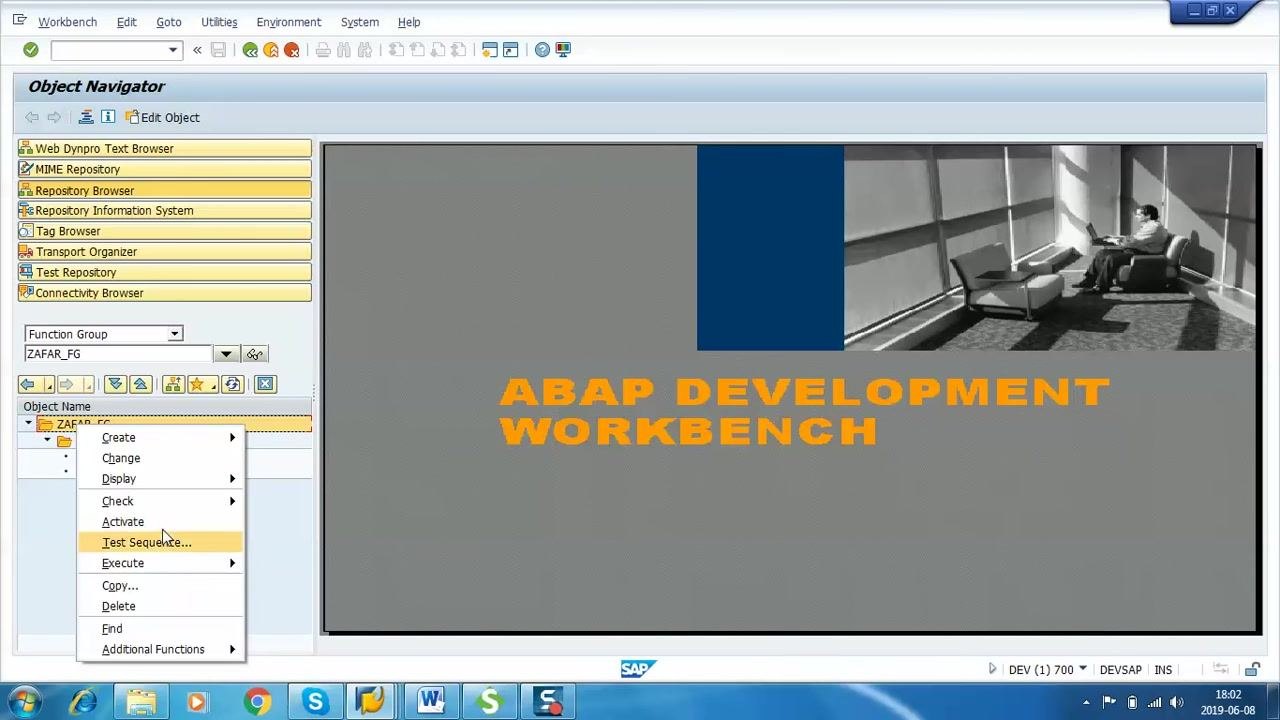
Once the function group is created, right-click on the function group name (ZAFAR_FG) in the object list and select Activate from the context menu to activate the function group.
Create the function module
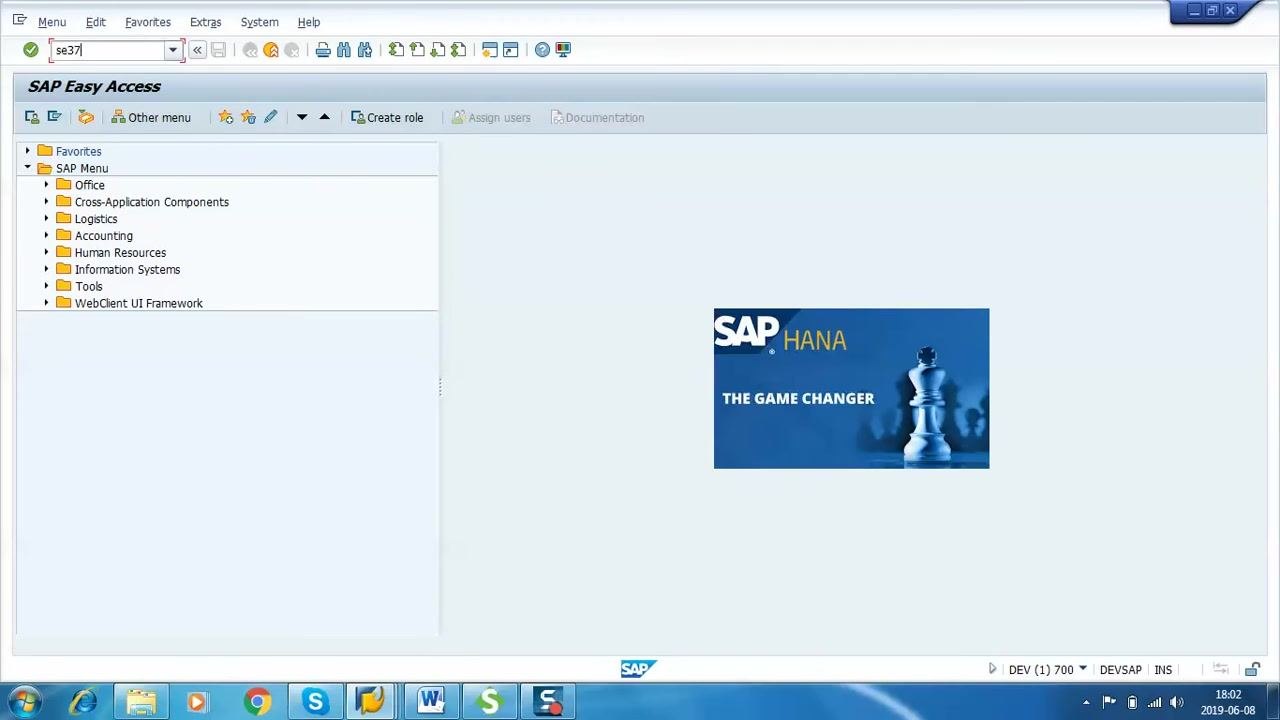
- Open the SAP GUI and enter transaction code SE37 in the command field, then press Enter to navigate to the Function Builder.
- In the Function Builder: Initial Screen, enter the function module name
ZAFAR_WEBSERVICE, then click Create.
- In the Create Function Module dialog, enter the following details:
- Function Module:
ZAFAR_WEBSERVICE - Function Group:
ZAFAR_FG - Short Text: "Basic webservice"
- Function Module:
If a warning appears stating that the function module name is reserved for SAP, click New entry to proceed.
-
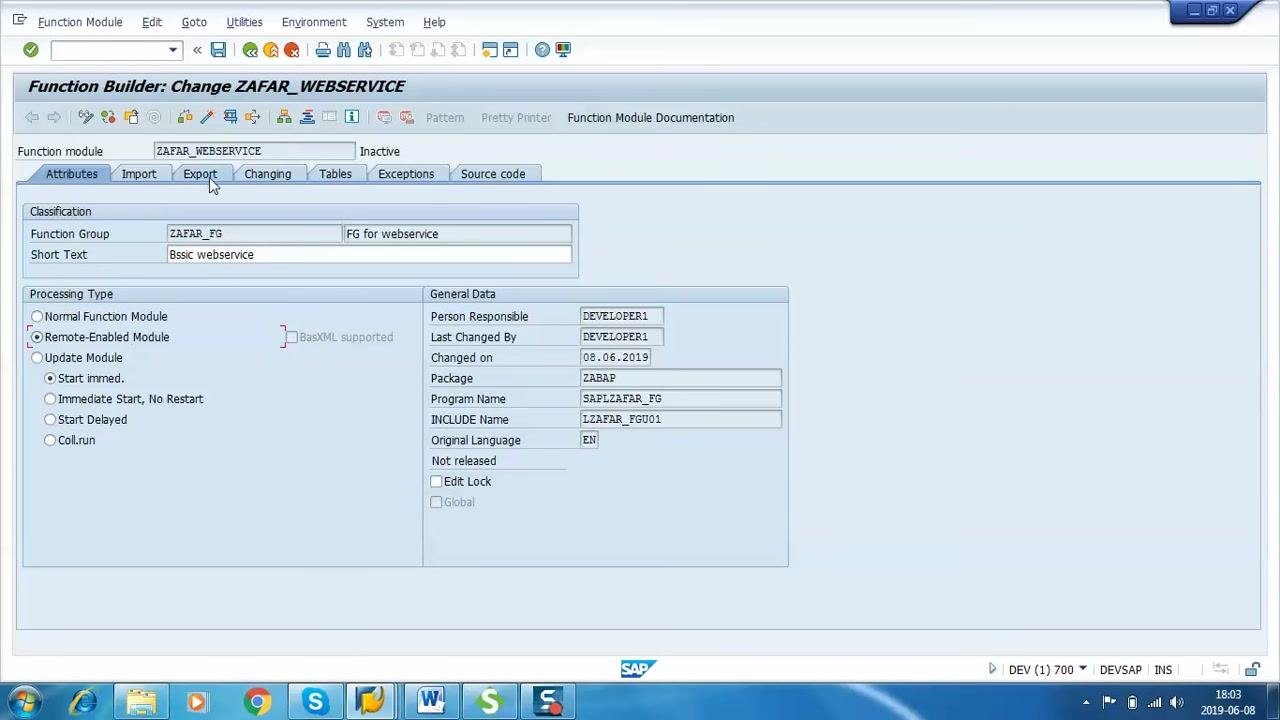
In the Function Builder: Change screen, open the Attributes tab and set Processing Type to Remote-Enabled Module by selecting the corresponding radio button. Confirm the function group, short text, and other general data as shown.
-
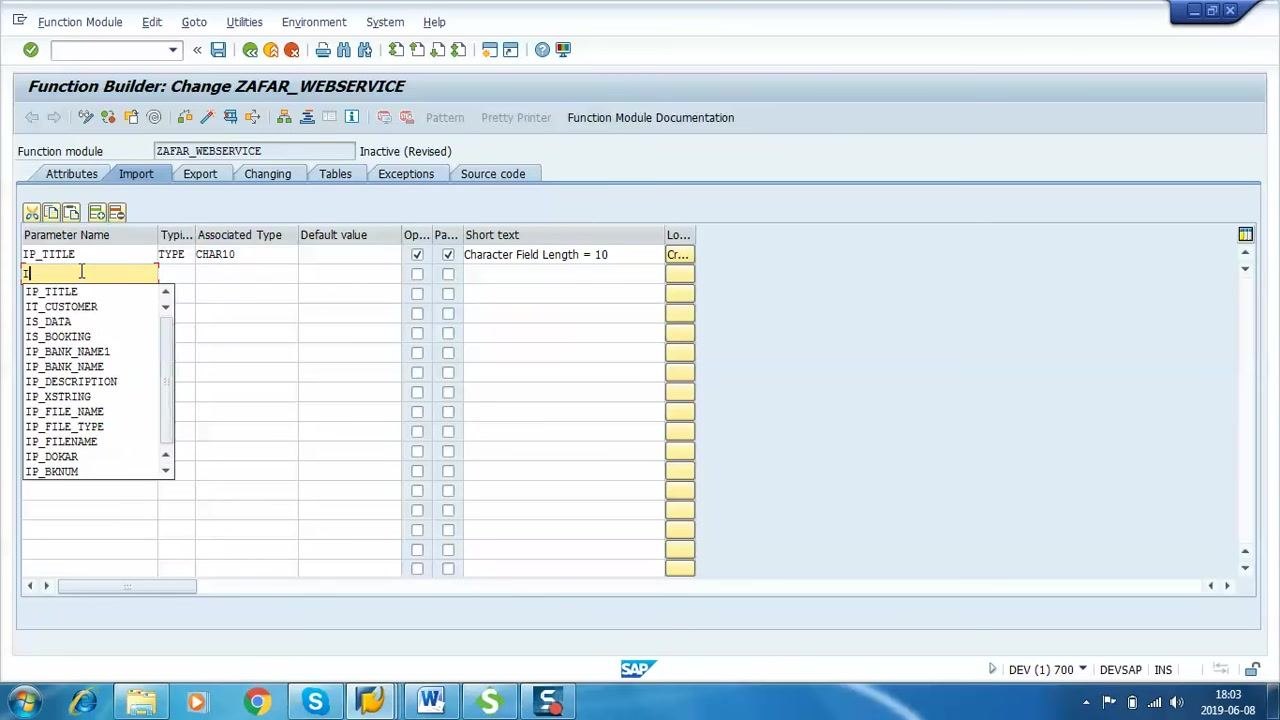
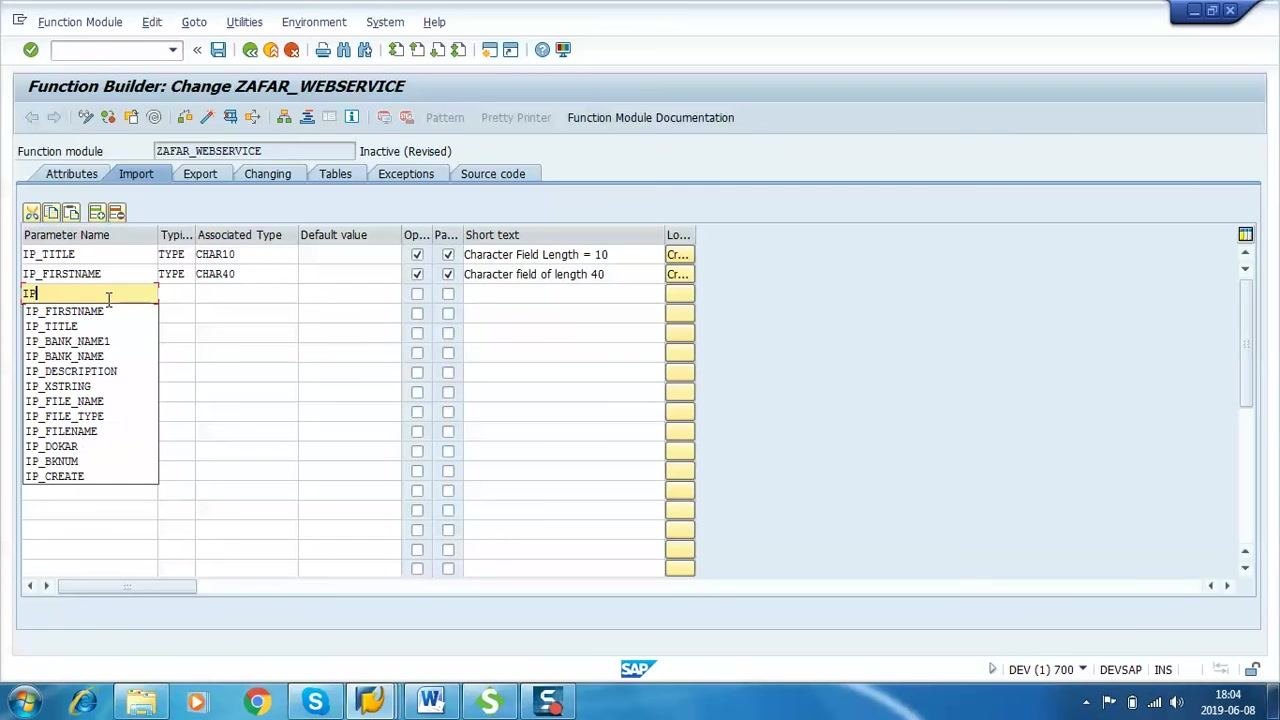
Go to the Import tab and add the following parameters:
IP_TITLEof typeCHAR10(Character Field Length = 10)IP_FIRSTNAMEof typeCHAR40(Character Field Length = 40)IP_LASTNAMEof typeCHAR40(Character Field Length = 40)
If an information dialog appears stating that reference parameters are not allowed with RFC, acknowledge it and ensure all parameters use simple data types.
- Go to the Export tab and add the following parameter:
EP_NAMEof typeSTRING
Implement and test the function module logic
- In the Source code tab of the Function Builder for
ZAFAR_WEBSERVICE, enter the ABAP code to concatenate the input parameters:
abap
   CONCATENATE IP_TITLE IP_FIRSTNAME IP_LASTNAME INTO EP_NAME SEPARATED BY SPACE.
This code combines the values of IP_TITLE, IP_FIRSTNAME, and IP_LASTNAME into the export parameter EP_NAME, separated by spaces.
-
Save and activate the function module. Confirm the status at the top changes to "Active".
-
Click the Test/Execute (F8) button in the Function Builder toolbar. The Test Function Module: Initial Screen appears.
-
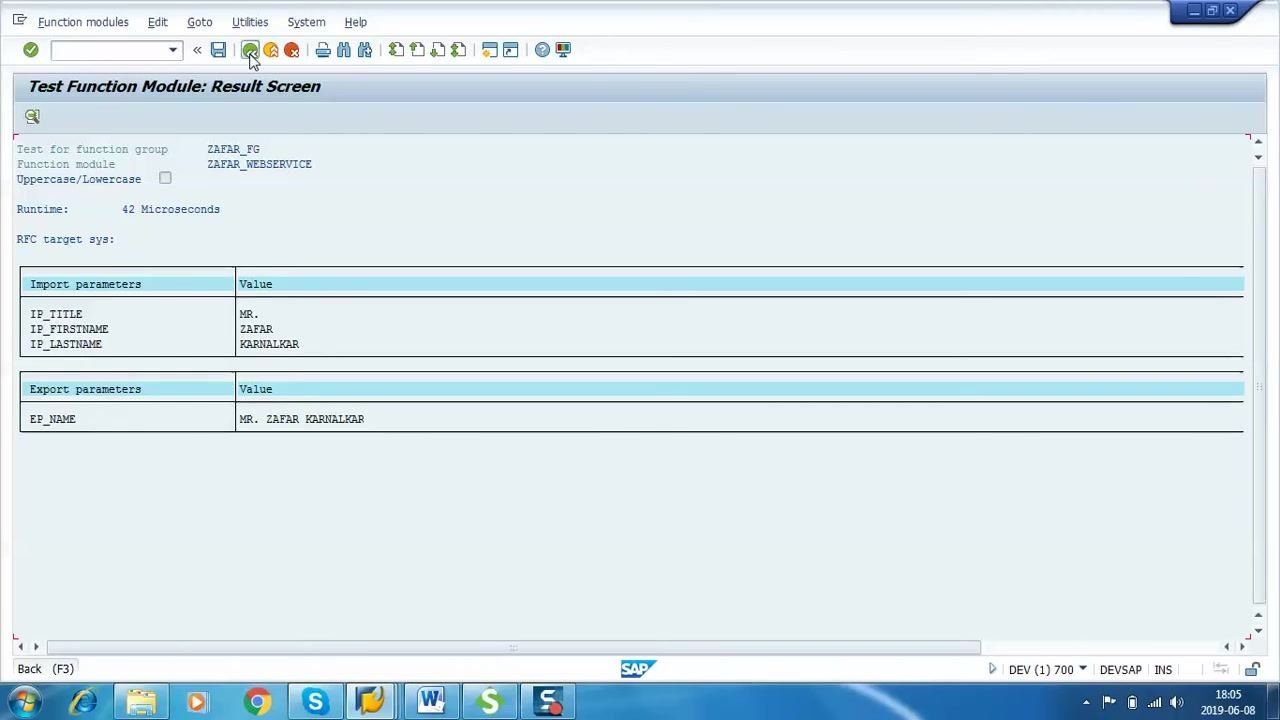
Enter test values for the import parameters:
- IP_TITLE:
Mr. - IP_FIRSTNAME:
Zafar - IP_LASTNAME:
Karnalkar
- IP_TITLE:
-
Execute the test. The result screen displays the concatenated output in the export parameter:
- EP_NAME:
MR. ZAFAR KARNALKAR
- EP_NAME:
Create a web service from the function module
-
Make sure you are in the Function Builder screen with your target function module (
ZAFAR_WEBSERVICE) displayed. -
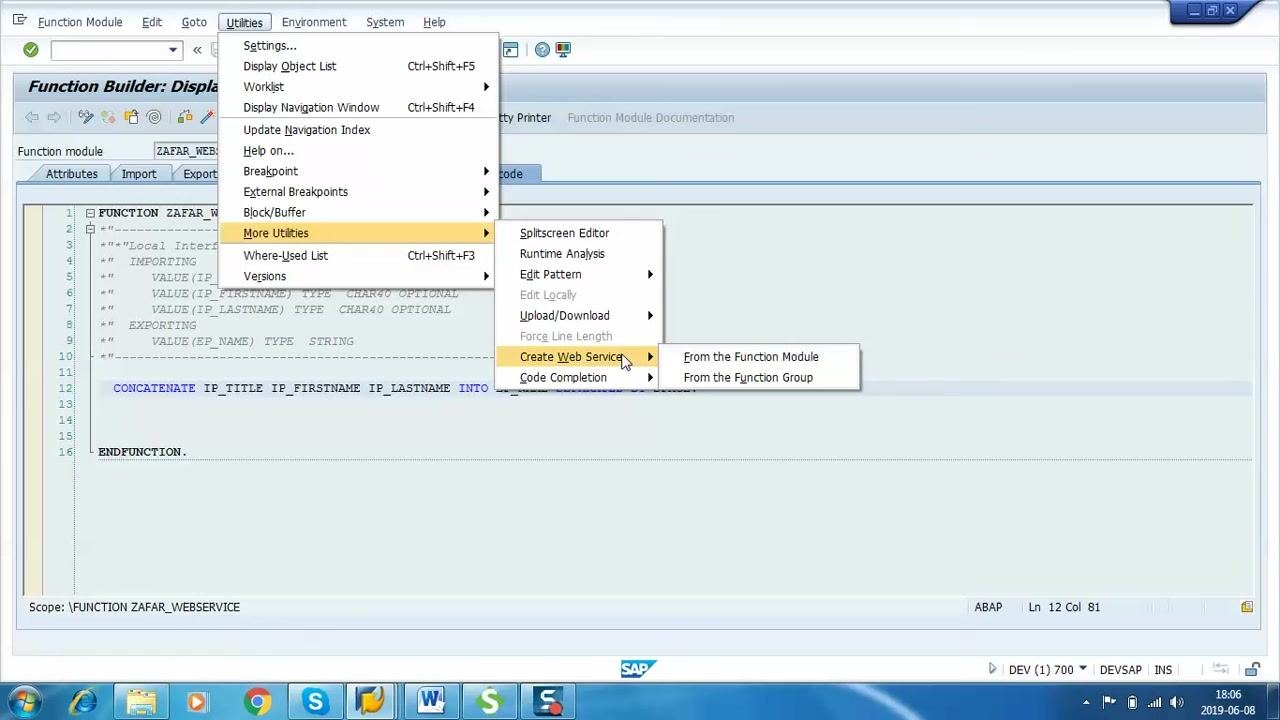
In the menu bar, click Utilities, then hover over More Utilities to expand additional options.
-
In the expanded menu, hover over Create Web Service and choose From the Function Module from the next submenu.
-
In the Enterprise Services: Create Webservice for Function Module dialog, enter a name for your web service in the Service Definition field (for example,
ZWS_NAME). Optionally, provide a description for the web service, then click Cont. (Continue) to proceed.
-
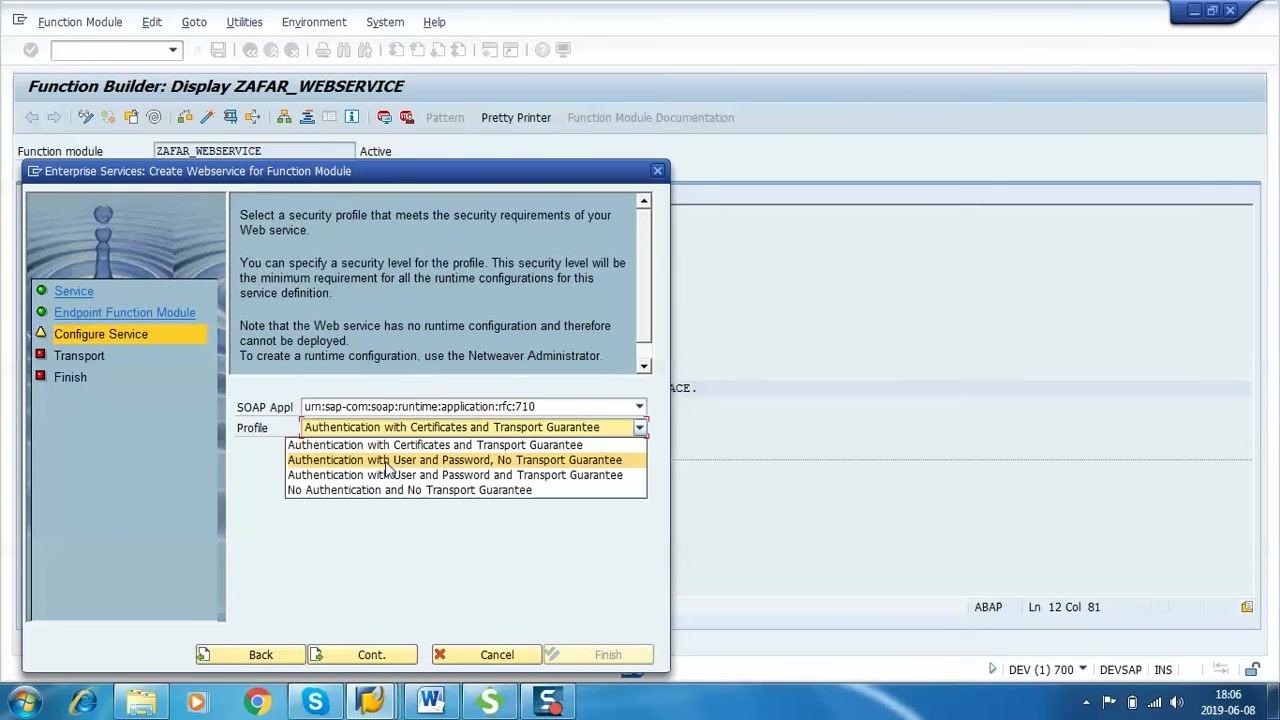
In the Configure Service step, select the appropriate SOAP Application URI (for example,
urn:sap-com:soap:runtime:application:rfc:710). In the Profile dropdown, choose the desired security profile, such as Authentication with Certificates and Transport Guarantee. -
Continue through the wizard until you reach the Finish step. Review the summary, which confirms the web service (
ZWS_NAME) will be created, then click Complete to finalize the creation. -
The system displays the Change Service Definition screen for your new web service. Review the details:
- Technical Name:
ZWS_NAME - Porttype Name:
ZWS_NAME - Short Description: "Basic web service for test"
- SOAP Namespace:
urn:sap-com:document:sap:rfc:functions - Endpoint Type: Function Module
- Referenced Object:
ZAFAR_WEBSERVICE - Package:
ZABAP - Created/Changed by:
DEVELOPER1
- Technical Name:
-
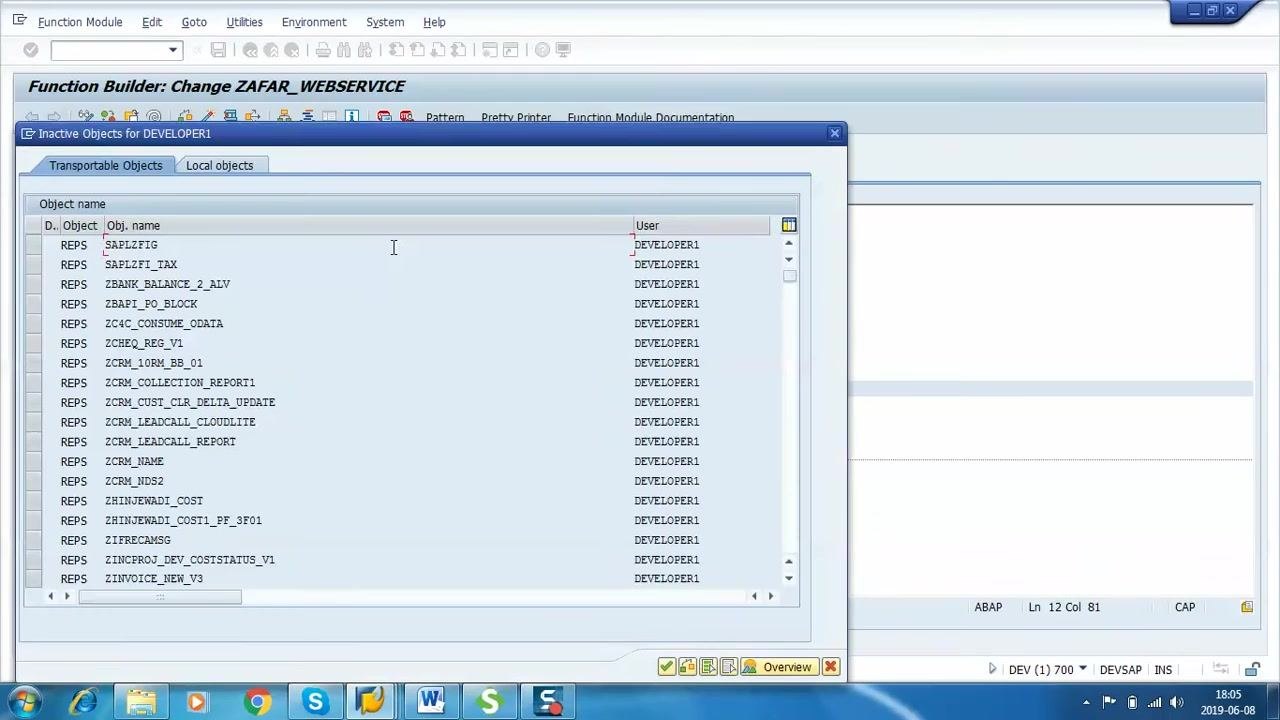
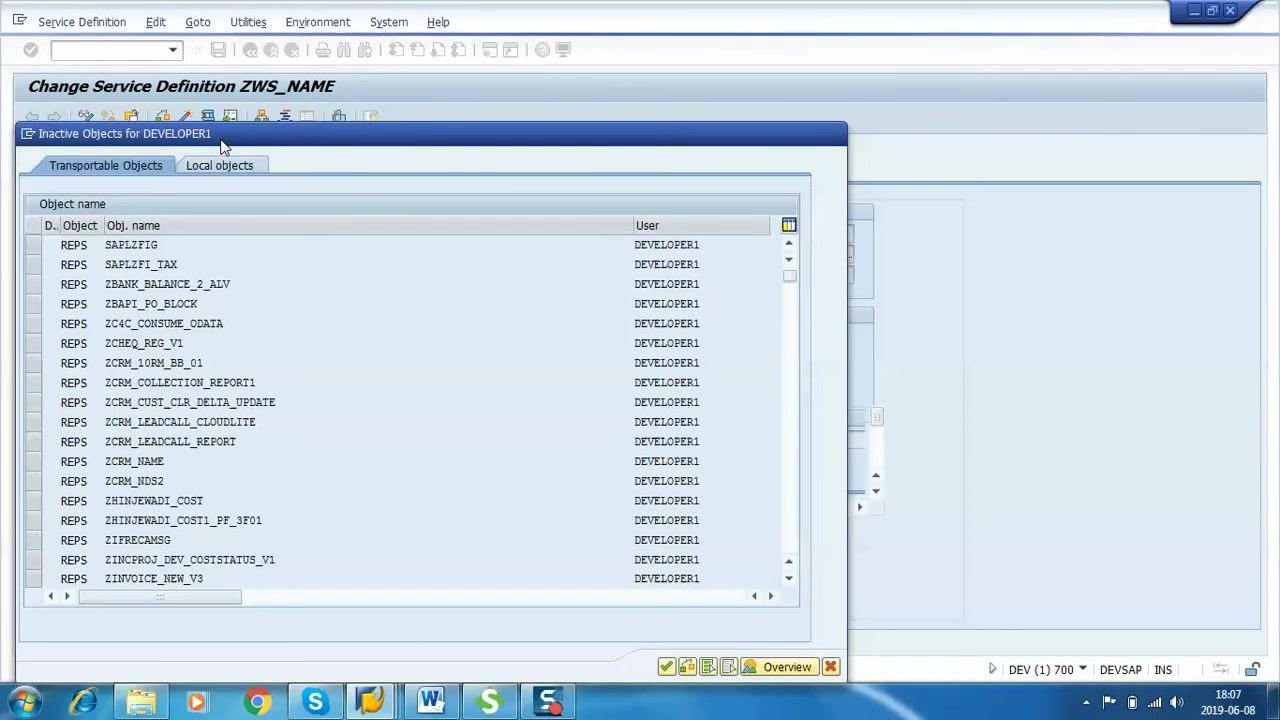
If prompted, select the appropriate transport request for your changes. The Inactive Objects for DEVELOPER1 dialog may appear, listing objects and users. Choose the relevant transportable object or local object as needed.
- In the Configuration tab of the service definition, verify the security profile settings and ensure the authentication level matches your requirements (Low, Medium, High, or None). Confirm that the service definition (
ZWS_NAME) has been activated by checking the status message at the bottom.
Configure the web service in SOA Manager
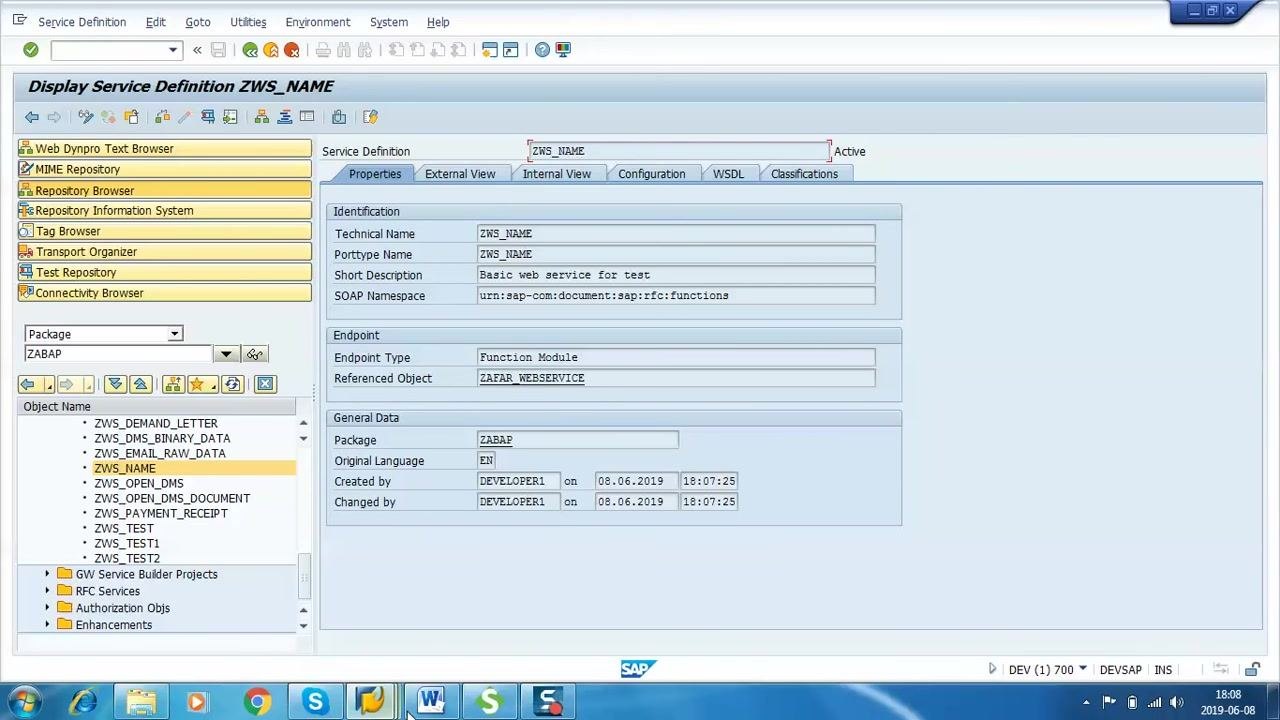
- In the ABAP Development Workbench (SE80), ensure your package (
ZABAP) is selected in the Object Navigator. Expand the Service Definitions node to confirm thatZWS_NAMEappears in the list of available service definitions.
-
Double-click on
ZWS_NAMEin the Service Definitions list. The Display Service Definition ZWS_NAME screen appears, showing detailed properties including Technical Name, Porttype Name, Short Description, SOAP Namespace, Endpoint Type, Referenced Object, Package, and Created/Changed by information. Available tabs include Properties, External View, Internal View, Configuration, WSDL, and Classifications. -
Launch your web browser and navigate to the SOA Manager URL (for example,
http://devsap.eiffel.in:8000/sap/bc/webdynpro/sap/appl_soap_management). If prompted, enter your SAP username and password to log in.
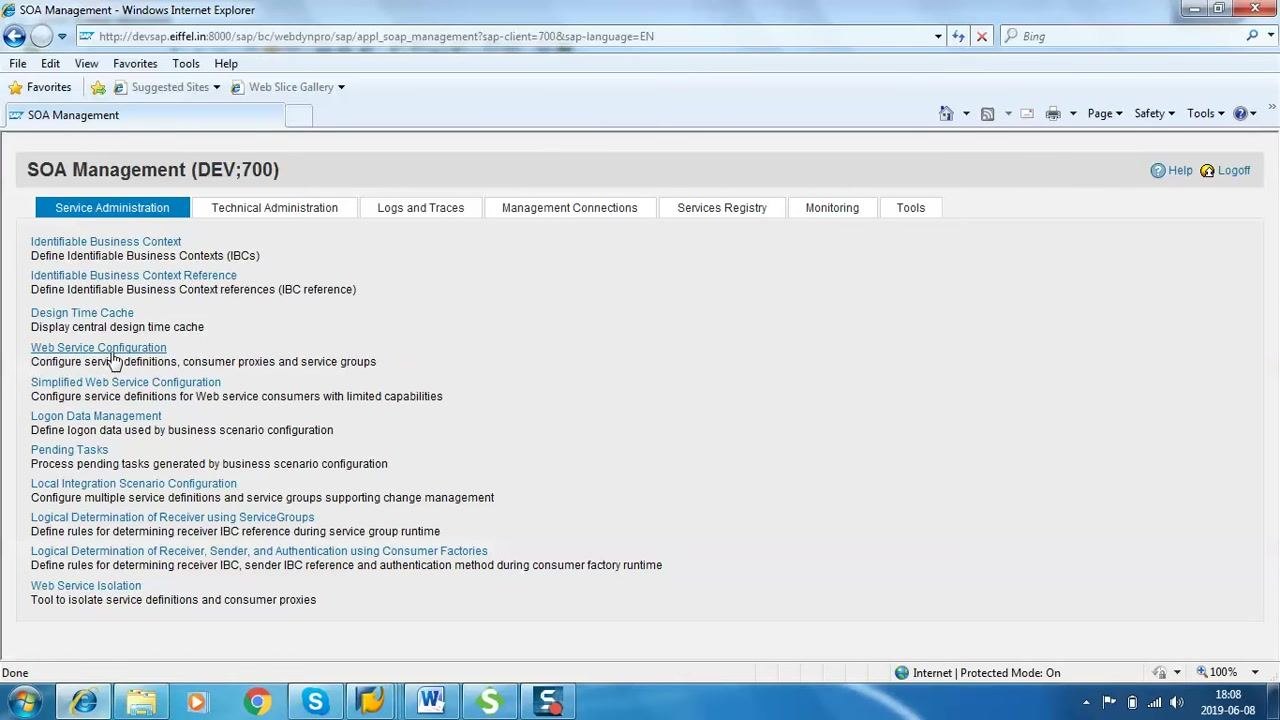
- In the SOA Management interface, ensure you are on the Service Administration tab. Locate and click on Web Service Configuration in the list of available options.
-
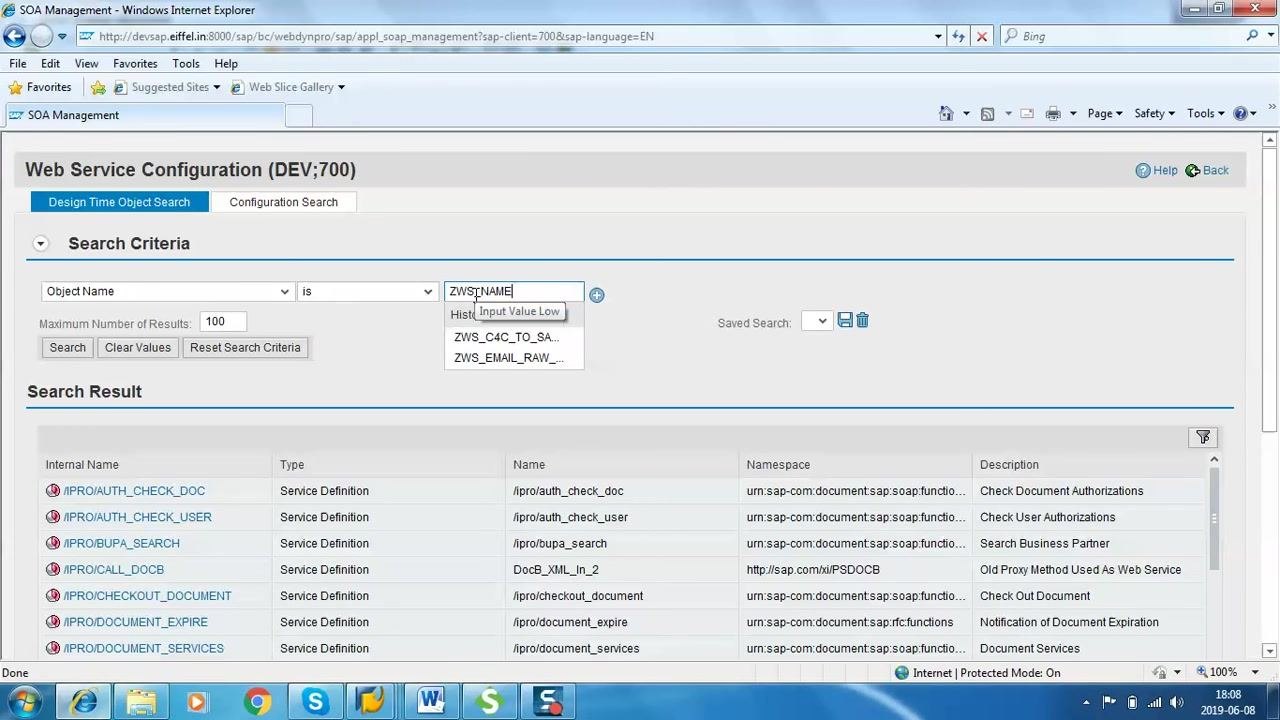
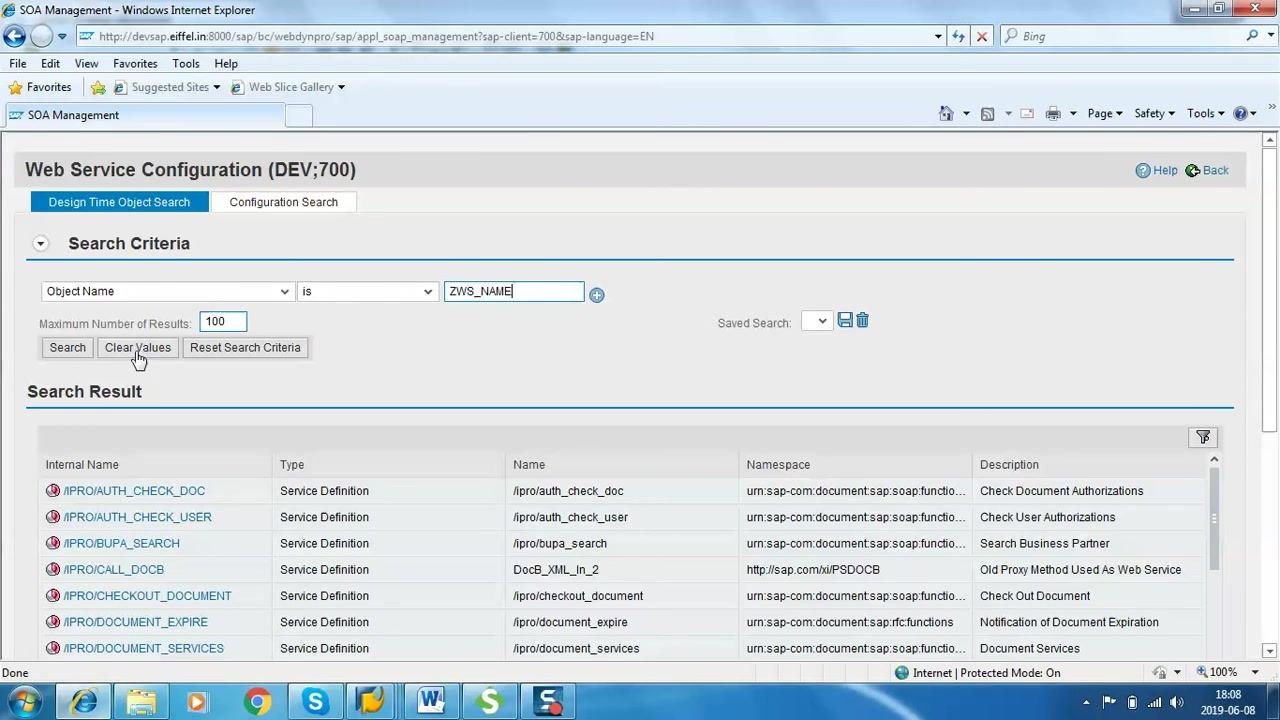
In the Web Service Configuration (DEV;700) screen, under Design Time Object Search, set Object Name to
isand enterZWS_NAMEin the field. Ensure Maximum Number of Results is set (for example, 100), then click Search to locate your service definition. The search results display below, listing matching service definitions. -
In the search results, select your service definition (
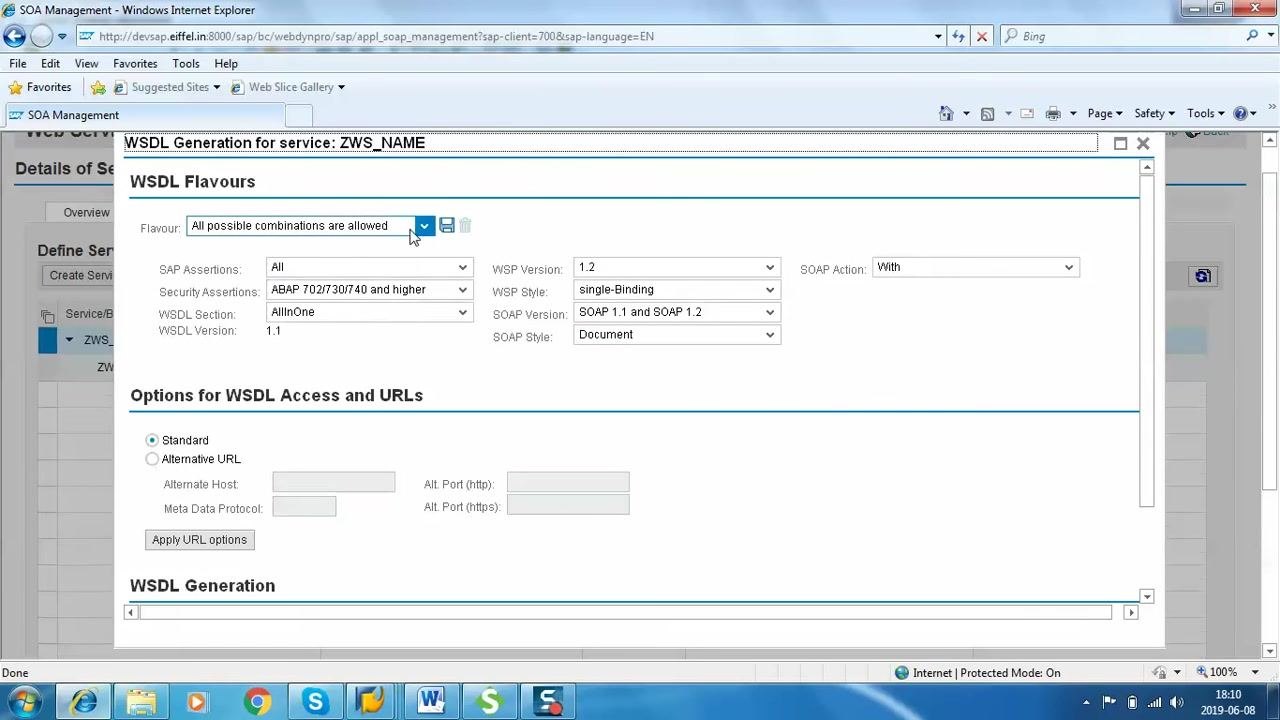
ZWS_NAME) and click Create Service to start the binding configuration wizard. In the Configuration of New Binding for Service Definition 'ZWS_NAME' screen, fill in:- Service Name:
ZWS_NAME - Service Description Text:
web service for name - New Binding Name:
ZWS_NAME
- Service Name:
-
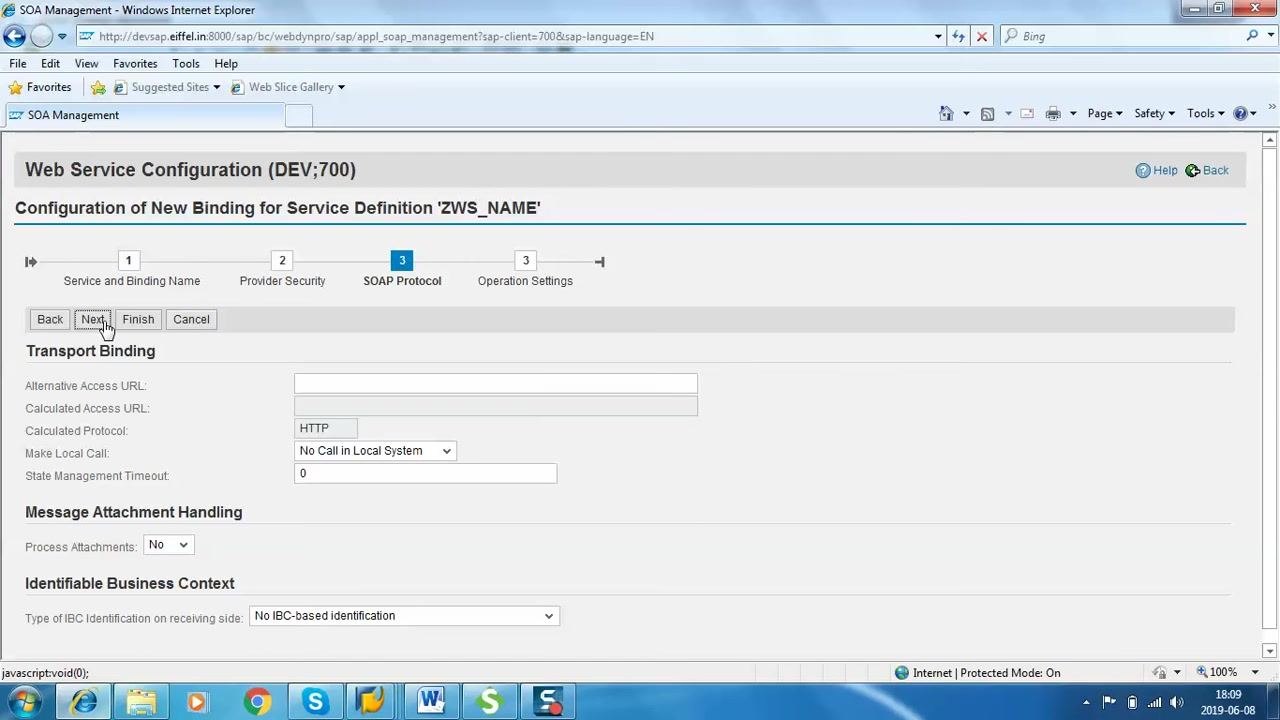
Click Next to continue to the Provider Security step.
-
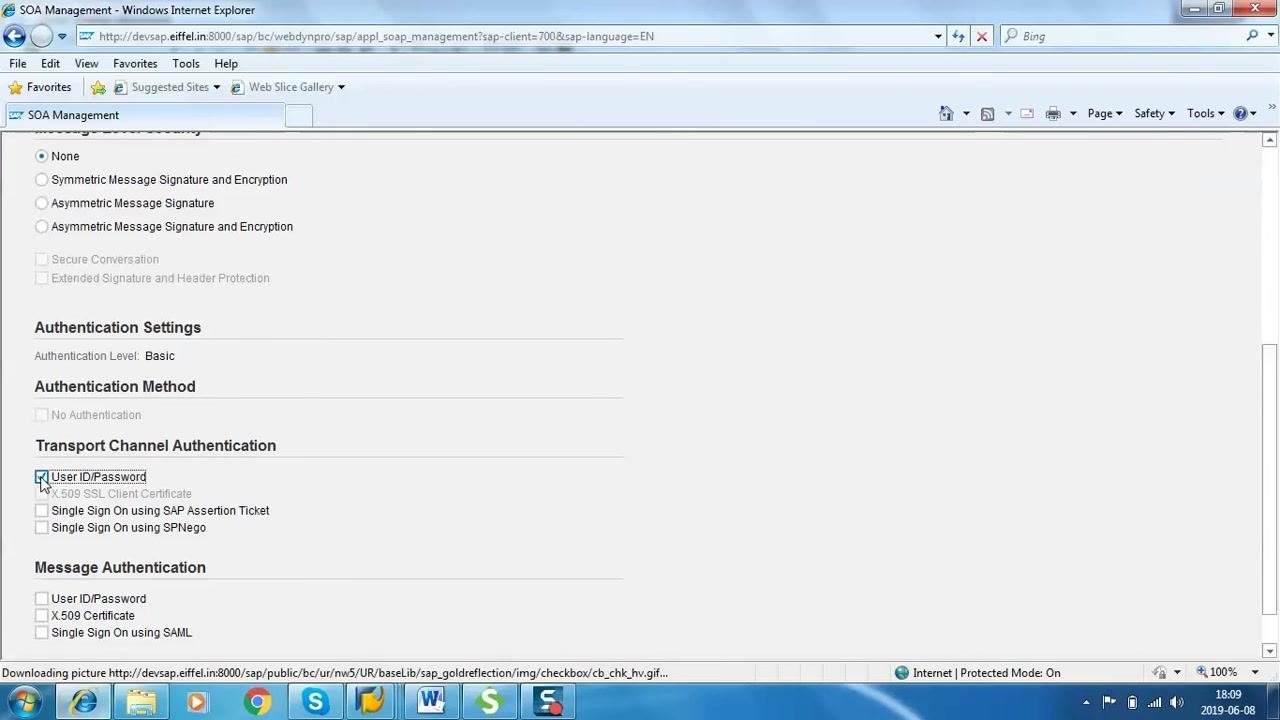
In the Provider Security step, locate the Transport Channel Authentication section and select the checkbox for User ID/Password to enable basic authentication for the web service. Leave other options (X.509 SSL Client Certificate, Single Sign On using SAP Assertion Ticket, Single Sign On using SPNego) unchecked unless required for your scenario. The Authentication Level is set to "Basic".
-
Click Next to advance to the SOAP Protocol step. Review the Transport Binding and Message Attachment Handling settings as needed.
-
After completing the wizard, you return to the Details of Service Definition: ZWS_NAME screen. Under the Configurations tab, verify that your service binding (
ZWS_NAME) is listed with the state Active and the description "web service for name." The creation type is shown as "Manually created."
Export the WSDL file
-
To use the web service outside of SAP (for example, in a non-SAP system), you need the WSDL file. In the Configurations tab, locate your active service binding and initiate WSDL generation by clicking a WSDL or export icon.
-
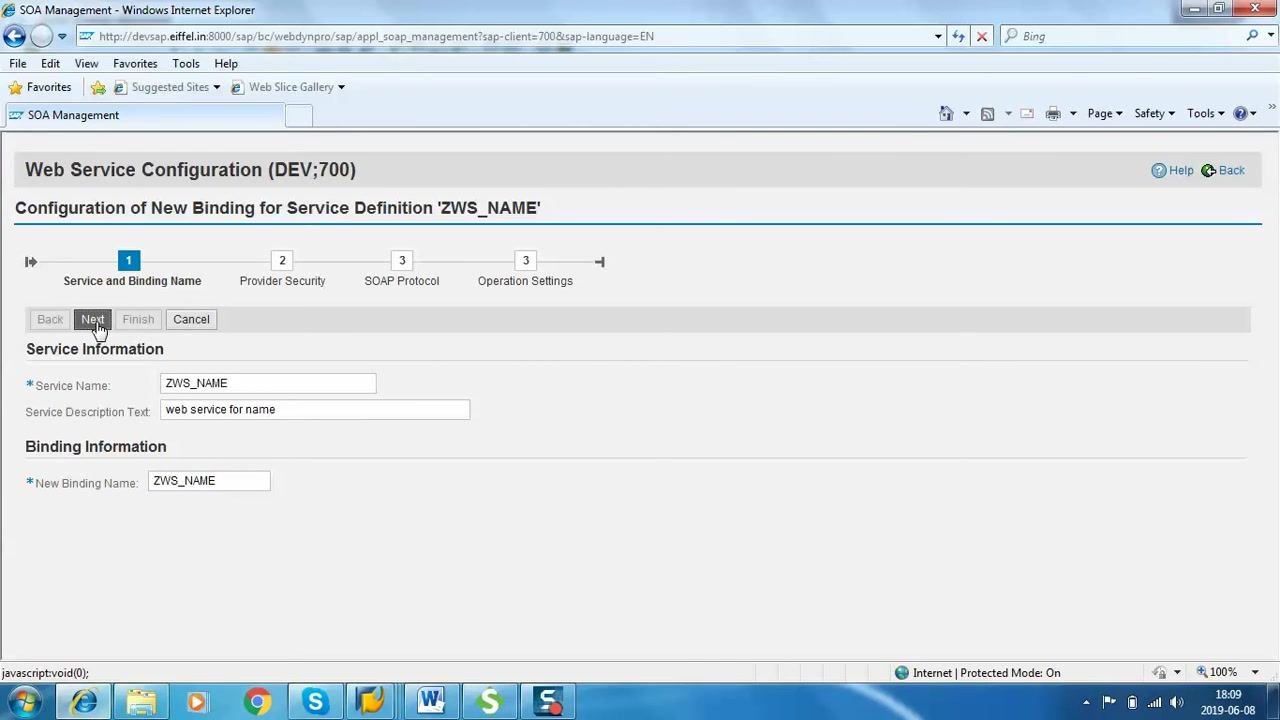
In the WSDL Generation for service: ZWS_NAME dialog, set the following options:
- Flavour: All possible combinations are allowed
- SAP Assertions: All
- Security Assertions: ABAP 702/7.30/7.40 and higher
- WSDL Section: AllInOne
- WSDL Version: 1.1
- WSP Version: 1.2
- WSP Style: single-Binding
- SOAP Version: SOAP 1.1 and SOAP 1.2
- SOAP Style: Document
- SOAP Action: With
Under Options for WSDL Access and URLs, select Standard.
-
Click the Save (disk icon) button in the WSDL Generation dialog to save the selected WSDL flavour.
-
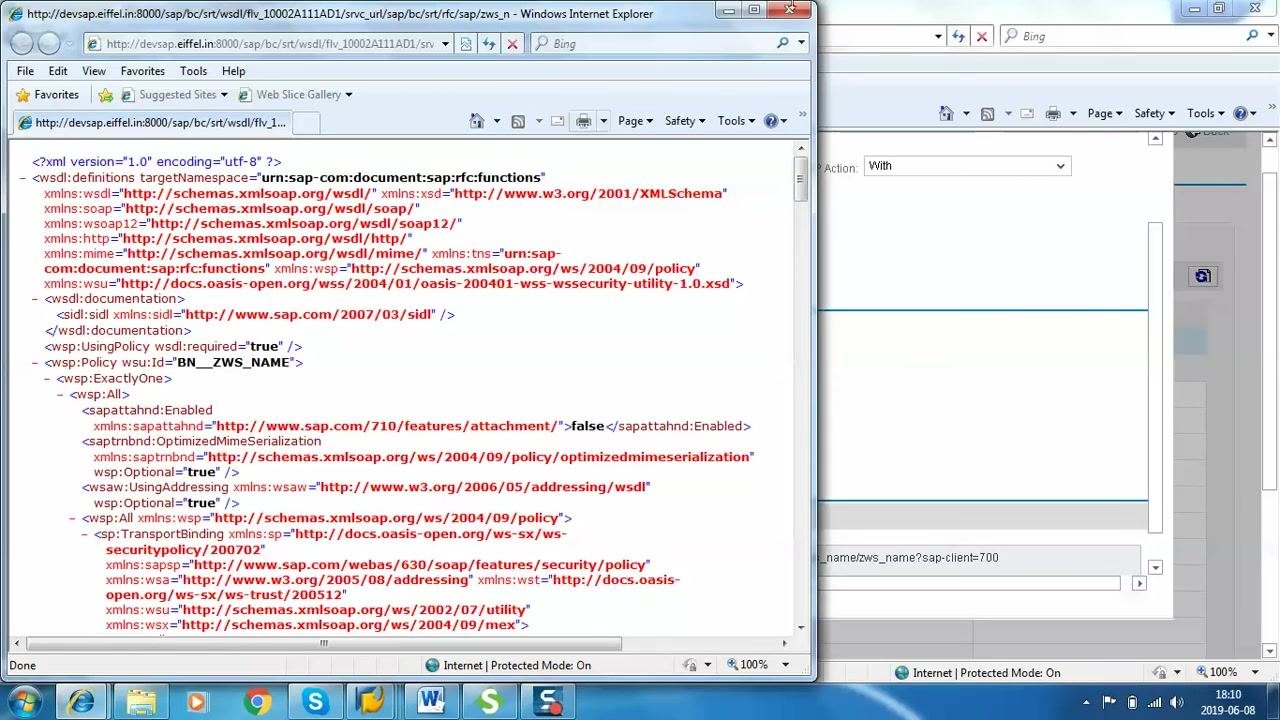
The WSDL file opens in a new browser window or tab, displaying the XML content for the web service definition. Review the XML to ensure it contains the correct target namespace, service name, and policy details.
-
In the browser window with the WSDL XML, go to the File menu and select Save As. In the Save As dialog:
- Set the File name to
zws_name.wsdl. - Ensure Save as type is set to "XML Files (*.xml)".
- Choose the desired location (for example, Desktop or a project folder).
- Click Save to store the WSDL file locally.
- Set the File name to
-
Navigate to your desktop or the folder where you saved the file. Look for
zws_name.wsdland confirm that it appears with the correct name and.wsdlextension. -
Optionally, double-click the
zws_name.wsdlfile to open it in your default XML or text editor and confirm that it opens without errors and displays the expected WSDL XML content.
Test the web service using SoapUI
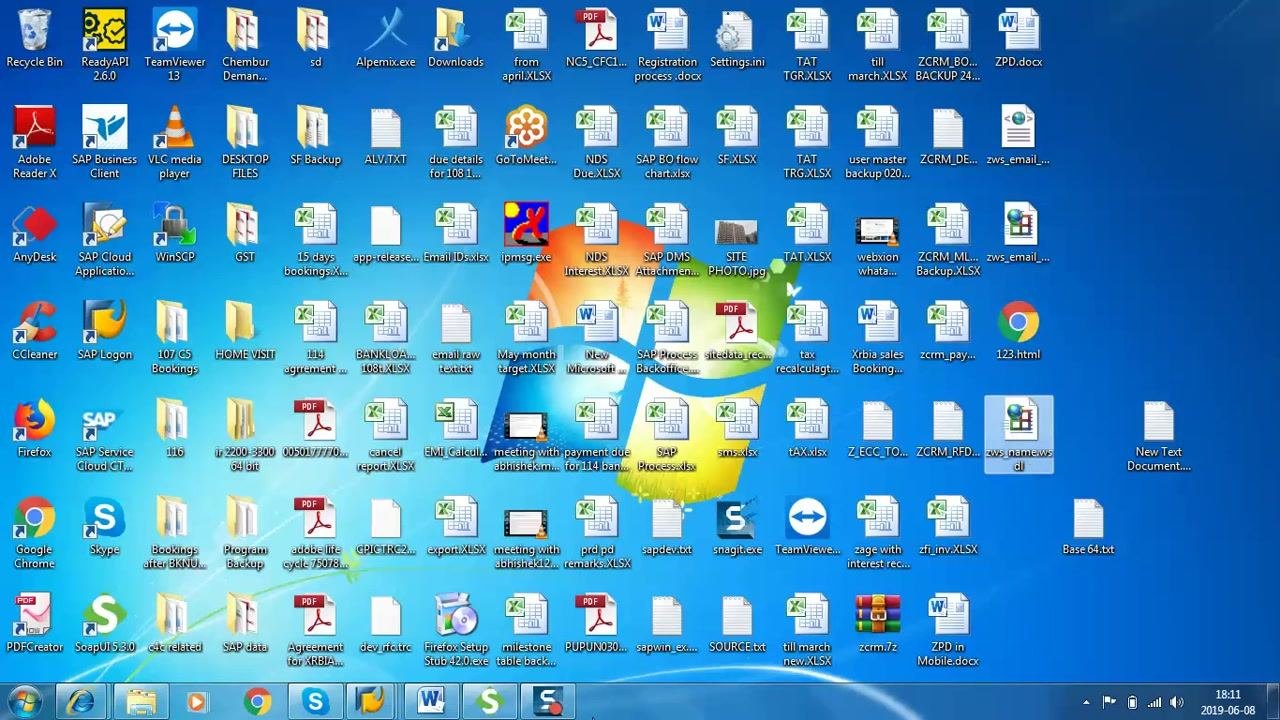
- On your Windows desktop, find the "SoapUI 5.3.0" shortcut icon (green S logo) and double-click it to open SoapUI.
-
In the SoapUI main window, click the File menu in the top left and select New SOAP Project from the dropdown menu.
-
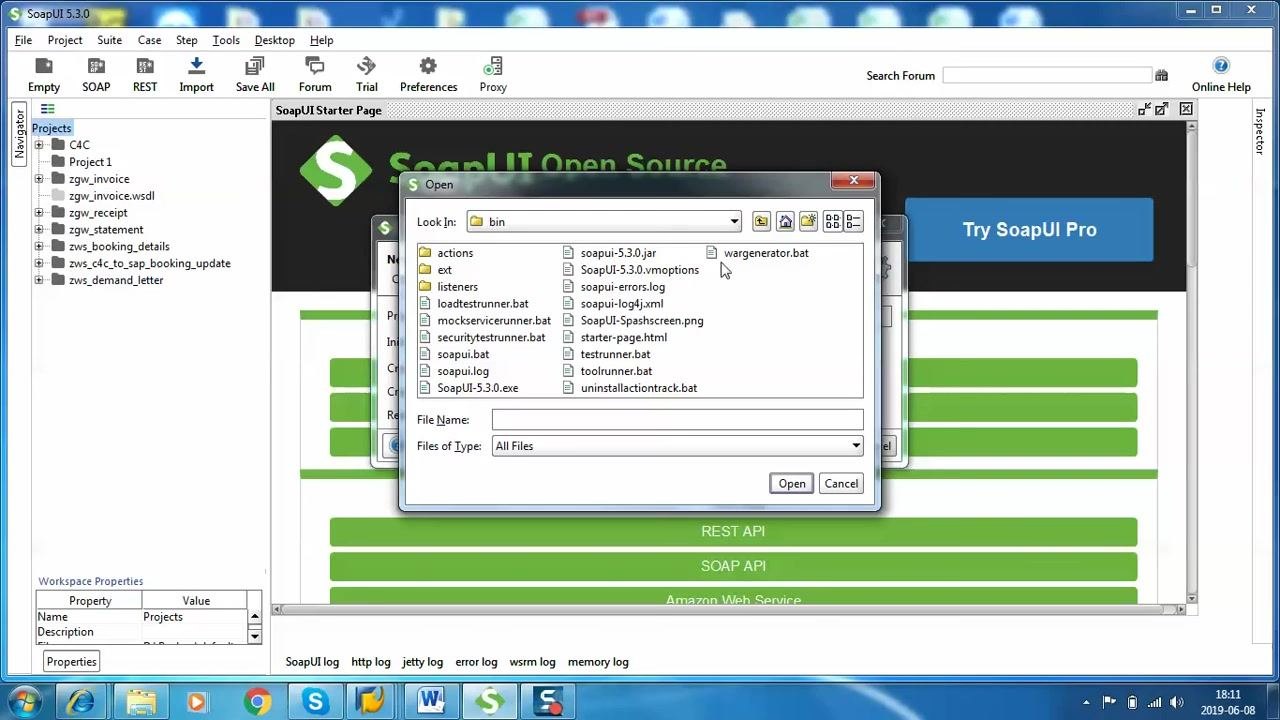
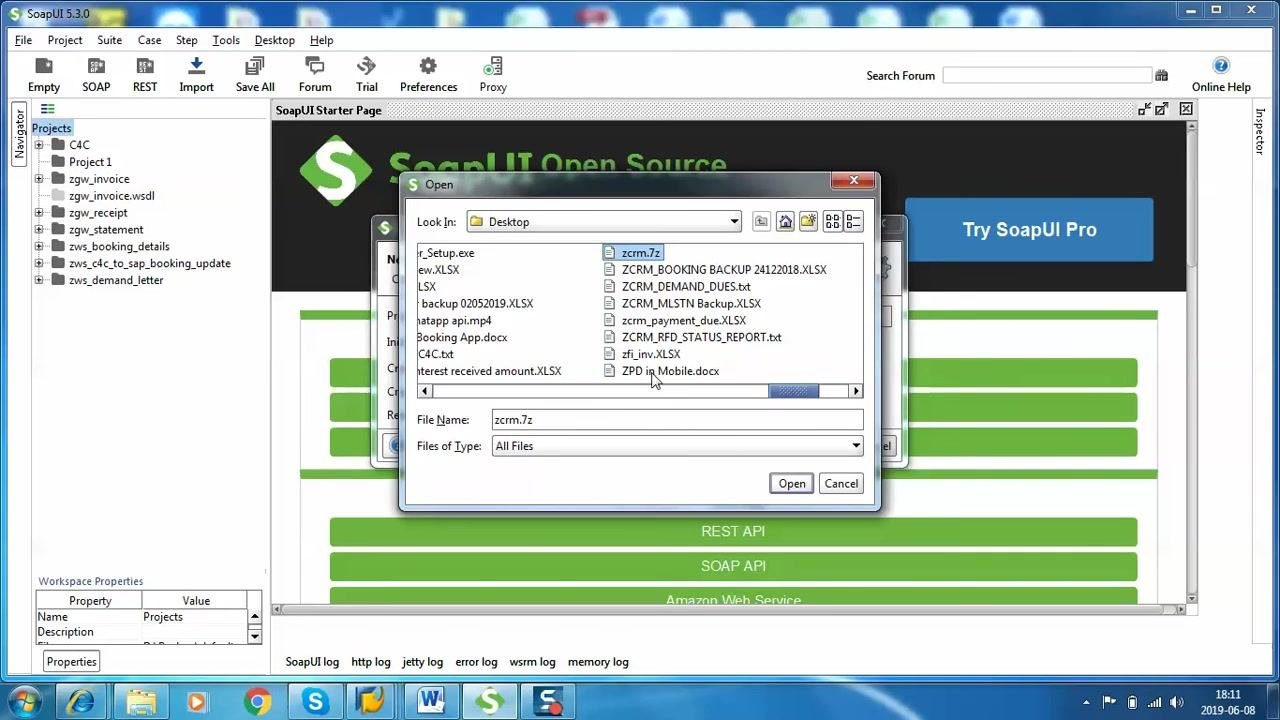
In the New SOAP Project dialog, click Browse next to Initial WSDL. In the file dialog, navigate to the location of your WSDL file — if your file is on the desktop, select Desktop from the left panel. Find and select your WSDL file (
zws_name.wsdl), then click Open to confirm your selection.
- In the New SOAP Project dialog:
- Set Project Name to
zws_name. - Ensure Initial WSDL points to the correct file path (for example,
D:\Backup\Desktop\zws_name.wsdl). - Check Create sample requests for all operations? if you want SoapUI to generate sample requests.
- Optionally, check Create TestSuite if you want a test suite created.
- Click OK to create the project.
- Set Project Name to
-
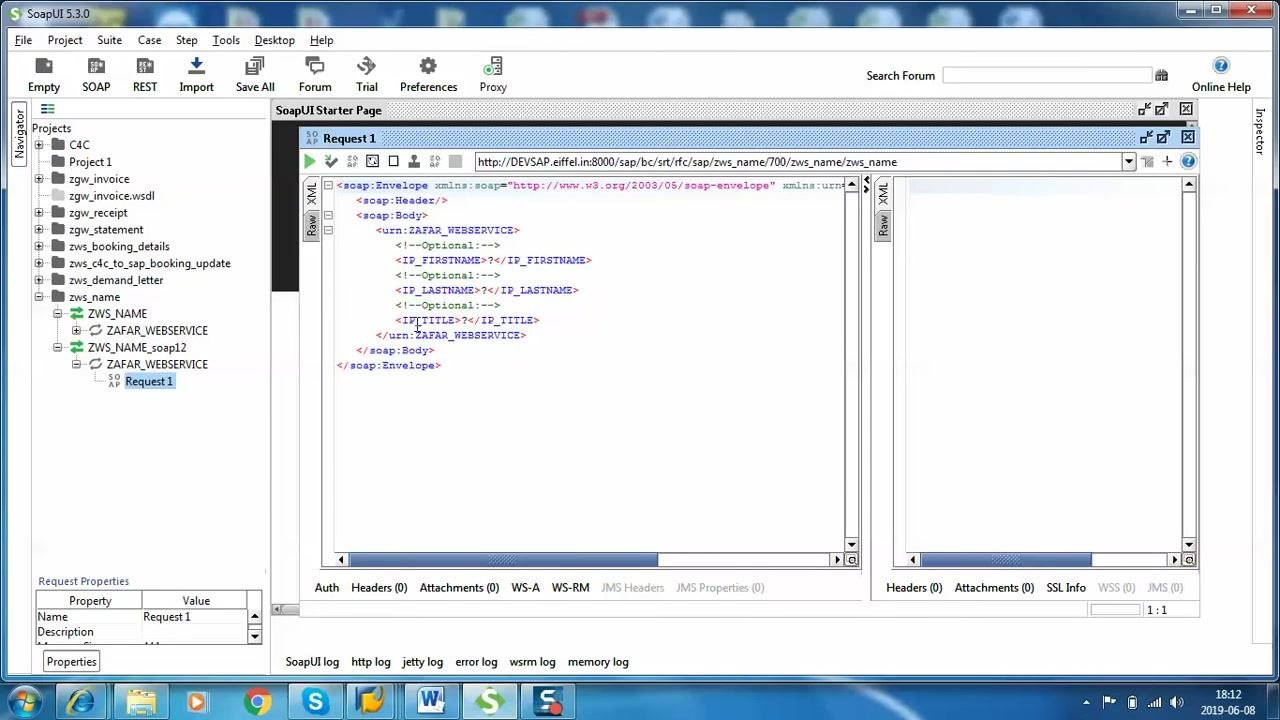
In the left Projects panel, expand the new project node (
zws_name), then expand the interface and operation nodes until you see "Request 1" under your web service (ZAFAR_WEBSERVICE). Double-click Request 1 to open the request editor. -
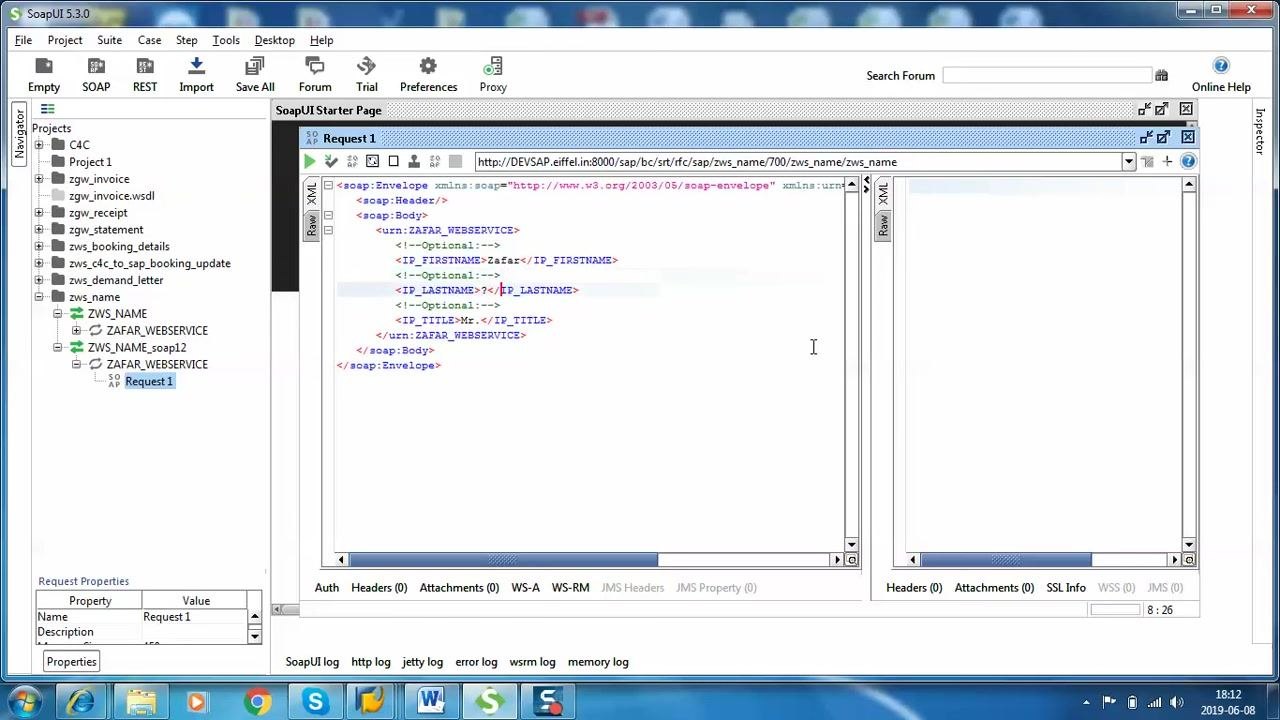
In the request editor, locate the XML body and fill in the required fields:
<IP_FIRSTNAME>: Enter the first name (for example,Zafar).<IP_LASTNAME>: Enter the last name (for example,Karnalkar).<IP_TITLE>: Enter the title (for example,Mr.).
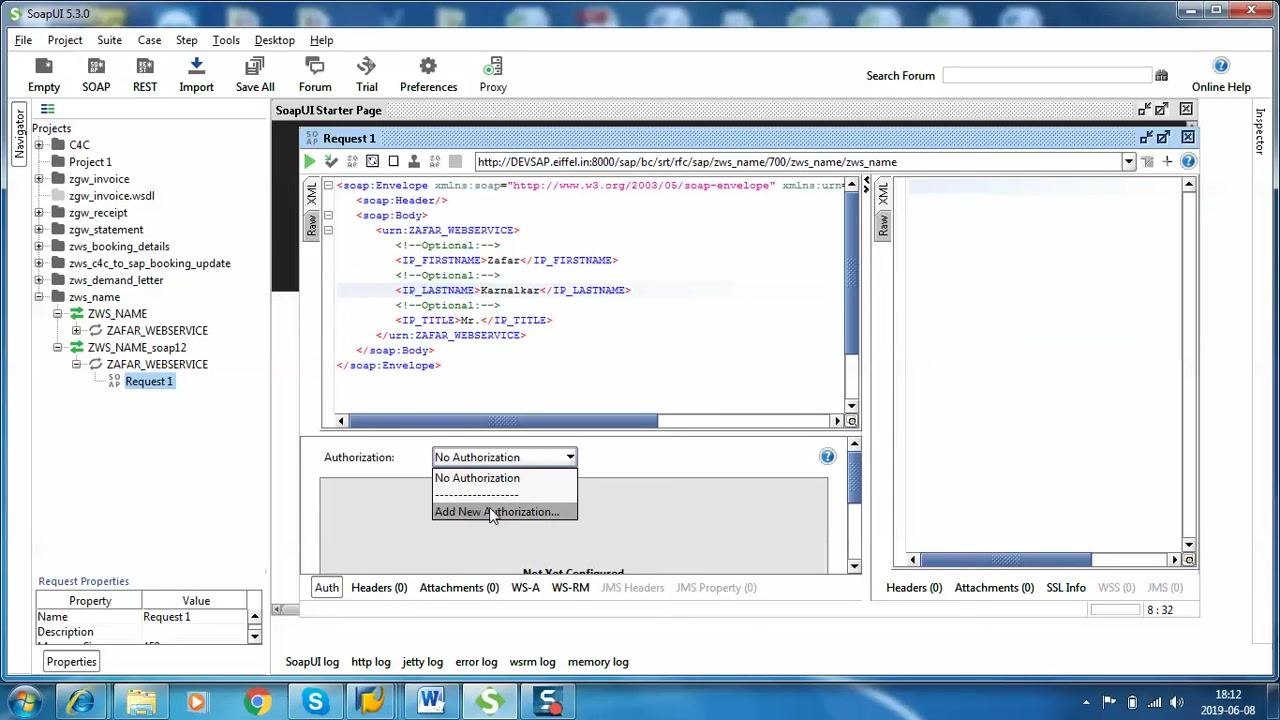
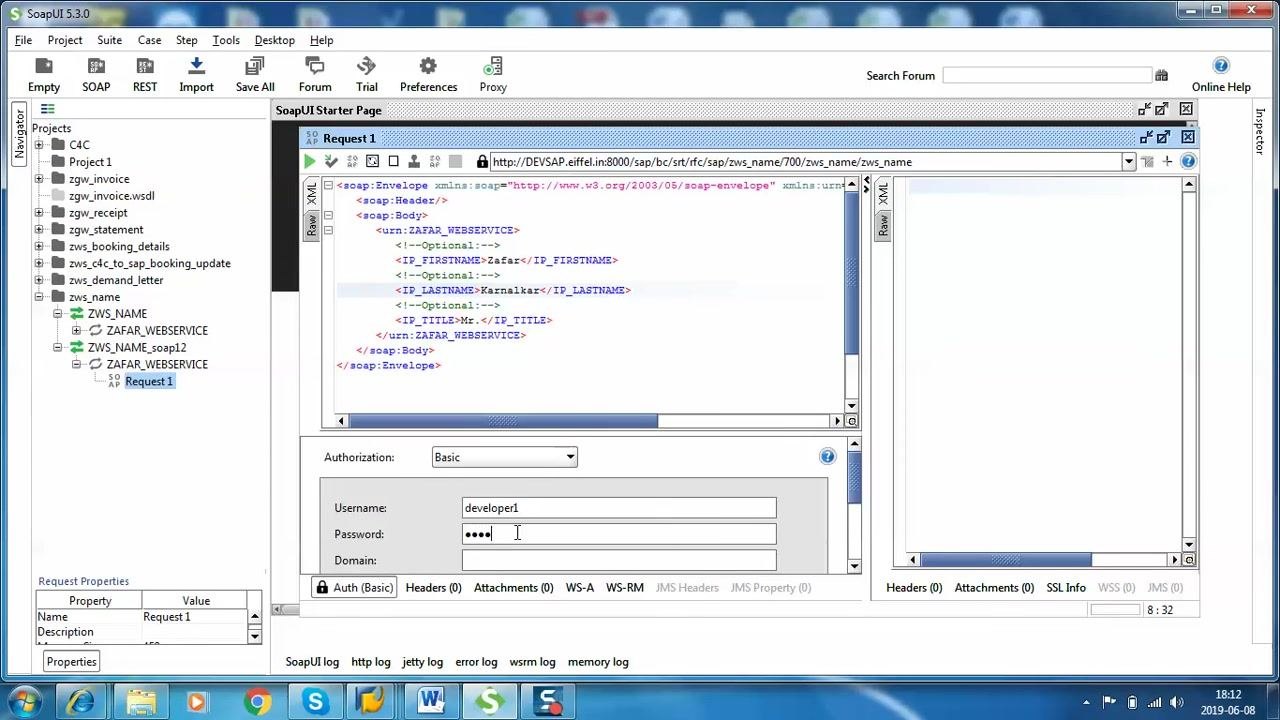
- At the bottom of the request editor, click the Auth tab. In the Authorization dropdown, select Add New Authorization..., choose Basic as the authorization type, and click OK to confirm. Enter your SAP user ID and password in the provided fields.
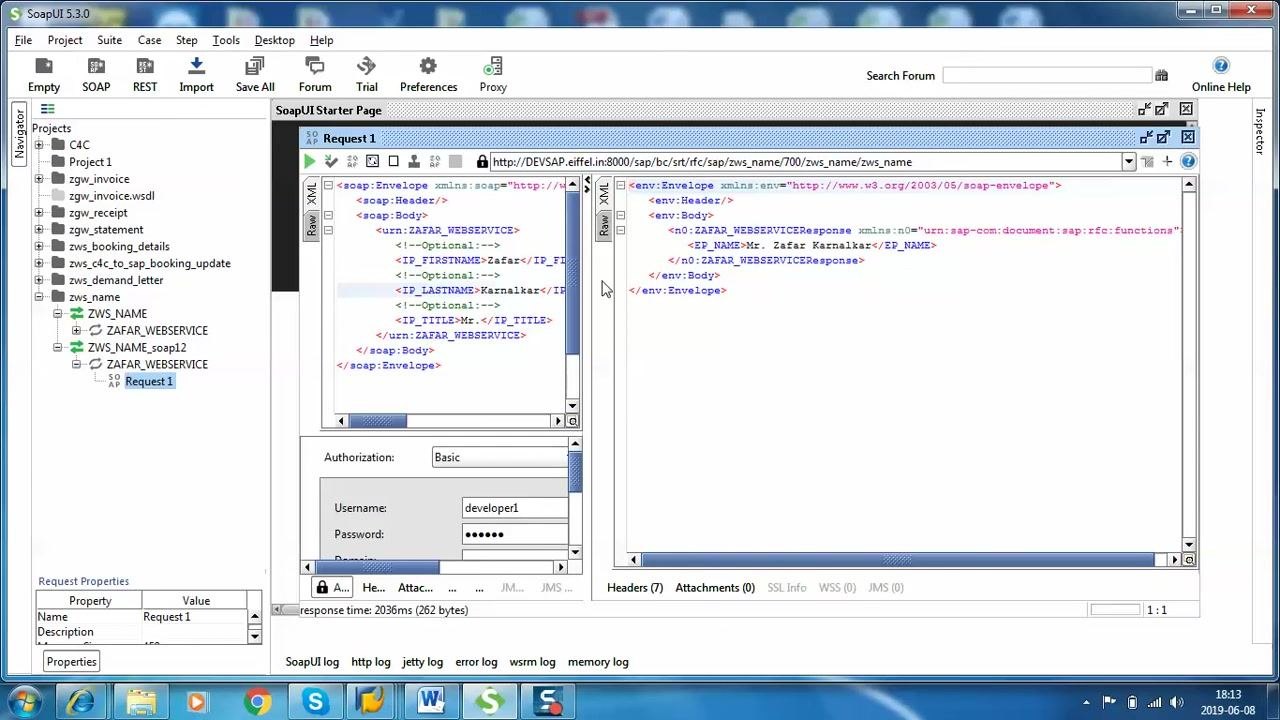
- In the SoapUI request editor, locate the icons above the XML request body. The Submit icon (green arrow) sends the SOAP request to the web service, while a Test icon may also be available for running tests or assertions. Hover over each icon to see tooltips describing its function, then click Submit (green arrow) to send your request.
- After clicking Submit, observe the right pane of the request editor. The response XML is displayed, showing the output from the web service. In this example, the response contains:
xml
   <EP_NAME>Mr. Zafar Karnalkar</EP_NAME>
Confirm that the response matches the expected output for your input parameters.
What's next
With your web service created, configured, and verified in SoapUI, you now have a working SOAP web service built on a function module that external systems can consume. You can reuse this same workflow — creating a function group, building a function module, generating a web service definition, configuring the binding in SOAMANAGER, and exporting the WSDL — to expose additional ABAP logic as web services for other integration scenarios.
Generation details: cost, quality tiers
Docsie billed 6,500 credits ($4.55) to analyze this 13-minute video at standard quality. The rewrite, template fill and Word/PDF exports were included. The same video at each quality tier:
| Quality | Frames sampled | Credits | Approx. cost |
|---|---|---|---|
| Draft | every 16-30 s | 3,250 | $2.27 |
| Standard (this guide) | every 8-15 s | 6,500 | $4.55 |
| Detailed | every 4-7 s | 13,000 | $9.10 |
| Ultra | every 1-3 s | 26,000 | $18.20 |
Credits priced at $0.70 per 1,000; plans include a monthly allowance. Enterprise customers on on-premise or bring-your-own-model deployments run this on their own inference and pay no per-video credits.
Generated by Docsie Video-to-Docs on 2026-10-14 from a 12-minute video. Screenshots are frames from the source video and belong to their creator, Zafar Karnalkar, whose original is embedded above. If you own this video and want the guide removed or credited differently, contact us and we will act within one business day.