
How to Create a GL Account in SAP
Creating a General Ledger (GL) account is a foundational task in SAP financial accounting. This guide walks you through how to create a GL account in SAP S/4HANA using the New GL configuration, from locating the correct account group and number range to entering control data and saving the account.
Video: GL Configuration Steps #26 Create GL account in SAP by EXCEL TO SAP (2016). All credit for the demonstration goes to the creator; watch the original on YouTube. The written guide below was generated from this video by Docsie. Creator? Request a change or removal.
Creating a General Ledger (GL) account is a foundational task in SAP financial accounting. This guide walks you through how to create a GL account in SAP S/4HANA using the New GL configuration, from locating the correct account group and number range to entering control data and saving the account.
Prerequisites
- Access to the SAP Easy Access screen with authorization to navigate the Accounting module.
- Familiarity with your organization's chart of accounts and account group structure.
- Knowledge of the transaction codes FS00 (Edit G/L Account Centrally) and OBD4 (G/L Account Groups).
Access the SAP Easy Access menu
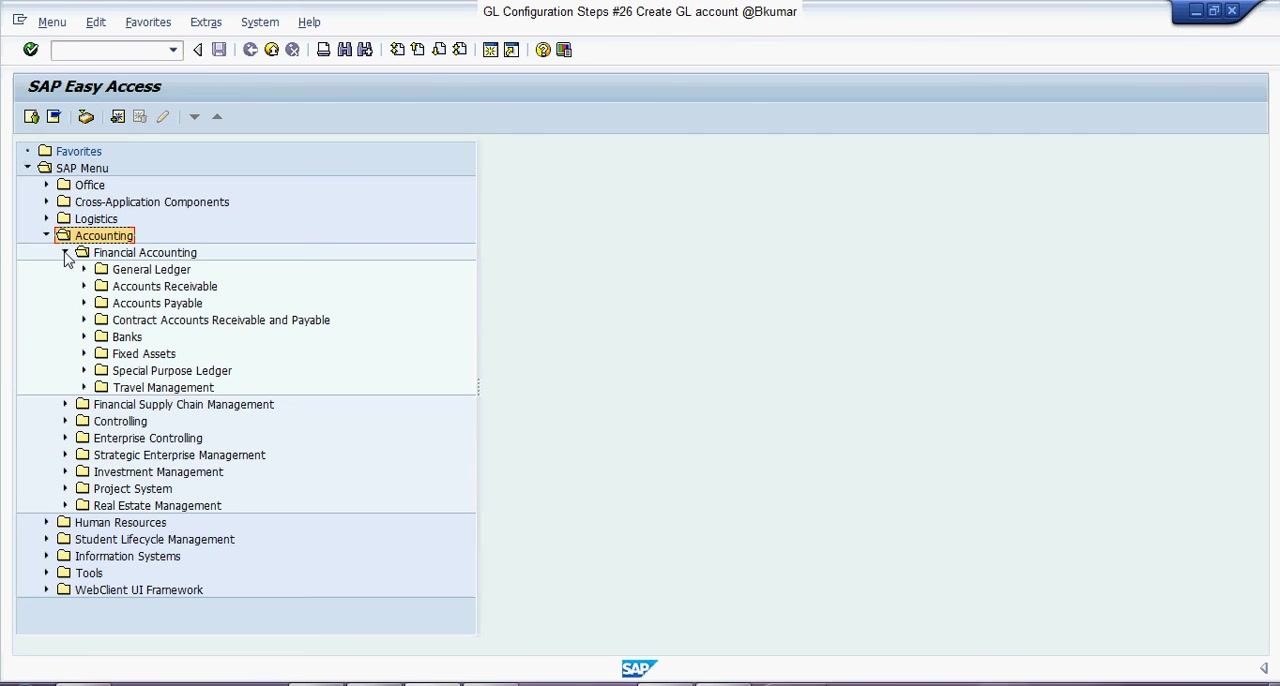
Log in to SAP and make sure you are on the SAP Easy Access screen. The left panel displays the SAP Menu with expandable folders such as Office, Logistics, and Accounting. Locate the Accounting folder in the SAP Menu to begin.
Navigate to the GL account creation path
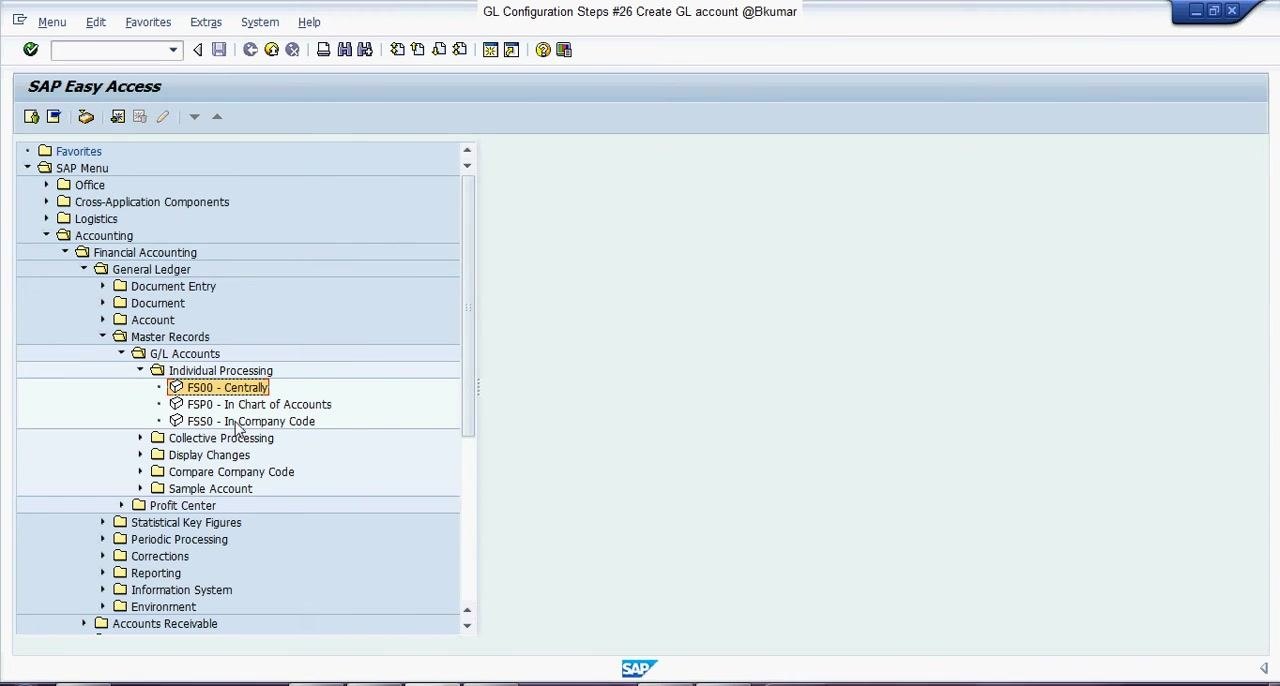
Expand the following path in the SAP Menu:
- Accounting
- Financial Accounting
- General Ledger
- Master Records
- G/L Accounts
- Individual Processing
This path leads you to the options for GL account processing.
Select FS00 to create a GL account centrally
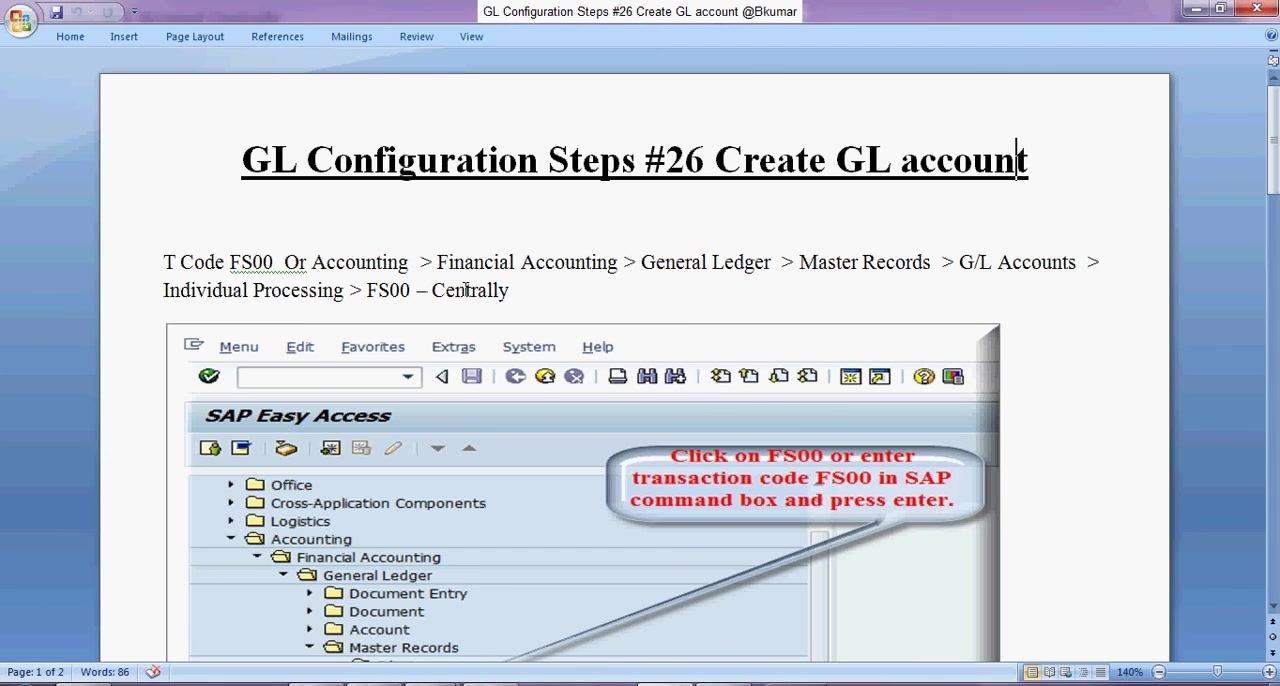
Under Individual Processing, locate and select FS00 - Centrally. Alternatively, you can enter the transaction code FS00 directly into the SAP command box at the top of the screen and press Enter.
If you use the direct entry method, the command box at the top displays FS00.
Open the GL account creation screen
The Edit G/L Account Centrally screen appears. Here you see fields for G/L Account, Company Code, Account Group, Description, and other relevant tabs: Type/Description, Control Data, Create/bank/interest, and Key word/translation.
If you are unsure which series or account group to use, proceed to the next step to check your chart of accounts.
Check the chart of accounts and account groups
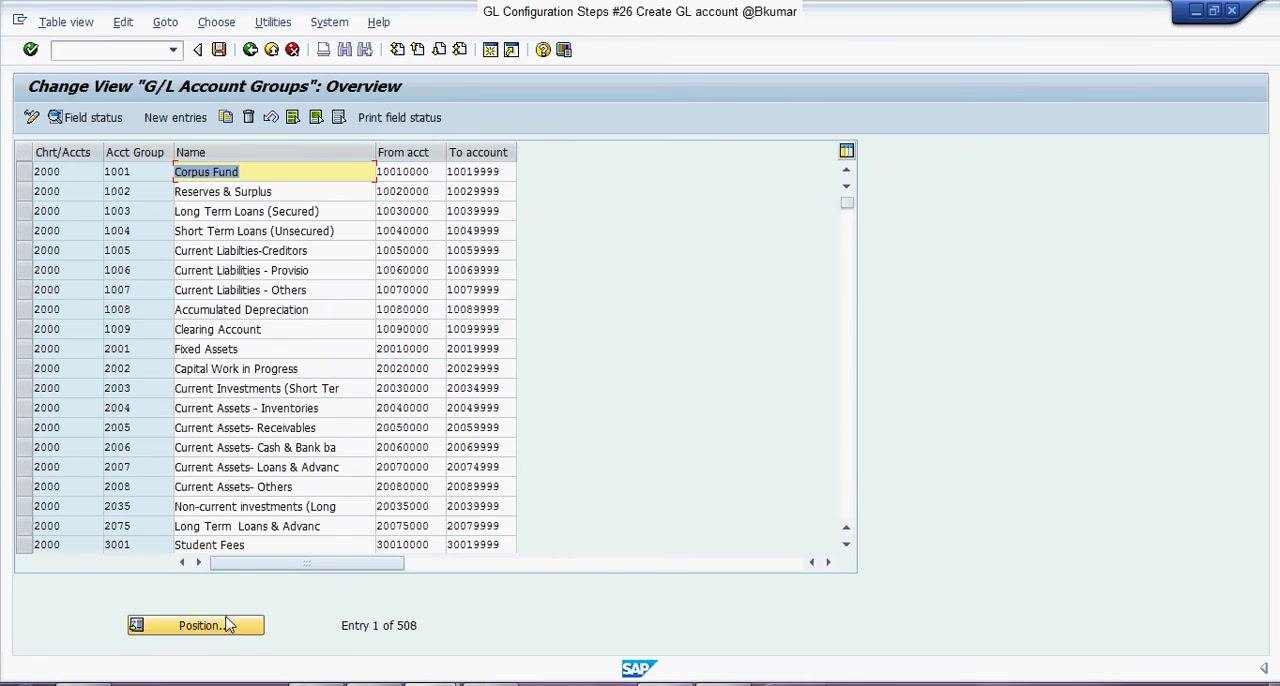
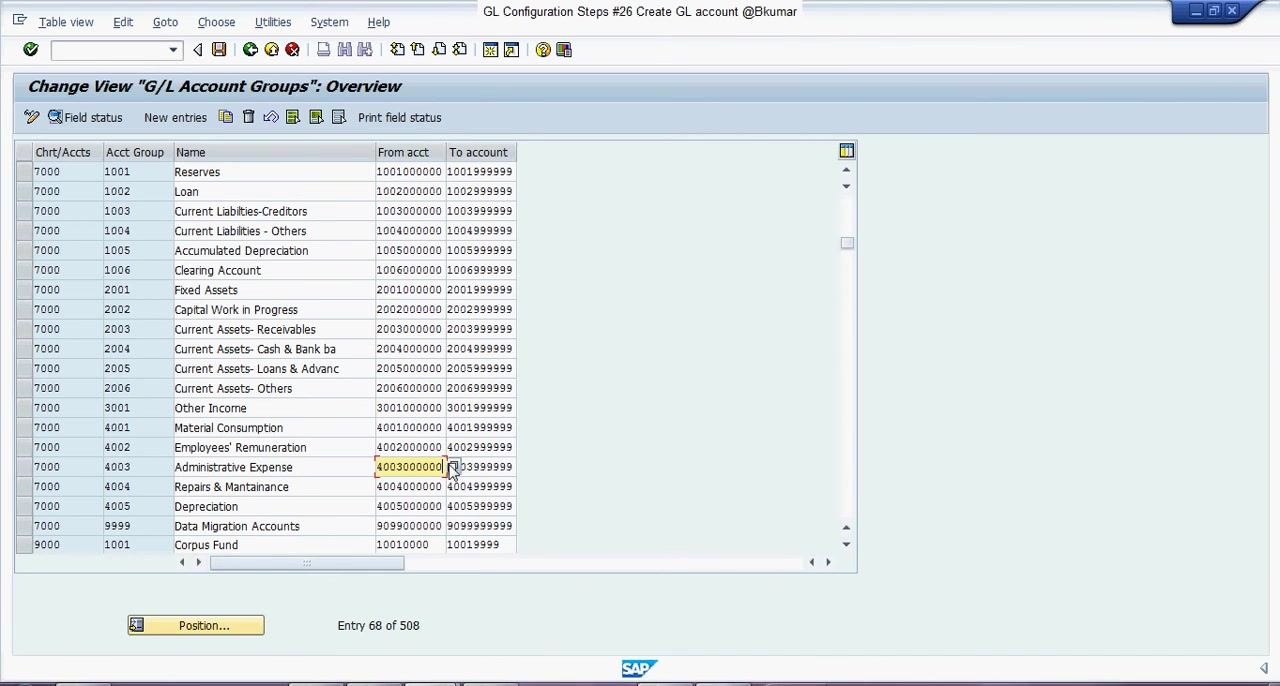
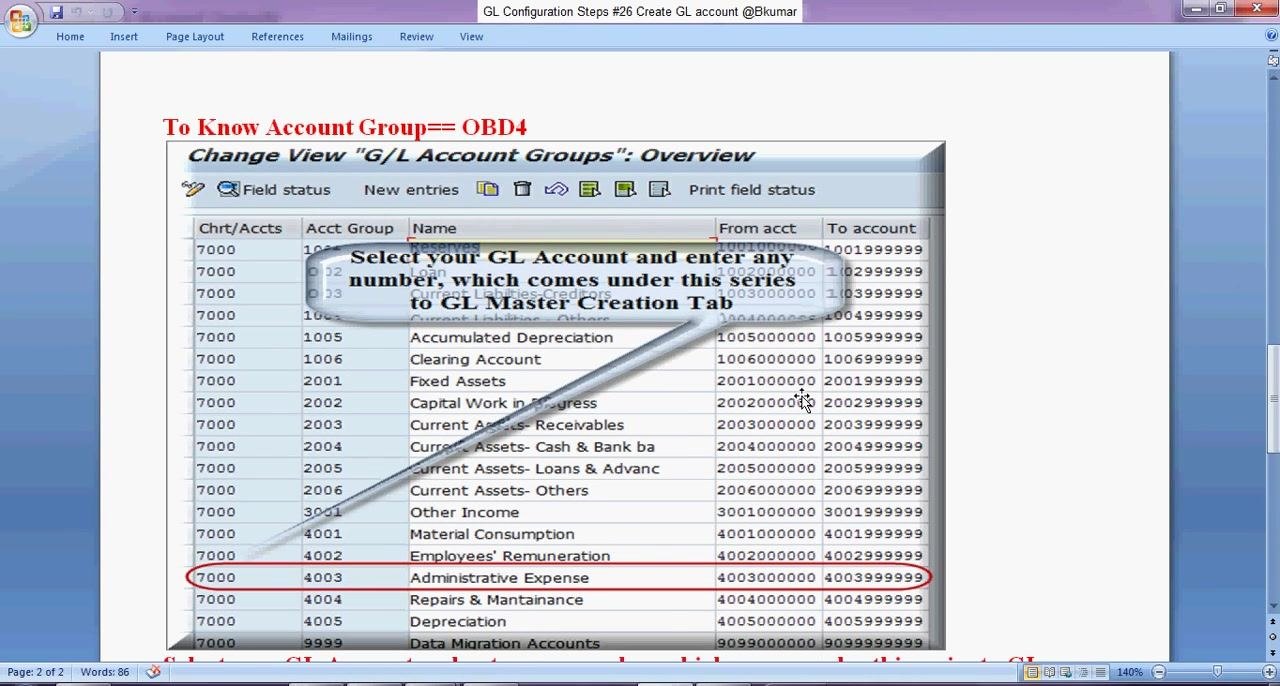
To view your chart of accounts or account groups, enter transaction code OBD4 in the SAP command box and press Enter. The Change View "G/L Account Groups": Overview screen displays a list of account groups, their names, and account number ranges.
Click the Position... button at the bottom left to quickly find your chart of accounts or account group.
Select the appropriate account group and series
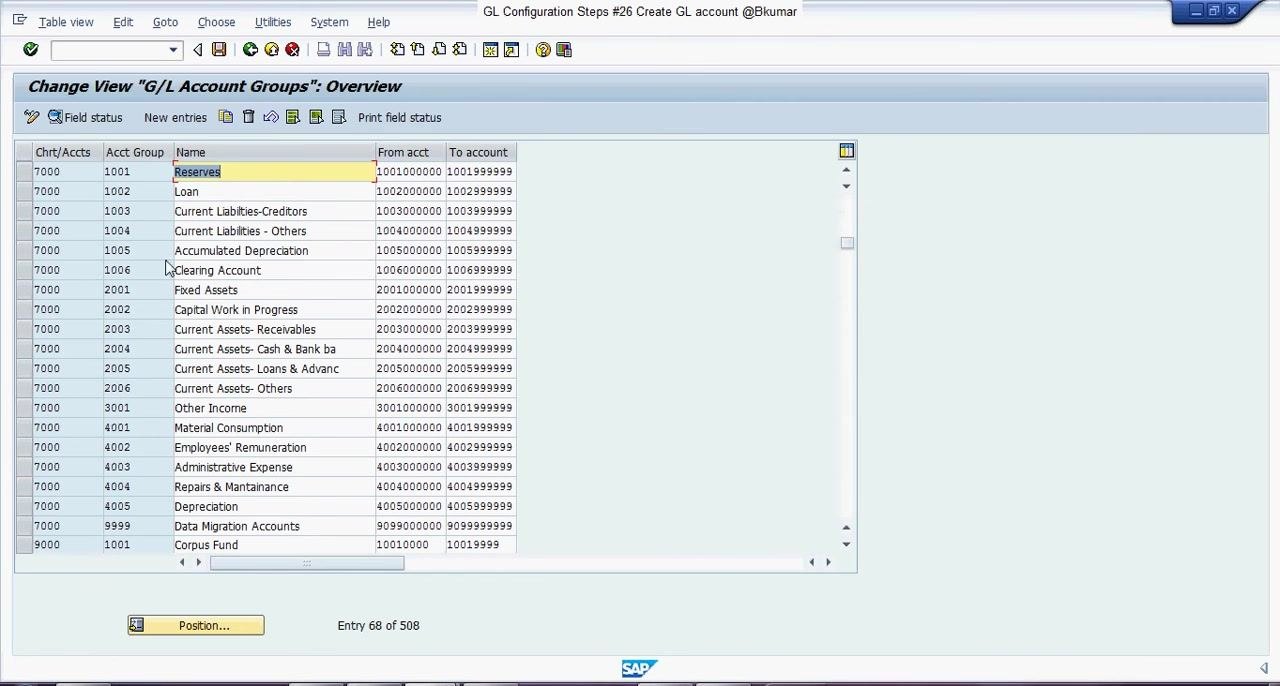
In the overview, locate the account group and series where you want to create the new GL account. For example, to create a GL account under Administrative Expense, find the row with:
- Acct Group: 4003
- Name: Administrative Expense
- From acct: 4003000000
- To account: 4003999999
Copy the number range for the new GL account
Note or copy the number range for the selected account group, such as 4003000000 to 4003999999 for Administrative Expense. This ensures your new GL account is created within the correct series.
Return to the GL account creation screen
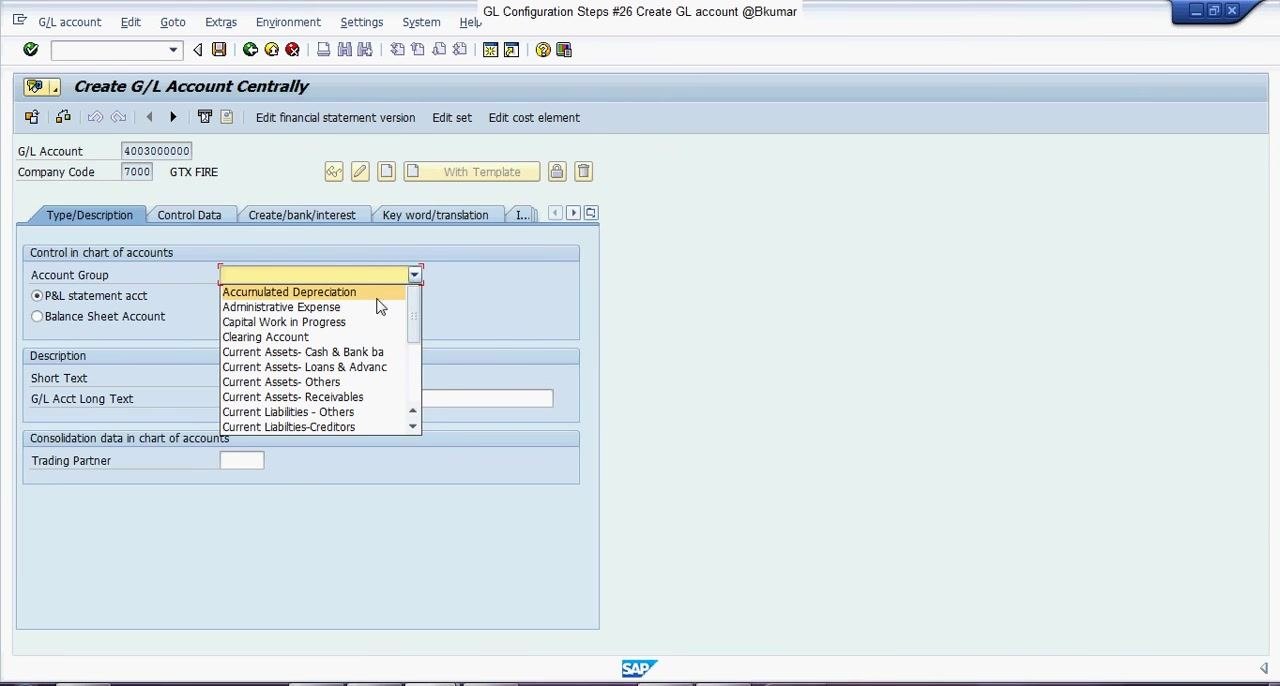
Click the Create icon on the Edit G/L Account Centrally screen, then select the appropriate account group (for example, 4003 for Administrative Expense). Choose P&L statement account if applicable, and enter a description for the new GL account in the Short Text and G/L Acct Long Text fields.
Select the account group in the creation screen
In the Create G/L Account Centrally screen, locate the Account Group dropdown. Click the dropdown and select the appropriate account group, such as Administrative Expense or Accumulated Depreciation, based on your chart of accounts and the number range identified earlier.
Maintain the account type and description
Choose the account type:
- Select P&L statement acct for profit and loss accounts.
- Select Balance Sheet Account for balance sheet accounts.
Enter a short description in the Short Text field (for example, "Admin Expenses") and a detailed description in the G/L Acct Long Text field.
Complete the Control Data tab
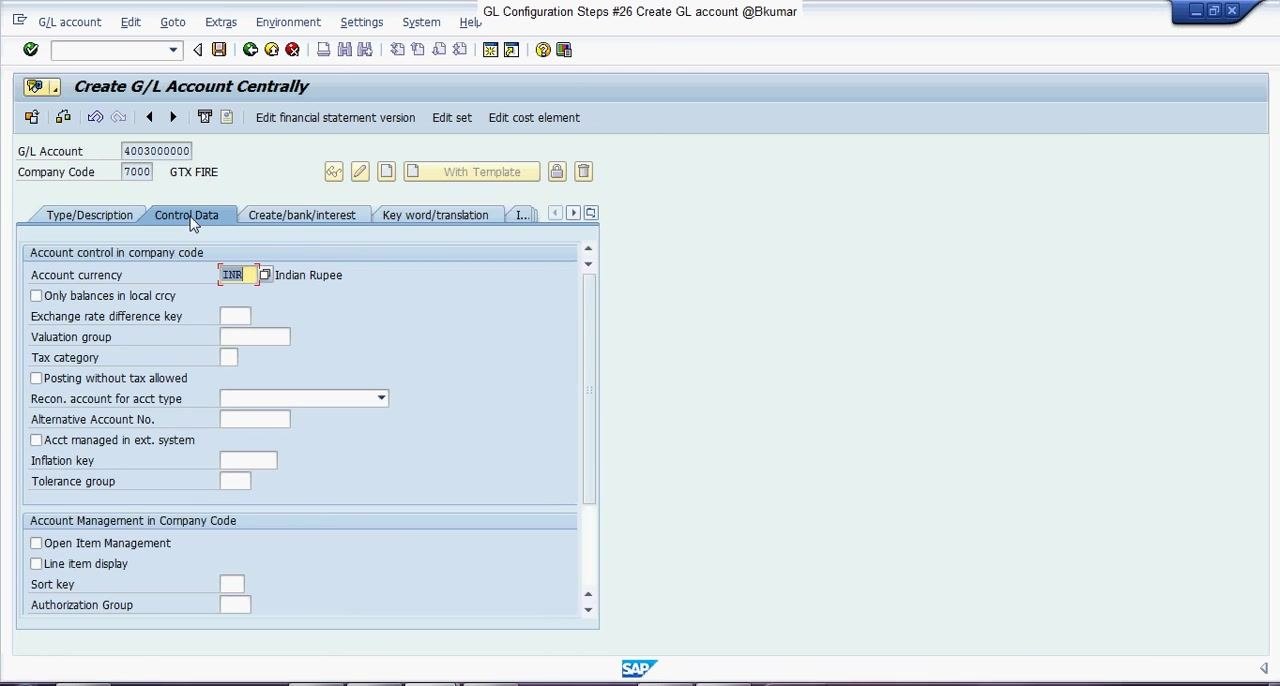
Click the Control Data tab and set the Account currency (for example, INR for Indian Rupee). If required, check Only balances in local crcy.
Fill in other relevant fields as needed:
- Exchange rate difference key
- Valuation group
- Tax category
- Reconciliation account for account type (if applicable)
- Alternative Account No.
- Inflation key
- Tolerance group
Under Account Management in Company Code, check Line item display if you want line items to be displayed for this account. Enter a Sort key and Authorization Group if required.
Complete the Create/bank/interest tab
Click the Create/bank/interest tab. In the Field status group dropdown, select the appropriate field status group, such as G004. Fill in any relevant bank or interest calculation details as required for your organization.
Save the GL account
After filling in all required fields across the tabs — Type/Description, Control Data, Create/bank/interest, and Key word/translation — click the Save icon at the top of the screen to create the GL account.
Reference key navigation details
For quick reference, keep the following details on hand:
- T Code: FS00
- Navigation Path: Accounting > Financial Accounting > General Ledger > Master Records > G/L Accounts > Individual Processing > FS00 – Centrally
Verify the account group and number range
Double-check your account group and number range using transaction code OBD4. Ensure your new GL account number falls within the correct range for the selected account group, such as 4003000000 to 4003999999 for Administrative Expense.
Confirm the GL account creation
Once saved, confirm that the new GL account appears in the master data list and is available for use in transactions.
Summary
You now know how to create a GL account in SAP S/4HANA using the New GL configuration, from locating the correct account group and number range in OBD4 to completing the Type/Description, Control Data, and Create/bank/interest tabs in FS00. Always verify that you select the correct account group and number range, and maintain all required fields before saving your changes.
Generation details: cost, quality tiers
Docsie billed 2,000 credits ($1.40) to analyze this 4-minute video at standard quality. The rewrite, template fill and Word/PDF exports were included. The same video at each quality tier:
| Quality | Frames sampled | Credits | Approx. cost |
|---|---|---|---|
| Draft | every 16-30 s | 1,000 | $0.70 |
| Standard (this guide) | every 8-15 s | 2,000 | $1.40 |
| Detailed | every 4-7 s | 4,000 | $2.80 |
| Ultra | every 1-3 s | 8,000 | $5.60 |
Credits priced at $0.70 per 1,000; plans include a monthly allowance. Enterprise customers on on-premise or bring-your-own-model deployments run this on their own inference and pay no per-video credits.
Generated by Docsie Video-to-Docs on 2026-10-02 from a 3-minute video. Screenshots are frames from the source video and belong to their creator, EXCEL TO SAP, whose original is embedded above. If you own this video and want the guide removed or credited differently, contact us and we will act within one business day.