
How to Create a Bin Location in SAP Business One
This guide explains how to create a bin location in SAP Business One and allocate received goods to it, using the Goods Receipt PO process in version 9.0. You will also learn how to review bin location contents and inventory postings, create a sales order, and complete the pick-and-pack process through to final delivery, so that goods received into your warehouse are properly tracked by bin from receipt to fulfillment.
Video: Bin Locations in SAP Business One 9.0 - Feature Clip by SAP Business One. All credit for the demonstration goes to the creator; watch the original on YouTube. The written guide below was generated from this video by Docsie. Creator? Request a change or removal.
This guide explains how to create a bin location in SAP Business One and allocate received goods to it, using the Goods Receipt PO process in version 9.0. You will also learn how to review bin location contents and inventory postings, create a sales order, and complete the pick-and-pack process through to final delivery, so that goods received into your warehouse are properly tracked by bin from receipt to fulfillment.
Prerequisites
- You must be logged into SAP Business One with an account that has access to the Purchasing - A/P, Inventory, and Sales - A/R modules.
- Bin location management must already be enabled for the relevant warehouse (in this example, Warehouse 05).
- You need a valid vendor and item set up in the system (in this example, vendor CTI Computers and item SDHC 64 GB CLASS 10).
Part 1: Create a Goods Receipt PO
Step 1: Access the SAP Business One main menu
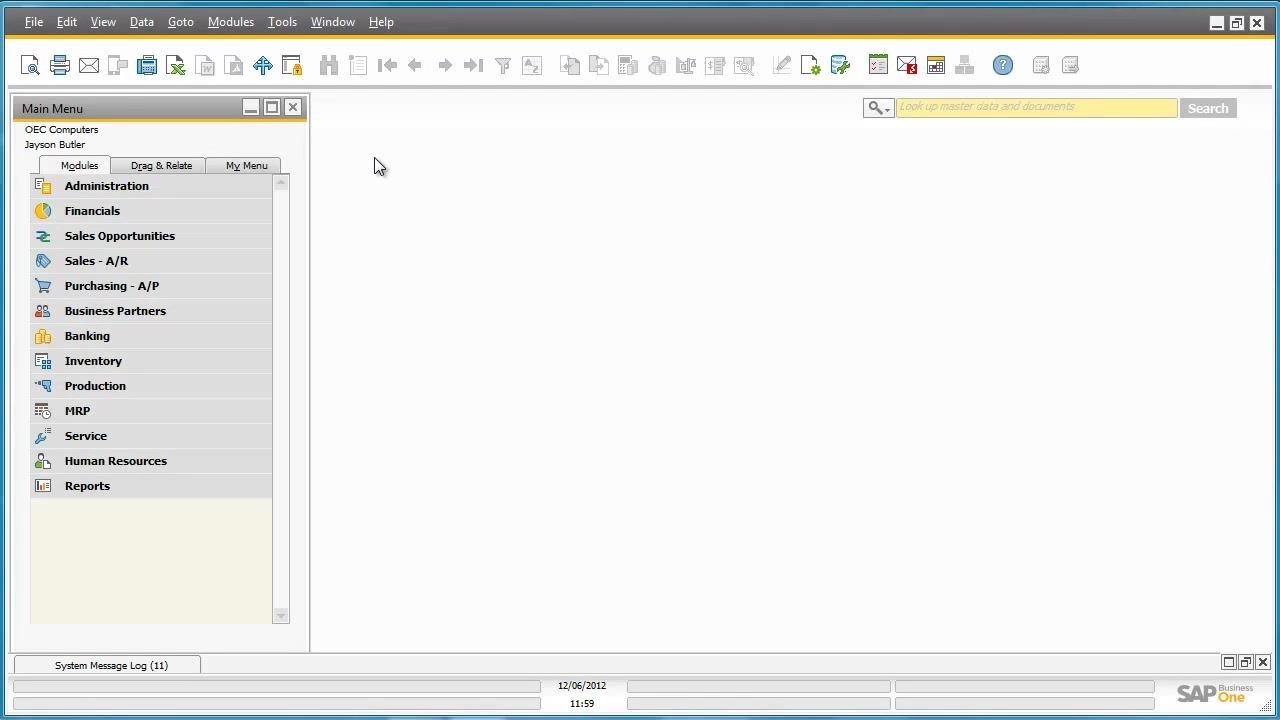
Log into SAP Business One to display the main menu. The menu lists modules such as Administration, Financials, Sales Opportunities, Sales - A/R, Purchasing - A/P, Business Partners, Banking, Inventory, Production, MRP, Service, Human Resources, and Reports.
Step 2: Navigate to the Purchasing module
In the left navigation pane, expand Purchasing - A/P. Locate and select Goods Receipt PO from the list to open a new document.
Step 3: Create a goods receipt purchase order
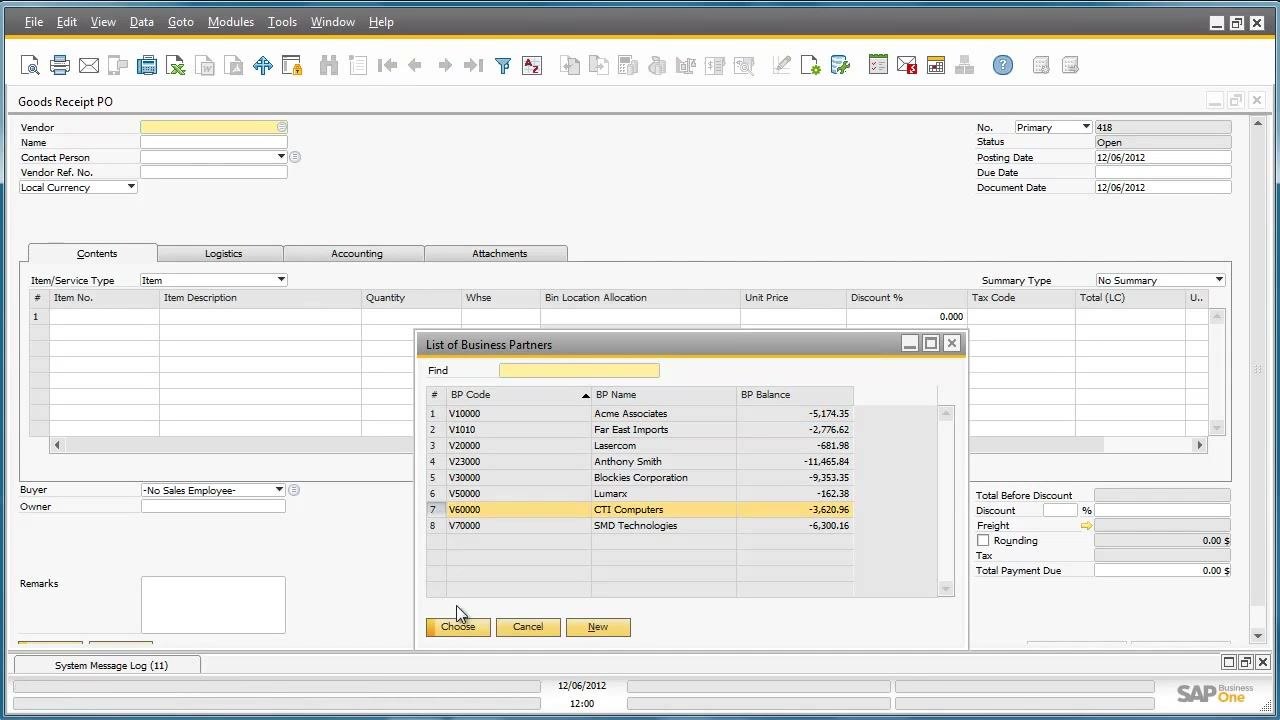
In the Goods Receipt PO window, click the vendor field to open the List of Business Partners. Select CTI Computers (BP Code: V60000), then click Choose to confirm the vendor.
Step 4: Select the item to receipt
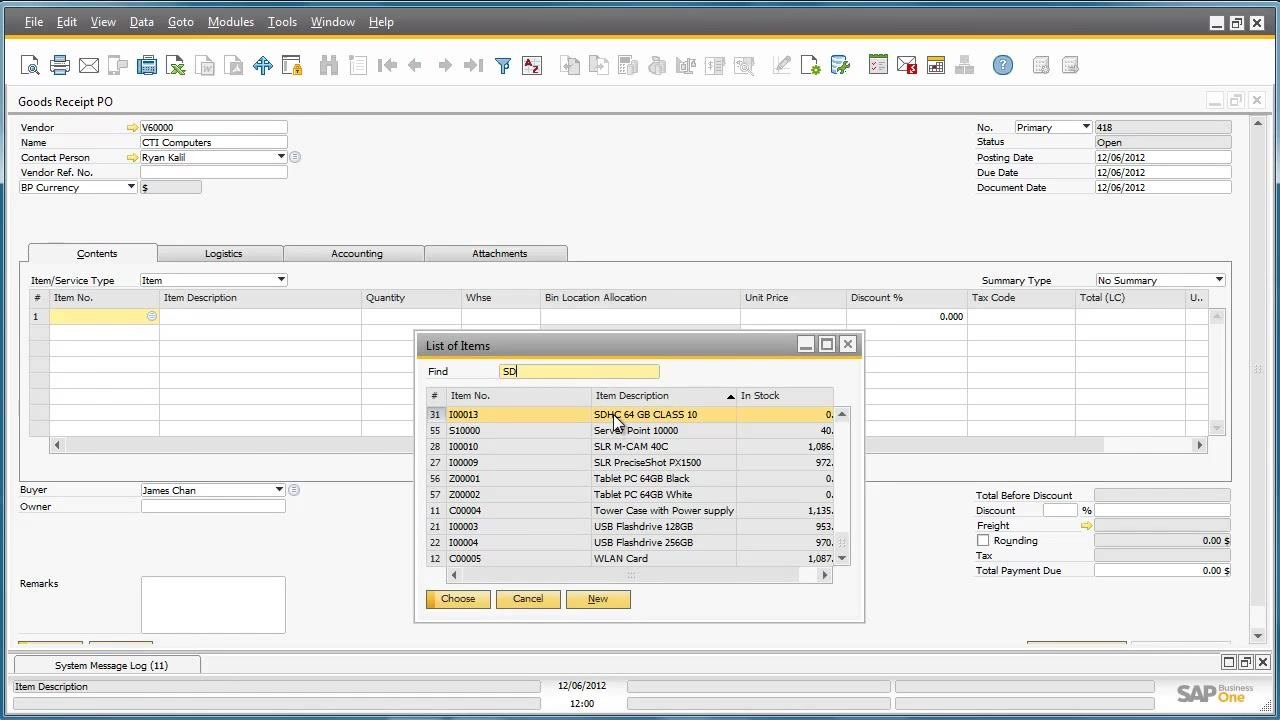
In the Item/Service Type section, click to add an item. In the List of Items dialog, search for "SD" and select SDHC 64 GB CLASS 10 (Item No.: 100013), then click Choose.
Step 5: Enter the quantity and warehouse
In the Quantity field, enter 50 to indicate 50 SD memory cards received. In the Whse field, enter or select 05 for Warehouse 5.
Part 2: Allocate Goods to Bin Locations
Step 6: Open the bin location allocation window
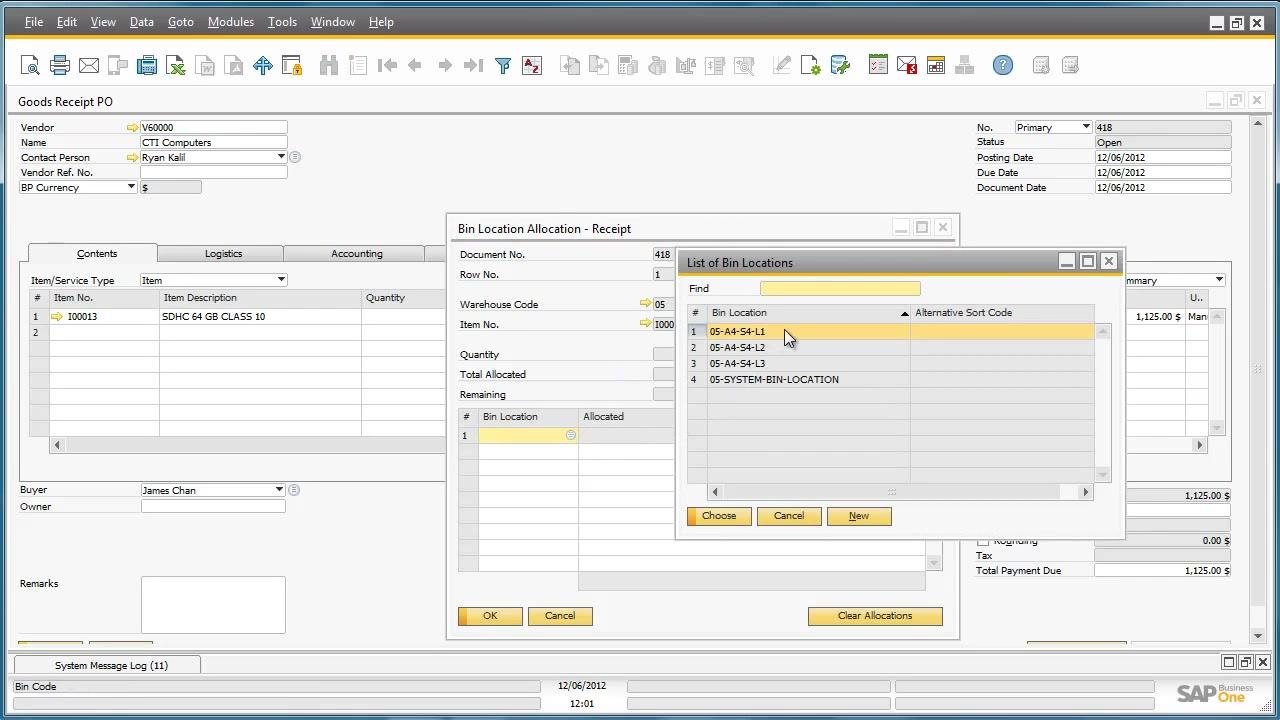
Click the Bin Location Allocation field on the item row to open the allocation window. In the Bin Location Allocation - Receipt dialog, verify the following details: Document No. 418, Row No. 1, Warehouse Code 05, Item No. 100013, Quantity 50, and Remaining 50.
Step 7: Select the bin location
Click the field under Bin Location to open the List of Bin Locations dialog. Select the bin location 05-A4-S4-L1 from the list, then click Choose to confirm it.
Step 8: Allocate quantity to the selected bin
In the Allocated field for the selected bin location, enter 25, since this bin can only hold 25 SD memory cards. The Remaining field updates automatically to show the unallocated quantity.
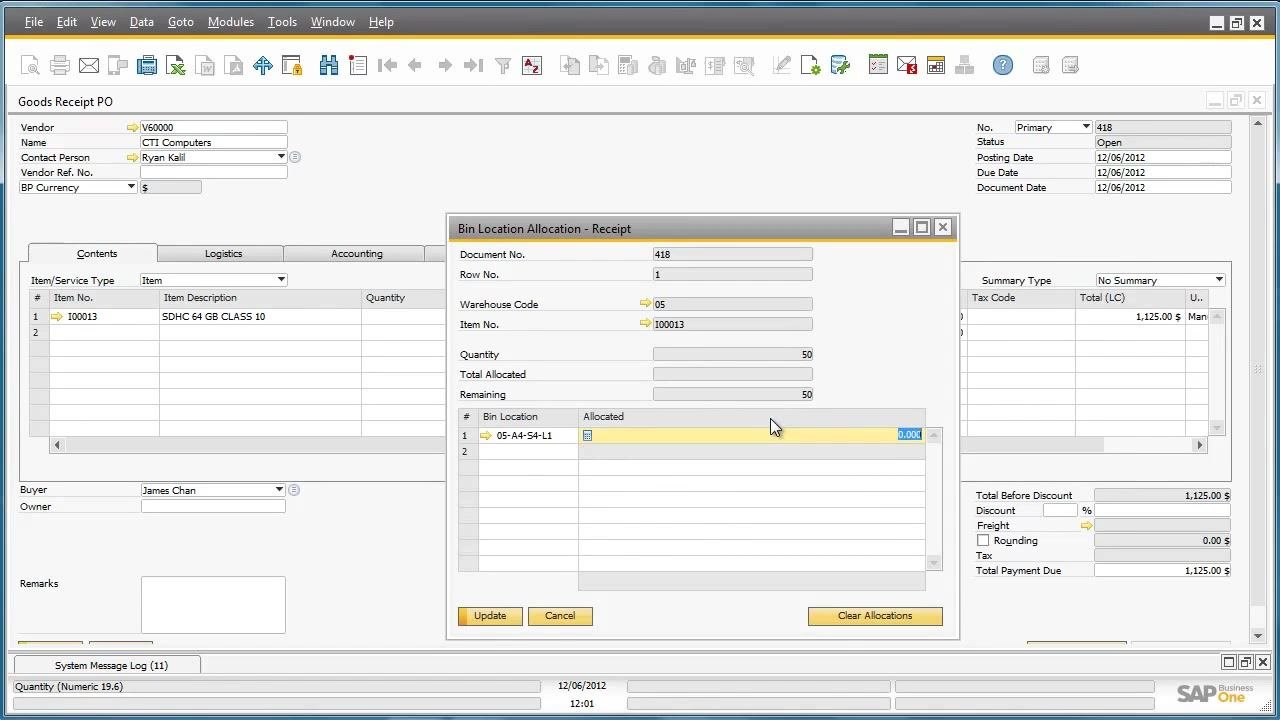
Continue allocating the remaining quantity to other bin locations as needed. This process ensures that all received goods are properly distributed according to bin capacity and warehouse structure.
Step 9: Allocate the remaining quantity to another bin location
In the Bin Location Allocation - Receipt window, type the next bin location directly into the Bin Location field (for example, 05-A4-S4-L2). Enter 25 in the Allocated field to allocate the remaining 25 items, and confirm that Total Allocated now equals 50 with Remaining at 0.
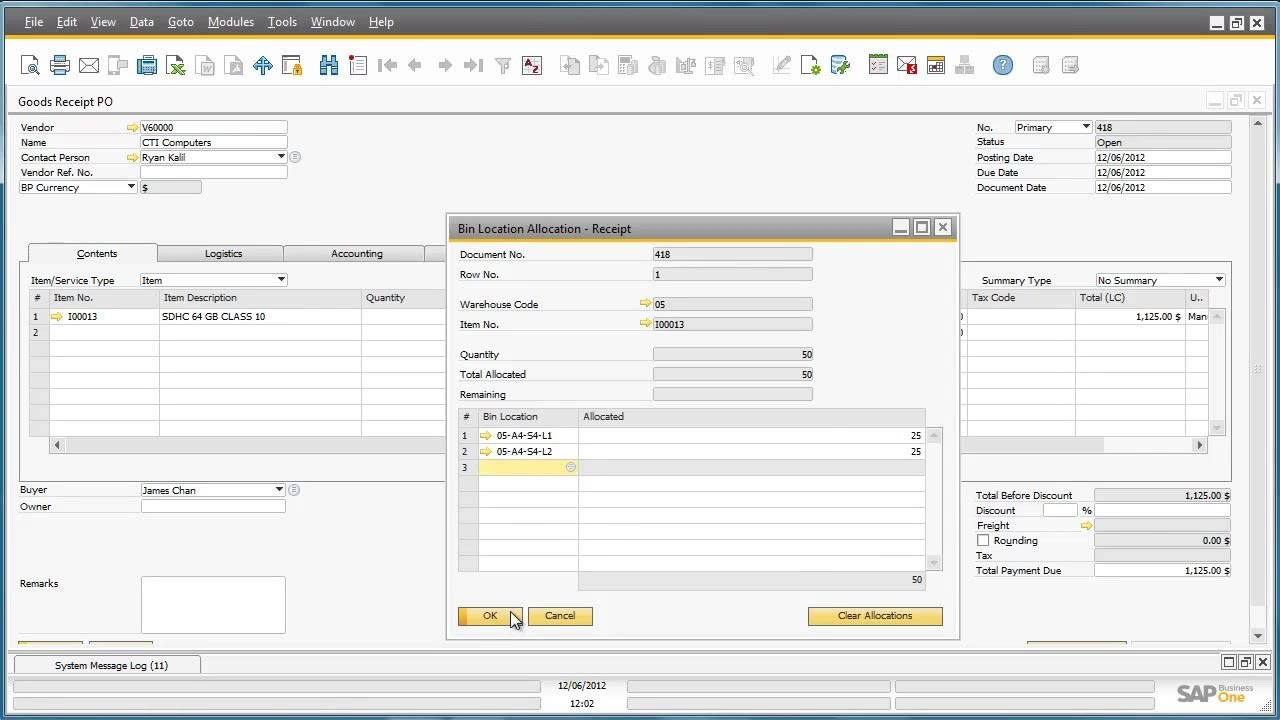
Step 10: Confirm the allocation
Click OK in the Bin Location Allocation - Receipt window to confirm and save the allocation.
Step 11: Finalize the goods receipt purchase order
Review the Goods Receipt PO window to ensure the Bin Location Allocation column reflects the total allocated quantity (for example, 50). Complete and add the Goods Receipt PO as required by your company process.
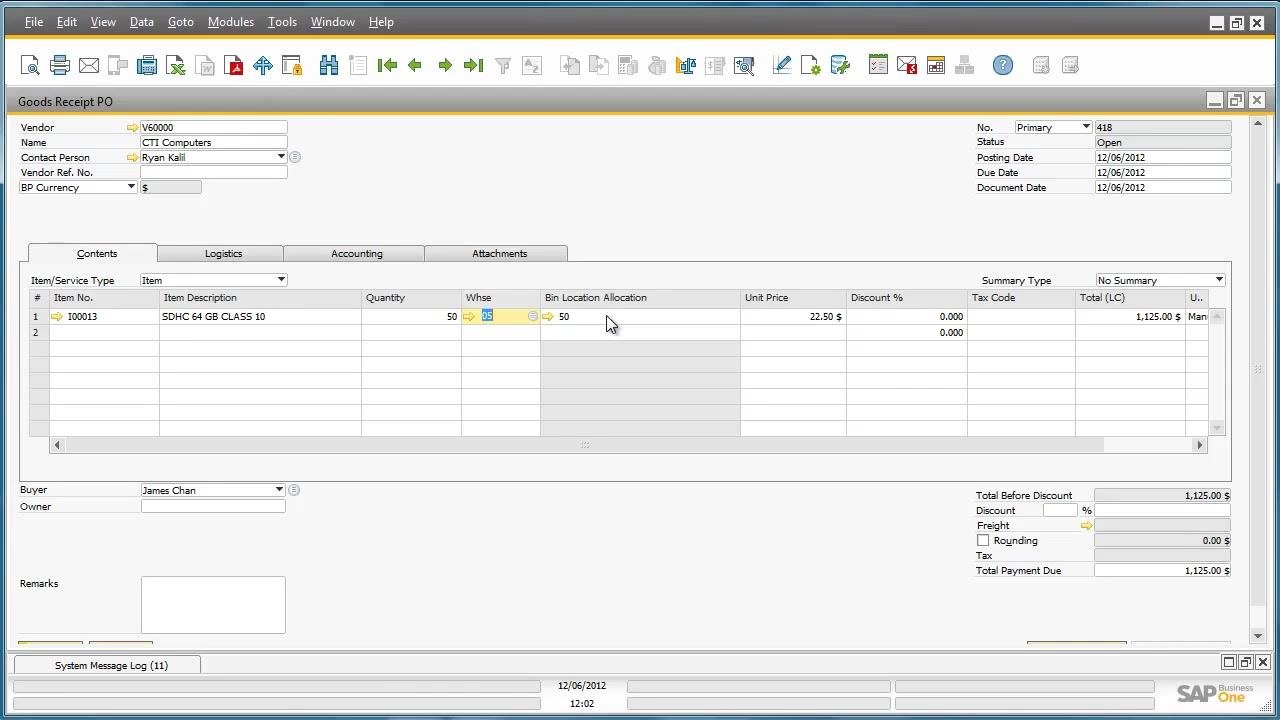
Step 12: Verify operation completion
Check the system message log for a confirmation such as "Operation completed successfully" to verify that the document was processed correctly.
Part 3: Review Bin Location Contents and Inventory Postings
Step 13: Navigate to the Bin Location Content List report
From the main menu, go to the Inventory module. Expand Inventory Reports and select Bin Location Content List.
Step 14: Run the Bin Location Content List report
In the Bin Location Content List - Selection Criteria window, leave the default settings or enter specific criteria as needed, then click OK to generate the report.
Step 15: Review bin location contents
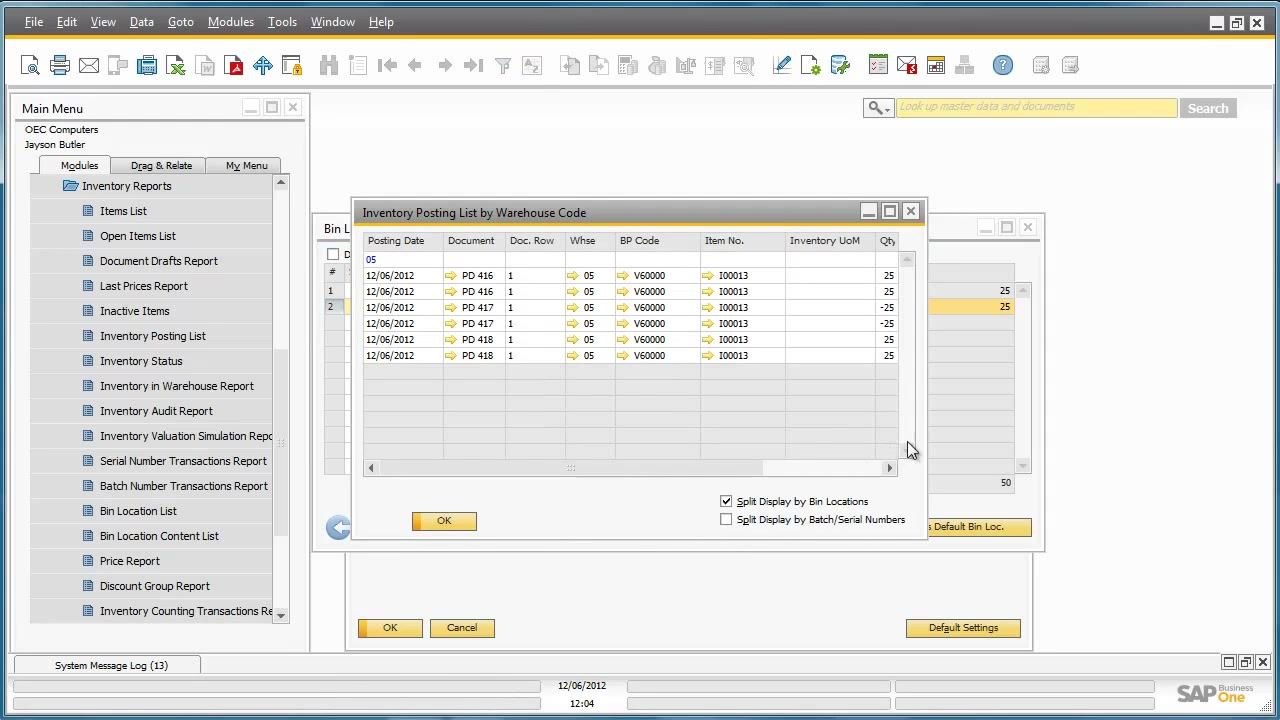
The Bin Location Content List window displays the bin locations (for example, 05-A4-S4-L1 and 05-A4-S4-L2), the item number (100013), and the item quantity in each bin (25 each). Confirm that the total quantity matches the allocation performed earlier.
Step 16: Review inventory postings for bin locations
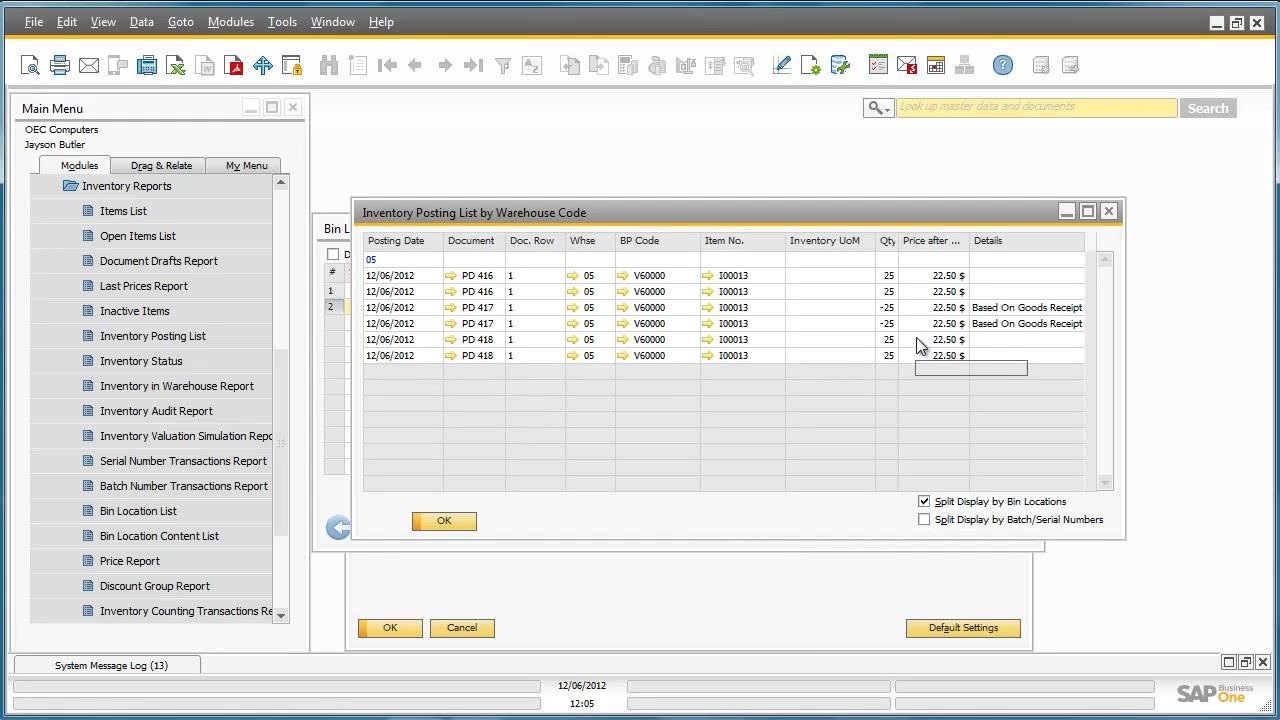
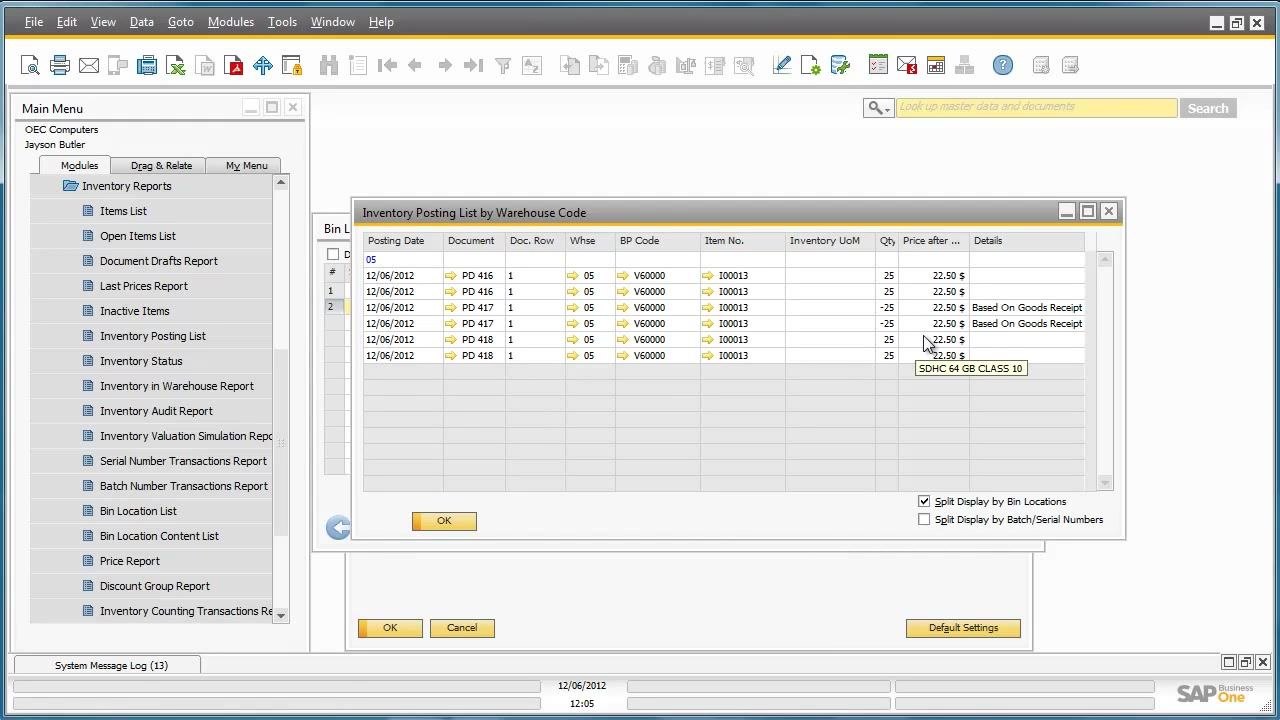
Select a bin location in the list and click Inventory Posting List to view all inventory postings for that bin. In the Inventory Posting List by Warehouse Code window, review the posting date, document number, warehouse (05), BP code (V60000), item number (100013), quantity (25), price after posting, and details (such as "Based On Goods Receipt"). Ensure the postings reflect the correct quantities and allocations.
Part 4: Create a Sales Order and Initiate the Pick Process
Step 17: Navigate to the sales order document
From the main menu, go to the Sales - A/R module and select Sales Order to open a new sales order document.
Step 18: Select the customer
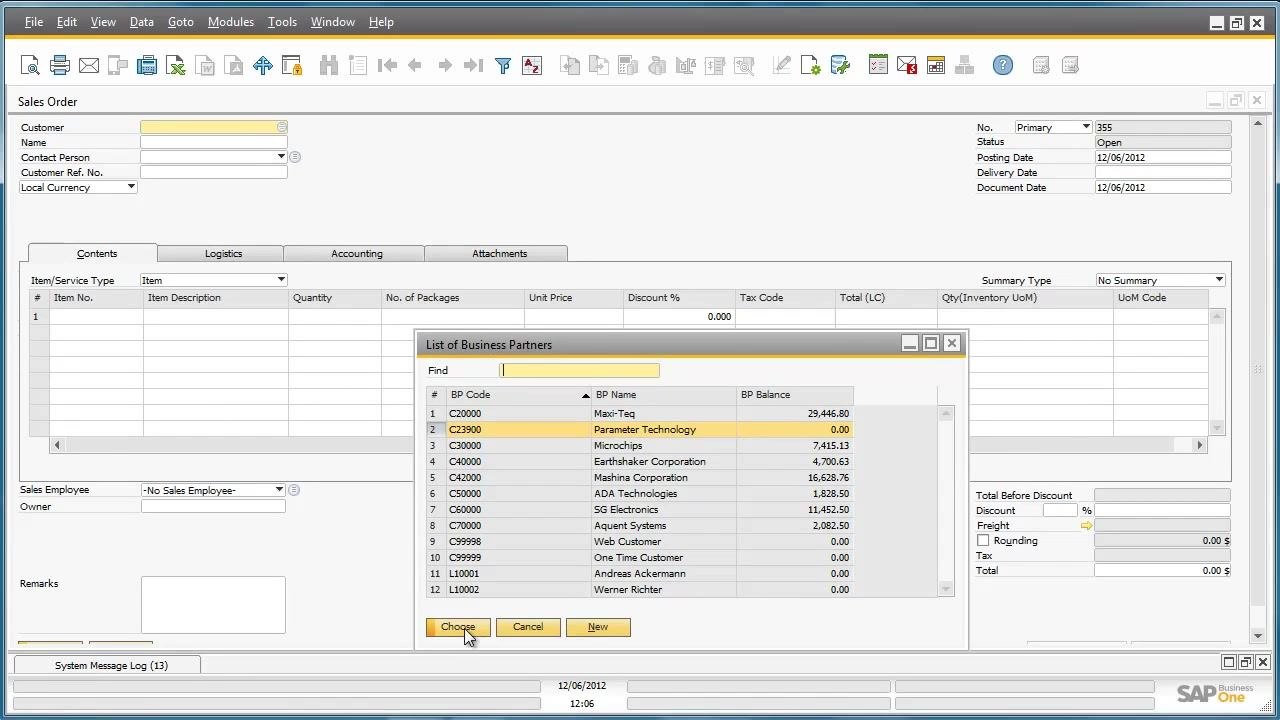
In the Sales Order window, click the Customer field to open the List of Business Partners. Locate and select Parameter Technology (BP Code: C23900), then click Choose to confirm the selection.
Step 19: Enter sales order details
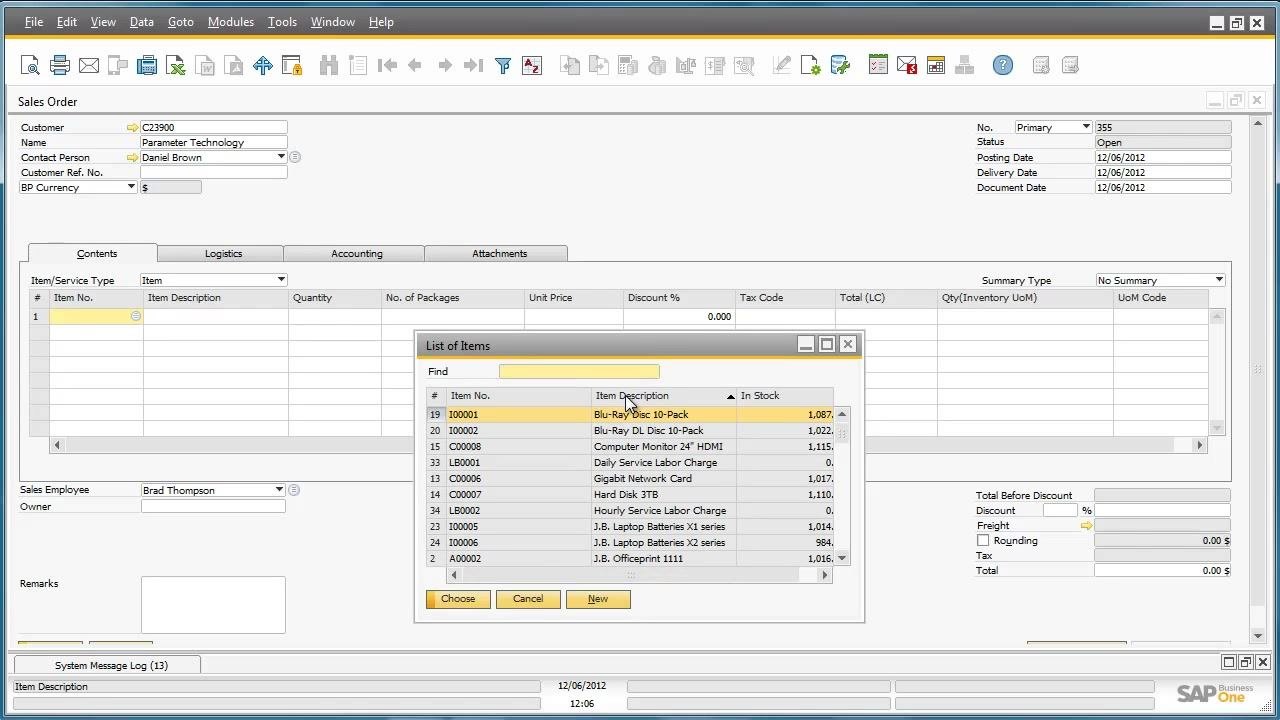
Enter the required delivery date in the Delivery Date field (for example, 12/06/2012) and the contact person if required (for example, Daniel Brown). In the item entry grid, click the Item No. field to open the List of Items, locate the required item (SDHC 64 GB CLASS 10, Item No. 100013), and click Choose.
Step 20: Enter quantity and pricing
In the Quantity field, enter 30 for the number of SD memory cards ordered. Confirm or enter the unit price (for example, $45.00), and review the calculated total (for example, $1,350.00 before tax). Ensure all other required fields are completed, such as tax code and UoM code, and review the summary and totals at the bottom right of the window.
Step 21: Add the sales order
Click Add at the bottom left of the Sales Order window to save the order to the system.
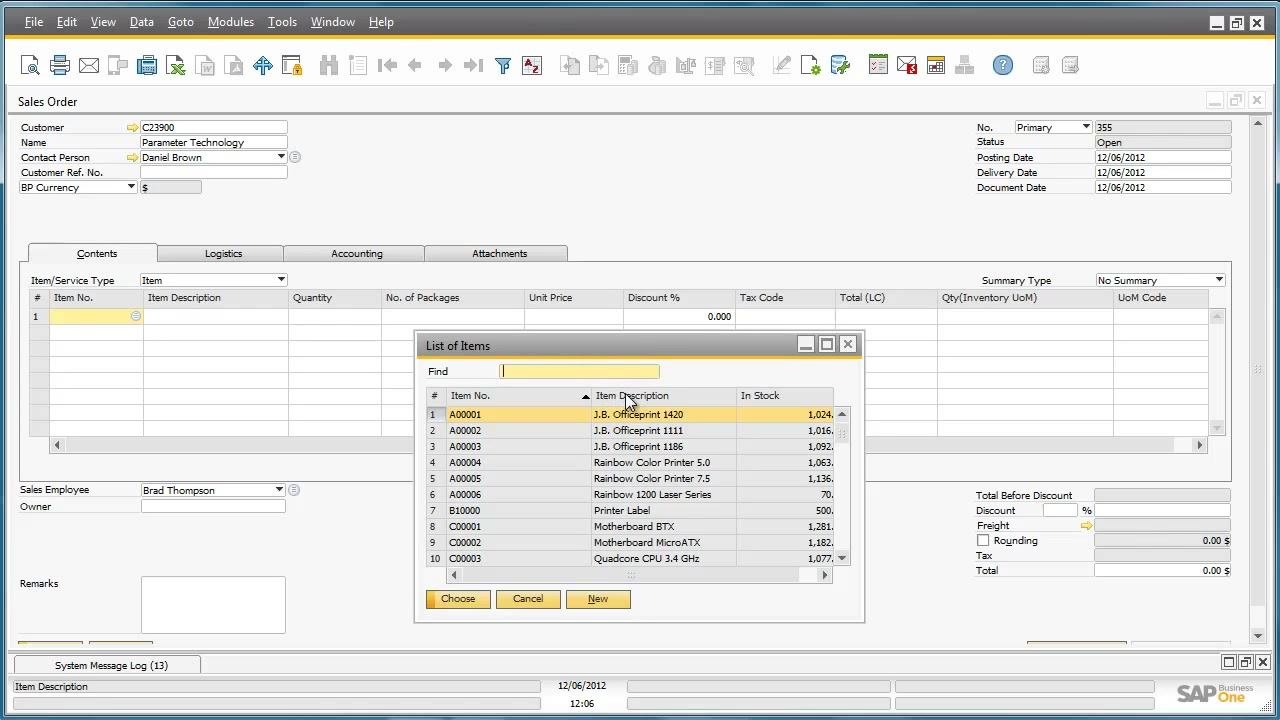
Step 22: Initiate the pick process for the sales order
After the sales order is added, navigate to the Inventory module. Expand Pick and Pack and select Pick and Pack Manager.
Step 23: Filter open sales orders by date
In the Pick and Pack Manager - Selection Criteria window, set the status to Open, select Sales Orders, enter the relevant posting date range (for example, From: 12/06/2012, To: 12/06/2012), and enter the required delivery date if needed. Select the relevant warehouse(s), such as Bin Warehouse, West Coast Warehouse, or General Warehouse, and sort by Delivery Date. Click OK to apply the filter.
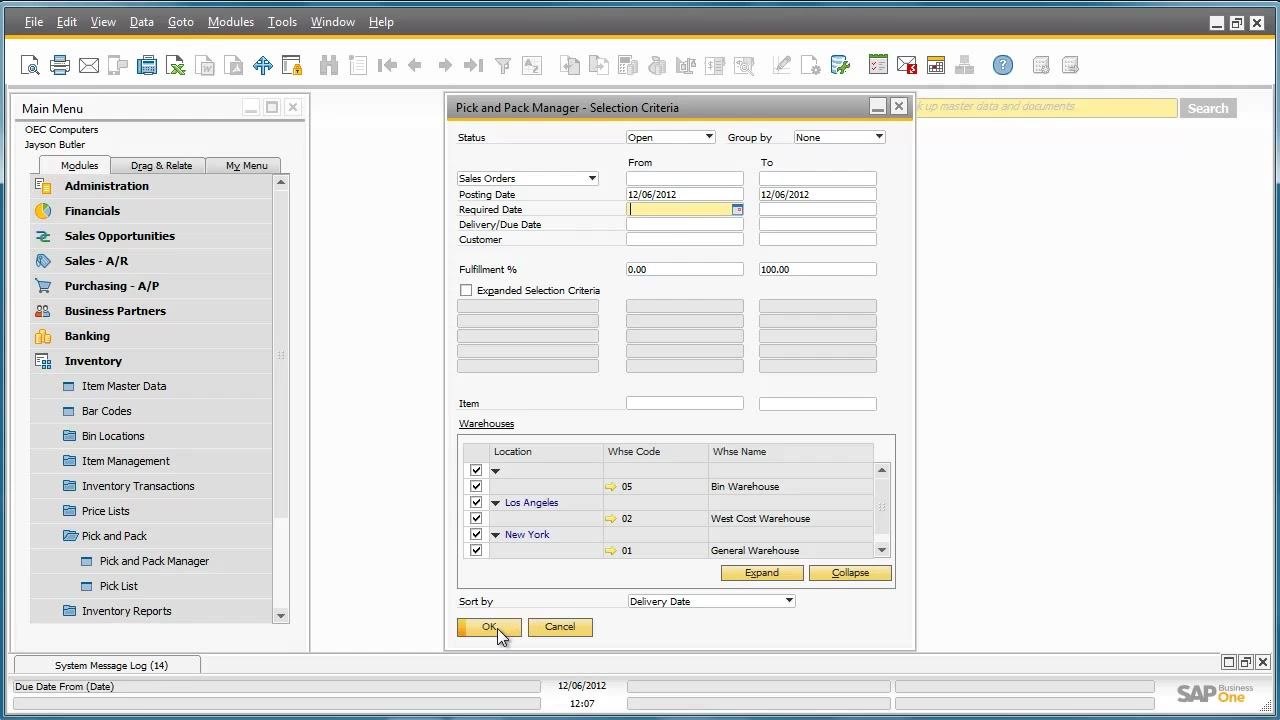
Step 24: Review transaction and customer details
After applying the selection criteria, review the list of open sales orders in the Pick and Pack Manager window. Confirm that the order for Parameter Technology is listed with the following details: Transaction Type OR, Document Number 355, Customer Code C23900, Customer Name Parameter Technology, Document Row 1, Delivery/Due Date 12/06/2012, Item Number 100013, Item Description SDHC 64 GB CLASS 10, Warehouse 05, Open Quantity 30, To Release 30, Available to Release 50, Fulfillment 100%, and Items per Unit 1. Use the scroll bar if necessary to view additional columns.
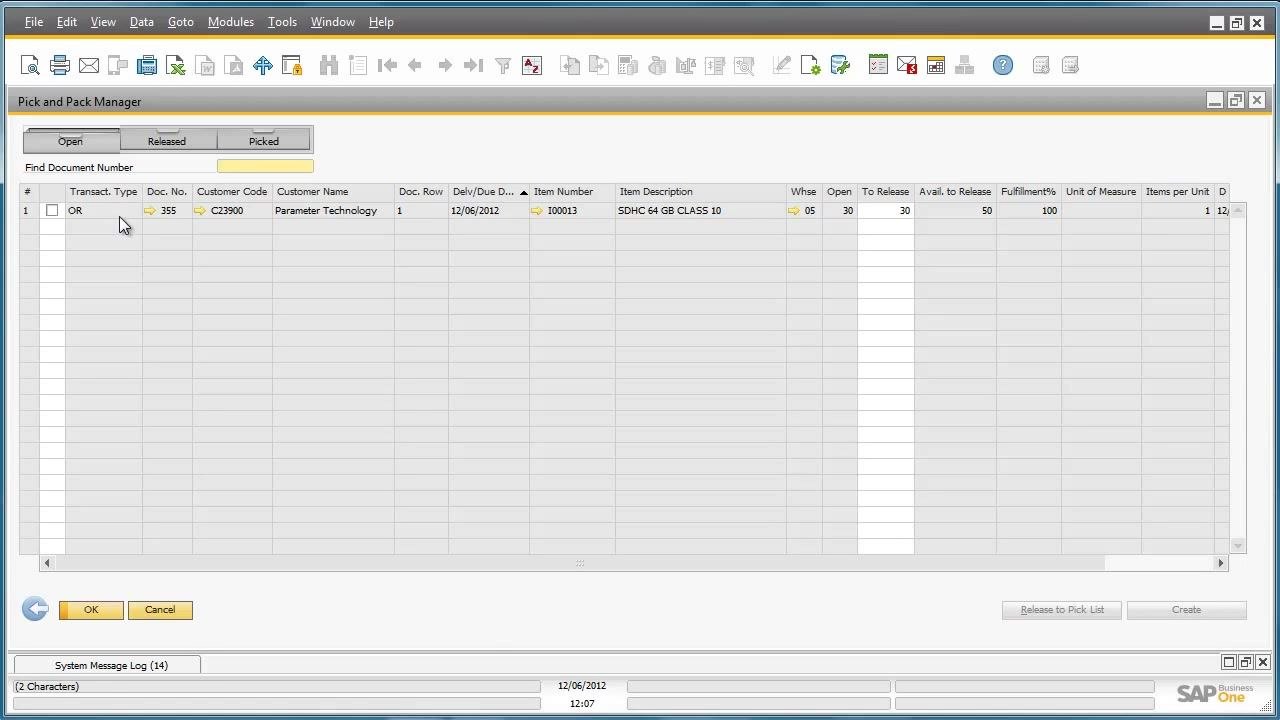
Part 5: Generate and Process Pick Lists
Step 25: Release items to the pick list
Select the checkbox next to the item(s) you wish to release, then click Release to Pick List at the bottom right of the screen.
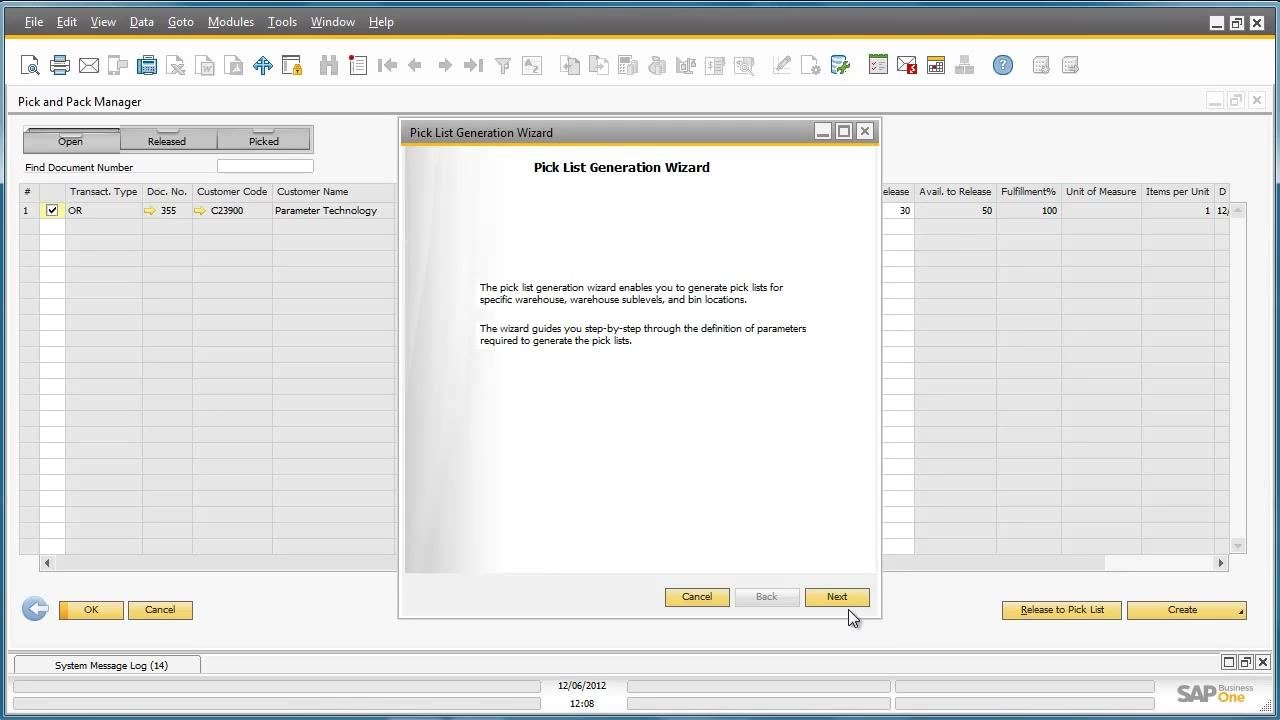
Step 26: Start the Pick List Generation Wizard
The Pick List Generation Wizard opens, explaining that it helps generate pick lists for specific warehouses, sublevels, and bin locations. Click Next to proceed.
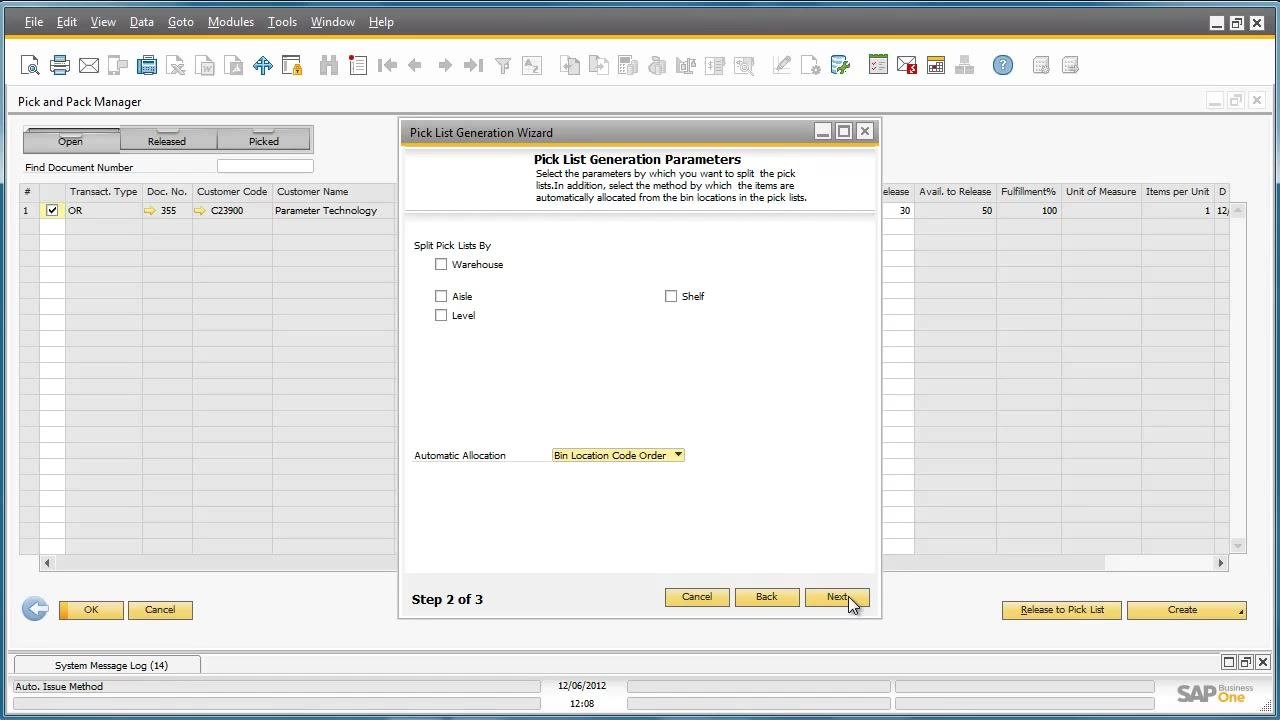
Step 27: Set pick list generation parameters
Optionally choose how to split pick lists, with options including Warehouse, Aisle, Level, or Shelf (none selected by default). Set Automatic Allocation to Bin Location Code Order (the default), then click Next.
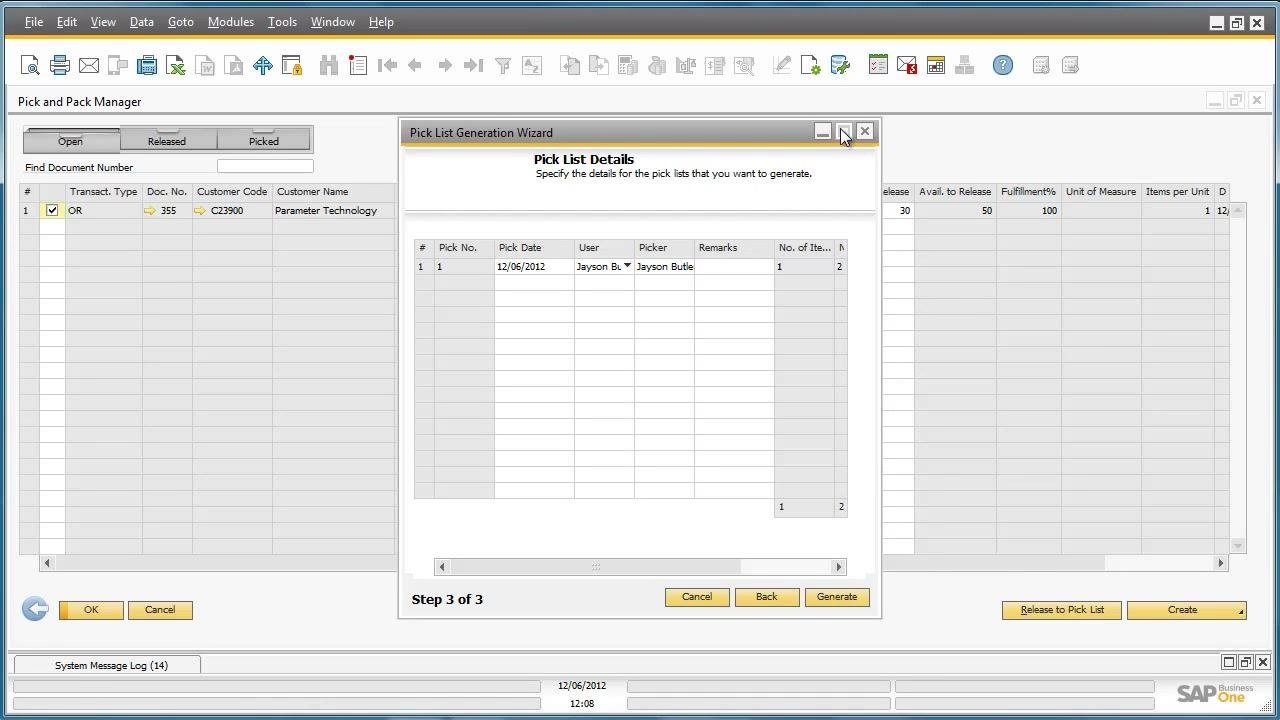
Step 28: Review pick list details
On the Pick List Details screen, review the automatically generated pick list: Pick No. 1, Pick Date 12/06/2012, User Jayson Butler, Picker Jayson Butler, Number of Items 1, Number of Picks 2, and Total Released Quantity 30. Confirm that the system has split the pick as needed — for example, 30 items ordered, with 25 available in one bin and 5 in another.
Step 29: Generate the pick document
If the pick list details are correct, click Generate to create the pick document.
Step 30: Drill down into the pick list
Return to the Pick and Pack Manager and switch to the Released tab to view the generated pick list. Locate the pick list by Pick No. (for example, 1) and review the details: Transaction Type OR, Document No. 355, Customer Code C23900, Item Description SDHC 64 GB CLASS 10, Warehouse 05, Available to Pick 50, Released 30, Open Quantity 30, Unit of Measure Manual, and Bin Location 30.
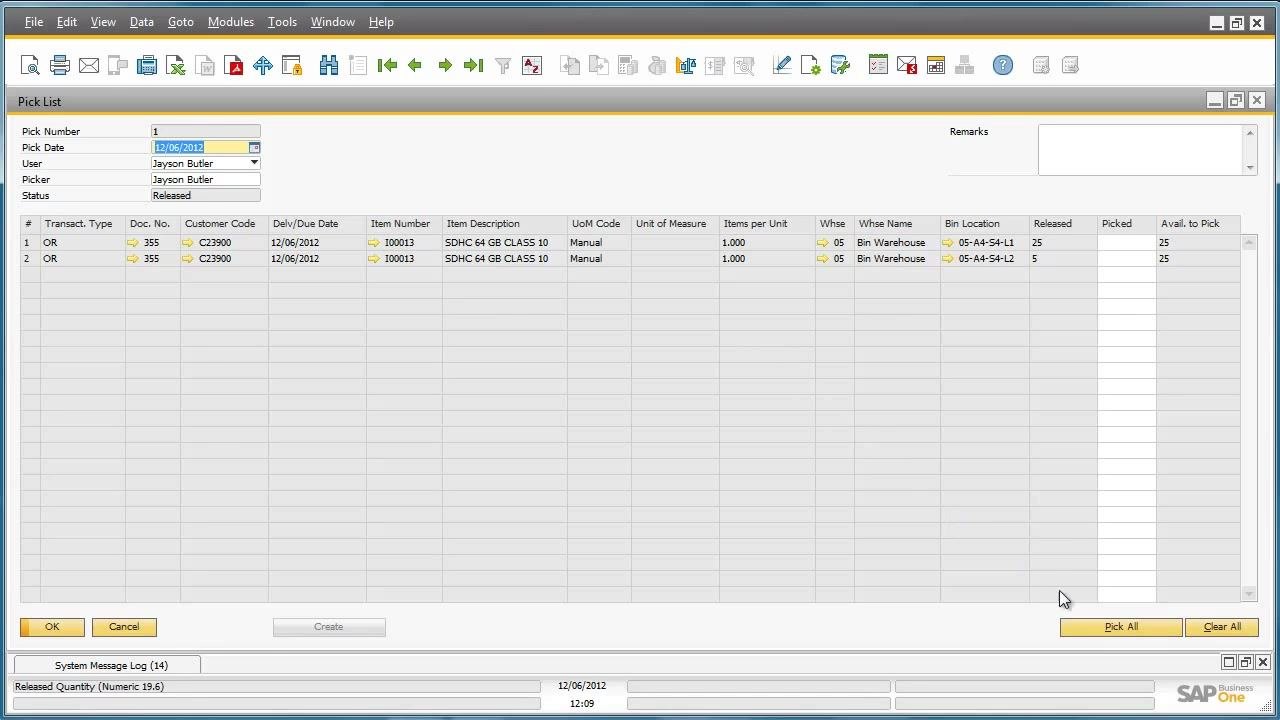
Step 31: Update the pick process after physical picking
Double-click the pick list to open the Pick List window. Review the details: Pick Number 1, Pick Date 12/06/2012, User Jayson Butler, Picker Jayson Butler, Status Released, with items and bin locations listed (25 from Bin 05-A4-S4-L1 and 5 from Bin 05-A4-S4-L2). Click Pick All to update the pick process, indicating that all items have been physically picked.
Part 6: Finalize and Add the Delivery Document
Step 32: Verify pick list status
After picking all items, confirm that the pick list status has changed to Picked. Review the Pick List window: Pick Number 1, Pick Date 12/06/2012, User Jayson Butler, Picker Jayson Butler, Status Picked, with items and bin locations listed (25 from Bin 05-A4-S4-L1 and 5 from Bin 05-A4-S4-L2). The Create button is now enabled for further processing.
Step 33: Initiate manual delivery creation
Click the dropdown arrow next to Create and select Manual Delivery (other options include Automatic Delivery and Manual Invoice). This opens the Delivery document for manual review and completion.
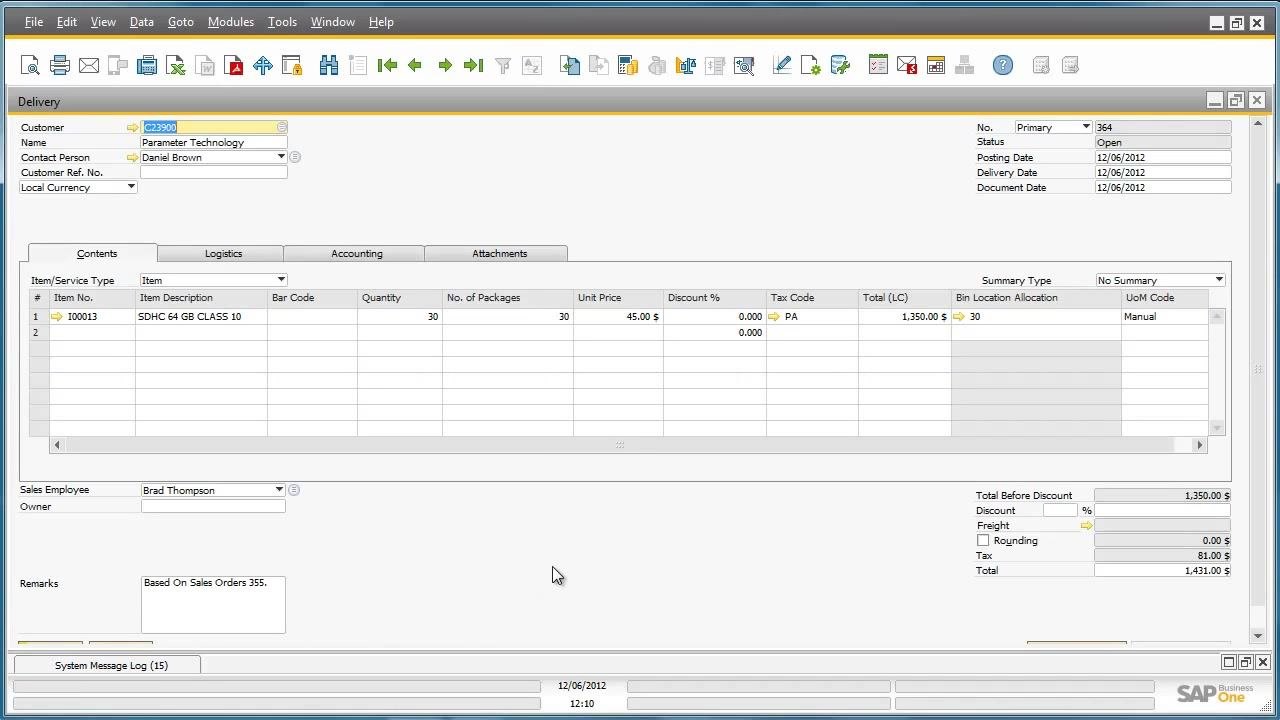
Step 34: Review delivery document details
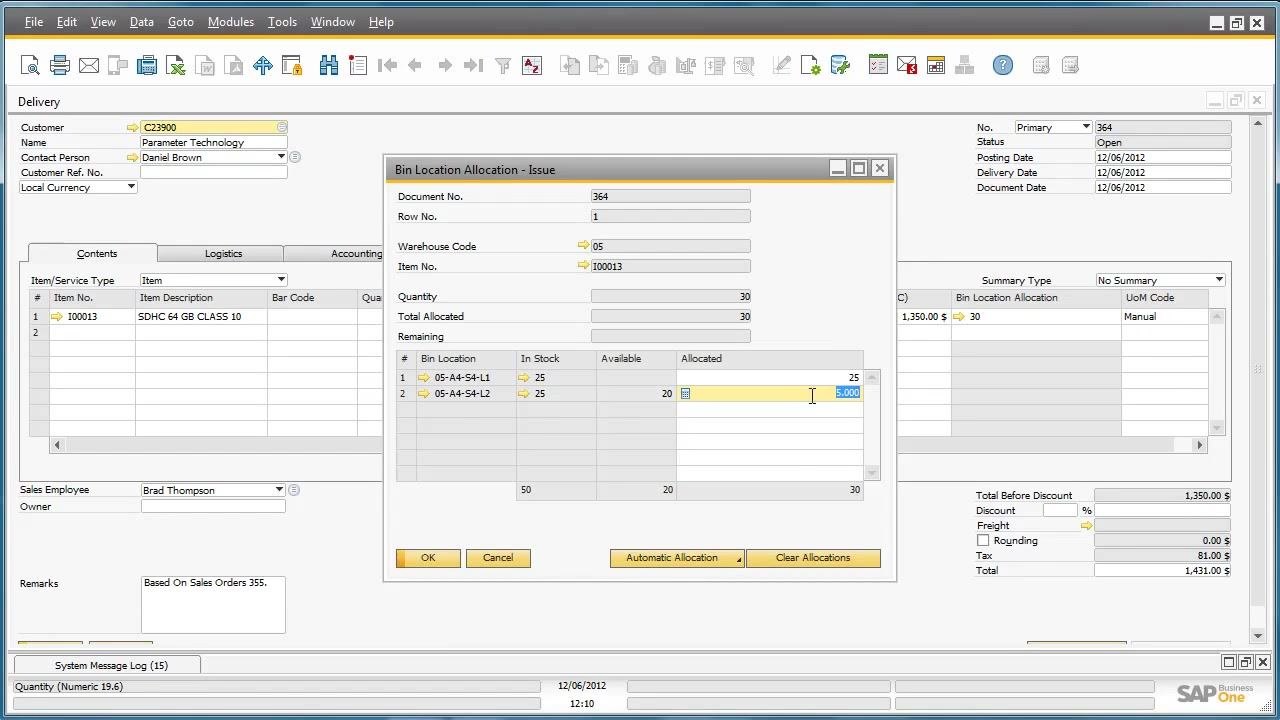
In the Delivery window, verify the following: Customer C23900 (Parameter Technology), Contact Person Daniel Brown, Item 100013 (SDHC 64 GB CLASS 10), Quantity 30, Number of Packages 30, Unit Price $45.00, Tax Code PA, Total (LC) $1,350.00, Bin Location Allocation 30, UoM Code Manual, Sales Employee Brad Thompson, and Remarks "Based On Sales Orders 355." Ensure all required data is present and correct.
Step 35: Check bin location allocation
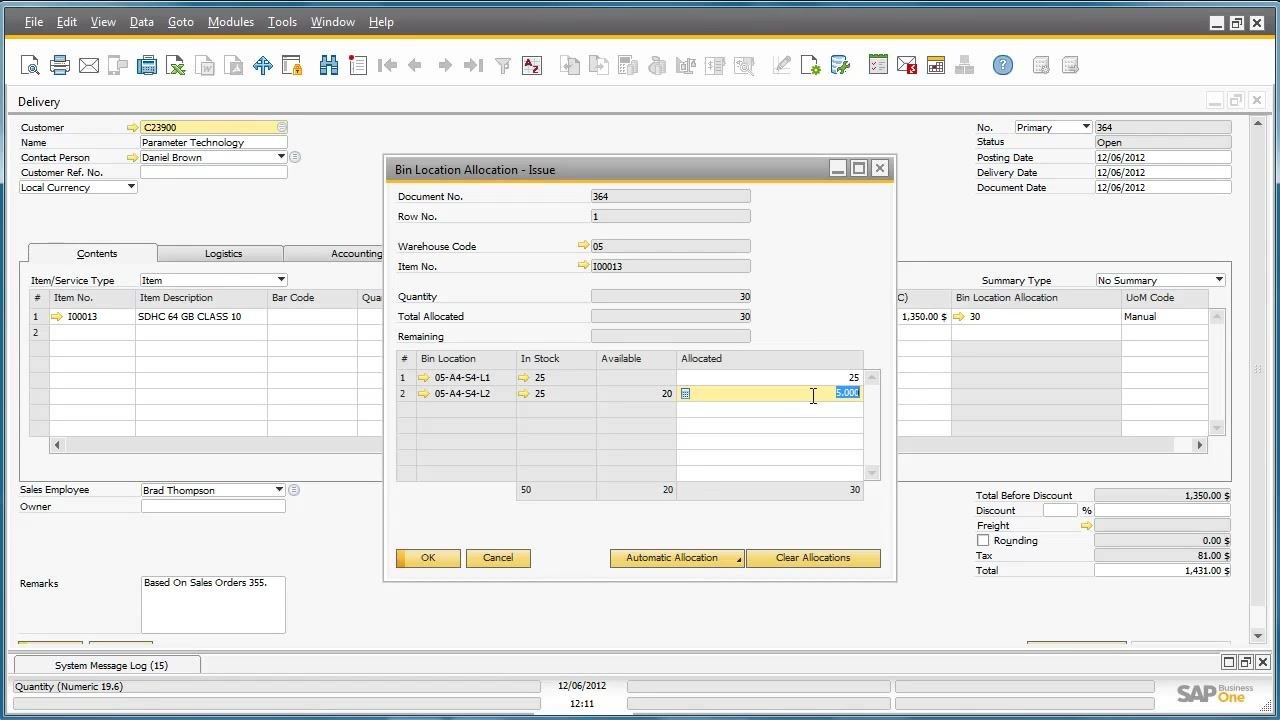
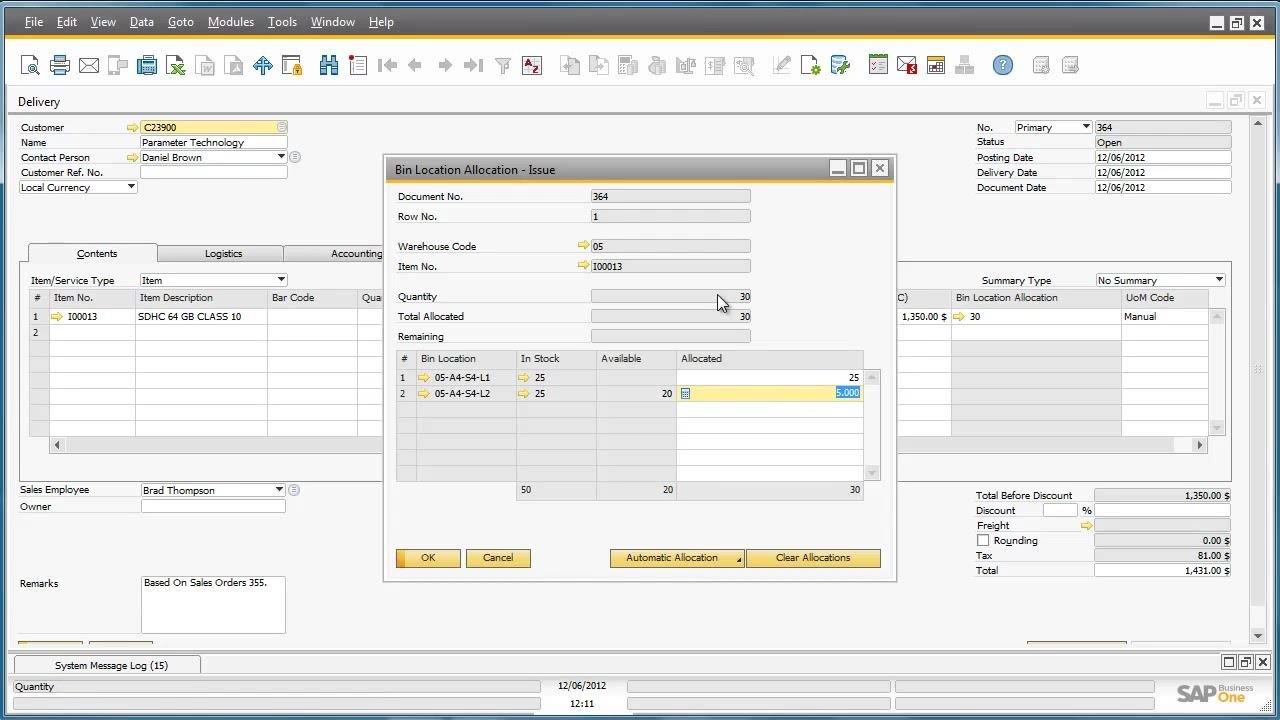
Open the Bin Location Allocation - Issue window to review how items are allocated across bins. Confirm the following: Document No. 364, Warehouse Code 05, Item No. 100013, Quantity 30, with bin 05-A4-S4-L1 showing In Stock 25, Available 25, Allocated 25, and bin 05-A4-S4-L2 showing In Stock 25, Available 20, Allocated 5, for a Total Allocated of 30. The system automatically allocates the correct quantities to each bin.
Step 36: Review available stock in bin locations
In the Bin Location Allocation window, verify the Available column to see remaining stock after allocation: 05-A4-S4-L1 shows Available 0 after allocating 25, and 05-A4-S4-L2 shows Available 15 after allocating 5. Ensure that the allocation matches the physical stock and picking requirements.
Step 37: Finalize and add the delivery document
Return to the Delivery window and click Add to finalize and save the delivery document, completing the delivery process for the picked items.
Step 38: Confirm pick list closure
Return to the Pick List window and verify that the status has changed to Closed. All item lines show the released and picked quantities, and the pick list can no longer be edited.
Summary
By following these steps, you have learned how to create a bin location in SAP Business One, allocate received goods across multiple bins, and verify bin location contents and inventory postings. You have also created a sales order, generated and processed pick lists by bin location, and finalized the delivery document — completing the full cycle from goods receipt to order fulfillment with accurate, bin-level inventory tracking.
Generation details: cost, quality tiers
Docsie billed 4,500 credits ($3.15) to analyze this 9-minute video at standard quality. The rewrite, template fill and Word/PDF exports were included. The same video at each quality tier:
| Quality | Frames sampled | Credits | Approx. cost |
|---|---|---|---|
| Draft | every 16-30 s | 2,250 | $1.57 |
| Standard (this guide) | every 8-15 s | 4,500 | $3.15 |
| Detailed | every 4-7 s | 9,000 | $6.30 |
| Ultra | every 1-3 s | 18,000 | $12.60 |
Credits priced at $0.70 per 1,000; plans include a monthly allowance. Enterprise customers on on-premise or bring-your-own-model deployments run this on their own inference and pay no per-video credits.
Generated by Docsie Video-to-Docs on 2026-10-12 from a 8-minute video. Screenshots are frames from the source video and belong to their creator, SAP Business One, whose original is embedded above. If you own this video and want the guide removed or credited differently, contact us and we will act within one business day.