
How to Create an Approval Process in Salesforce
This guide walks you through how to create an approval process in Salesforce, using the Discount Approval Process example from the Salesforce Trailhead module "Build a Discount Approval Process." You will use the Trailhead instructions alongside the Salesforce Setup interface to configure entry criteria, approvers, and page layouts, then verify your work to earn Trailhead points.
Video: Create an Approval Process || Build a Discount Approval Process || Salesforce || Trailhead by Education Matters (2023). All credit for the demonstration goes to the creator; watch the original on YouTube. The written guide below was generated from this video by Docsie. Creator? Request a change or removal.
This guide walks you through how to create an approval process in Salesforce, using the Discount Approval Process example from the Salesforce Trailhead module "Build a Discount Approval Process." You will use the Trailhead instructions alongside the Salesforce Setup interface to configure entry criteria, approvers, and page layouts, then verify your work to earn Trailhead points.
Prerequisites
- Access to a Salesforce Trailhead account and a hands-on org (such as "My Trailhead Playground 1").
- Administrator access to Salesforce Setup.
- If your org's default language is not English, set it to English before completing the verification step.
Open the Trailhead module
Open your web browser and go to the Salesforce Trailhead module for "Build a Discount Approval Process," then locate the unit titled Create an Approval Process.
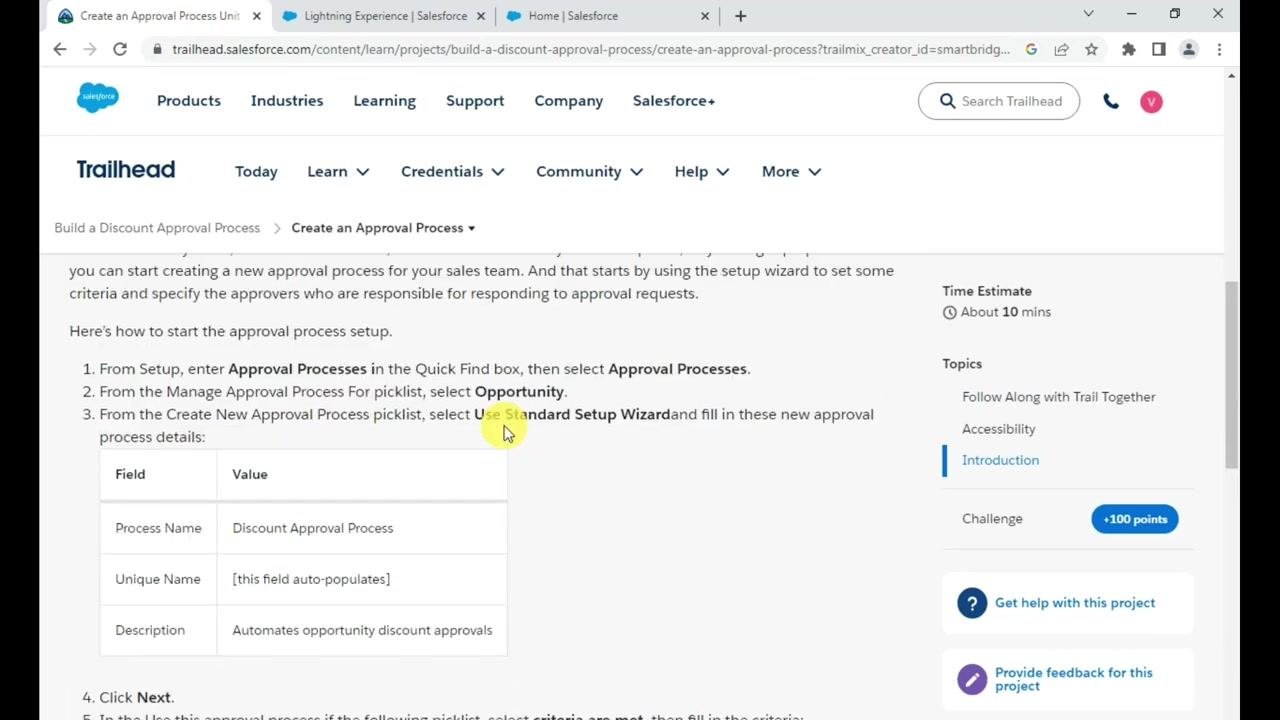
Review the introductory information, including the estimated time (about 10 minutes) and topics such as "Follow Along with Trail Together," "Accessibility," and "Introduction." You can optionally watch the embedded Trail Together video for additional guidance, and use the Get help with this project or Provide feedback for this project buttons if you need assistance.
Review the approval process setup instructions
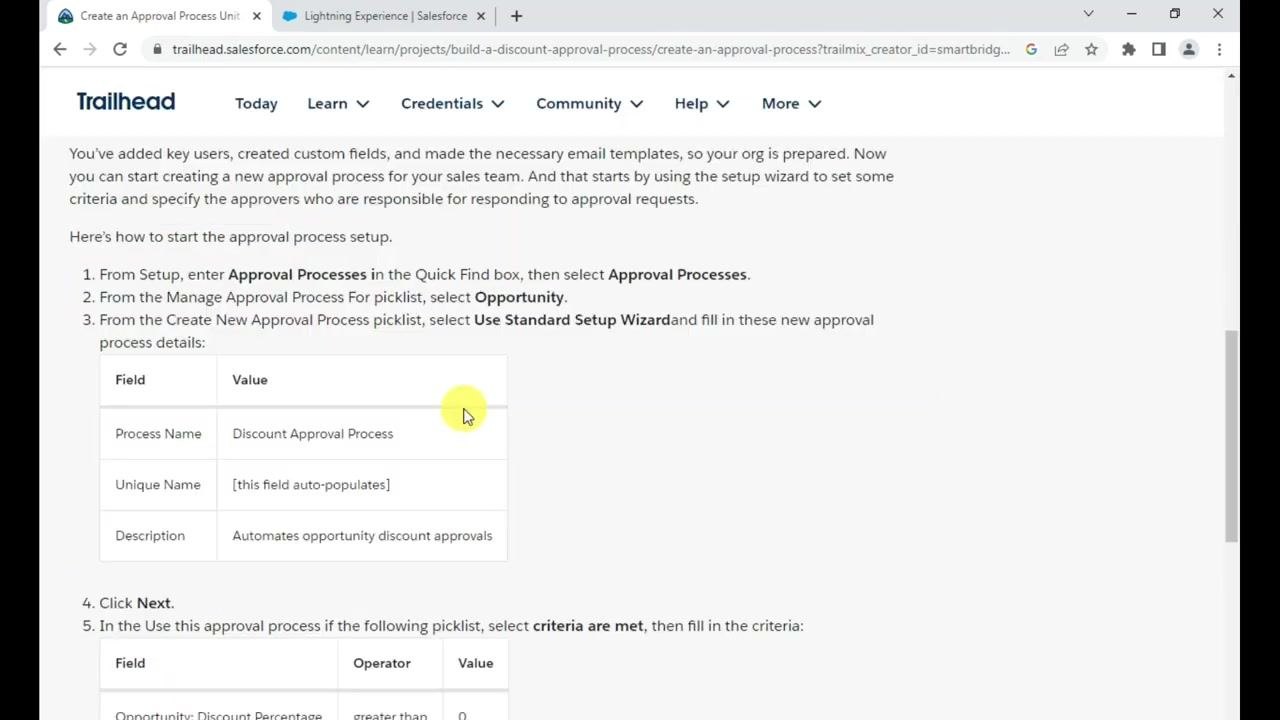
Read the step-by-step instructions provided on the Trailhead page before switching to Salesforce Setup:
- From Setup, enter Approval Processes in the Quick Find box, then select Approval Processes.
- From the Manage Approval Process For picklist, select Opportunity.
- From the Create New Approval Process picklist, select Use Standard Setup Wizard.
Fill in the new approval process details as shown:
- Process Name: Discount Approval Process
- Unique Name: auto-populates based on the process name
- Description: Automates opportunity discount approvals
Click Next to proceed.
Specify the initial submitter
Continue following the Trailhead instructions to define who can submit records for approval:
- Submitter Type: Owner
- Allowed Submitters: Opportunity Owner
- Allow submitters to recall approval requests: deselect this option
Click Save. On the "What Would You Like To Do Now?" page, select I'll do this later, take me to the approval detail page to review what I've just created, then click Go!
Access approval processes in Salesforce Setup
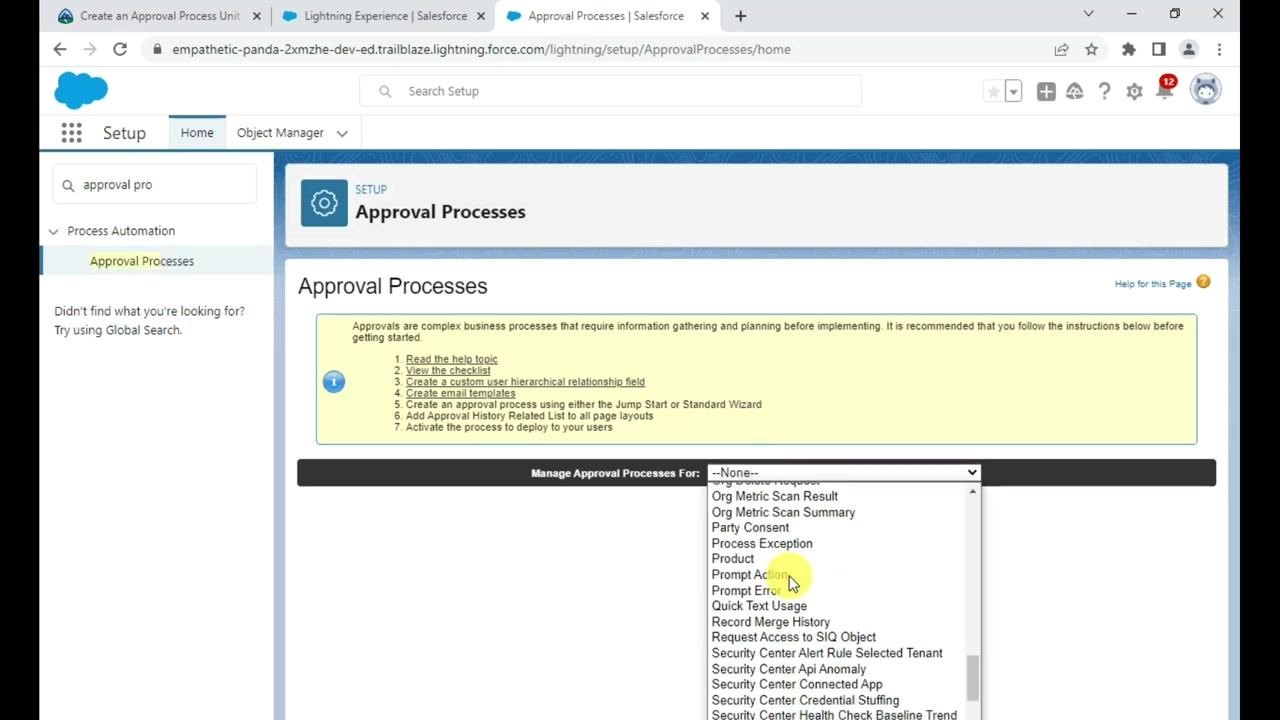
In Salesforce Setup, use the Quick Find box to search for Approval Processes. Under Process Automation in the left sidebar, click Approval Processes.
The main panel displays the Approval Processes setup screen, including a checklist and links to help topics and related setup tasks.
Select the object for the approval process
In the Manage Approval Processes For dropdown, select Opportunity from the list of available objects. The screen updates to show approval processes specific to Opportunities.
Start the new approval process
Click the Create New Approval Process dropdown and select the option to start the setup wizard. If this is your first process, confirm that no active or inactive approval processes are listed yet for Opportunities.
Enter the approval process details
Return to the Trailhead instructions and enter the following details in the setup wizard:
- Process Name: Discount Approval Process
- Unique Name: auto-populated
- Description: Automates opportunity discount approvals
Click Next to continue.
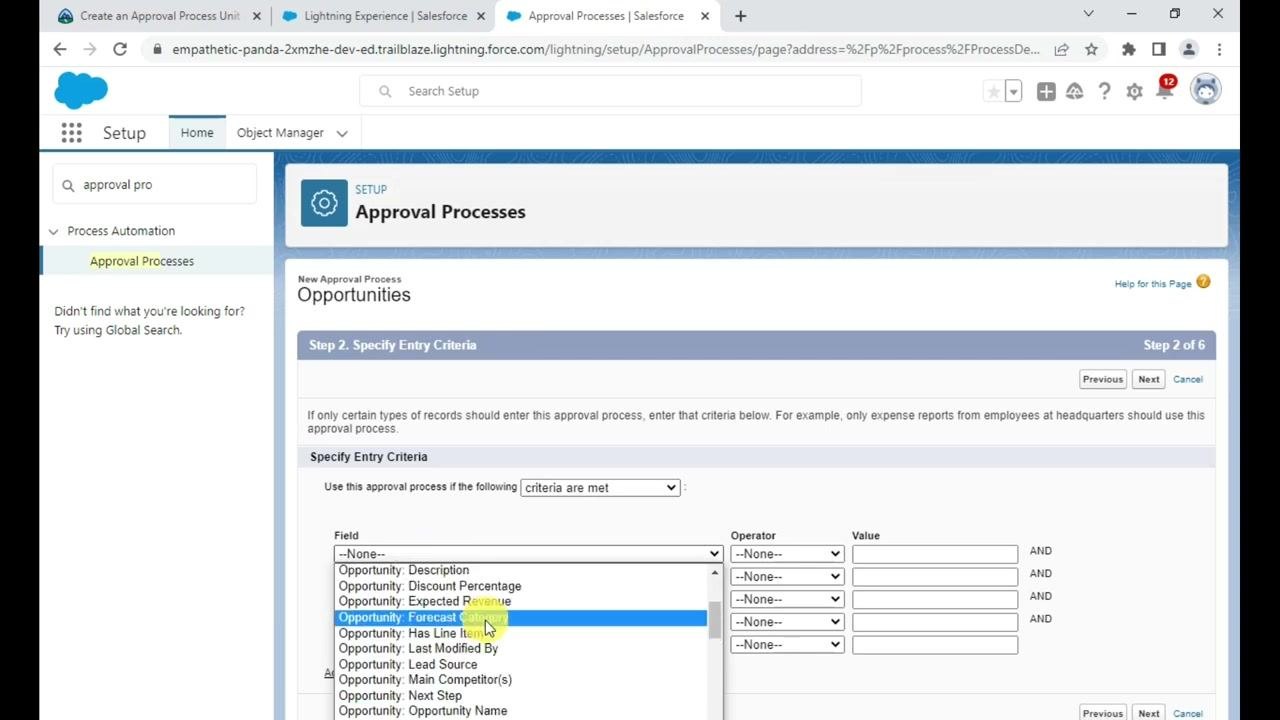
Specify entry criteria (Step 2 of 6)
In the setup wizard, proceed to Step 2 of 6: Specify Entry Criteria. Use the dropdown menus to define which records should enter this approval process.
For example, you can select fields such as "Opportunity: Discount Percentage," "Opportunity: Expected Revenue," or "Opportunity: Forecast Category" as criteria, then set the operator and value for each field to match your business requirements. Click Next to proceed.
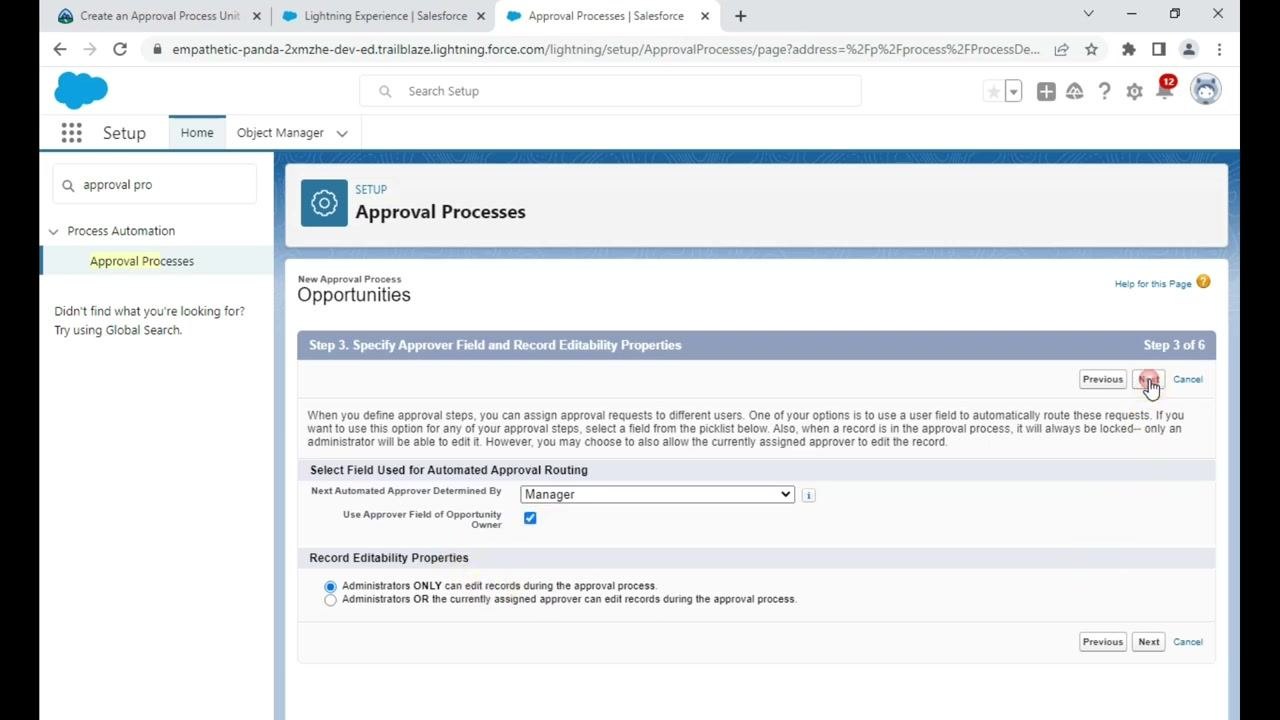
Specify the approver field and record editability (Step 3 of 6)
In Step 3: Specify Approver Field and Record Editability Properties, open the dropdown for Next Automated Approver Determined By under Select Field Used for Automated Approval Routing. You can choose from:
- Standard User Fields
- Custom User Fields
- Create New Hierarchical Relationship Field
Select the appropriate field for your process, such as "Manager." Optionally, check Use Approver Field of Opportunity Owner if you want to route approvals to the manager of the record owner.
Under Record Editability Properties, select one of the following:
- Administrators ONLY can edit records during the approval process
- Administrators OR the currently assigned approver can edit records during the approval process
Click Next to proceed.
Select fields for the approval page layout (Step 5 of 6)
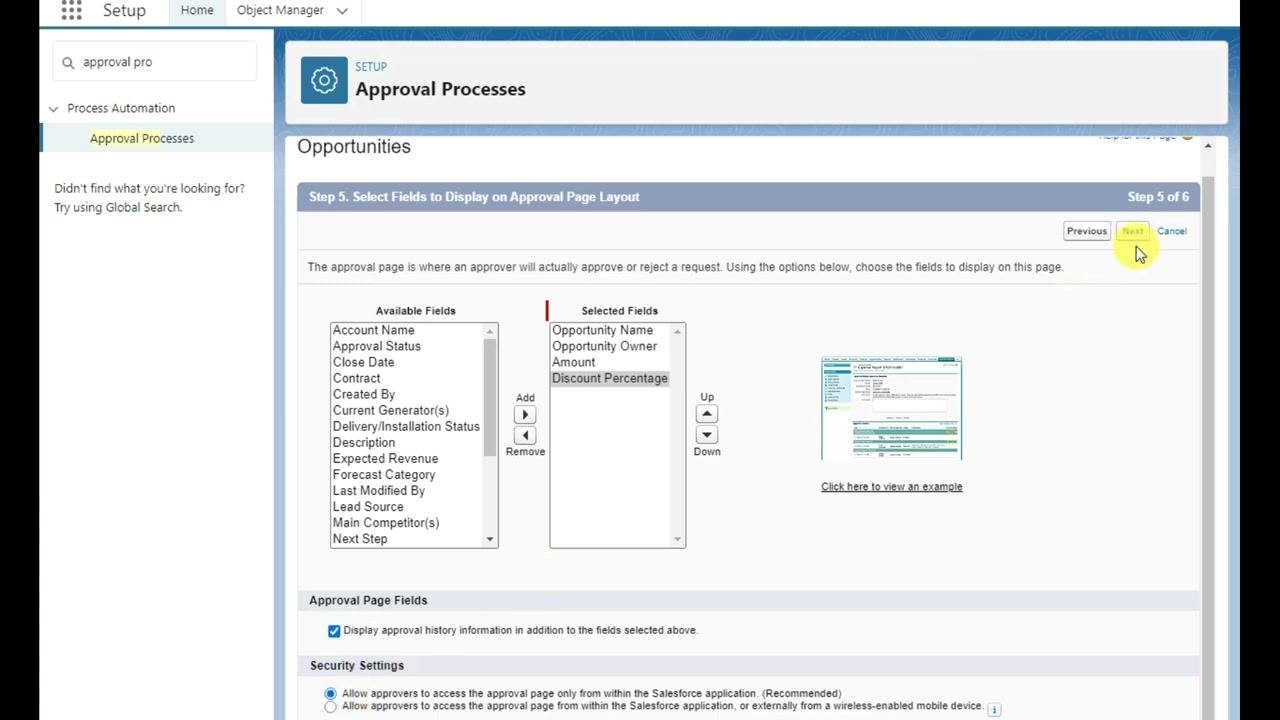
In Step 5: Select Fields to Display on Approval Page Layout, choose which fields will be visible to approvers. The Available Fields list includes options such as:
- Account Name
- Approval Status
- Close Date
- Contract
- Created By
- Expected Revenue
- Forecast Category
- Lead Source
- Main Competitor(s)
- Next Step
Move the fields you want approvers to see into the Selected Fields list — for example, Opportunity Name, Opportunity Owner, Amount, and Discount Percentage. Use the Add, Remove, Up, and Down buttons to organize the selected fields, and click Click here to view an example for a preview of the layout if needed.
Under Approval Page Fields, check Display approval history information to show approval history on the page. Under Security Settings, choose whether approvers can access the approval page only from within Salesforce or also from mobile devices. Click Next to continue.
Review the process definition
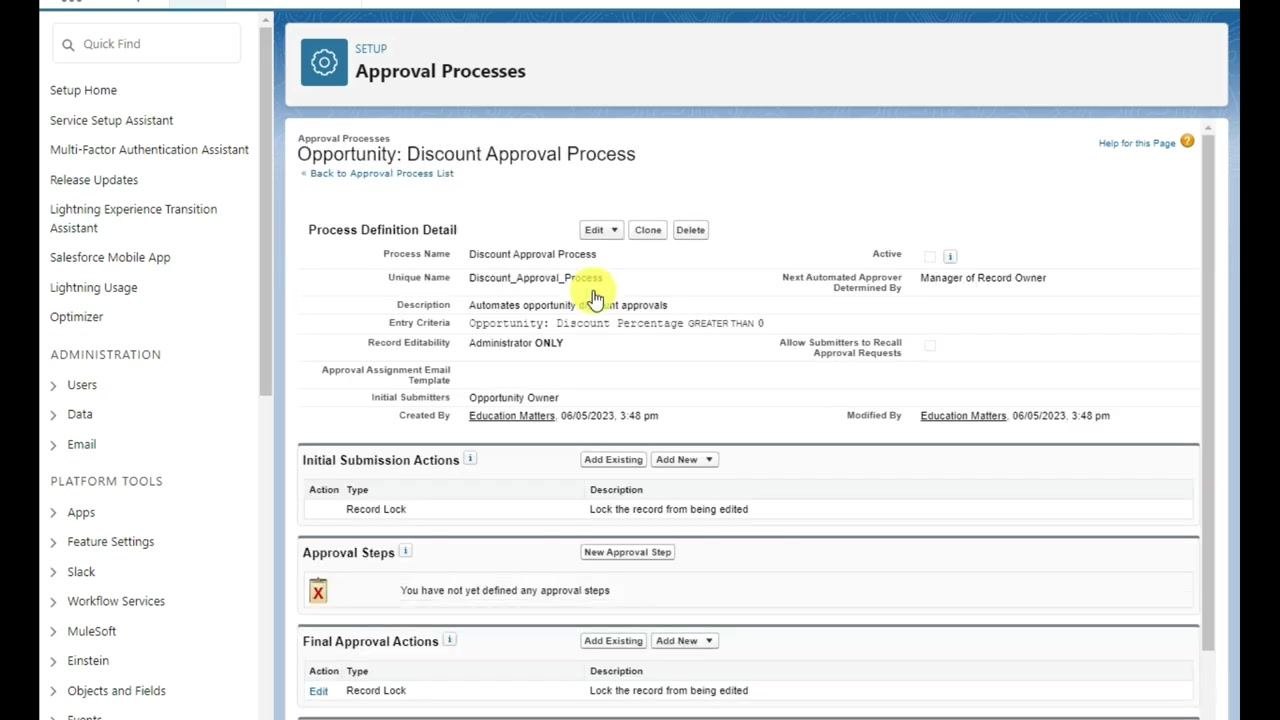
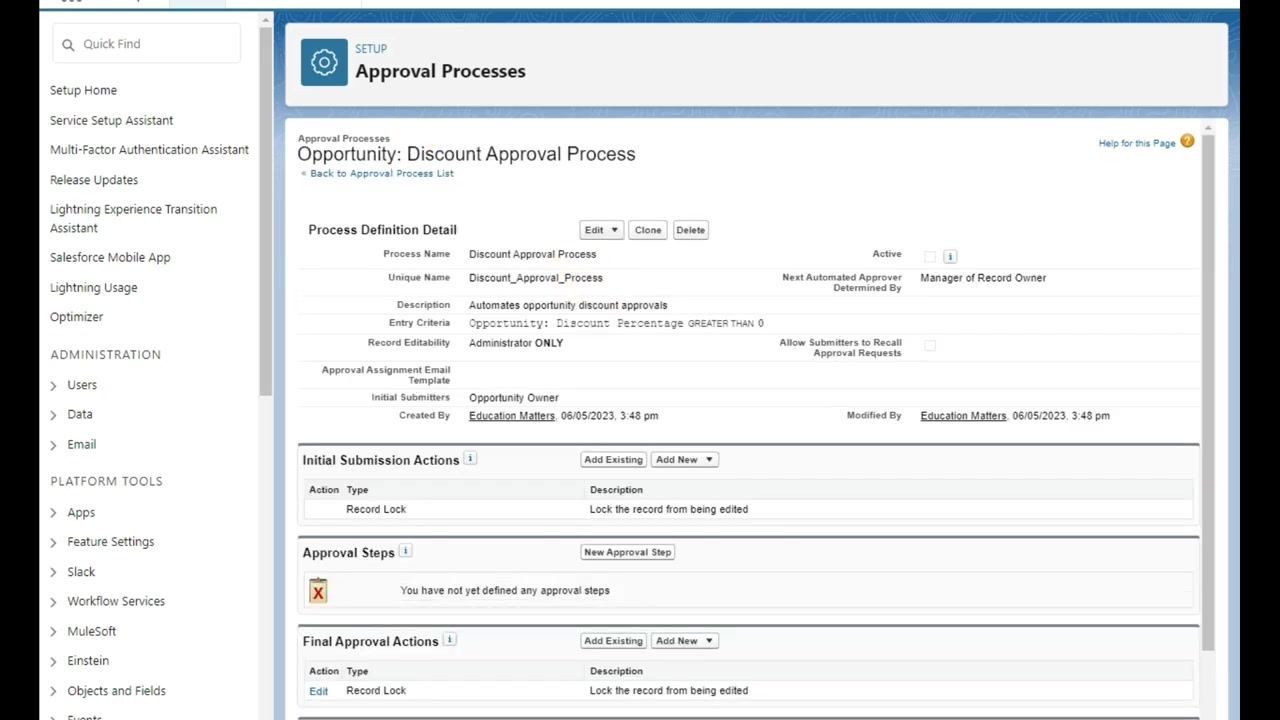
After completing the wizard, review the Process Definition Detail page for your new approval process and confirm the following:
- Process Name: Discount Approval Process
- Unique Name: Discount_Approval_Process
- Description: Automates opportunity discount approvals
- Entry Criteria: Opportunity: Discount Percentage GREATER THAN 0
- Record Editability: Administrator ONLY
- Next Automated Approver Determined By: Manager of Record Owner
- Allow Submitters to Recall Approval Requests: unchecked
- Initial Submitters: Opportunity Owner
- Created By: your user/org name and the creation date
Also review the Initial Submission Actions (such as Record Lock), the Approval Steps (none defined yet), and the Final Approval Actions (such as Record Lock). Use the Edit, Clone, or Delete buttons if you need to make changes.
Verify your work in Trailhead
Return to the Salesforce Trailhead module to verify your step and earn points. In the Verify Step section:
- Confirm you are using your own hands-on org (such as "My Trailhead Playground 1").
- Click Launch to open your org and complete any required actions.
- If Salesforce is set to a language other than English, switch your org's language to English before proceeding.
- Click Verify step to earn 100 points once you have completed the process in your org.
Review the time estimate (about 10 minutes) and related topics, and use the Get help with this project or Provide feedback for this project buttons if you need assistance.
Summary
You have now completed all the steps needed to create, configure, and verify a Discount Approval Process in Salesforce using Trailhead — from setting entry criteria and approver routing to customizing the approval page layout and confirming the final process definition.
What's next
With the approval process created, you can continue to refine it by adding approval steps, configuring email templates and notifications, or extending the same approach to build approval processes for other objects in your org.
Generation details: cost, quality tiers
Docsie billed 2,000 credits ($1.40) to analyze this 4-minute video at standard quality. The rewrite, template fill and Word/PDF exports were included. The same video at each quality tier:
| Quality | Frames sampled | Credits | Approx. cost |
|---|---|---|---|
| Draft | every 16-30 s | 1,000 | $0.70 |
| Standard (this guide) | every 8-15 s | 2,000 | $1.40 |
| Detailed | every 4-7 s | 4,000 | $2.80 |
| Ultra | every 1-3 s | 8,000 | $5.60 |
Credits priced at $0.70 per 1,000; plans include a monthly allowance. Enterprise customers on on-premise or bring-your-own-model deployments run this on their own inference and pay no per-video credits.
Generated by Docsie Video-to-Docs on 2026-09-14 from a 3-minute video. Screenshots are frames from the source video and belong to their creator, Education Matters, whose original is embedded above. If you own this video and want the guide removed or credited differently, contact us and we will act within one business day.