
How to Customize a Standard Report in Oracle Fusion
Oracle Fusion often ships with standard (seeded) BI Publisher reports that cover common business needs, but customers frequently request specific columns, layouts, or formatting that differ from the out-of-the-box version. This guide walks you through how to customize a standard report in Oracle Fusion, using the Payables Invoice Register report as a working example. You'll learn how to locate the report through the XMLP server interface, link it to a custom data model, redesign its template in Microsoft Word, and upload and test your changes.
Video: How to Customize Standard BIP report in Oracle Fusion by Global Savian Consulting. All credit for the demonstration goes to the creator; watch the original on YouTube. The written guide below was generated from this video by Docsie. Creator? Request a change or removal.
Oracle Fusion often ships with standard (seeded) BI Publisher reports that cover common business needs, but customers frequently request specific columns, layouts, or formatting that differ from the out-of-the-box version. This guide walks you through how to customize a standard report in Oracle Fusion, using the Payables Invoice Register report as a working example. You'll learn how to locate the report through the XMLP server interface, link it to a custom data model, redesign its template in Microsoft Word, and upload and test your changes.
Prerequisites
- Access to your Oracle Fusion application with valid login credentials.
- Permissions to customize reports in BI Publisher.
- A clear understanding of the client's requirements, including any sample output or specific columns they need in the report. Clients often request modifications to an existing standard Oracle report rather than a report built from scratch.
Log in to Oracle Fusion
Open your browser and log in to your Oracle Fusion application using your credentials.
Access BI Publisher directly
Copy the base Fusion application URL from your browser (for example, https://esbe-dev2.fa.em8.oraclecloud.com/). Open a new browser tab, paste the URL, and append /xmlpserver after the slash so the full address reads https://esbe-dev2.fa.em8.oraclecloud.com/xmlpserver. Press Enter to navigate directly to the Oracle Analytics Publisher interface.
Open the Catalog
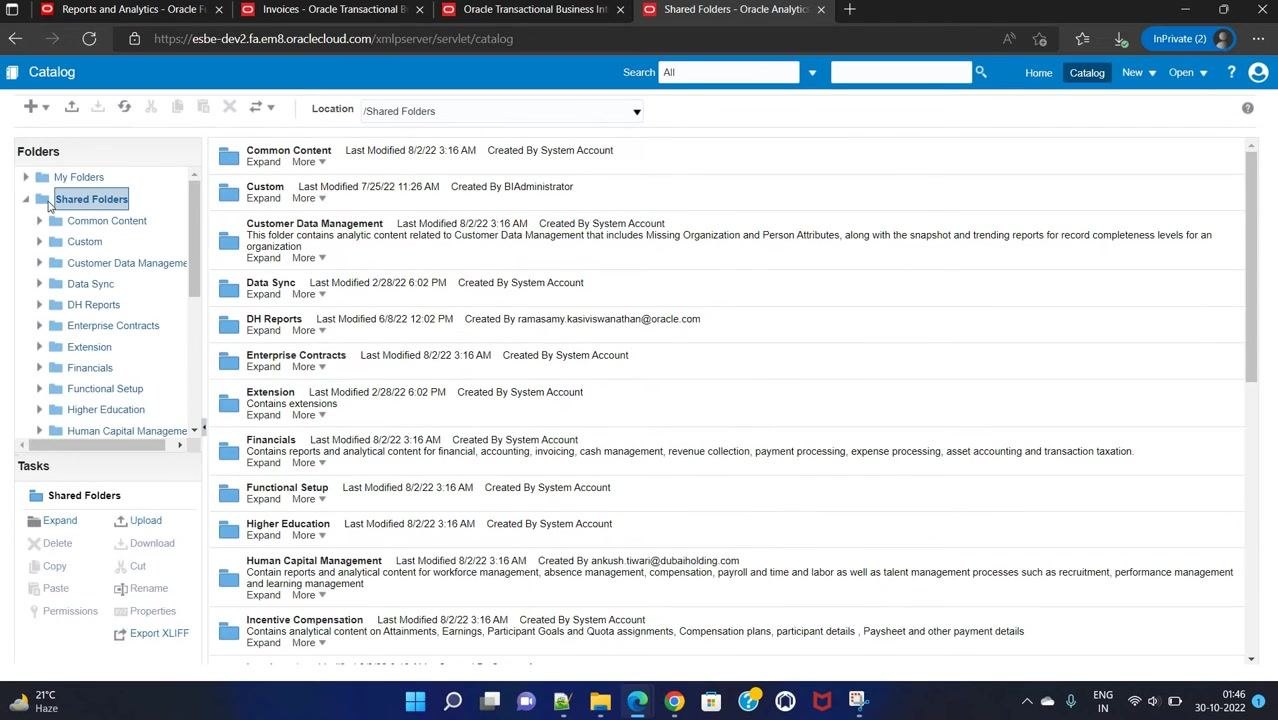
In the Analytics Publisher interface, click Catalog at the top menu to access the report folders.
Locate the standard report for customization
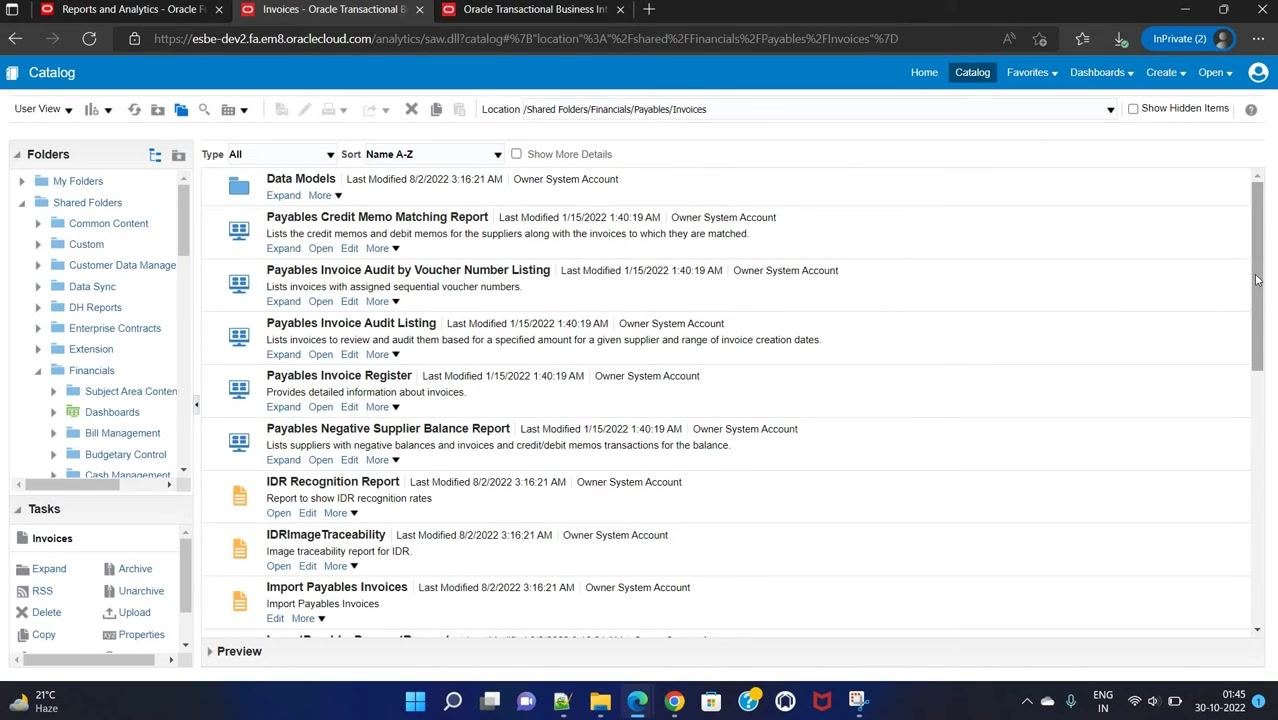
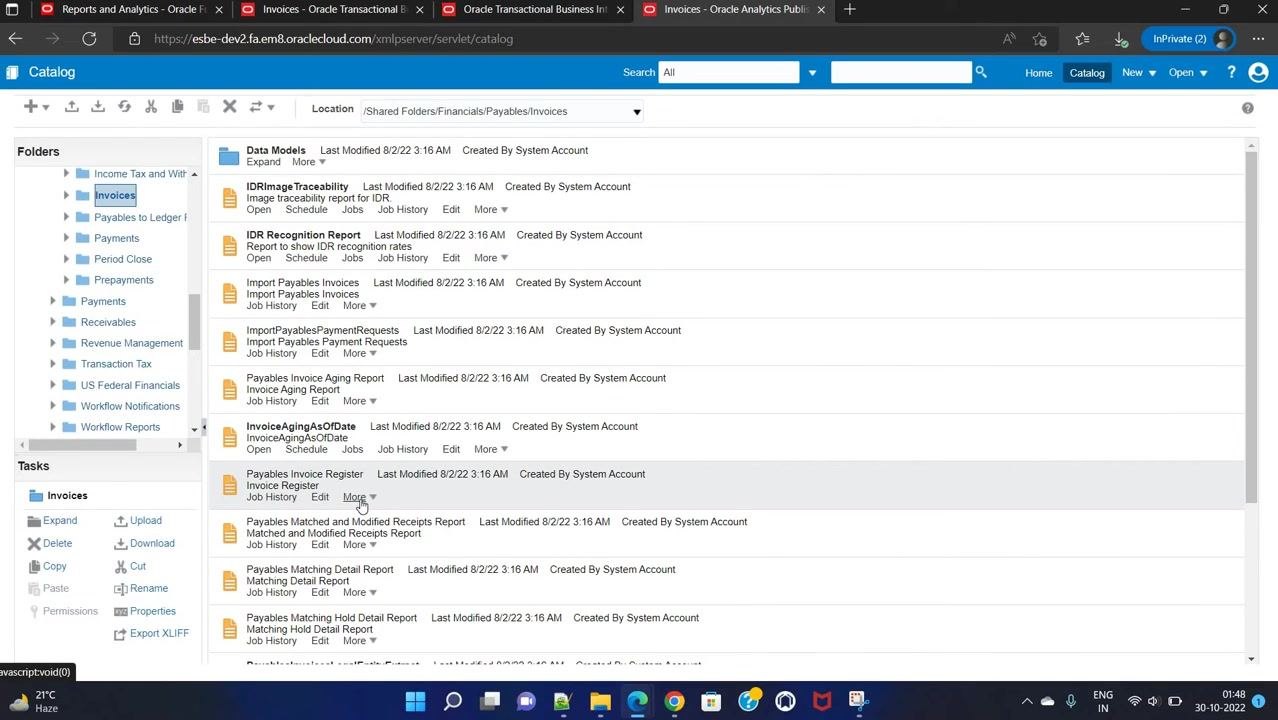
In the Catalog, expand Shared Folders in the left navigation pane. Under Shared Folders, expand Financials, then Payables, and select the Invoices folder.
Inside the Invoices folder, scroll to find the Payables Invoice Register report. It is listed alongside other Payables reports such as "Payables Invoice Audit Listing" and "Payables Negative Supplier Balance Report."
Select the report and review available actions
Click the Payables Invoice Register report to highlight it. The available actions—Open, Edit, and More—appear in the left Tasks pane and beneath the report name.
Open the Customize option
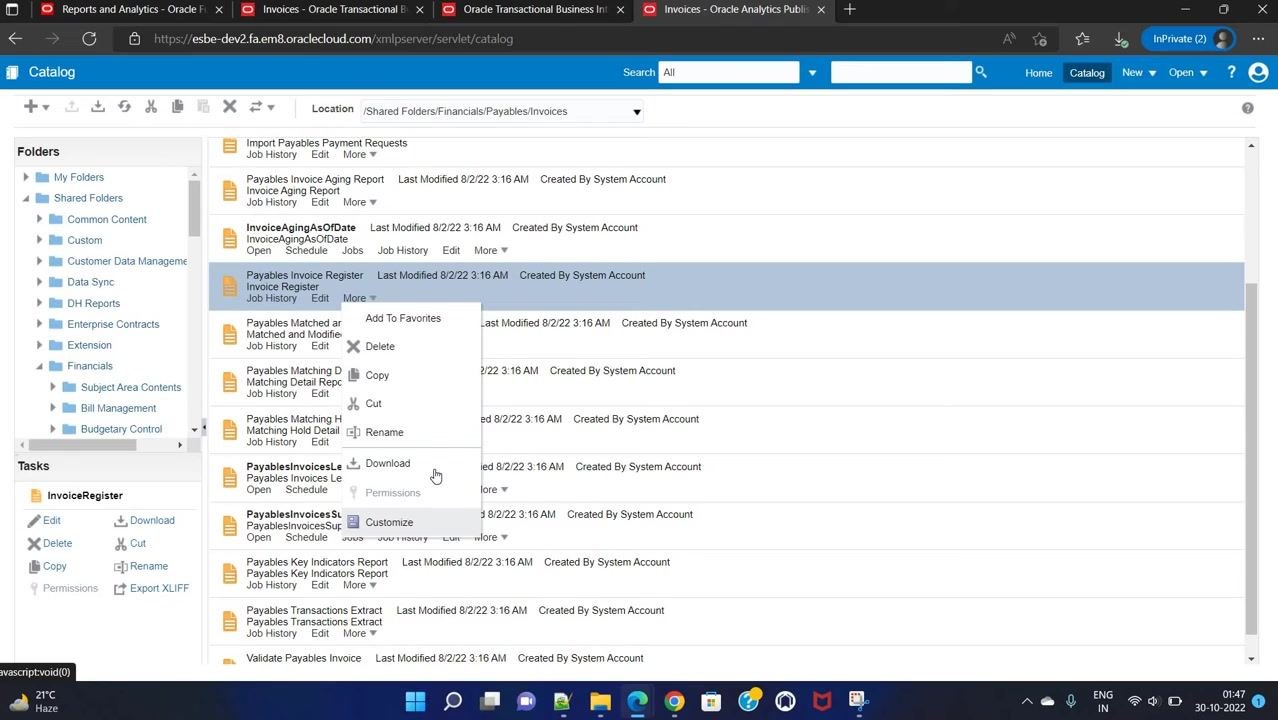
Click the More dropdown for the Payables Invoice Register report. In the XMLP server interface, the Customize option appears at the bottom of the dropdown menu. Click Customize to begin the customization process.
The XMLP server path is the only way to reach this Customize option—it is not available through the standard Reports and Analytics interface.
Retry if the customization page doesn't load
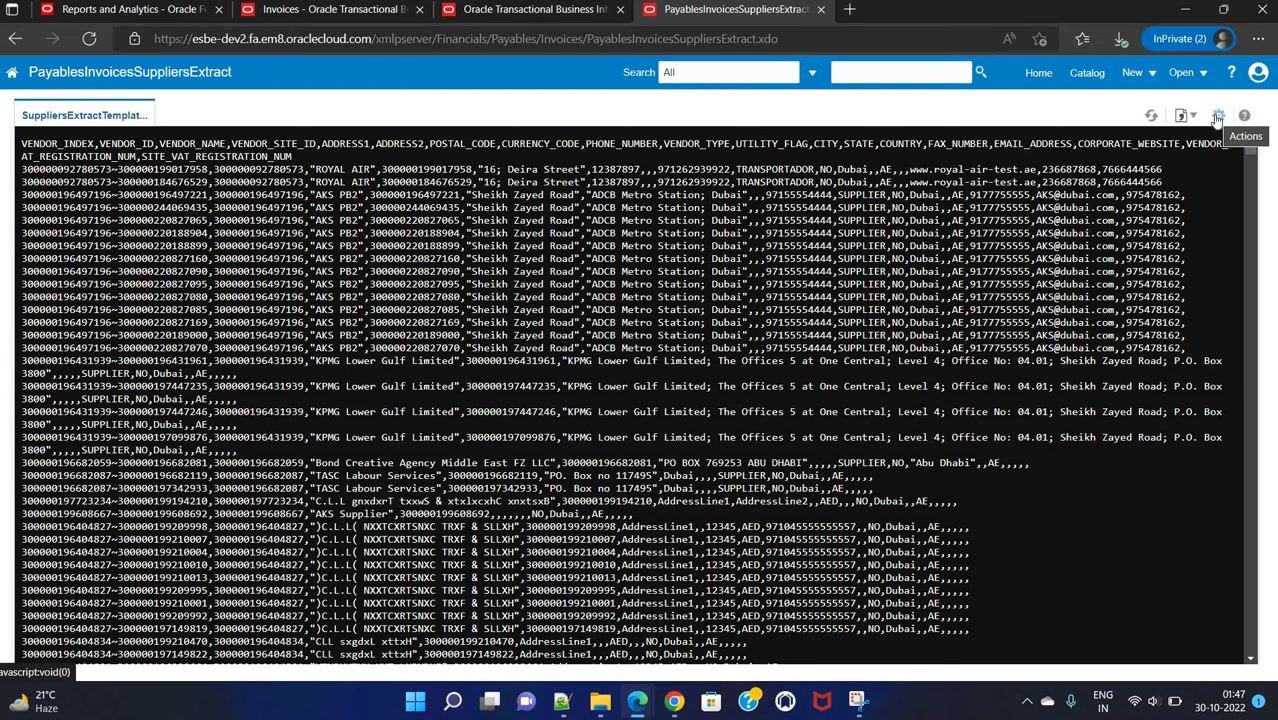
If the customization page doesn't load correctly, navigate back to the Invoices folder, locate the Payables Invoice Register report again, and click More > Customize once more. Repeat this process until the customization page loads successfully.
Verify you are in the customization workspace
Confirm the page title displays Payables Invoice Register at the top, and that you see a Data Model link labeled "Payables Invoice Register Data Model" near the top left. The folder path tooltip should read /Financials/Payables/Invoices/Data Models/Payables Invoice Register Data Model.
In the main workspace, locate the report thumbnail labeled Payables Invoice Register. Below it, you'll find these actions:
- Edit – modify the report layout or content.
- Properties – view or change report properties.
- Delete – remove the report (use with caution).
Explore additional report options
On the right side of the workspace, you'll find additional buttons:
- Parameters – view or edit report parameters.
- Properties – access report properties.
- View Report – run and preview the report.
- View Thumbnails and View a list – toggle between thumbnail and list display.
- Add New Layout – create a new layout for the report.
Check for a custom copy of the report
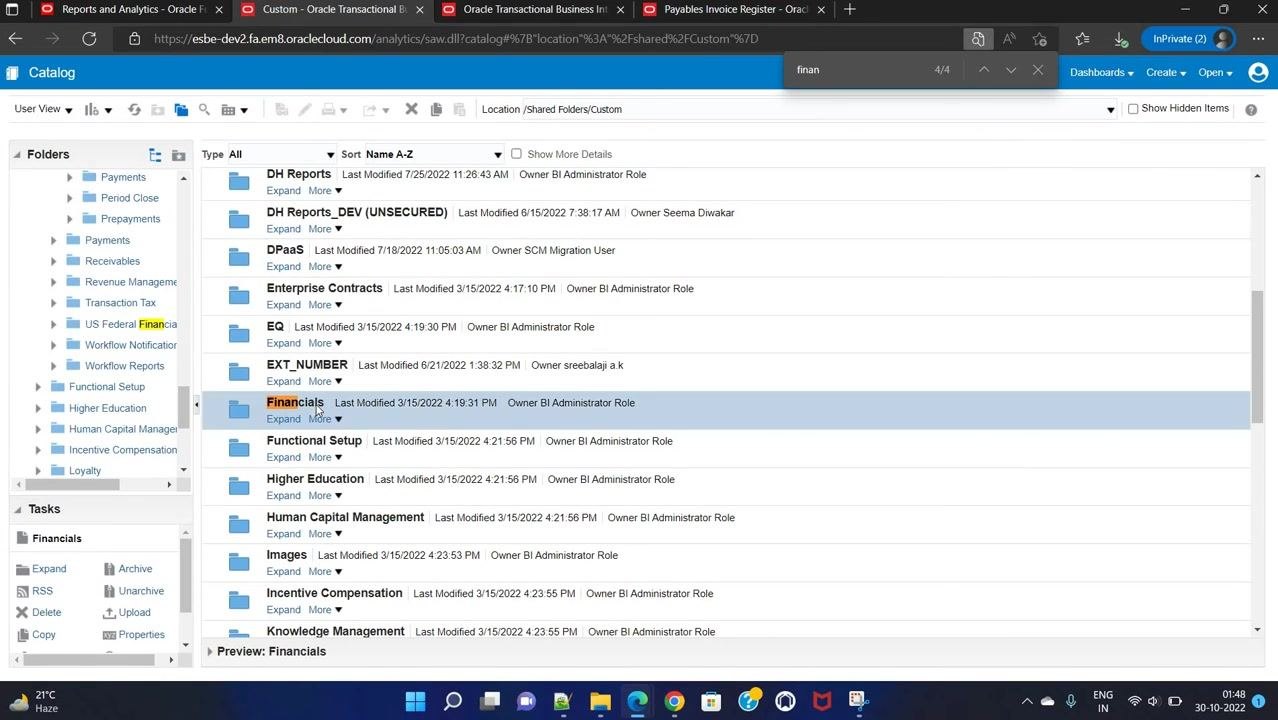
A copy of a customized report is typically created under the Custom folder. In the folder tree, click Custom under Shared Folders to see whether a copy already exists there. The catalog view updates to show the contents of /Shared Folders/Custom, including subfolders such as "AutoConfig," "CloudTools," "Common Content," "Dashboards," "Data Sync," and "Financials."
Drill down to the Financials folder in Custom
In the Custom folder, scroll to find and select the Financials subfolder. The right pane updates to display folders such as "Collections," "Expenses," "Fixed Assets," "Payables," "Payments," "Receivables," and "Workflow Notifications," with Financials now highlighted as selected.
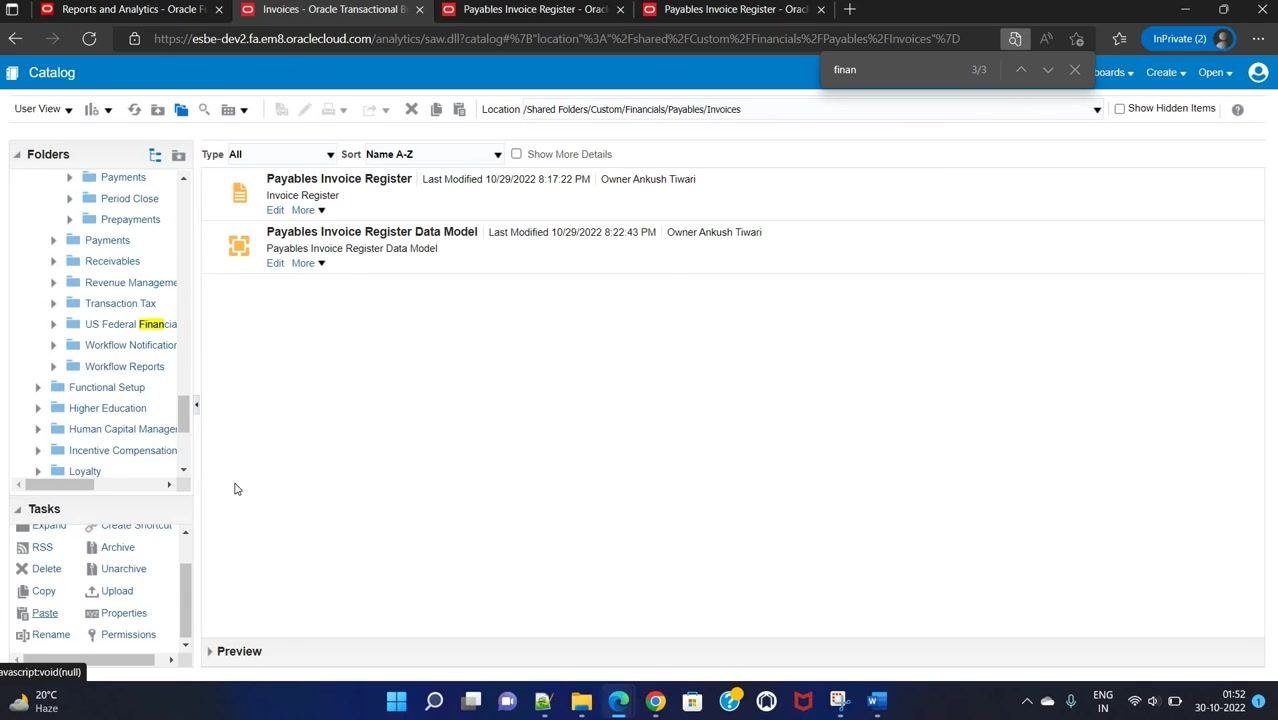
Expand Payables within Financials, then select Invoices inside Payables. The right pane lists the available reports and templates at this location, including "Payables Invoice Register" with its last modified date, owner, and the Edit and More options.
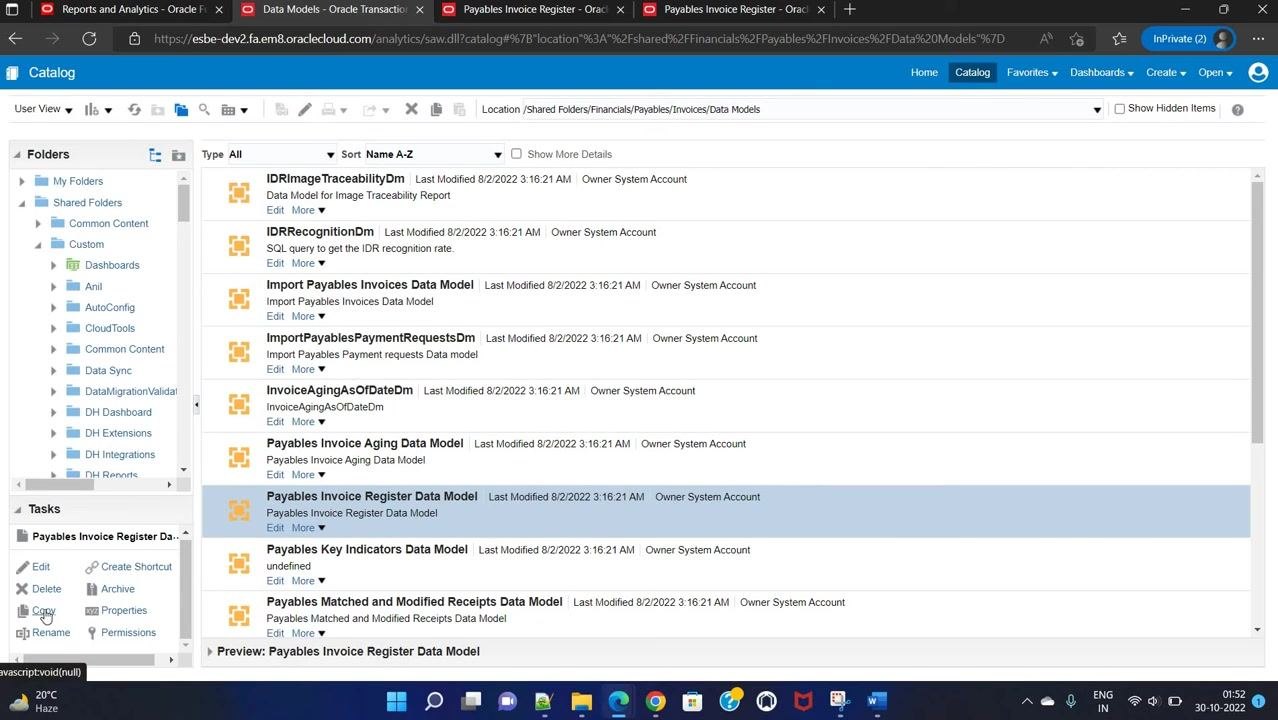
Locate the data model in the standard folder
Navigate to /Shared Folders/Financials/Payables/Invoices/Data Models to view all available data models. The main panel displays several models, including "IDRImageTraceabilityDm," "Import Payables Invoices Data Model," "InvoiceAgingAsOfDateDm," and "Payables Invoice Register Data Model." Select Payables Invoice Register Data Model from the list.
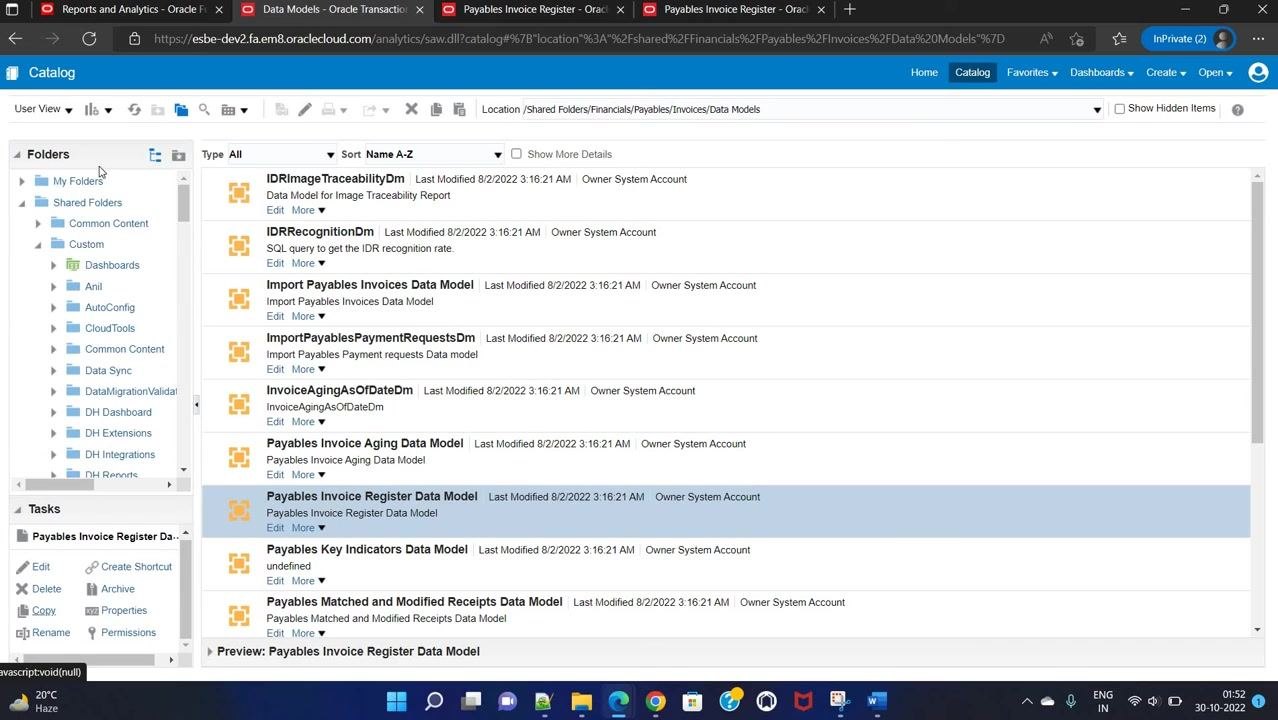
Return to the Custom folder for editing
Navigate back to the Custom folder under Shared Folders. Expand Custom, then Financials, then Payables, and finally Invoices to locate your custom report and data model. The main panel displays "Payables Invoice Register" and "Payables Invoice Register Data Model," both owned by the user who created the custom copy.
Link the report to the custom data model
In the Invoices folder, locate the Payables Invoice Register report and click Edit next to the report name to open the report editor. Find the section to select or change the data model and click to open the Select Data Model dialog.
In the dialog, navigate to Custom > Financials > Payables > Invoices to select your custom data model. The dialog displays available data models and reports in the selected folder—select the appropriate one and click OK to confirm.
Download the report template
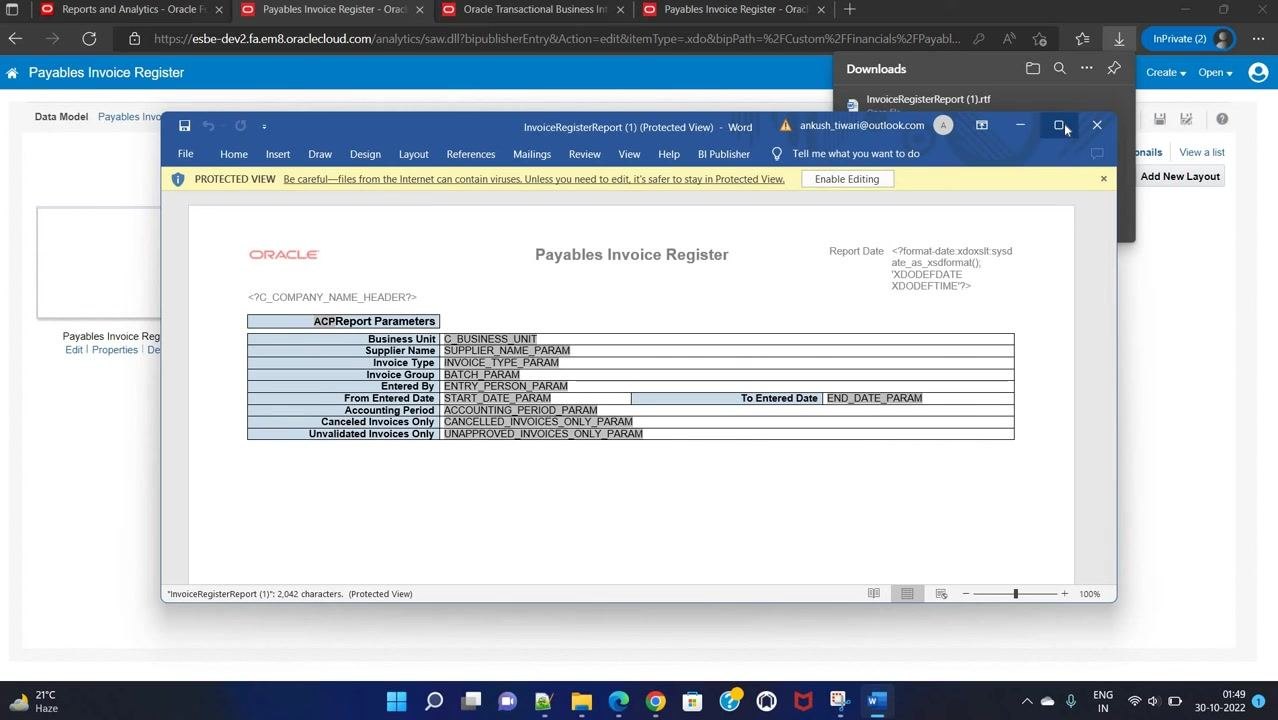
Click Edit below the Payables Invoice Register report to open the report template in edit mode. The template file (for example, InvoiceRegisterReport.rtf) downloads and opens in Microsoft Word, typically in Protected View.
The template displays the layout and parameters for the report, such as Business Unit, Supplier Name, Invoice Type, Invoice Group, Entered By, From/To Entered Date, Accounting Period, Canceled Invoices Only, and Unvalidated Invoices Only. A yellow bar at the top of the document indicates Protected View.
Enable editing and prepare for redesign
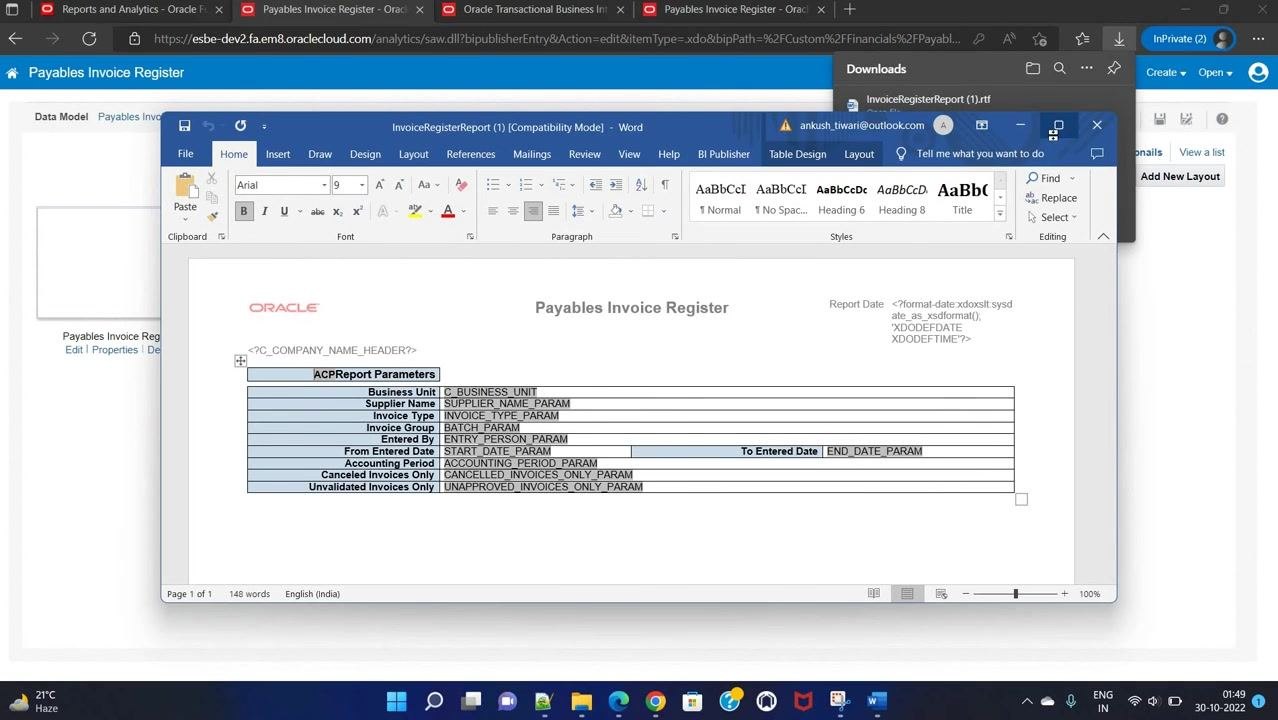
If the document opens in Protected View, click Enable Editing to allow modifications. Most customization requests focus on redesigning the template layout, so this step prepares the file for the bulk of your work.
Obtain the XML data for template design
To facilitate the template redesign, obtain the XML data output from the report. Run the report in Oracle Cloud and export the XML data file. Use this XML data as the data source when editing the template, so that all required fields and structures are available for mapping.
Redesign the template in Microsoft Word
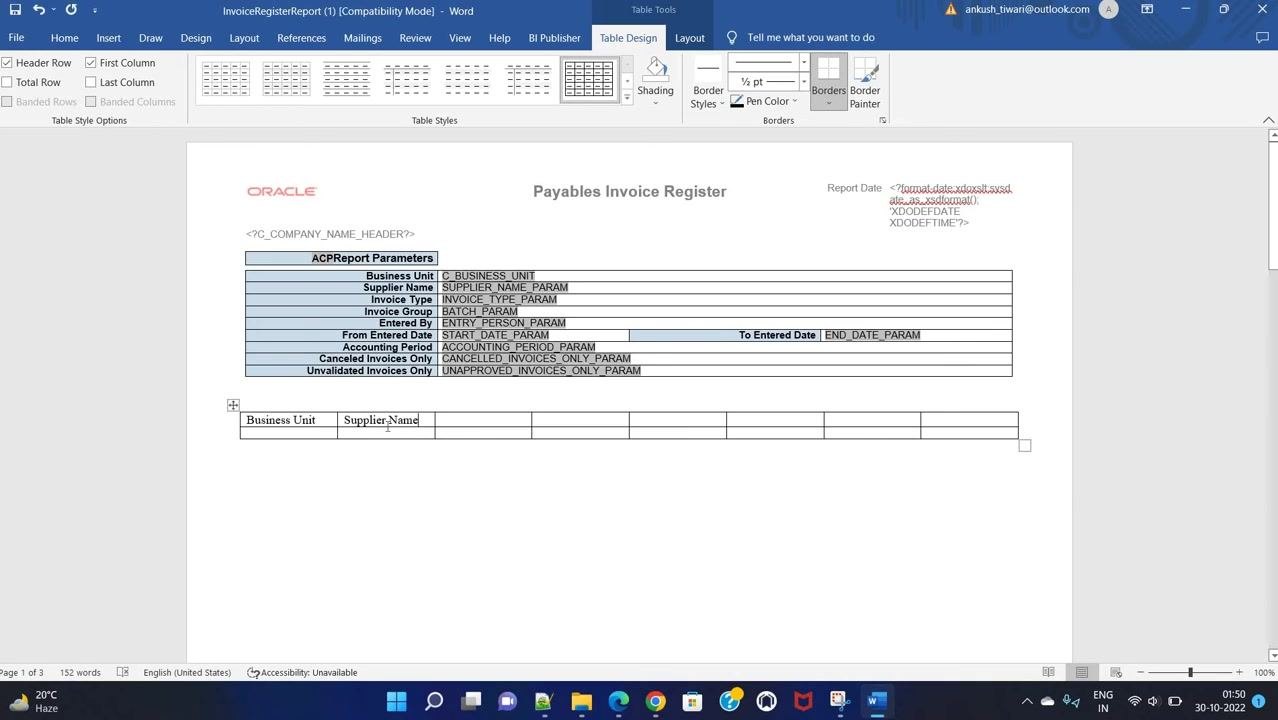
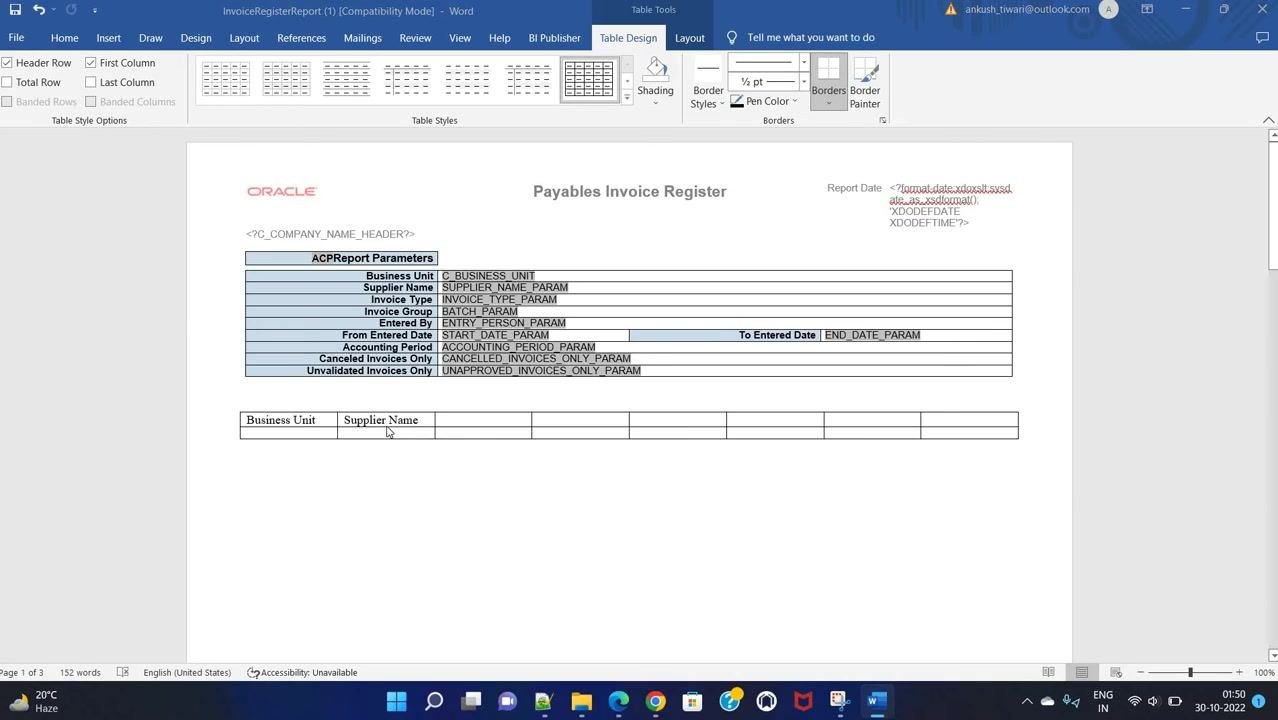
With the template open in Microsoft Word, you'll see the report title "Payables Invoice Register" and a table of report parameters (for example, Business Unit, Supplier Name, Invoice Type, and others). Begin redesigning the template as required—for example, by adding or modifying columns in the tabular section to match your reporting needs.
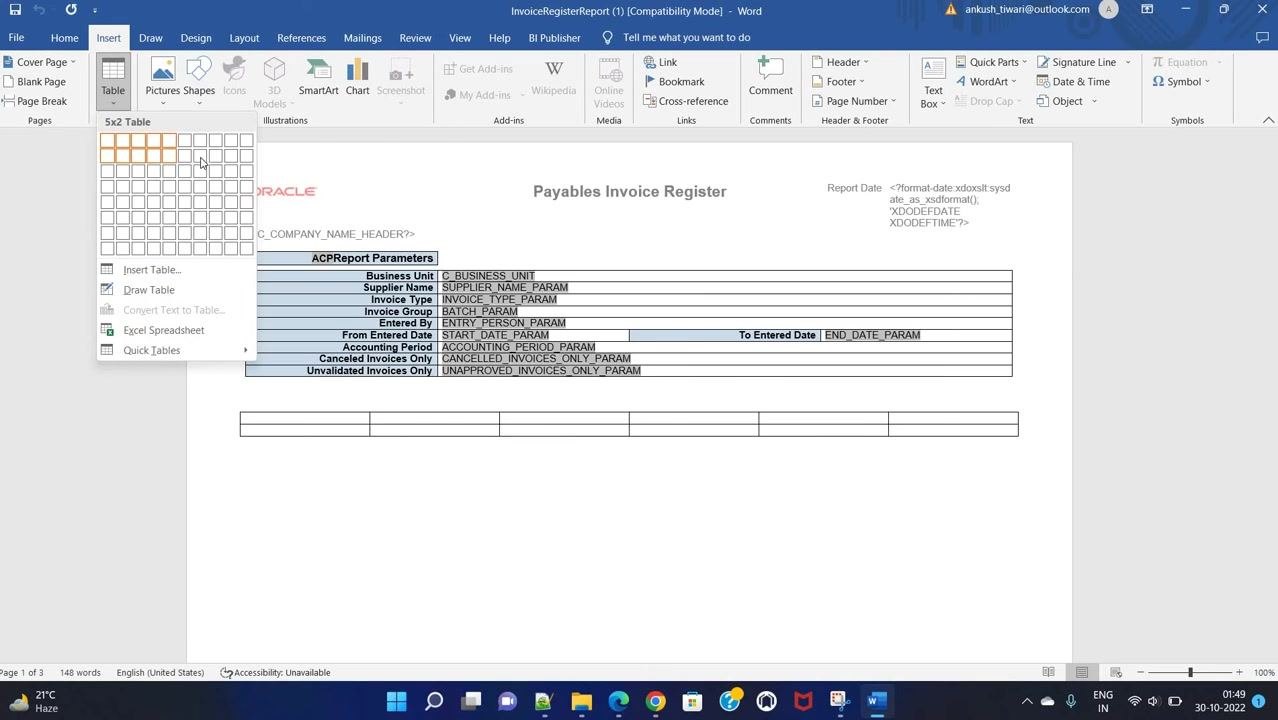
Using the Insert tab's "Insert Table" feature, insert a new table (for example, a 5x2 grid) to hold your additional columns. The BI Publisher add-in remains visible in the standard Word window throughout this process.
Add column headers to the new table
After inserting the table, enter the required column headers—for example, type "Business Unit" and "Supplier Name" in the first row of the new table. Continue adding any additional columns or fields as required by your business needs. The Table Design and Layout tabs remain active for further formatting.
Upload the modified template
Save your changes to the template file (InvoiceRegisterReport.rtf), then return to the Oracle Cloud Reports and Analytics interface. Navigate to the Payables Invoice Register report's layout properties and click the Upload icon in the Templates section to upload your modified template. The screen displays the Templates section with the option to upload a template file for the English locale, and a Translations section below allows extraction of translation files if needed.
Select and confirm the template file
In the file upload dialog, browse to the location where you saved your modified template (for example, your Downloads folder). Select the updated InvoiceRegisterReport.rtf file and click Open to confirm your selection.
Save, validate, and test the customized report
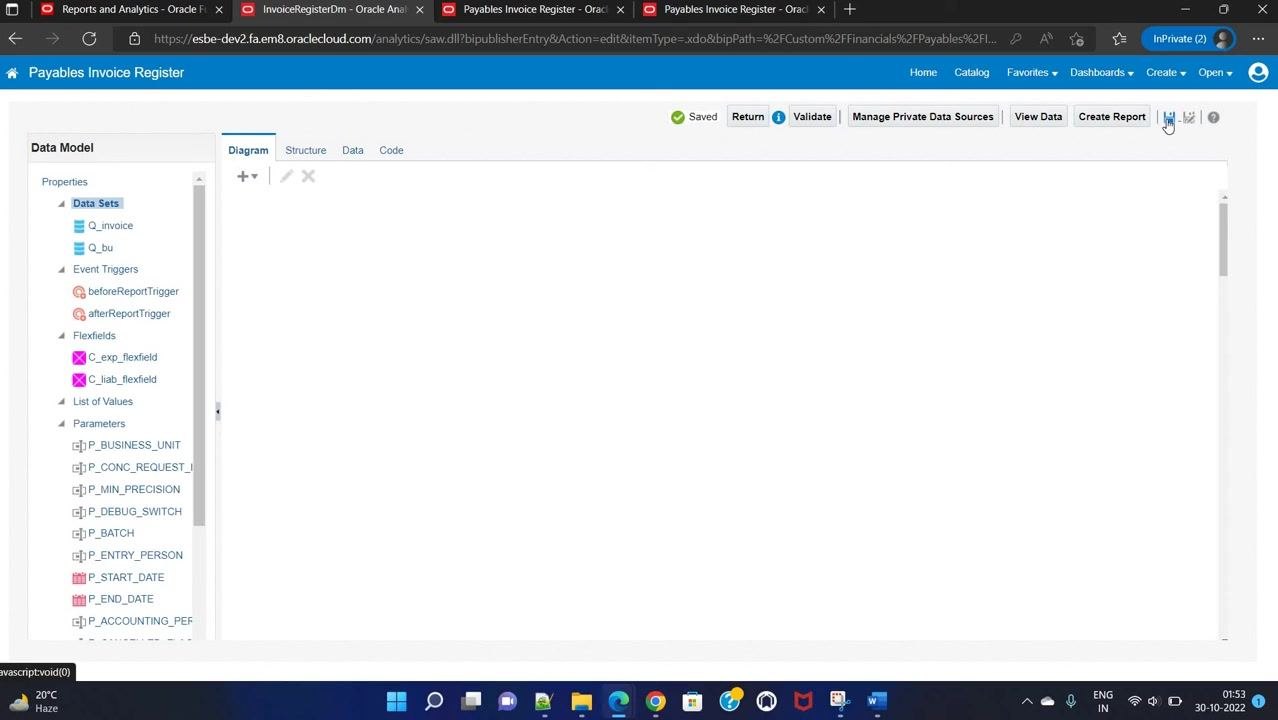
Click Save in the report editor to store your changes. Use the Validate button to check for errors in the data model or template. Optionally, use View Data or Create Report to preview the output and confirm the redesign meets requirements. If necessary, repeat the edit and validation steps until the report is finalized.
Summary
To customize a standard report in Oracle Fusion:
- Navigate through the Oracle Cloud Catalog using the XMLP server path to find the standard report and select Customize.
- Check the Custom folder for an existing copy of the report and its data model.
- Edit the report to link it to the correct custom data model.
- Download the report template and redesign it in Microsoft Word according to customer requirements, using the report's XML data output to map fields accurately.
- Upload the modified template, then save, validate, and test the report to confirm your customizations are applied correctly.
What's next
Continue with any further steps required for your specific project, such as editing the data model further, updating additional report layouts, or deploying the customized report to a production environment.
Generation details: cost, quality tiers
Docsie billed 5,500 credits ($3.85) to analyze this 11-minute video at standard quality. The rewrite, template fill and Word/PDF exports were included. The same video at each quality tier:
| Quality | Frames sampled | Credits | Approx. cost |
|---|---|---|---|
| Draft | every 16-30 s | 2,750 | $1.92 |
| Standard (this guide) | every 8-15 s | 5,500 | $3.85 |
| Detailed | every 4-7 s | 11,000 | $7.70 |
| Ultra | every 1-3 s | 22,000 | $15.40 |
Credits priced at $0.70 per 1,000; plans include a monthly allowance. Enterprise customers on on-premise or bring-your-own-model deployments run this on their own inference and pay no per-video credits.
Generated by Docsie Video-to-Docs on 2026-10-12 from a 10-minute video. Screenshots are frames from the source video and belong to their creator, Global Savian Consulting, whose original is embedded above. If you own this video and want the guide removed or credited differently, contact us and we will act within one business day.