
How to Create an Excel Template in Oracle Fusion
This guide walks you through how to create an Excel template in Oracle Fusion for BI Publisher reports — from designing the underlying data model, through building the XLS template and mapping XML fields, to uploading the template and running the final report. Follow the steps in order, since each stage builds on the one before it.
Video: Oracle Fusion BI Publisher Excel Template by Ora Trainings (2019). All credit for the demonstration goes to the creator; watch the original on YouTube. The written guide below was generated from this video by Docsie. Creator? Request a change or removal.
This guide walks you through how to create an Excel template in Oracle Fusion for BI Publisher reports — from designing the underlying data model, through building the XLS template and mapping XML fields, to uploading the template and running the final report. Follow the steps in order, since each stage builds on the one before it.
Prerequisites
Before you start, review the template types available in Oracle Fusion BI reports and confirm you have the required desktop tools installed.
Supported template types
Oracle Fusion BI reports support several template types:
- RTF Template
- PDF Template
- Excel Template
- Flash Template
- XSL Stylesheet (FO)
- XSL Stylesheet (HTML/XML/Text)
- eText Template
- BI Publisher Template
- Analyzer Template
This guide focuses on the Excel Template type.
Overview of the design process
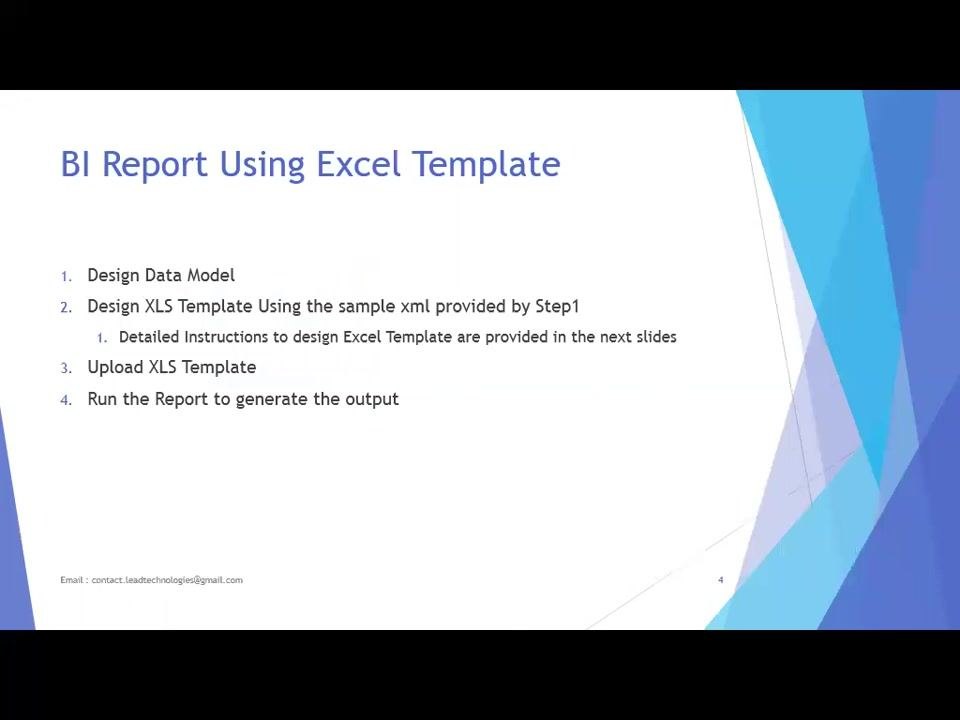
Building a BI report with an Excel template involves four main stages:
- Design the data model.
- Design the XLS template using the sample XML generated by the data model.
- Upload the XLS template.
- Run the report to generate the output.
Excel templates compared to RTF templates
Designing an Excel template requires more manual steps than designing an RTF template. RTF templates offer a wizard that simplifies the design process, while Excel templates must be configured manually.
Choose an Excel template when your report contains a large number of columns, since Excel handles wide datasets more efficiently. Keep in mind that Excel templates only support XLS output, whereas RTF templates can generate RTF, PDF, HTML, and other formats.
Install the required BI Publisher plugin
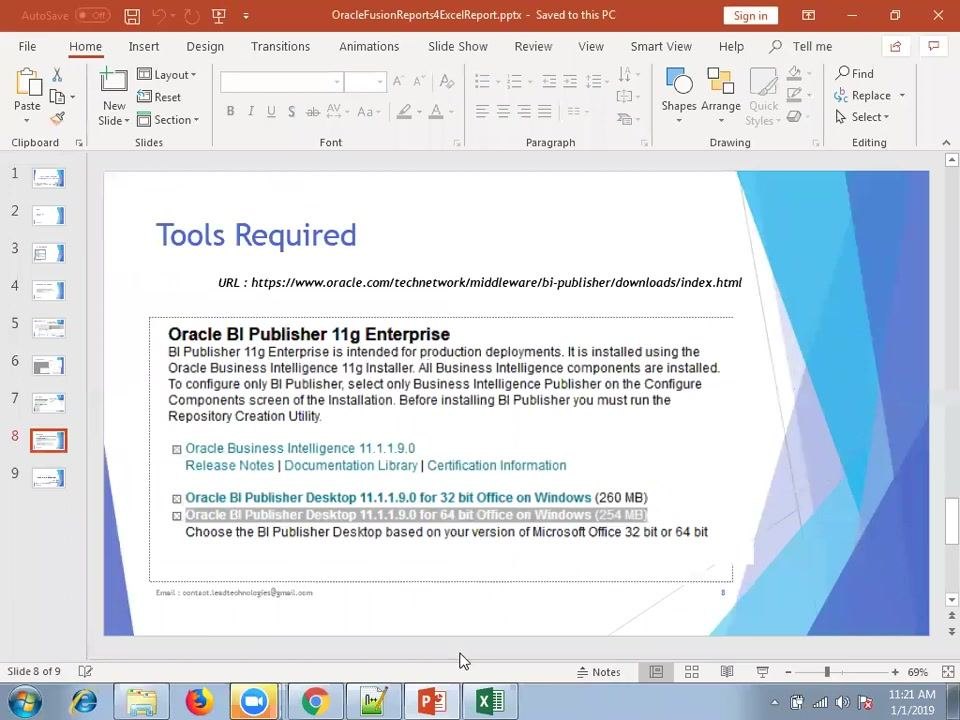
If you haven't already installed the Oracle BI Publisher Desktop plugin, download it from the official Oracle website at:
https://www.oracle.com/technetwork/middleware/bi-publisher/downloads/index.html
Choose the version that matches your Microsoft Office installation (32-bit or 64-bit) — for example, "Oracle BI Publisher Desktop 11.1.1.9.0 for 32 bit Office on Windows (260 MB)."
Once installed, open Excel and confirm the BI Publisher tab is visible. Click About on that tab to verify the installed version and build number (for example, Version 11.1.1.6, Build 11.119.00.0), and make sure it is compatible with your Oracle Fusion ERP environment. The plugin can be used independently or alongside other Oracle applications.
Step-by-step guide
Design the data model
Determine which table or tables you need to retrieve data from. In database technology, data is stored in setup tables, so write a query that returns the data in the format you need for your report. If you need data from multiple tables — for example, employee data along with department information — join the relevant tables in your query.
Review the structure of your data query
Identify the main group in your data query and ignore any elements labeled data_source or similar; focus on the primary group node. Recognize the hierarchy: the top-level tag is typically the row set, and inside it, each row contains your data columns.
Example columns within a row might include inventory ID, organization ID, last updated date, last updated login, purchase item flag, and any other relevant fields.
Create the Excel (XLS) template file
Use the sample XML generated from your data model to design the Excel template — it provides the structure and fields you need to map. Open Microsoft Excel with the BI Publisher plugin installed, and create a new XLS file for your template.
Set up the required sheets
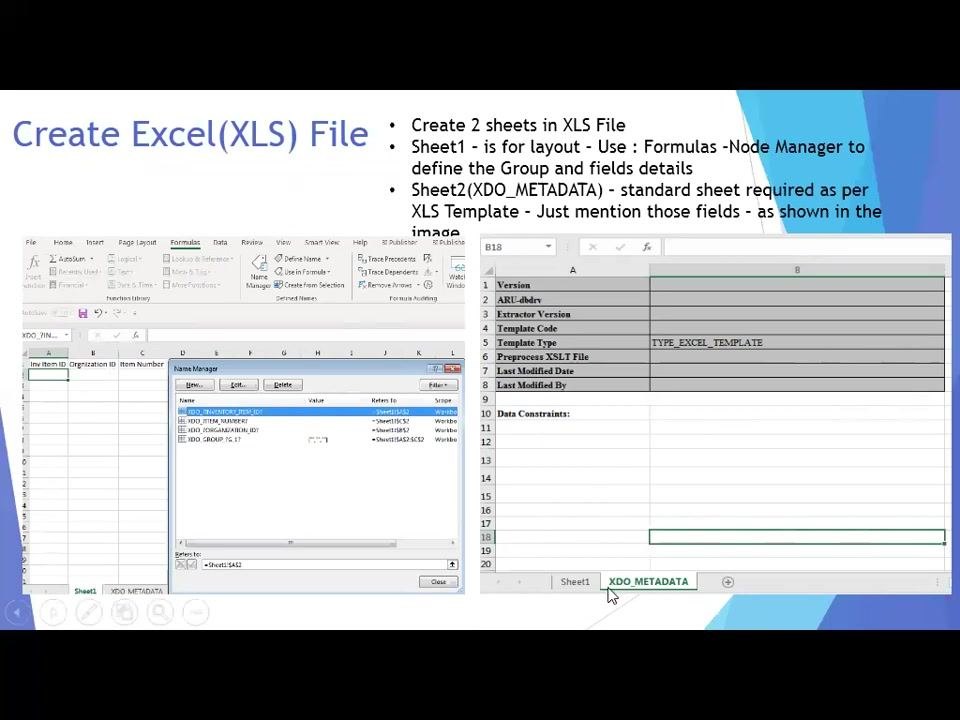
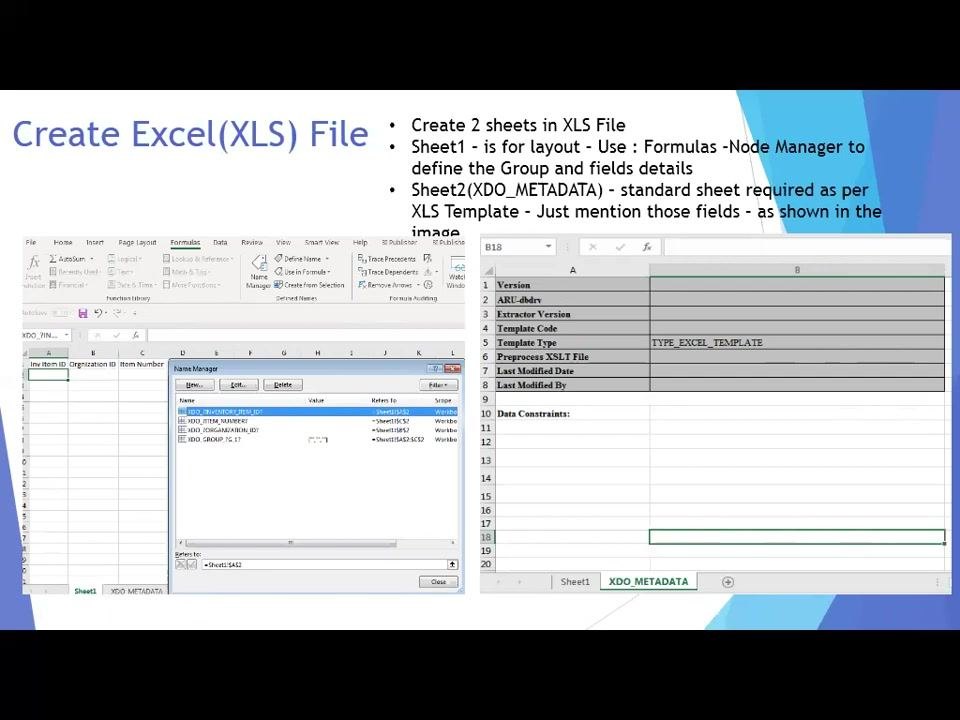
Create two sheets in your workbook:
- Sheet 1 is your primary layout sheet. You can name it however you like (for example, "Sheet1"). List all the fields (columns) you want in your report, and use Excel formulas with the Name Manager to define groups and field details.
- Sheet 2 must be named exactly
XDO_METADATA. This sheet is mandatory for BI Publisher Excel templates and contains predefined columns required by BI Publisher. For most reports, copy the standard metadata fields and use the default structure — you only need to customize it for advanced features such as extra conditions, summations, or groups.
Populate the XDO_METADATA sheet
Enter the following fields on the XDO_METADATA sheet:
- Version
- ARU-dbdrv
- Extractor Version
- Template Code
- Template Type (set to
TYPE_EXCEL_TEMPLATE) - Preprocess XSLT File
- Last Modified Date
- Last Modified By
- Data Constraints (if any)
Use the exact layout and field names shown in your reference example.
Finalize the template against your data model
Make sure your Excel (XLS) template includes every column required for the report output, matching the fields defined in your data model's sample XML. For example, an item report might include columns such as "Inv Item ID," "Organization ID," and "Item Number."
Confirm that the populated template will produce the output you expect. Remember that Excel templates support only XLS output — for example, a template with columns Inv Item ID, Organization ID, and Item Number should produce rows populated according to your data model.
Open the XML data file to review key fields
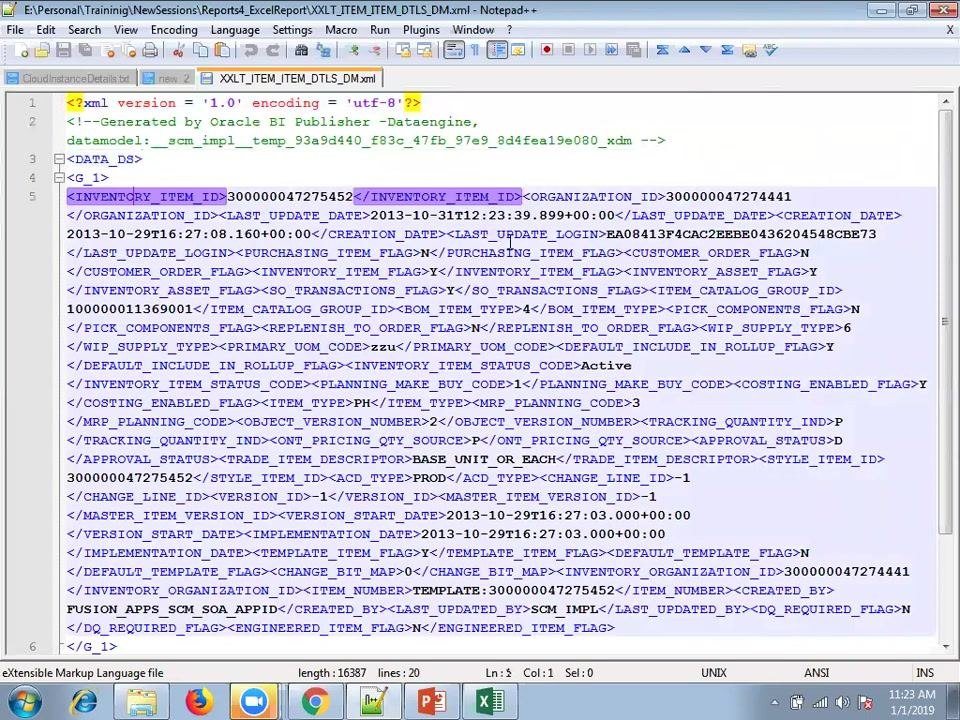
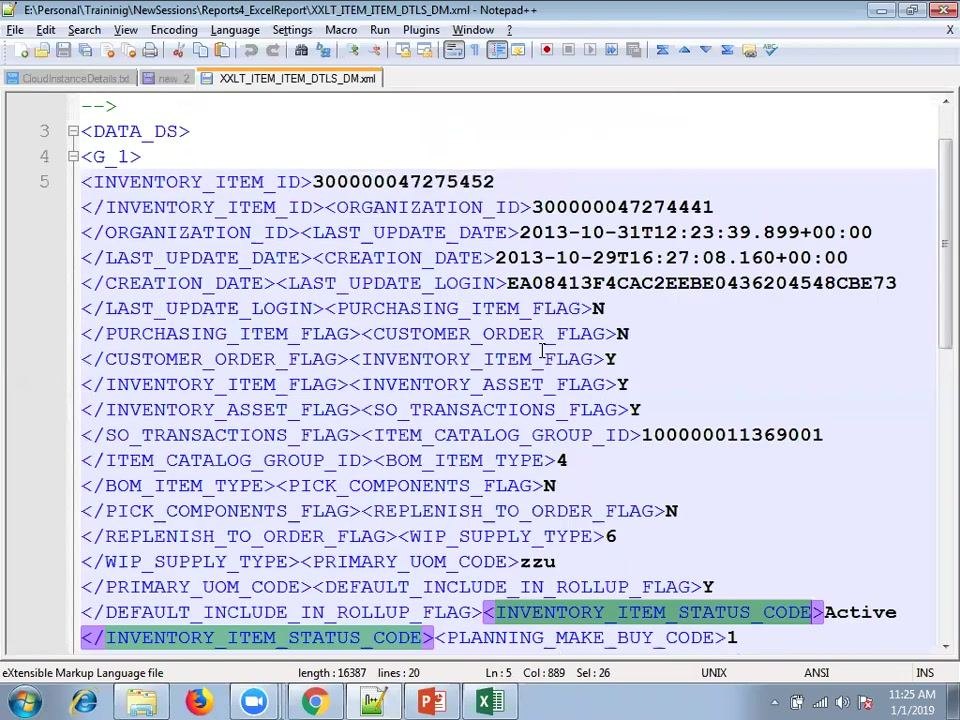
Launch Notepad++ and open the XML file generated by your data model (for example, XXLT_ITEM_ITEM_DTLS_DM.xml). Review the structure and note the key fields, including <INVENTORY_ITEM_ID>, <ORGANIZATION_ID>, <LAST_UPDATE_DATE>, <CREATION_DATE>, <LAST_UPDATE_LOGIN>, <PURCHASING_ITEM_FLAG>, and <INVENTORY_ITEM_STATUS_CODE>. This file is generated by Oracle BI Publisher and contains detailed item data.
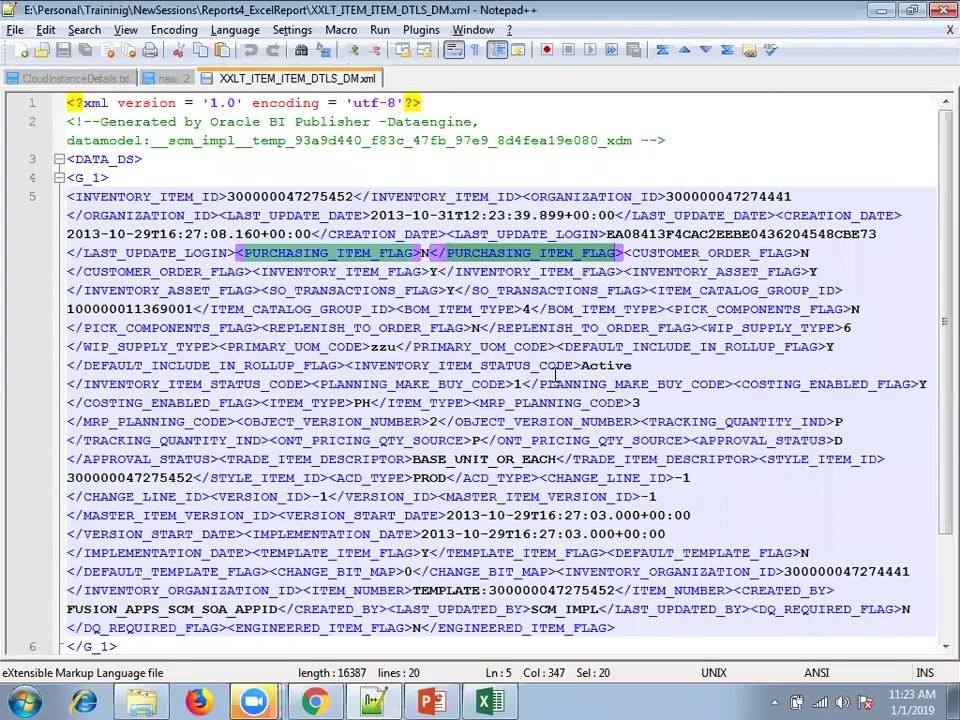
Focus on the fields you need to map — in this example, LAST_UPDATE_LOGIN, PURCHASING_ITEM_FLAG, and INVENTORY_ITEM_STATUS_CODE, which track item updates, purchase eligibility, and current status.
Prepare the Excel template's header row
Open your Excel template file (for example, XXLT_ITEM_ITEM_DTLS_TMPL.xls) and confirm the header row contains the columns you need — for example, A: Inv Item ID, B: Organization ID, C: Item Number, and D: Inventory Item Sts Code. Make sure "Inventory Item Sts Code" is included, since this column will store the status code from the XML.
Load the XML data into Excel
On the BI Publisher tab, click Load Data (or Import) to open the XML data file. In the file dialog, navigate to the folder containing your XML file (for example, XXLT_ITEM_ITEM_DTLS_DM.xml), select it, and click Open to load the data into your template.
Verify field mappings using the Field Browser
Open the Field Browser from the BI Publisher tab and review the mapped fields — for example, XDO_?INVENTORY_ITEM..., XDO_?ITEM_NUMBER?, XDO_?ORGANIZATION_ID?, and XDO_GROUP_2G_1?. Confirm each field is correctly mapped to the corresponding Excel column (for example, Sheet1!$A$2 for Inventory Item ID), and update any mappings that are incorrect.
Open the Name Manager
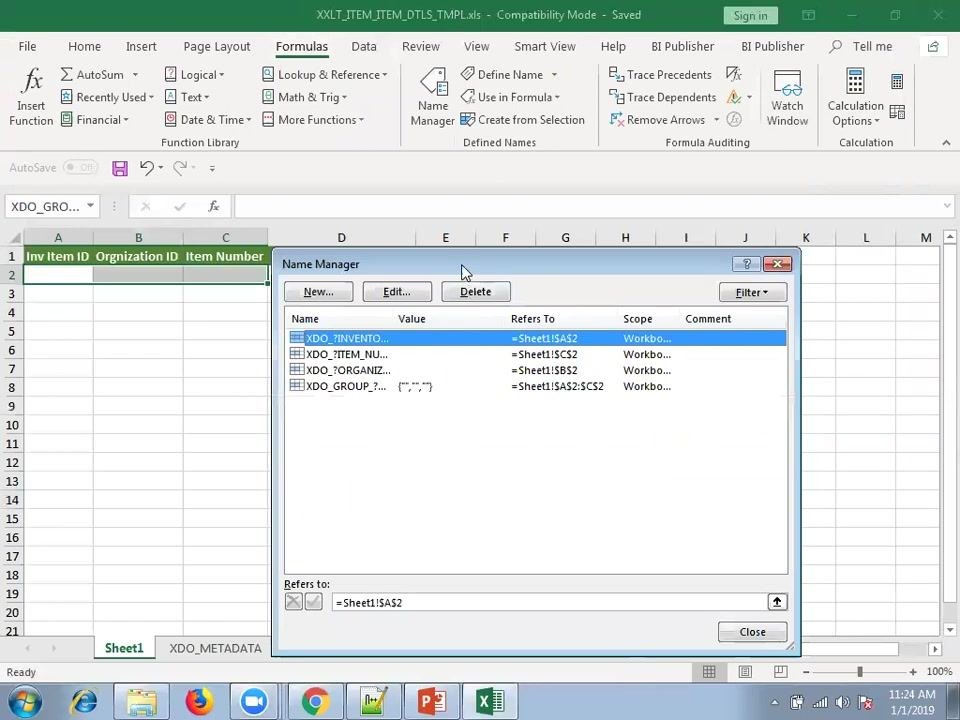
Go to the Formulas tab in the Excel ribbon and click Name Manager. The Name Manager window opens, displaying all currently defined names and their cell references.
Review your existing named ranges
In the Name Manager, check the defined names against their cell references — for example:
XDO_?INVENTORY_ITEM...refers to=Sheet1!$A$2XDO_?ITEM_NUMBER?refers to=Sheet1!$C$2XDO_?ORGANIZATION_ID?refers to=Sheet1!$B$2XDO_GROUP_2G_1?refers to a range such as=Sheet1!$A$2:$C$2
Confirm each name matches its intended XML tag and Excel column.
Edit named ranges as needed
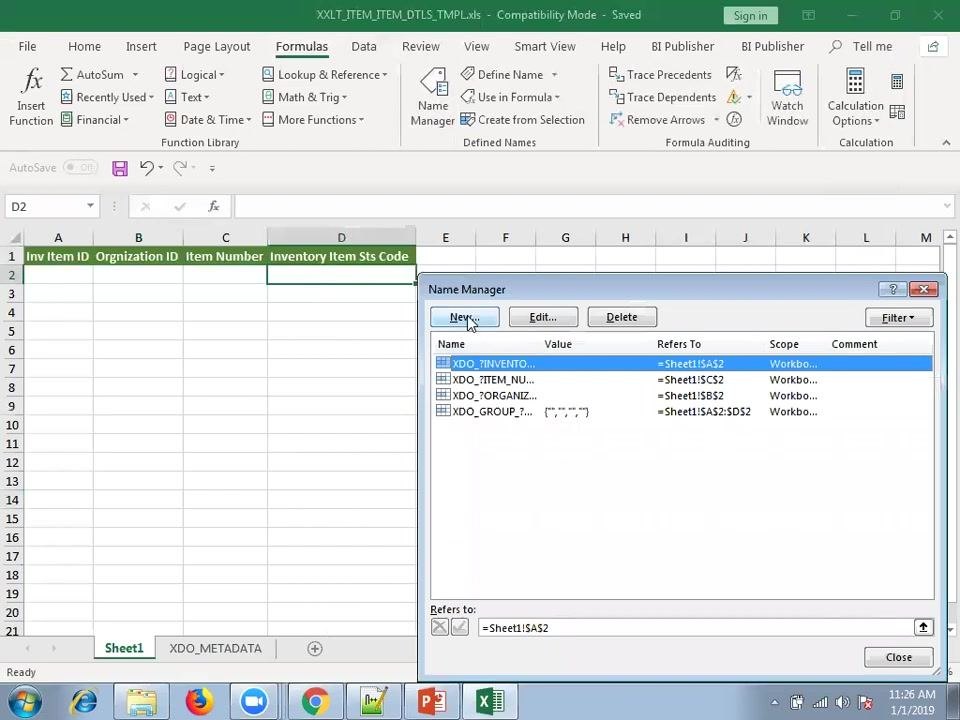
To adjust a named range, select it in the Name Manager and click Edit. For group ranges such as XDO_GROUP_2G_1?, make sure the reference covers all relevant columns — for example, update =Sheet1!$A$2:$C$2 to =Sheet1!$A$2:$D$2 if you now have four columns (A through D).
Confirm the XML tag name
Open the XML data file in Notepad++ and locate the relevant tag — for example, <INVENTORY_ITEM_STATUS_CODE>Active</INVENTORY_ITEM_STATUS_CODE>. Use this tag name, in uppercase with underscores, when defining the named range in Excel.
Create the named range with the correct name
When creating or editing a named range, enter the exact XML tag name — for example, XDO_?INVENTORY_ITEM_STATUS_CODE? for the "Inventory Item Sts Code" column. The name should start with XDO_?, followed by the XML field name in uppercase, and end with a question mark (?).
Leave the default settings in the New Name dialog unless you have a specific reason to change them: keep Scope set to "Workbook" and leave Comment empty. The Refers to field should automatically point to the correct cell (for example, =Sheet1!$D$2 for the "Inventory Item Sts Code" column).
Confirm the layout sheet before upload
Open your finalized template in Excel and make sure Sheet1 contains your complete report layout and columns (for example, "Inv Item ID," "Organization ID," "Item Number").
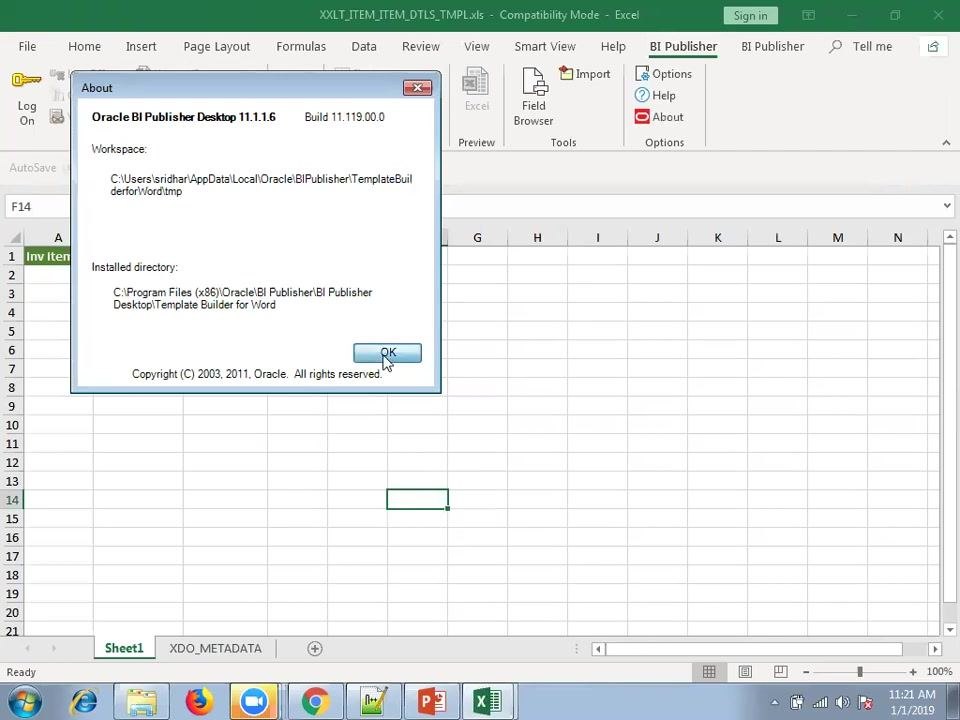
Verify the XDO_METADATA sheet
Double-check that the XDO_METADATA sheet includes all required fields, entered exactly as shown, so Oracle BI Publisher can recognize the template:
- Version
- ARU-dbdrv
- Extractor Version
- Template Code
- Template Type (set to
TYPE_EXCEL_TEMPLATE) - Preprocess XSLT File
- Last Modified Date
- Last Modified By
- Data Constraints (if any)
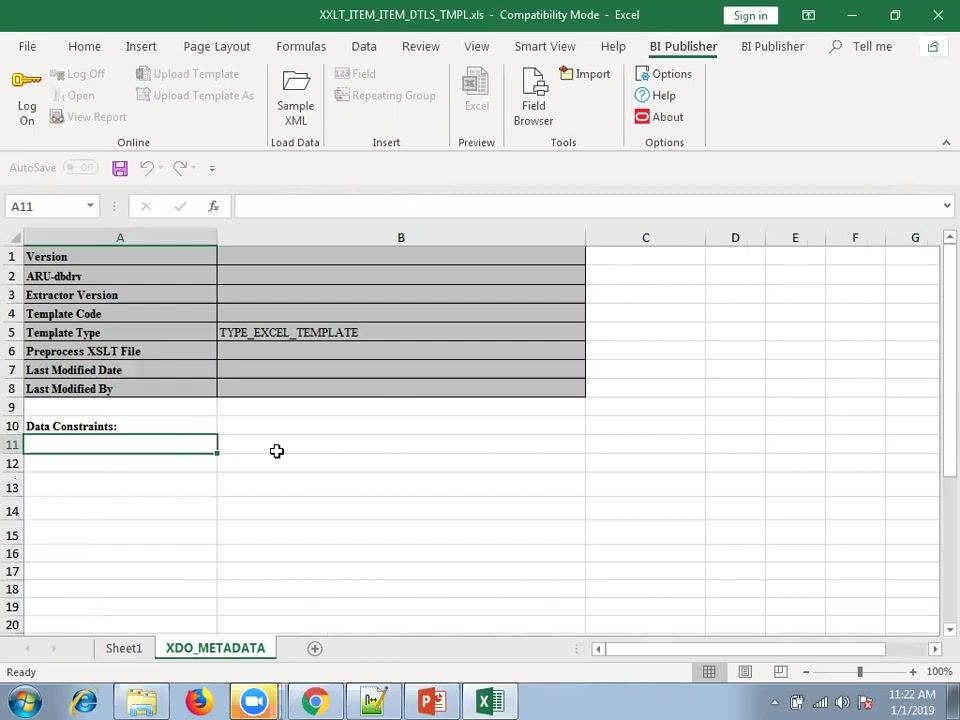
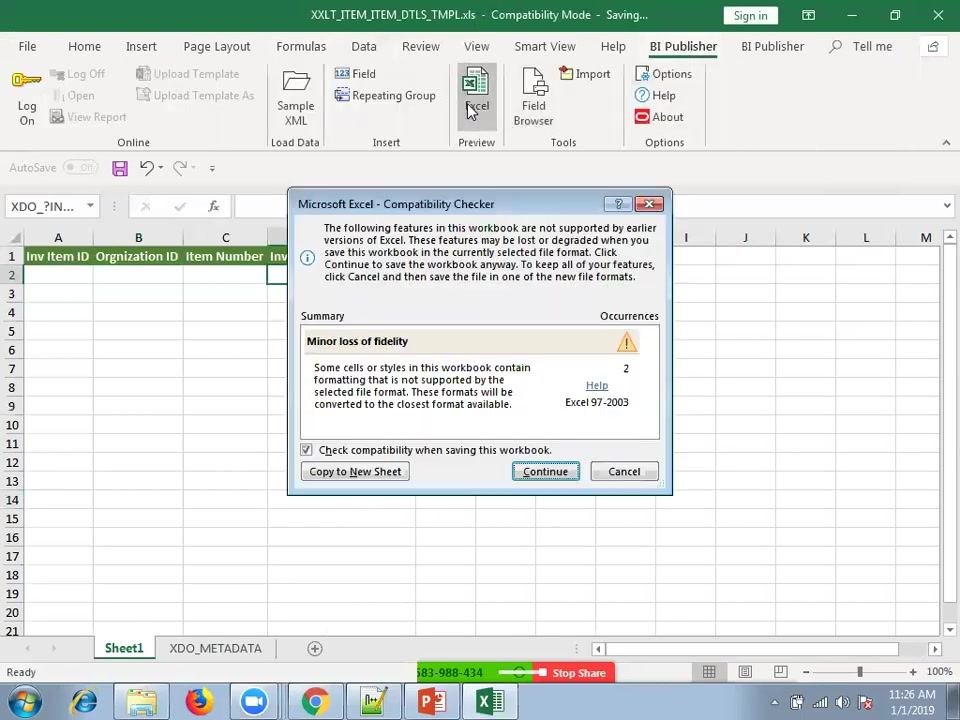
Save the workbook and confirm compatibility
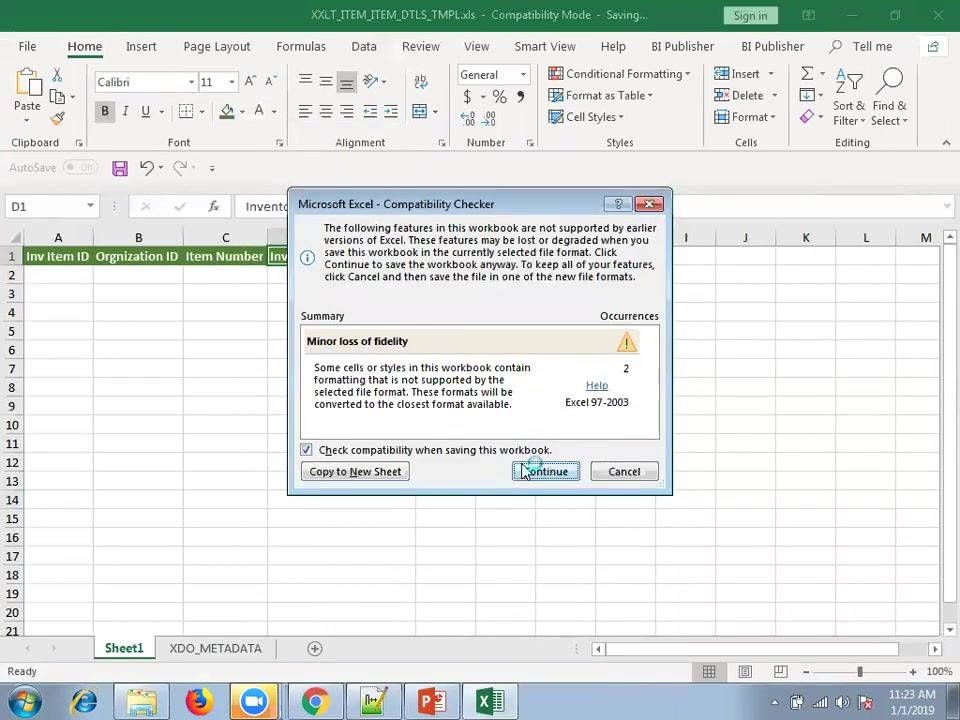
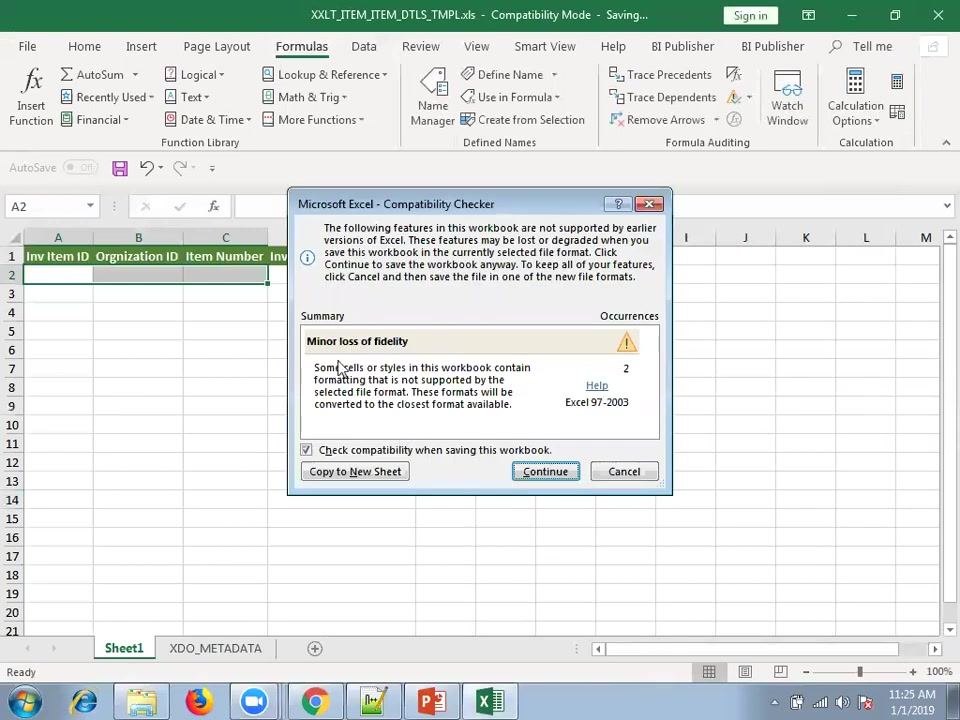
Save the file in XLS format (not XLSX) to ensure compatibility with Oracle BI Publisher. If the Compatibility Checker prompts you, review any warnings about minor loss of fidelity, make sure "Check compatibility when saving this workbook" is checked, and click Continue to complete the save.
Open your Oracle Cloud instance
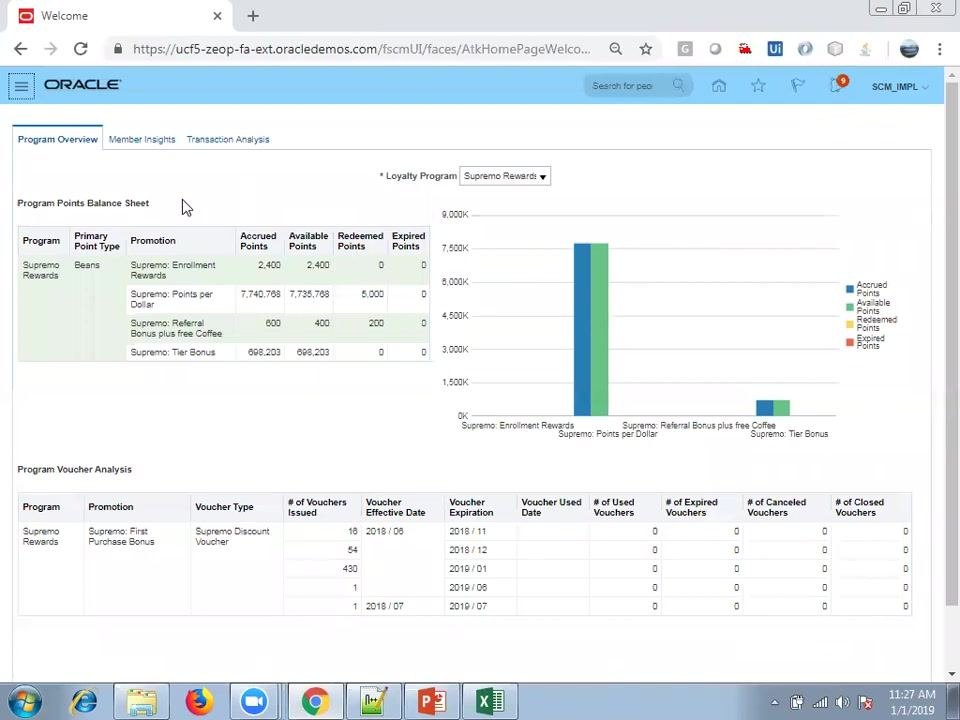
Open your web browser, go to your Oracle Cloud instance URL, and log in if required. The dashboard displays various analytics and program overview panels, such as "Program Points Balance Sheet" and "Program Voucher Analysis."
Navigate to Reports and Analytics
Click the Navigator icon to open the Navigator panel, which displays a categorized list of modules and tools. Scroll to the Tools section and select Reports and Analytics.
Locate the appropriate folder or report
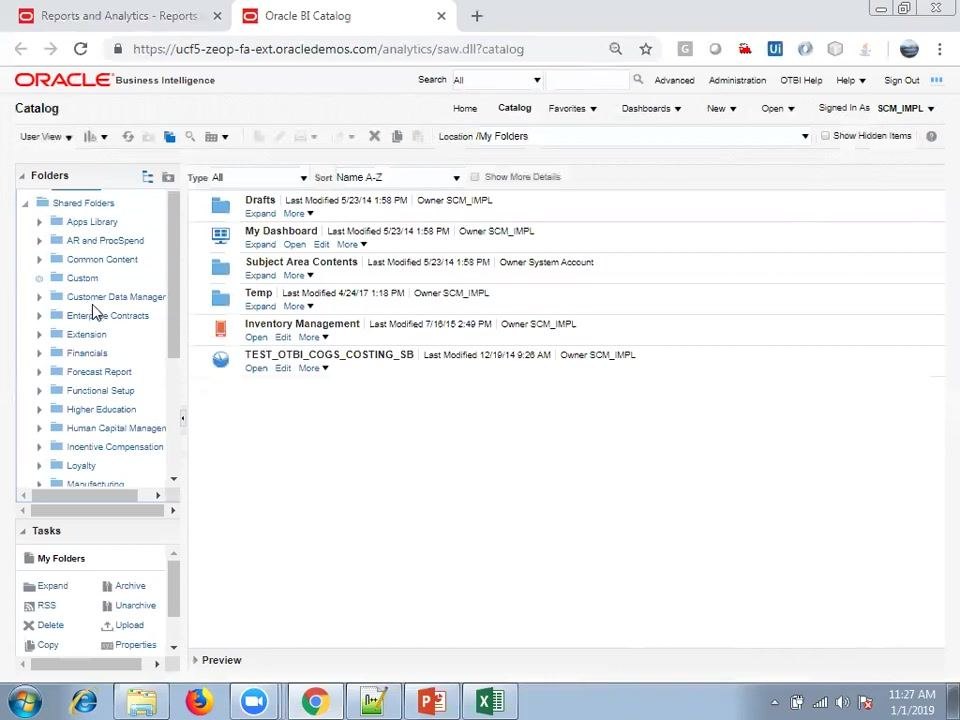
In the Oracle BI Catalog, browse the folder tree on the left to find the relevant business area or report category (for example, Customer Relationship or Inventory Management). The main panel lists folders and reports such as Drafts, My Dashboard, Subject Area Contents, Inventory Management, and custom reports, along with details like last modified date and owner. Click a folder to expand it and select the report or dashboard you want to work with.
Upload your new template file
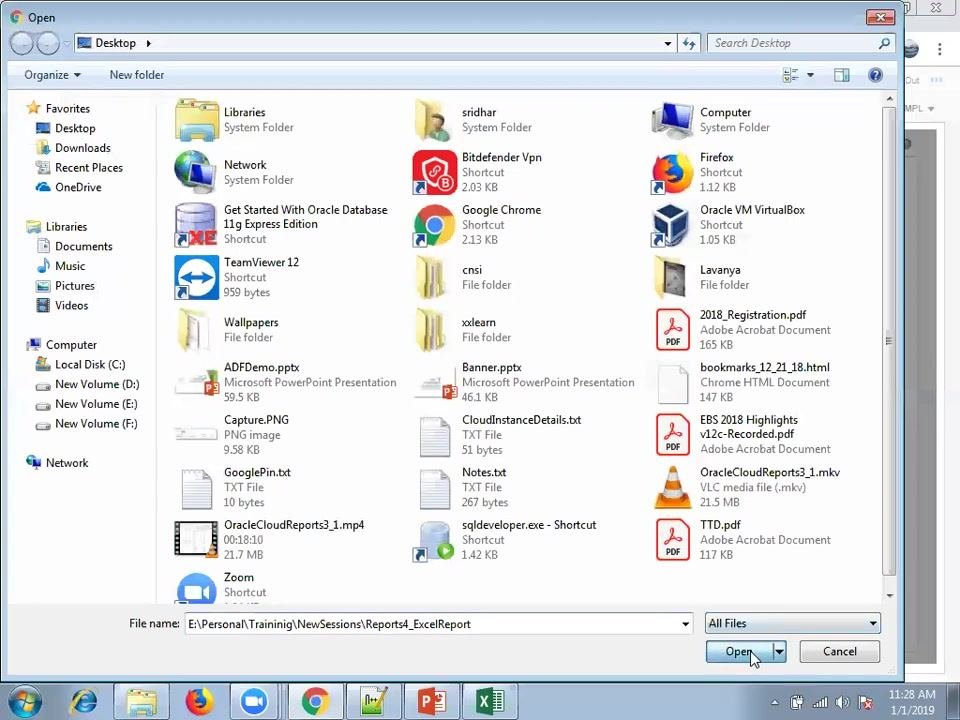
Open the Upload Template File dialog, click Choose File, and select your saved Excel template (for example, XXLT_ITEM_ITEM_DTLS_TMPL2.xls). Set Type to Excel Template and Locale to English, then click Upload.
View the report
After uploading, confirm your new layout appears in the list of available layouts in the BI Publisher repository, alongside any previous templates. Click View Report to test the new layout.
While the report generates, the status shows "Processing... To cancel, click here" until it completes.
Download and review the generated report
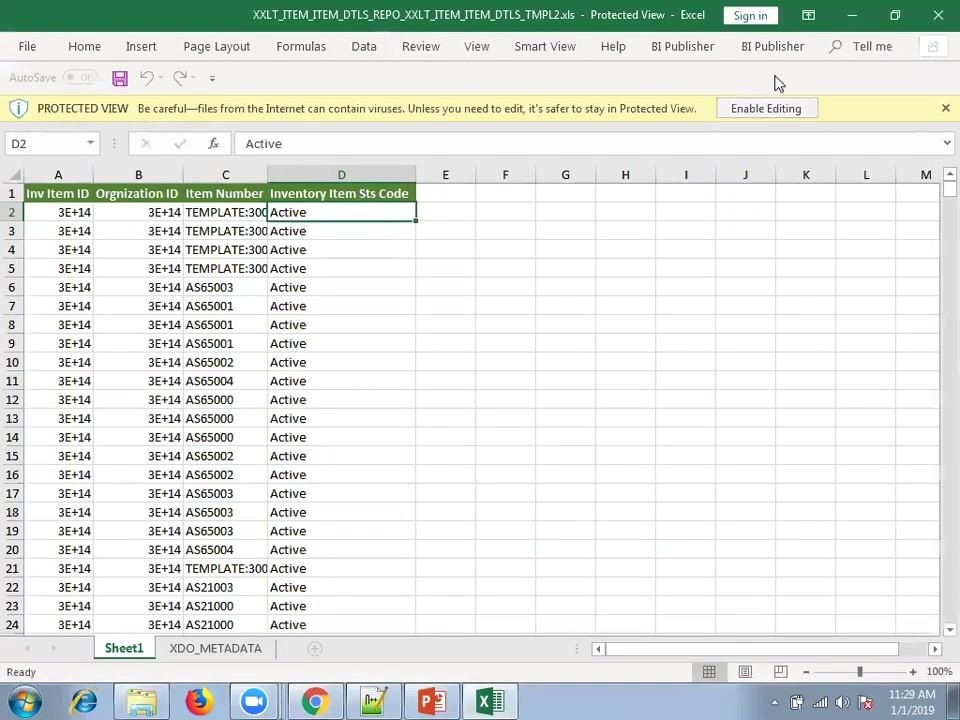
Once the report completes, download and open the generated Excel file. It opens in Protected View — click Enable Editing if you need to make changes. Review the data to confirm it matches your expectations, including columns such as Inv Item ID, Organization ID, Item Number, and Inventory Item Sts Code (for example, Item Number: TEMPLATE:300, AS65003; Inventory Item Sts Code: Active).
Summary
Creating an Excel template in Oracle Fusion involves designing your data model and sample XML, building the XLS template with a layout sheet and a mandatory XDO_METADATA sheet, mapping each field to a named range that matches the corresponding XML tag, and saving the file in XLS format. Once your template is ready, you upload it through Reports and Analytics in the Oracle BI Catalog, run the report, and verify the output against your expected columns and data.
What's next
With your Excel template uploaded and validated, you can continue refining the data model or template as your reporting needs evolve, add additional fields or groups to the XDO_METADATA sheet for more advanced report logic, or create additional layouts for the same data model to support different output requirements.
Generation details: cost, quality tiers
Docsie billed 6,500 credits ($4.55) to analyze this 13-minute video at standard quality. The rewrite, template fill and Word/PDF exports were included. The same video at each quality tier:
| Quality | Frames sampled | Credits | Approx. cost |
|---|---|---|---|
| Draft | every 16-30 s | 3,250 | $2.27 |
| Standard (this guide) | every 8-15 s | 6,500 | $4.55 |
| Detailed | every 4-7 s | 13,000 | $9.10 |
| Ultra | every 1-3 s | 26,000 | $18.20 |
Credits priced at $0.70 per 1,000; plans include a monthly allowance. Enterprise customers on on-premise or bring-your-own-model deployments run this on their own inference and pay no per-video credits.
Generated by Docsie Video-to-Docs on 2026-10-14 from a 12-minute video. Screenshots are frames from the source video and belong to their creator, Ora Trainings, whose original is embedded above. If you own this video and want the guide removed or credited differently, contact us and we will act within one business day.