
How to Create a Job Set in Oracle Fusion
If you need to run multiple job requests together—either one after another or at the same time—this guide shows you how to create a job set in Oracle Fusion ERP using Oracle Enterprise Scheduler Service (ESS). A job set lets you group individual jobs and control whether they execute in serial or parallel order, making it easier to manage related processes such as data extraction and reporting as a single unit.
Video: How to create job set - Oracle Fusion Applications by Ora Trainings (2024). All credit for the demonstration goes to the creator; watch the original on YouTube. The written guide below was generated from this video by Docsie. Creator? Request a change or removal.
If you need to run multiple job requests together—either one after another or at the same time—this guide shows you how to create a job set in Oracle Fusion ERP using Oracle Enterprise Scheduler Service (ESS). A job set lets you group individual jobs and control whether they execute in serial or parallel order, making it easier to manage related processes such as data extraction and reporting as a single unit.
Prerequisites
Before you create a job set, you need the following in place:
- Access to Oracle Analytics Publisher (BI) to locate the reports your jobs will run.
- The reports your job set requires, stored in the BI Catalog (for example, under Shared Folders > Custom > OraTrainings).
- Access to Setup and Maintenance in Oracle Fusion Cloud Applications to create job definitions and job sets.
Locate the required reports in the BI Catalog
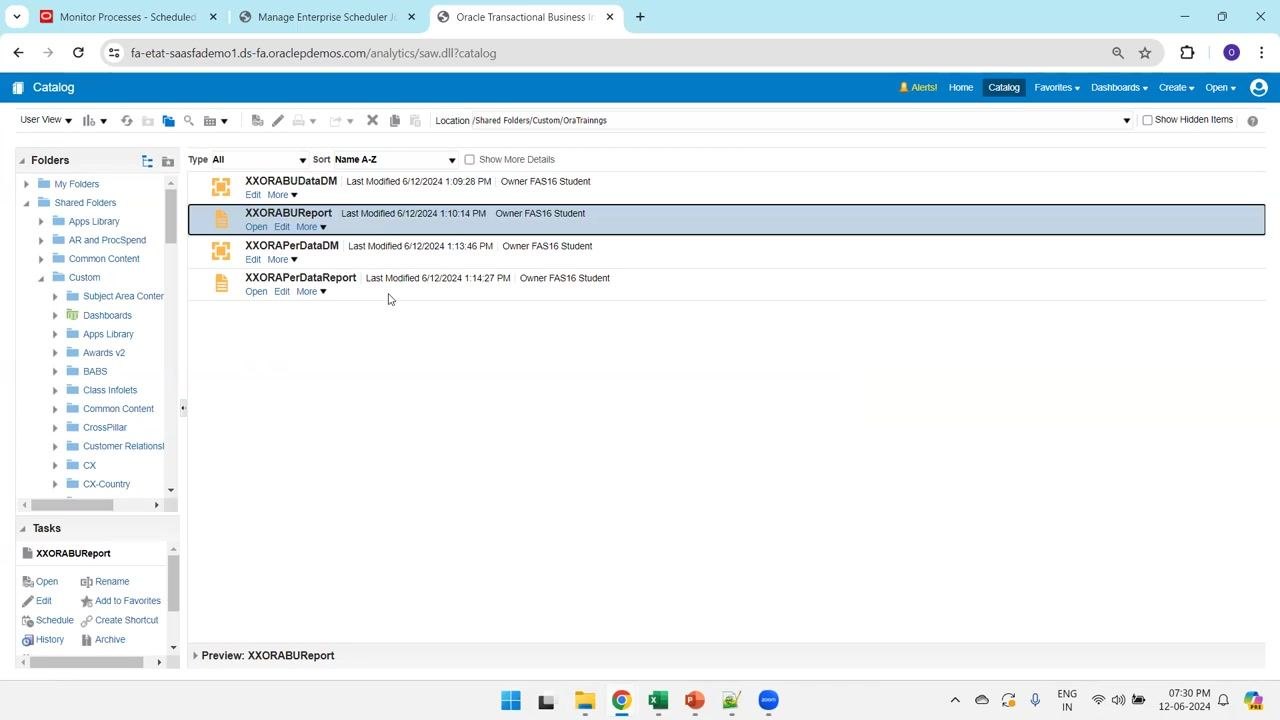
Open Oracle Analytics Publisher (BI) and navigate to the Catalog section. Browse to Shared Folders > Custom > OraTrainings to find the reports you will reference in your job definitions.
For this example, you need two reports:
- XXORABUReport
- XXORAPerDataReport
Confirm the owner and last modified details for each report to make sure you are selecting the correct files.
Retrieve the report path
Select a report (for example, XXORABUReport) by clicking it. Click the More dropdown and select Schedule. The system displays the full path of the report, which you will need when you create a job definition.
Note the path shown (for example, /Shared Folders/Custom/OraTrainings/XXORABUReport). You will enter this path in the Report ID field when you define a job in the scheduler.
Open Setup and Maintenance
In Oracle Fusion Cloud Applications, click your username in the top right corner. From the dropdown menu, select Setup and Maintenance under the Administration section.
Find the job definitions and job sets task
In Setup and Maintenance, use the search bar to find the task. Enter Manage Enterprise Scheduler Job Definitions and Job Sets, then select the task relevant to your application area (for example, Financial, Supply Chain Management, and Related Applications).
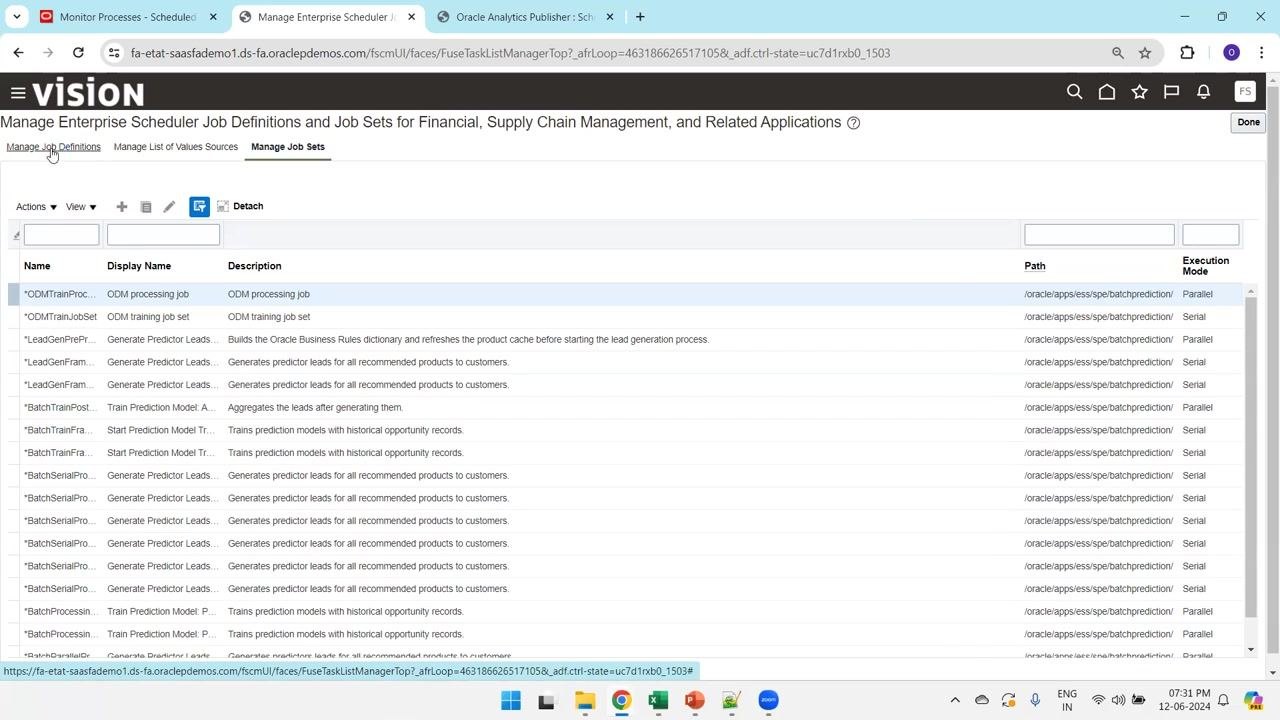
Open the Manage Enterprise Scheduler Job Definitions and Job Sets for Financial, Supply Chain Management, and Related Applications screen, and make sure you are on the Manage Job Definitions tab.
Create the first job definition
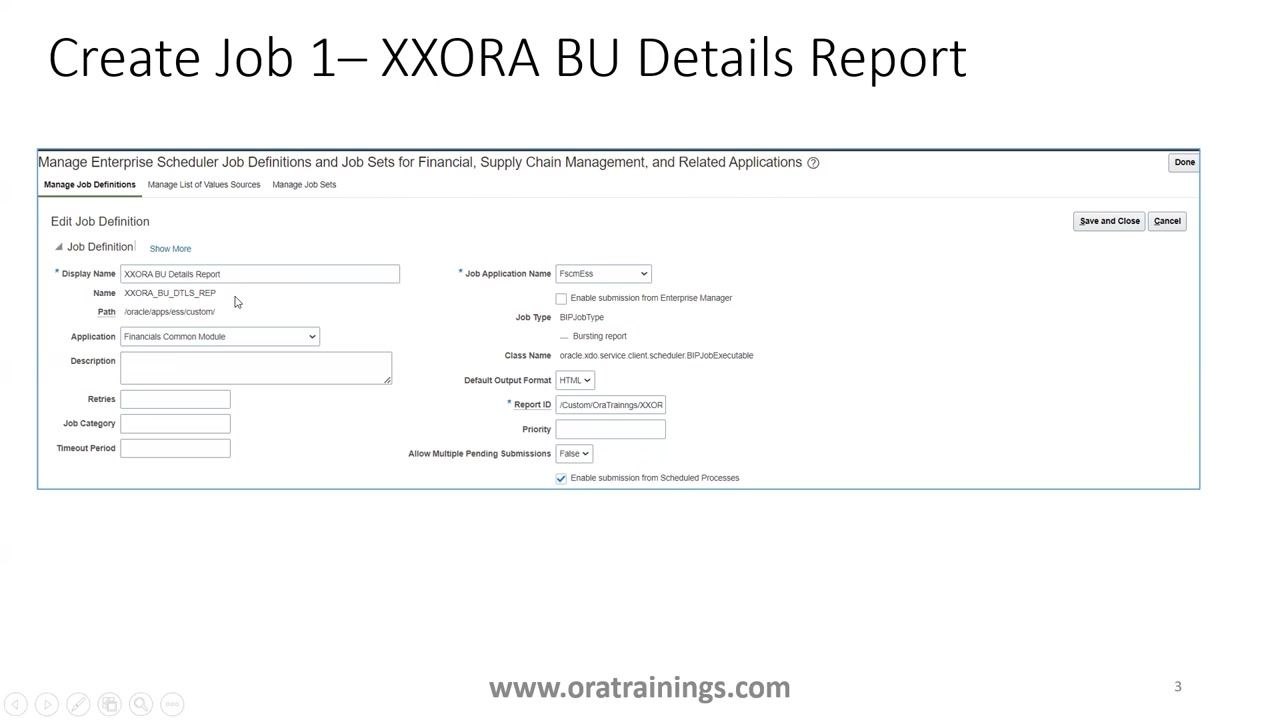
On the Edit Job Definition screen, enter the following details for your first job:
- Display Name: XXORA BU Details Report
- Name: XXORA_BU_DTLS_REP
- Path: /oracle/apps/ess/custom/
- Application: Financials Common Module
- Job Application Name: FscmEss
- Job Type: BIPJobType (Bursting report)
- Class Name: oracle.xdo.service.client.scheduler.BIPJobExecutable
- Default Output Format: HTML
- Report ID: /Custom/OraTrainings/XXOR
Leave the remaining fields (Description, Retries, Job Category, Timeout Period, Priority) as needed or blank. Make sure Enable submission from Scheduled Processes is checked, then click Save and Close.
Create the second job definition
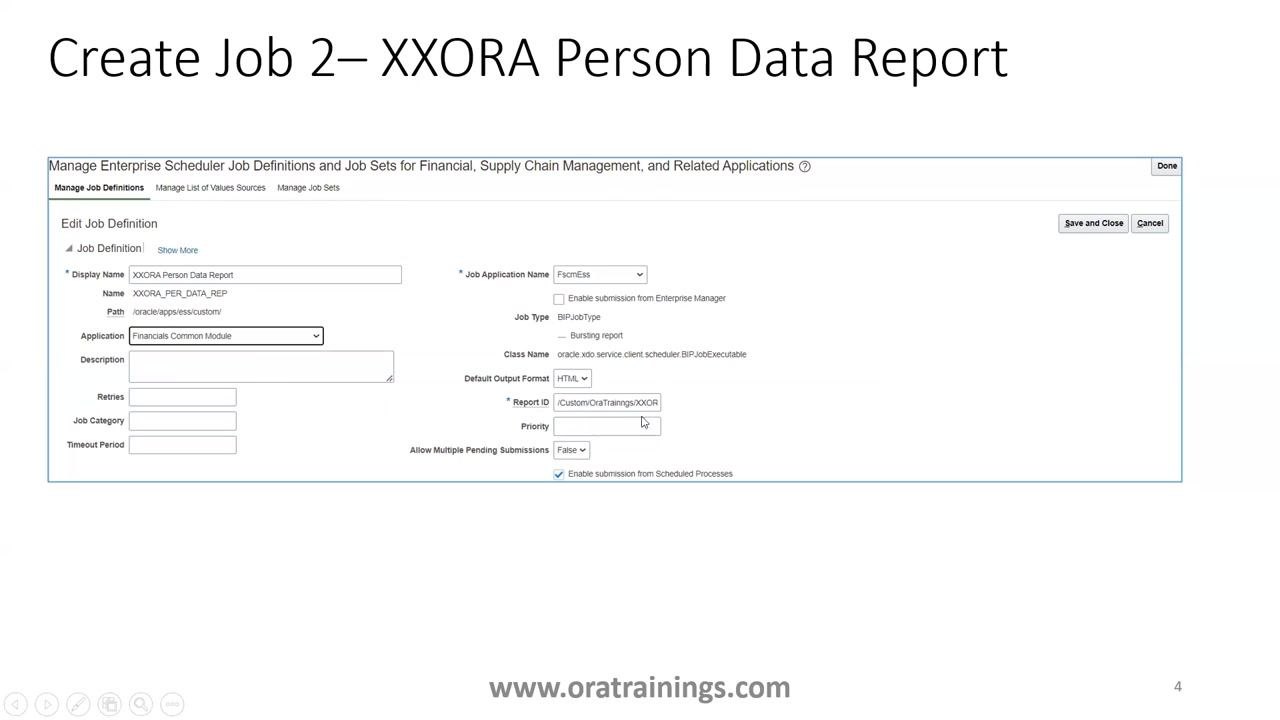
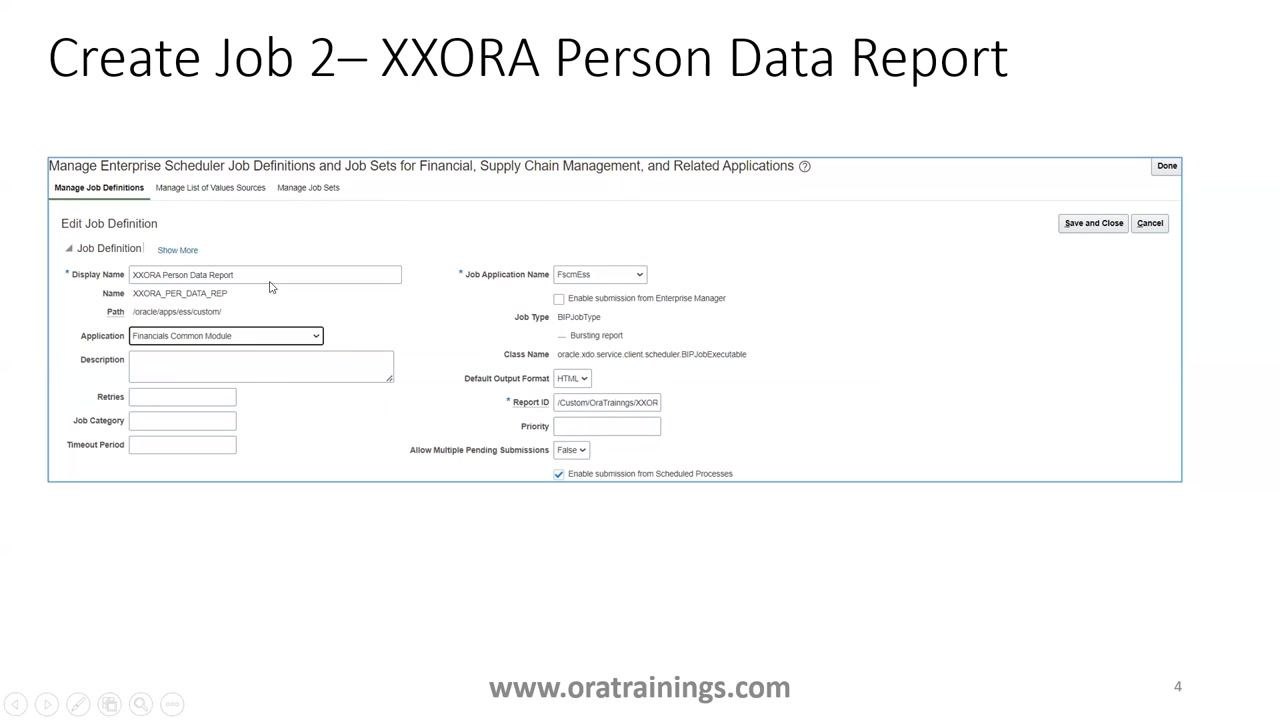
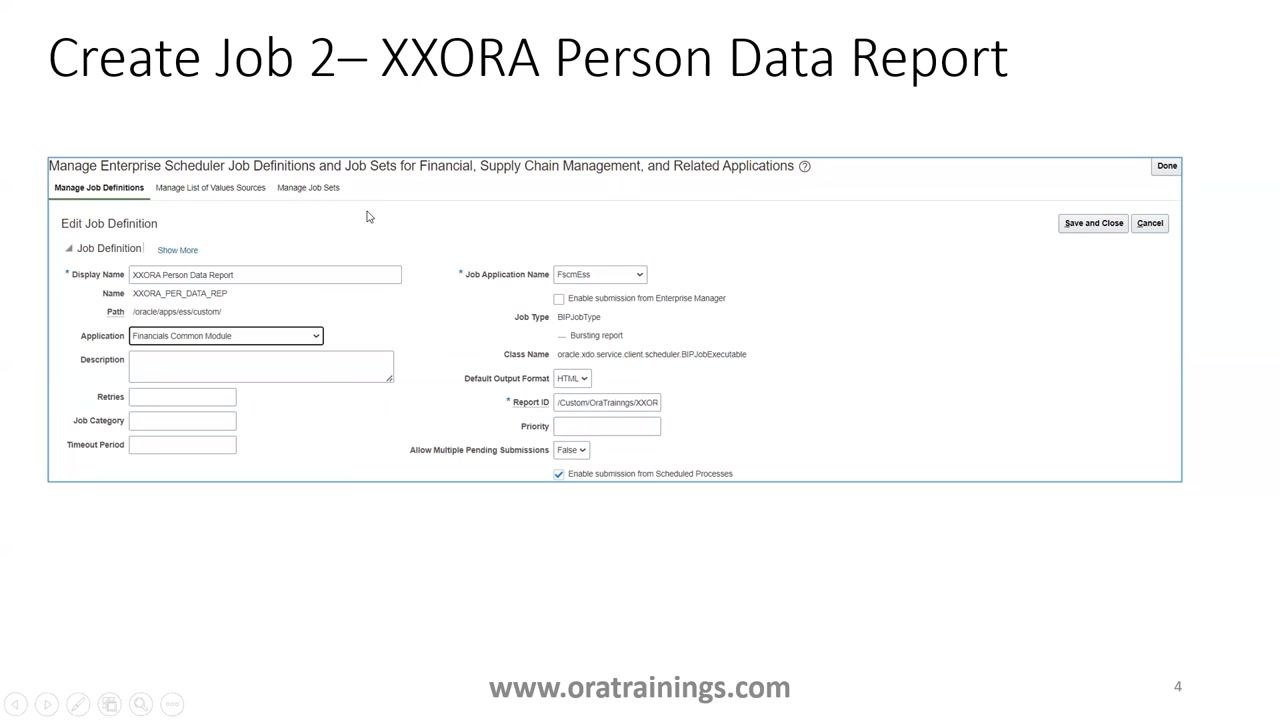
Repeat the process to create the second job, using these details:
- Display Name: XXORA Person Data Report
- Name: XXORA_PER_DATA_REP
- Path: /oracle/apps/ess/custom/
- Application: Financials Common Module
- Job Application Name: FscmEss
- Job Type: BIPJobType (Bursting report)
- Class Name: oracle.xdo.service.client.scheduler.BIPJobExecutable
- Default Output Format: HTML
- Report ID: /Custom/OraTrainings/XXOR
As before, leave optional fields as needed, confirm Enable submission from Scheduled Processes is checked, and click Save and Close.
With both job definitions saved, you're ready to create the job set itself.
Open the Manage Job Sets tab
Navigate to the Manage Job Sets tab within the Manage Enterprise Scheduler Job Definitions and Job Sets for Financial, Supply Chain Management, and Related Applications screen, then click Manage Job Sets to begin creating a new job set.
Define the job set properties
On the Create Job Sets screen, enter the following details:
- Name: XXORA_JOB_SET
- Display Name: XXORA Job Set
- Description: XXORA Job Set
- Package: /oracle/apps/ess/custom/
Select whether the job set should run in Serial or Parallel mode. This example uses Serial.
Add the first job as a step
Under Job Set Steps, click the plus (+) symbol to add a new step. In the Add Step dialog, enter the following for the first job:
- Step ID: 10
- Job: XXORA_BU_DTLS_REP (use the search box to select the job)
- Package: /oracle/apps/ess/custom/
Leave other options as default unless specific properties are required, then click OK to add the step.
Add the second job as a step
Click the plus (+) symbol again and enter the following:
- Step ID: 20
- Job: XXORA_PER_DATA_REP
- Package: /oracle/apps/ess/custom/
Click OK to add the step.
Verify and configure the step sequence
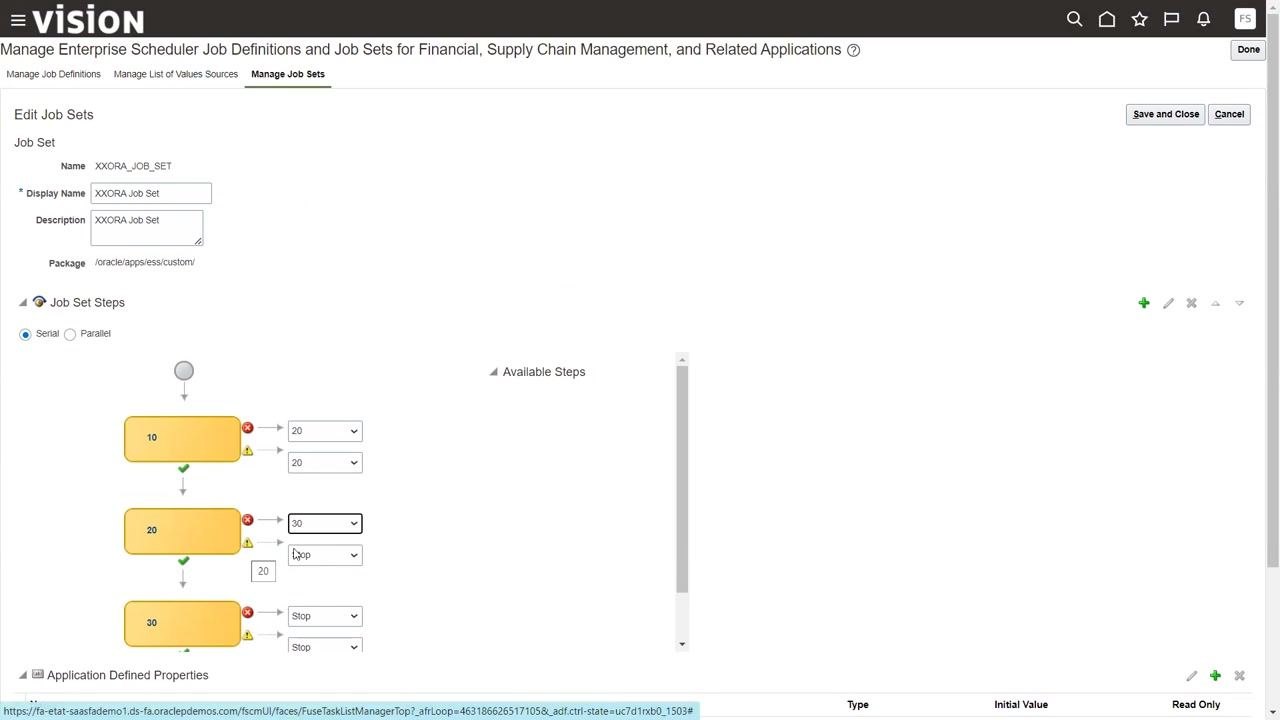
After adding both jobs, verify that all required jobs are listed in the job set steps. In this example, three steps (10, 20, 30) appear in a serial sequence.
Each step includes dropdowns to configure what happens if the job fails or completes with warnings—for example, stopping execution or moving to another step. Adjust the flow as needed; for instance, you can set the second step to proceed to the third step even if the second job fails or issues a warning.
Add required system properties
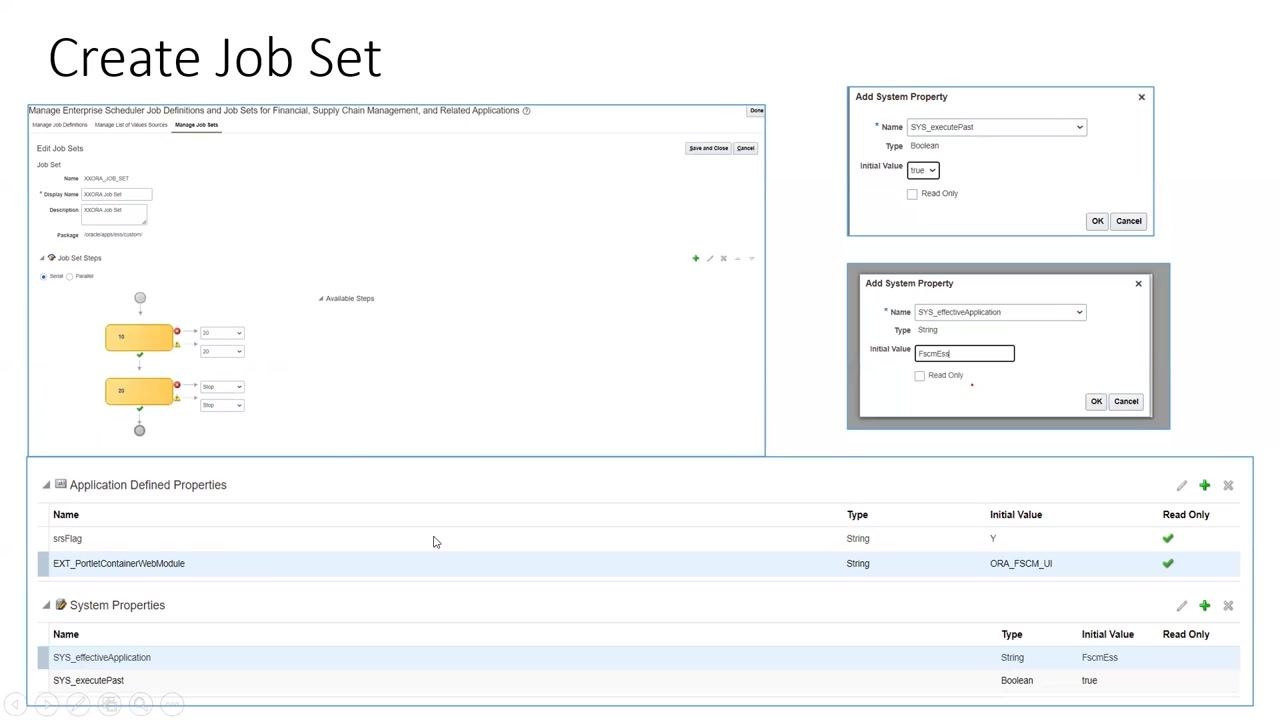
Scroll to the System Properties section at the bottom of the job set configuration screen. Two system properties are mandatory for the job set to function correctly:
- SYS_effectiveApplication — Type: String, Initial Value: FscmEss
- SYS_executePast — Type: Boolean, Initial Value: true
To add each property, click the plus (+) symbol in the System Properties section, enter the property details in the Add System Property dialog, and click OK to save.
Verify that both properties are listed with the correct values, then click Save and Close to save the job set.
You have now successfully created and configured a job set in Oracle Fusion ERP, including all required jobs and system properties.
Open Scheduled Processes
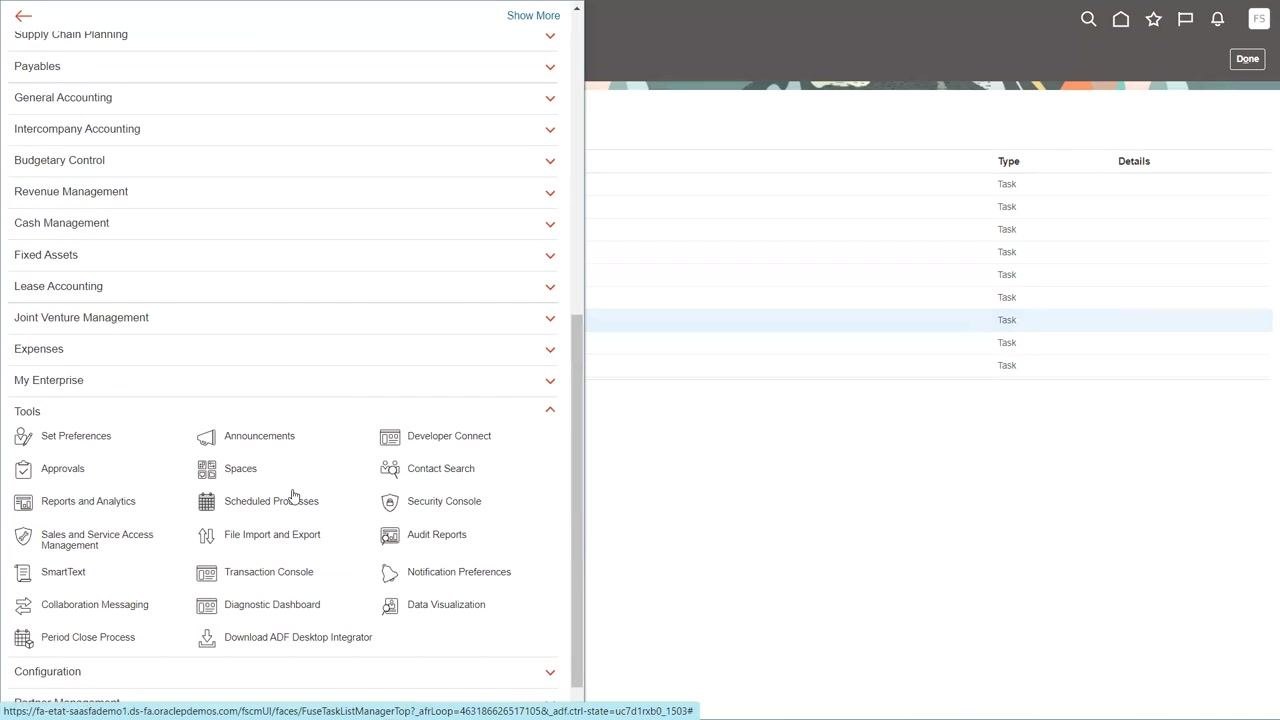
To schedule or monitor your job set, navigate to the main menu. Under the Tools section, locate and click Scheduled Processes. This area lets you manage and monitor scheduled jobs and job sets.
Start scheduling a new process
In the Oracle Enterprise Scheduler interface, click Schedule New Process. In the Schedule New Process dialog, select Job Set (not Job) under Type, and enter the name of your job set in the Name field (for example, XXORA_JOB_SET). Optionally, enter a description, then click OK.
Search for and select your job set
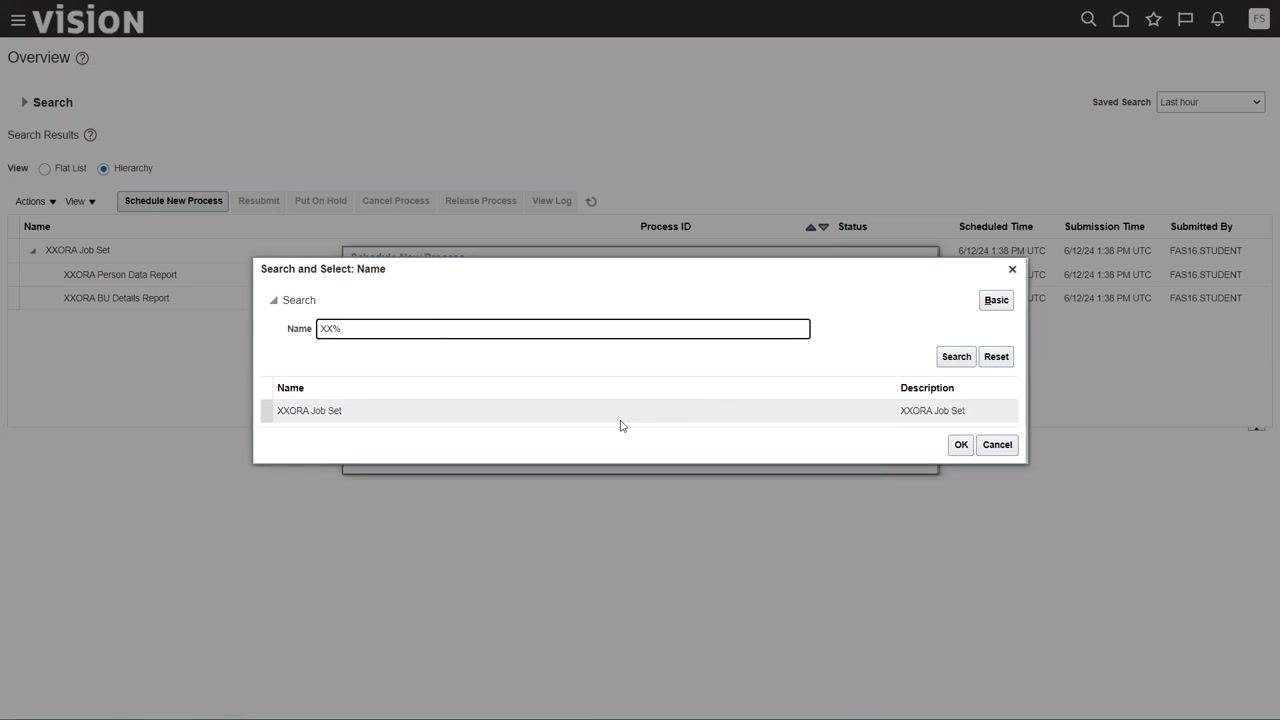
In the Search and Select: Name dialog, enter a search pattern (for example, XX%) in the Name field and click Search. From the results, select XXORA Job Set (or your job set name) and click OK to confirm.
Review and submit the job set
The Process Details window displays information about the selected job set, including the Process Set Name and Description. The Processes tab lists all jobs included in the job set, showing their names, paths, and parent process set. Optionally add Submission Notes, then click Submit to queue the job set for execution.
Monitor job set execution
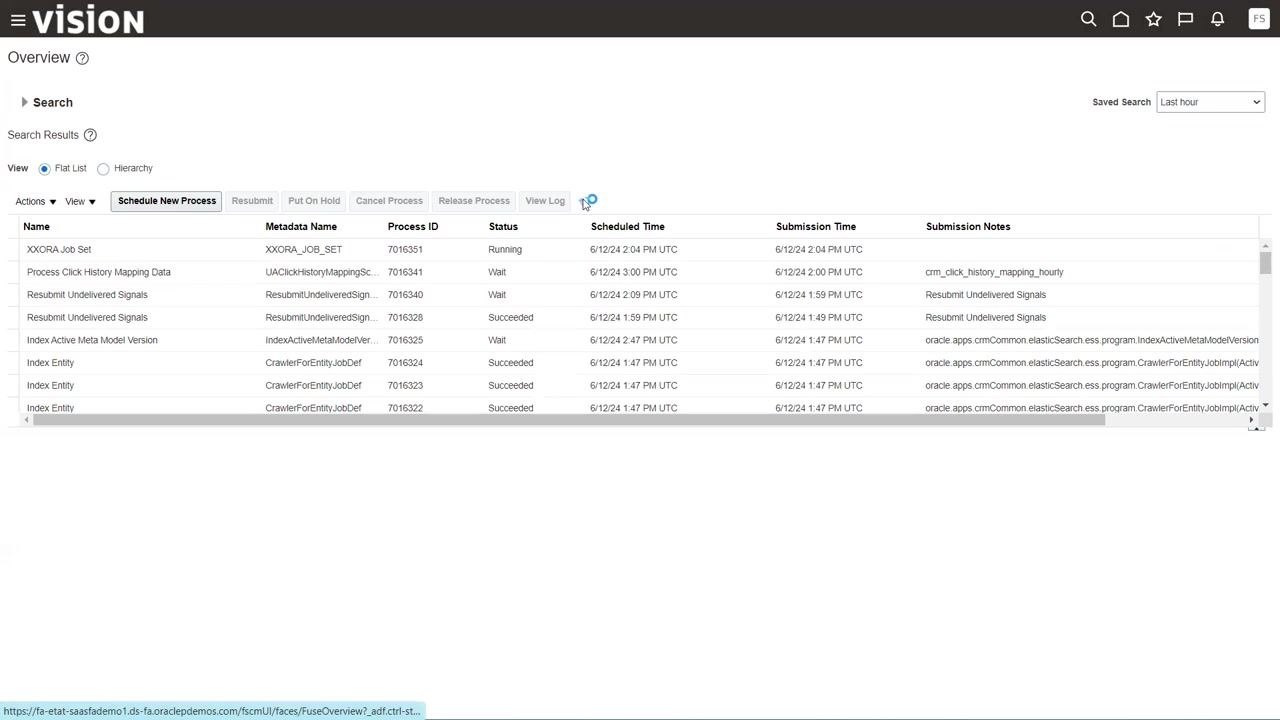
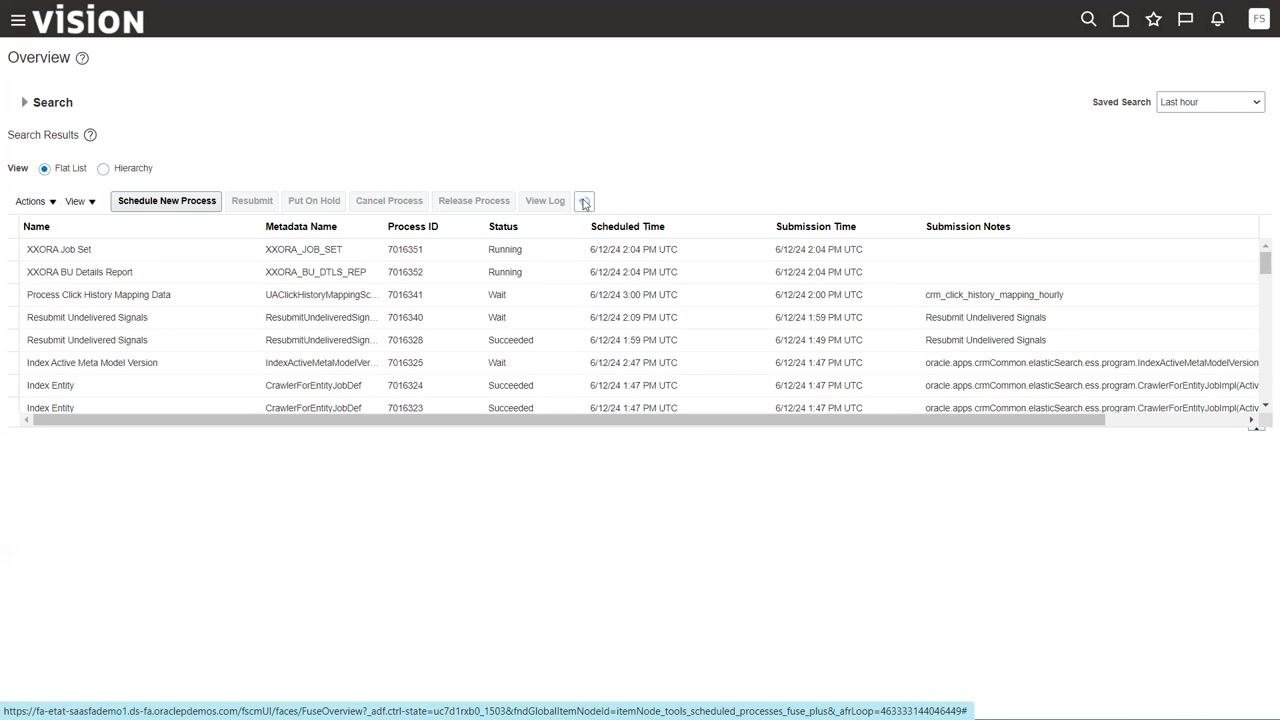
After submission, return to the main Overview screen. The job set and its component jobs appear in the process list. Check the Status column to monitor progress (for example, "Running" or "Succeeded"). The Process ID, Scheduled Time, Submission Time, and Submitted By columns provide additional tracking information.
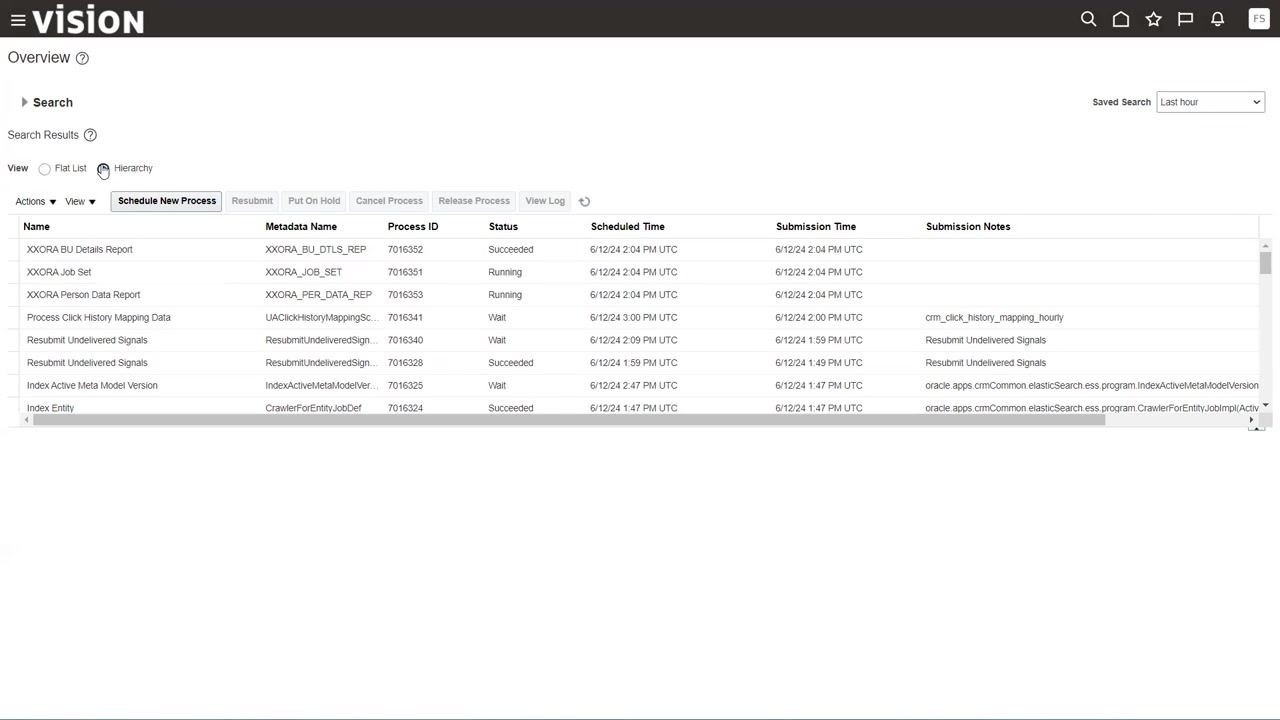
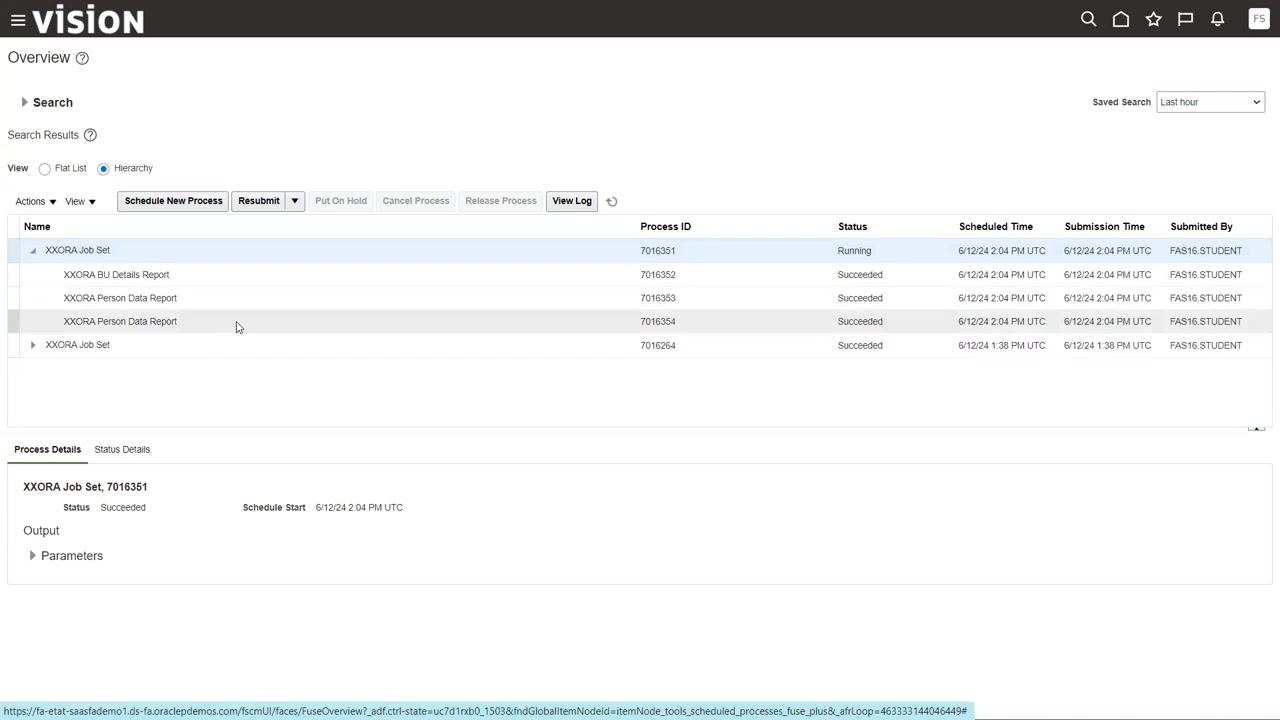
In the process list, "Running" indicates an active process, "Succeeded" indicates successful completion, and "Wait" or other statuses may indicate pending or intermediate states. The job set acts as a parent job, with its child jobs listed beneath it in Hierarchy view.
Switch between Flat List and Hierarchy views
To view all jobs and job sets in a simple list, select Flat List under the View options. To see parent-child relationships, select Hierarchy. Use the Search or Refresh buttons to update the displayed information.
View job set details and output
Click a job set or job in the list to expand and view more details. The Process Details section at the bottom displays the status (for example, Succeeded or Running), schedule start time, and expandable Output and Parameters sections. This confirms which jobs are part of the job set and their execution results.
Verify completion
Once all jobs in the job set have succeeded, the job set status updates to "Succeeded," and the process list reflects the final status for each job and the job set as a whole.
What's next
By following these steps, you have created, configured, scheduled, and monitored a job set in Oracle Enterprise Scheduler—including customizing the execution flow and handling job failures or warnings according to your business requirements. You can now reuse this job set whenever you need to run these reports together, and apply the same approach to build additional job sets for other reporting or processing needs.
Generation details: cost, quality tiers
Docsie billed 4,500 credits ($3.15) to analyze this 9-minute video at standard quality. The rewrite, template fill and Word/PDF exports were included. The same video at each quality tier:
| Quality | Frames sampled | Credits | Approx. cost |
|---|---|---|---|
| Draft | every 16-30 s | 2,250 | $1.57 |
| Standard (this guide) | every 8-15 s | 4,500 | $3.15 |
| Detailed | every 4-7 s | 9,000 | $6.30 |
| Ultra | every 1-3 s | 18,000 | $12.60 |
Credits priced at $0.70 per 1,000; plans include a monthly allowance. Enterprise customers on on-premise or bring-your-own-model deployments run this on their own inference and pay no per-video credits.
Generated by Docsie Video-to-Docs on 2026-10-14 from a 8-minute video. Screenshots are frames from the source video and belong to their creator, Ora Trainings, whose original is embedded above. If you own this video and want the guide removed or credited differently, contact us and we will act within one business day.