
How to Create a Chart of Accounts in Oracle Fusion
Learn how to create a chart of accounts in Oracle Fusion General Ledger, from understanding the underlying structure to configuring value sets, building the chart of accounts structure, creating a structure instance, deploying the flexfield, and entering value set values. This guide walks through each stage using a sample three-segment structure (Company, Department, and Account) so you can apply the same approach to your own organization.
Video: Oracle Fusion - How to Create Chart of Accounts Structure and Instance by CA SUHAS VAZE (2017). All credit for the demonstration goes to the creator; watch the original on YouTube. The written guide below was generated from this video by Docsie. Creator? Request a change or removal.
Learn how to create a chart of accounts in Oracle Fusion General Ledger, from understanding the underlying structure to configuring value sets, building the chart of accounts structure, creating a structure instance, deploying the flexfield, and entering value set values. This guide walks through each stage using a sample three-segment structure (Company, Department, and Account) so you can apply the same approach to your own organization.
Prerequisites
- Access to Oracle Fusion Applications with permissions to use Setup and Maintenance.
- An existing implementation project to work within (for example, a project named "GOOGLE PROJECT").
- A clear understanding of the segments you want to include in your chart of accounts (this guide uses Company, Department, and Account).
Understanding the chart of accounts structure
Review the basic definition of a chart of accounts
In traditional accounting, a chart of accounts is simply a list of accounts. Typical accounts include land, building, computers, and other assets, along with liabilities, expenses, revenues, and ownership accounts.
Recognize the enhanced structure in Oracle Fusion
Oracle Fusion lets you add multiple dimensions, called segments, to your chart of accounts. You combine the values from these segments to create unique account combinations, giving you a multidimensional structure instead of a simple list.
Review a sample chart of accounts structure
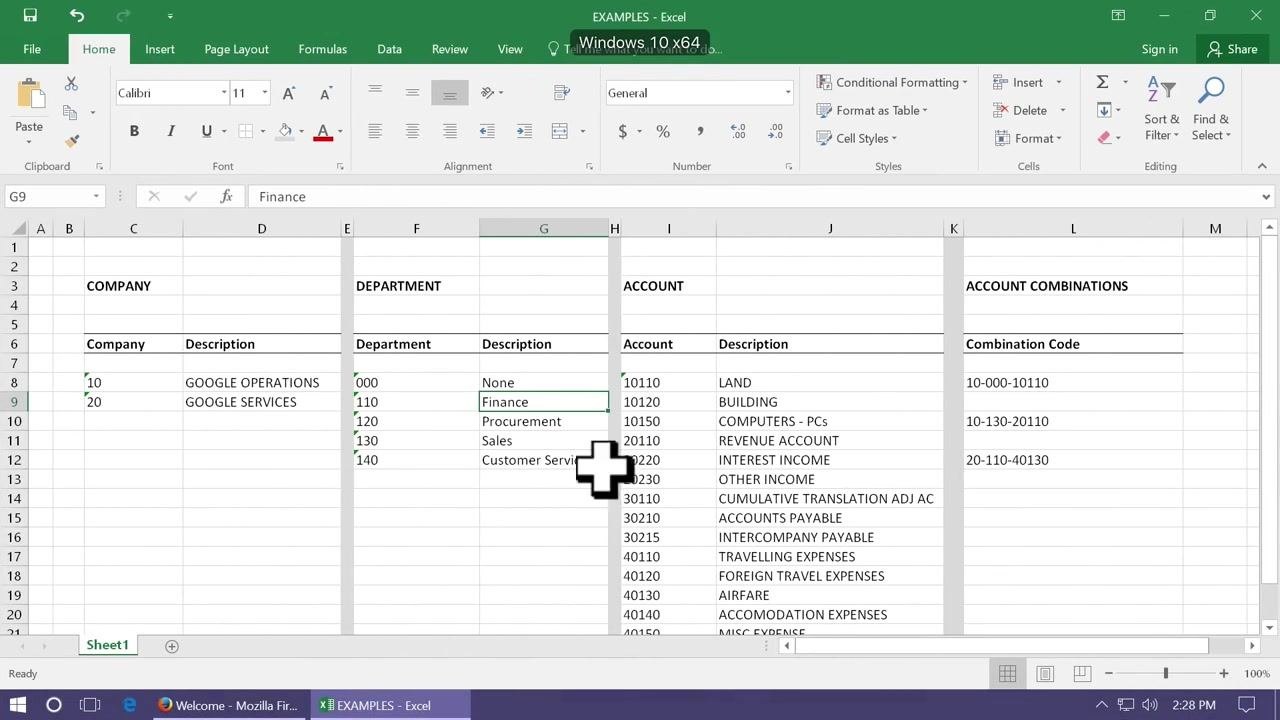
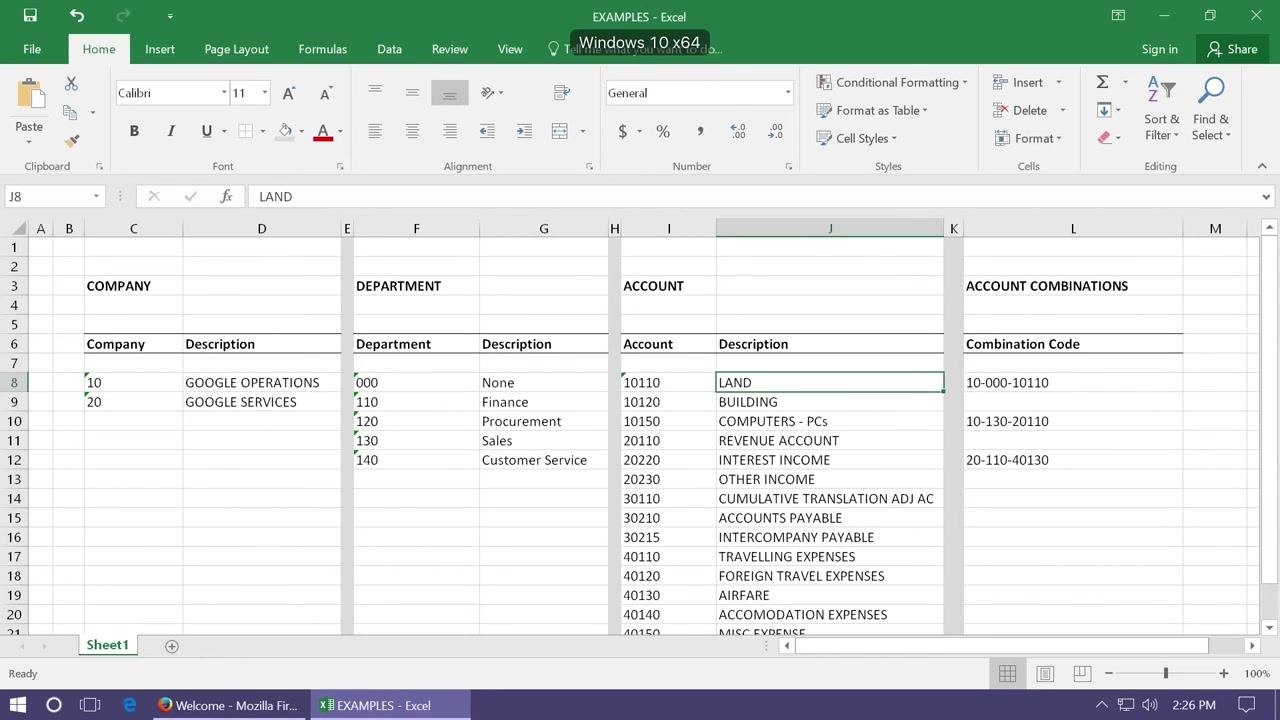
This guide uses the following sample structure with three segments:
- Company Segment:
- 10: GOOGLE OPERATIONS
- 20: GOOGLE SERVICES
- Department Segment:
- 000: None
- 110: Finance
- 120: Procurement
- 130: Sales
- 140: Customer Service
- Account Segment:
- 10110: LAND
- 10120: BUILDING
- 10150: COMPUTERS - PCs
- 20110: REVENUE ACCOUNT
- 20220: INTEREST INCOME
- 20230: OTHER INCOME
- 30110: CUMULATIVE TRANSLATION ADJ AC
- 30210: ACCOUNTS PAYABLE
- 30215: INTERCOMPANY PAYABLE
- 40110: TRAVELLING EXPENSES
- 40120: FOREIGN TRAVEL EXPENSES
- 40130: AIRFARE
- 40140: ACCOMMODATION EXPENSES
- 40150: MISC EXPENSE
Understand how account combinations are formed
You combine the values from each segment to create a unique account code. For example:
- 10-000-10110: Company 10 (GOOGLE OPERATIONS), Department 000 (None), Account 10110 (LAND)
- 10-130-20110: Company 10 (GOOGLE OPERATIONS), Department 130 (Sales), Account 20110 (REVENUE ACCOUNT)
- 20-110-40130: Company 20 (GOOGLE SERVICES), Department 110 (Finance), Account 40130 (AIRFARE)
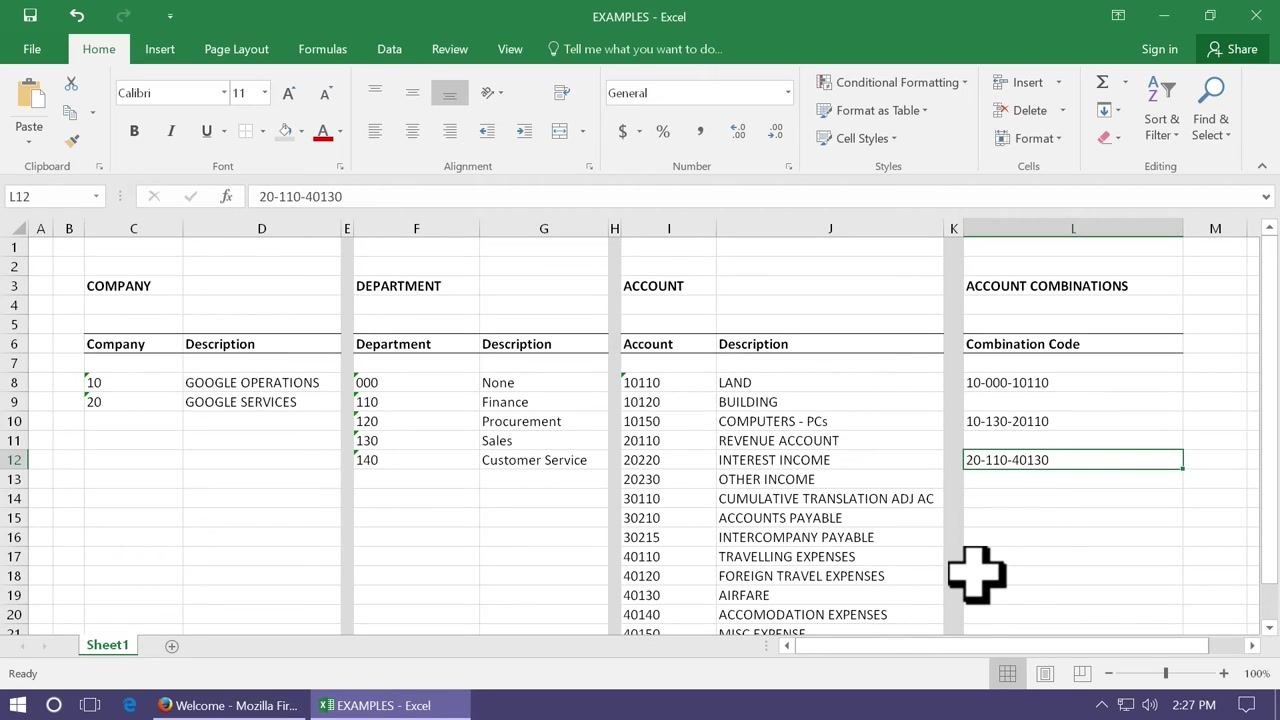
Each combination code uniquely identifies a specific financial transaction context within your organization. For instance, 20-110-40130 means Company 20 (GOOGLE SERVICES), Department 110 (Finance), and Account 40130 (AIRFARE).
A chart of accounts in Oracle Fusion is more than a simple list — it is a multidimensional structure that uses segments such as company, department, and account to create unique combinations for detailed financial tracking and reporting.
Create value sets for each segment
Before you build the chart of accounts structure, you create a value set for each segment: Company, Department, and Account.
Log in to Oracle Fusion Applications
Enter your credentials and access the main dashboard.
Navigate to your implementation project
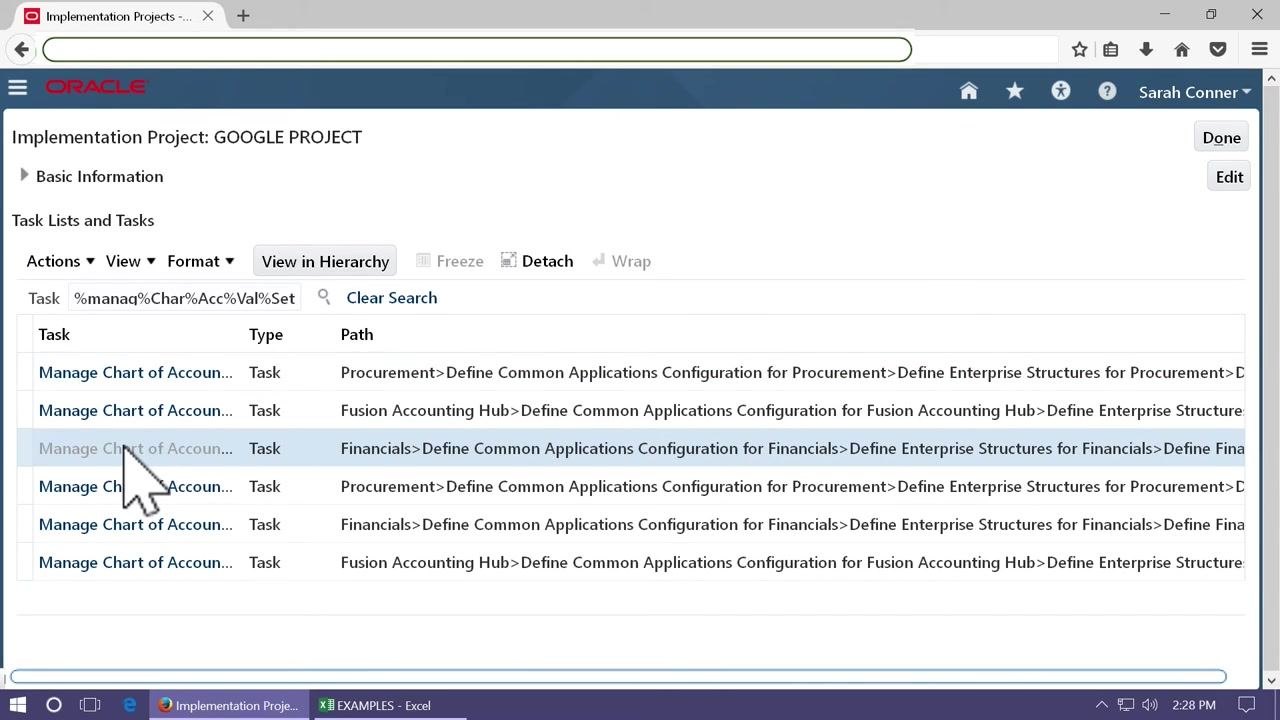
Click the menu and select Setup and Maintenance. On the Setup and Maintenance screen, locate the Implementation Projects section, search for the implementation project you are using (for example, "GOOGLE PROJECT"), and open it.
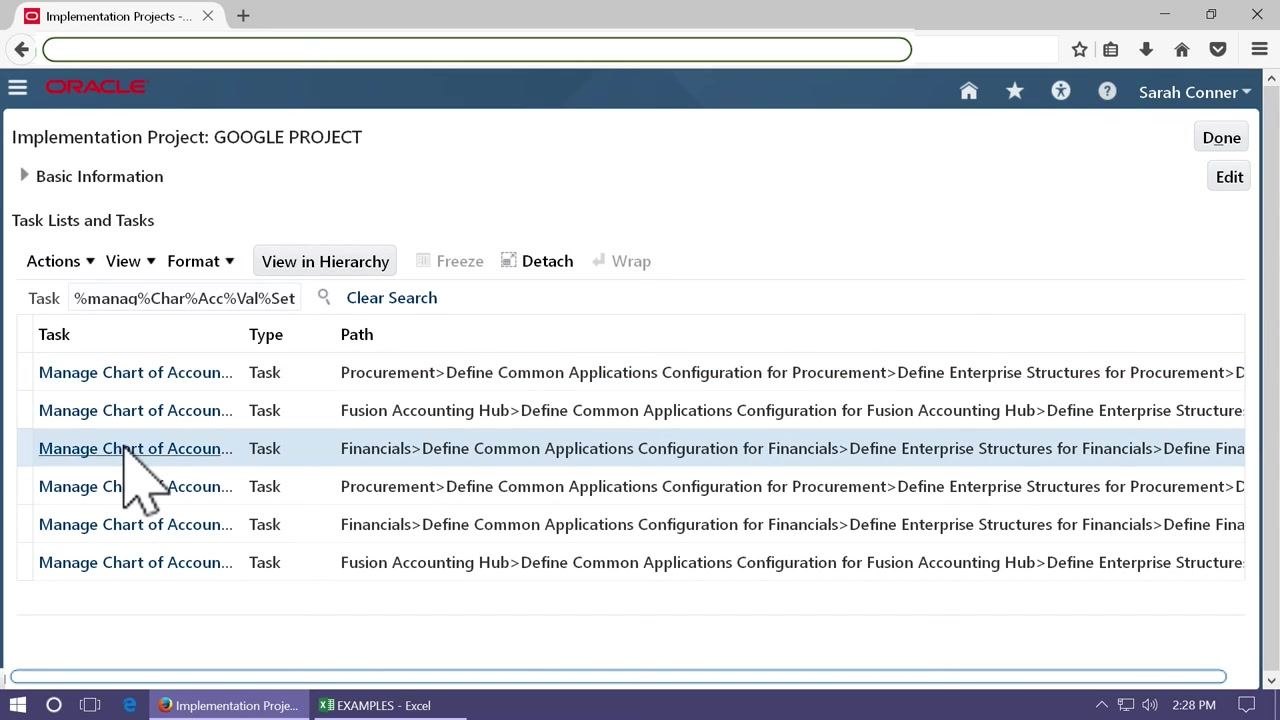
Find the task for managing chart of accounts value sets
In the implementation project, use the search bar to enter keywords such as %mana%Char%Acc%Val%Set%. Review the filtered list of tasks and locate Manage Chart of Accounts Value Sets under the appropriate module (for example, Financials).
Click the Go to Task button next to the selected task to proceed.
Create the value set for the Company segment
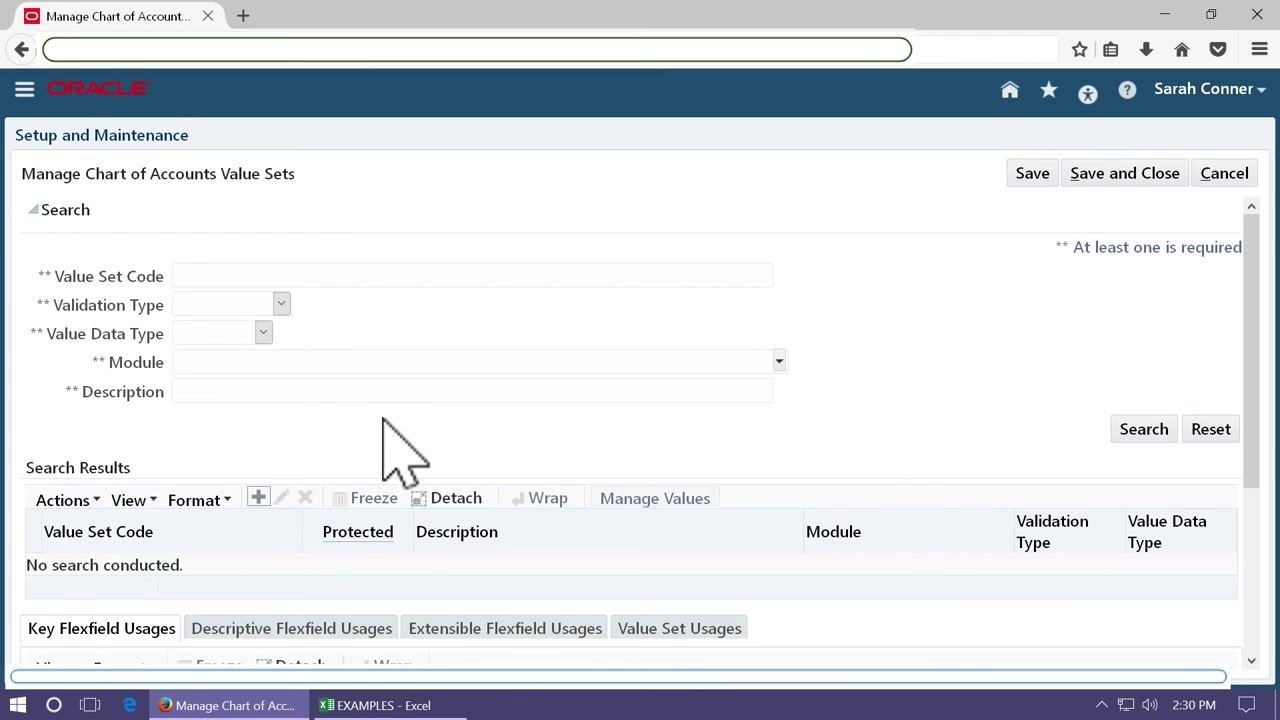
On the Manage Chart of Accounts Value Sets screen, click the plus (+) button to create a new value set.
In the Value Set Code field, enter a code such as GX_COMPANY for the Company segment, then fill in the remaining fields: Description (for example, "Company Segment Value Set"), Module, Validation Type, and Value Data Type.
Complete the value set details for the Company segment:
- Set Module to "General Ledger".
- Set Validation Type to "Independent".
- Set Value Data Type to "Character".
- Set Value Subtype to "Text".
- Set Maximum Length to
2, since company codes are two digits.
Leave all other fields at their defaults unless you have specific requirements, then click Save and Close.
Create the value set for the Department segment
Click the plus (+) button to add a new value set and enter the following details:
- Value Set Code:
GX_DEPARTMENT - Description:
GX_DEPARTMENT - Module: "General Ledger"
- Validation Type: "Independent"
- Value Data Type: "Character"
- Value Subtype: "Text"
- Maximum Length:
3, since department codes are three digits
Click Save and Close to save the value set.
Create the value set for the Account segment
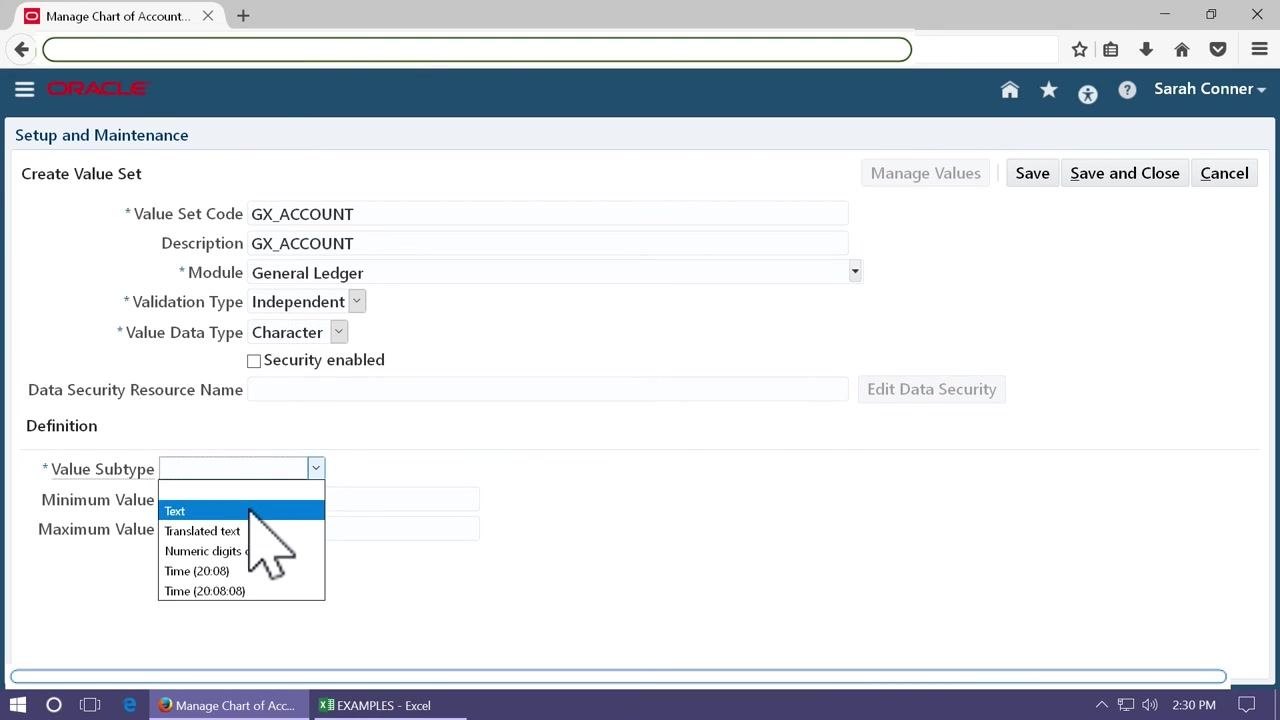
Click the plus (+) button to add a new value set and enter the following details:
- Value Set Code:
GX_ACCOUNT - Description:
GX_ACCOUNT - Module: "General Ledger"
- Validation Type: "Independent"
- Value Data Type: "Character"
- Value Subtype: "Text"
- Maximum Length:
5, since account codes are five digits
Click Save and Close to save the value set.
At this point, you have created three value sets for the chart of accounts segments: Company (2 digits), Department (3 digits), and Account (5 digits). Each uses the "Independent" validation type, "Character" data type, and "Text" subtype, with the appropriate maximum length for each segment. Next, you will define the chart of accounts structure using these value sets.
Create the chart of accounts structure
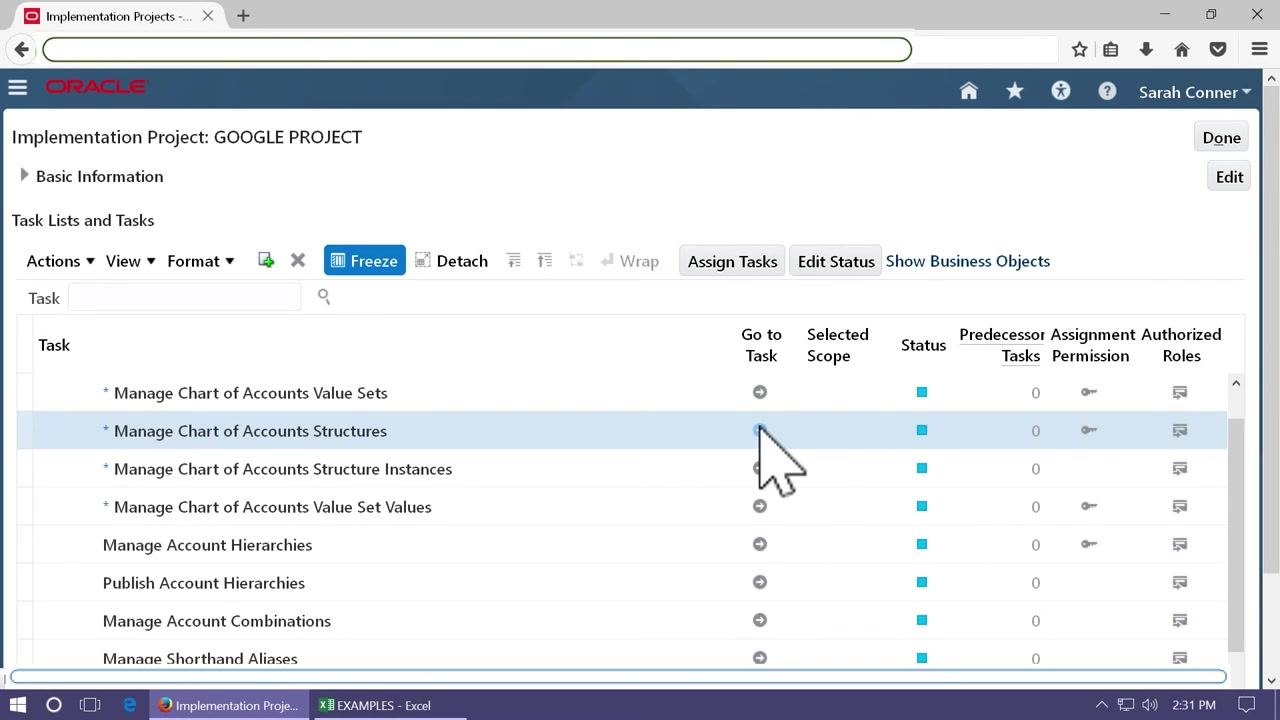
Open the Manage Chart of Accounts Structures task
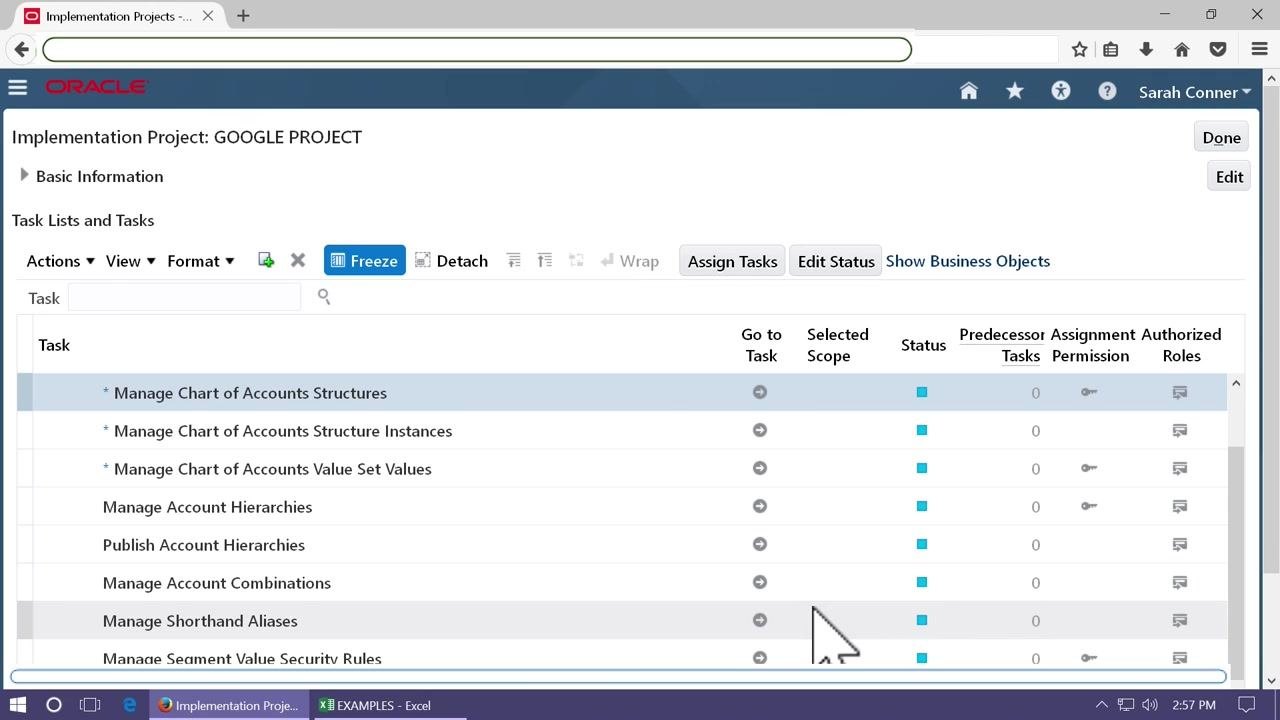
In the Implementation Project task list, locate Manage Chart of Accounts Structures and click the Go to Task icon (right arrow) next to it.
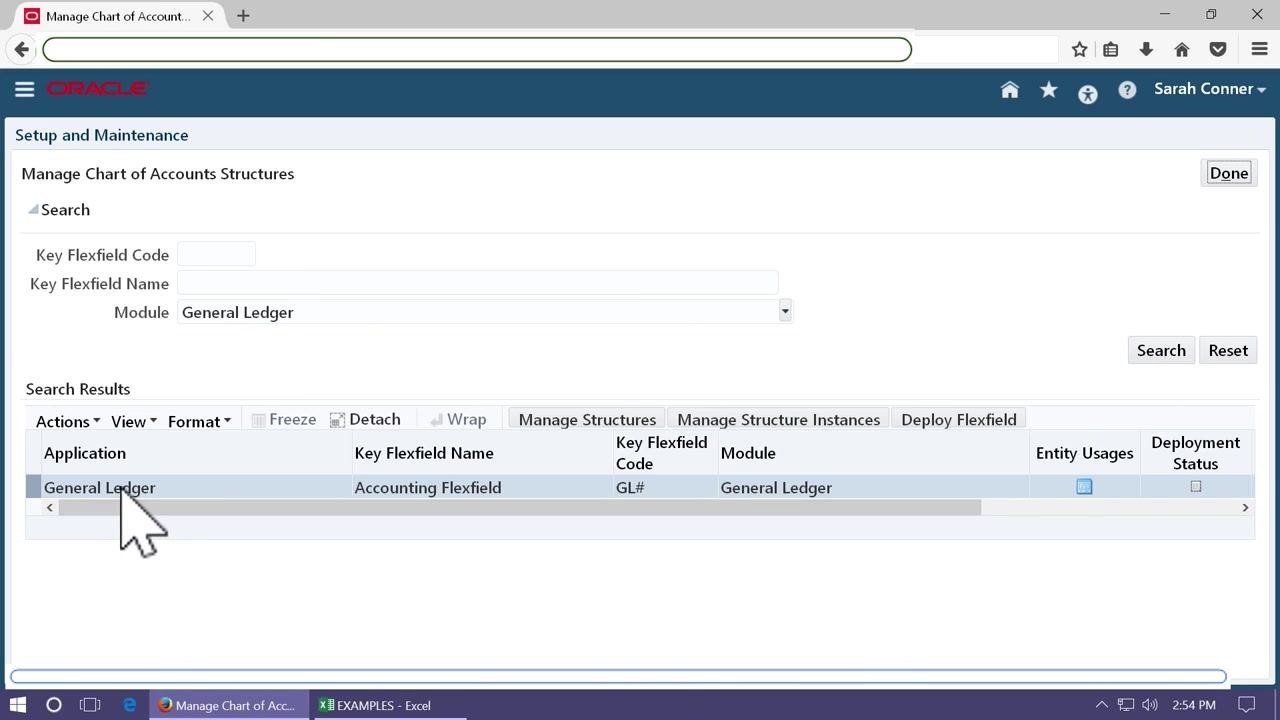
Search for the Accounting Flexfield
On the Manage Chart of Accounts Structures screen, type General Ledger in the Module field and click Search to display available flexfields.
Select the flexfield and open structure management
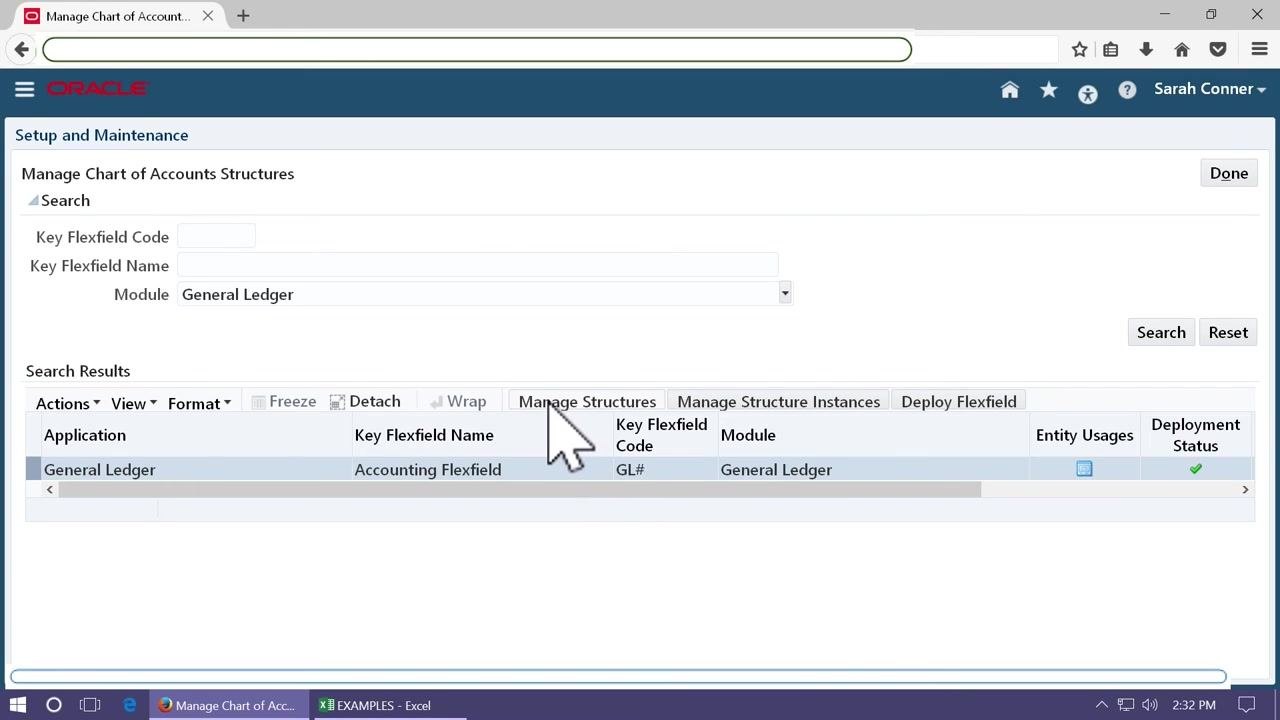
In the search results, select the row where Application is General Ledger, Key Flexfield Name is Accounting Flexfield, Key Flexfield Code is GL#, and Module is General Ledger. Click Manage Structures at the top of the results.
Create a new structure
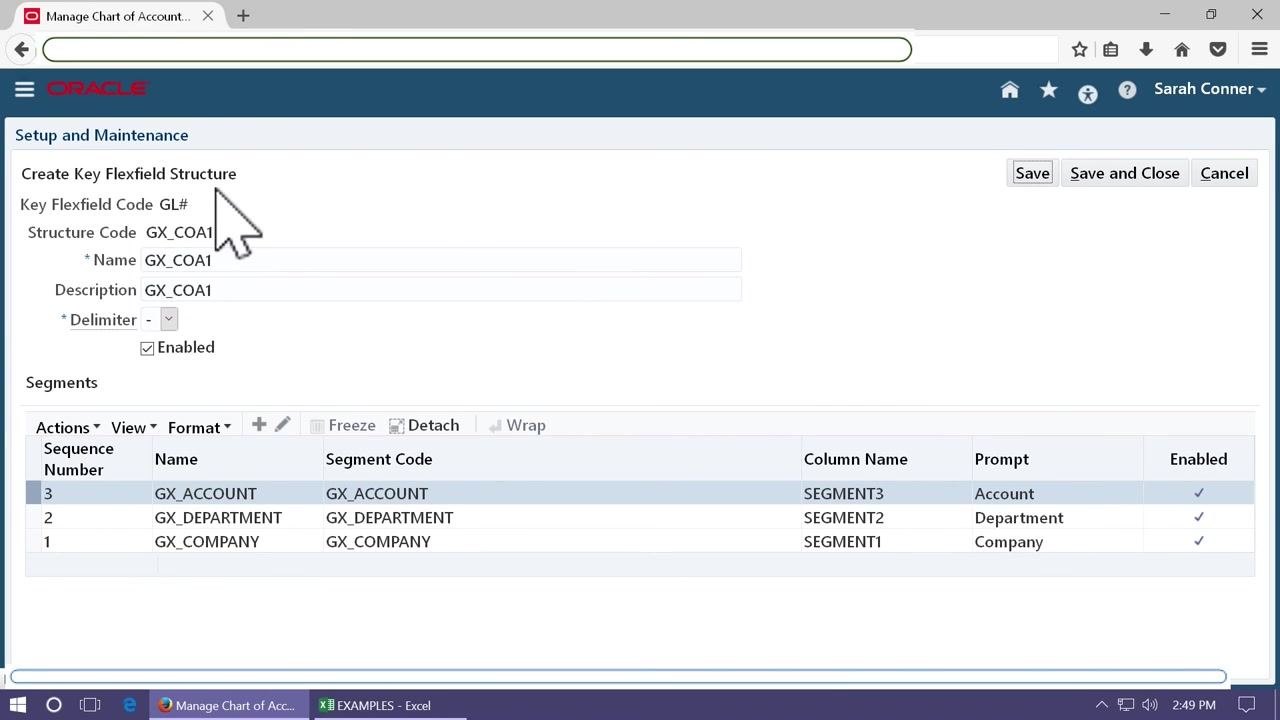
Click the plus (+) button to add a new structure. In the Create Key Flexfield Structure form, enter:
- Structure Code:
GX_COA1 - Name:
GX_COA1 - Description:
GX_COA1
Make sure the Enabled checkbox is checked.
Use the Delimiter dropdown to select the appropriate delimiter (for example, hyphen or comma), then click Save.
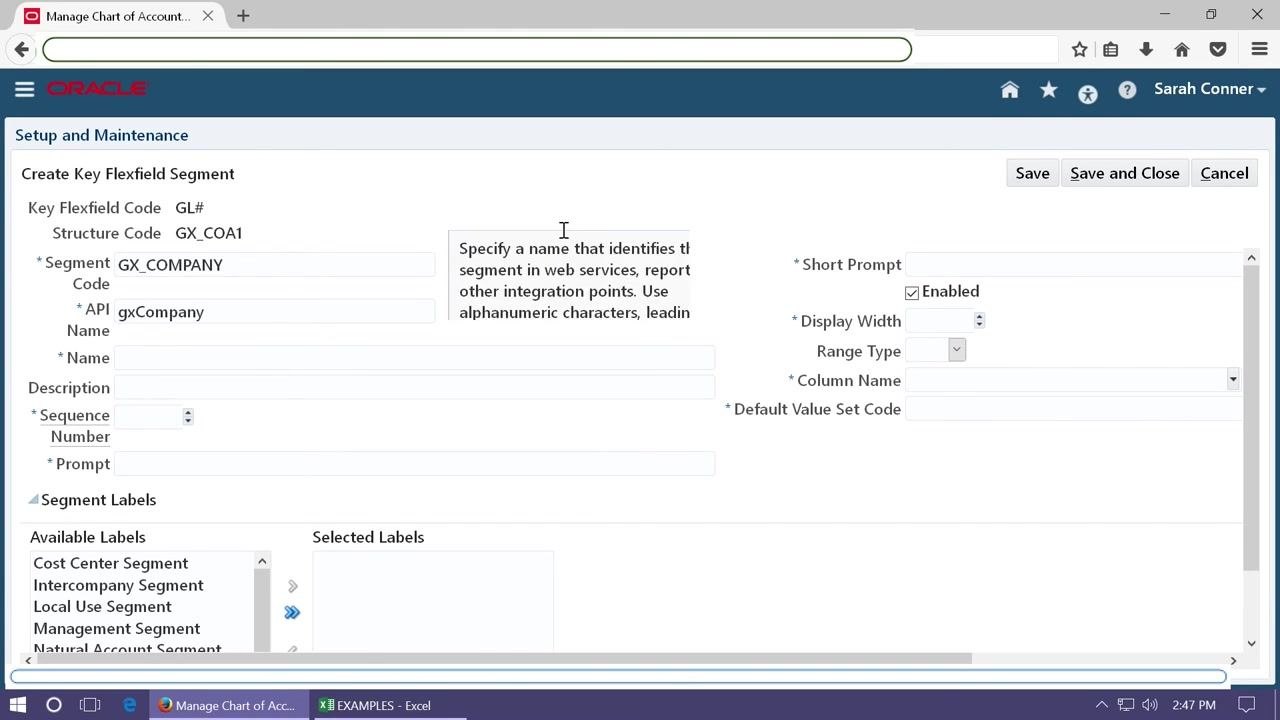
Define the Company segment
In the Create Key Flexfield Segment form, enter:
- Segment Code:
GX_COMPANY - API Name:
gxCompany - Name:
GX_COMPANY - Description:
GX_COMPANY - Sequence Number:
1 - Prompt:
Company
Make sure the Enabled checkbox is checked.
Assign the column name and value set: select SEGMENT1 from the Column Name dropdown and select GX_COMPANY as the Default Value Set Code. The screen displays the segment code, API name, name, description, sequence number, and prompt you previously entered. The Segment Labels section is visible but not yet populated.
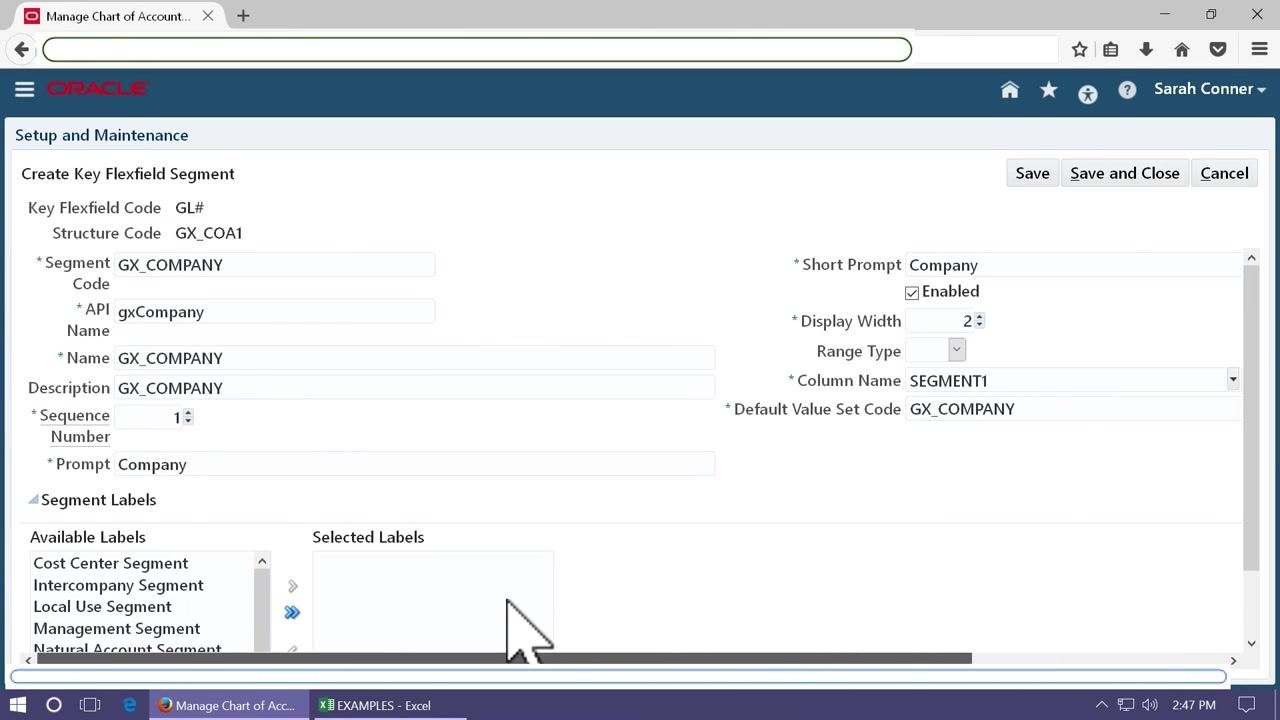
In the Available Labels list, select Primary Balancing Segment and move it to the Selected Labels list to flag this segment as the primary balancing segment (equivalent to a flexfield qualifier in Oracle R12). This step is critical for identifying the company segment in your chart of accounts structure.
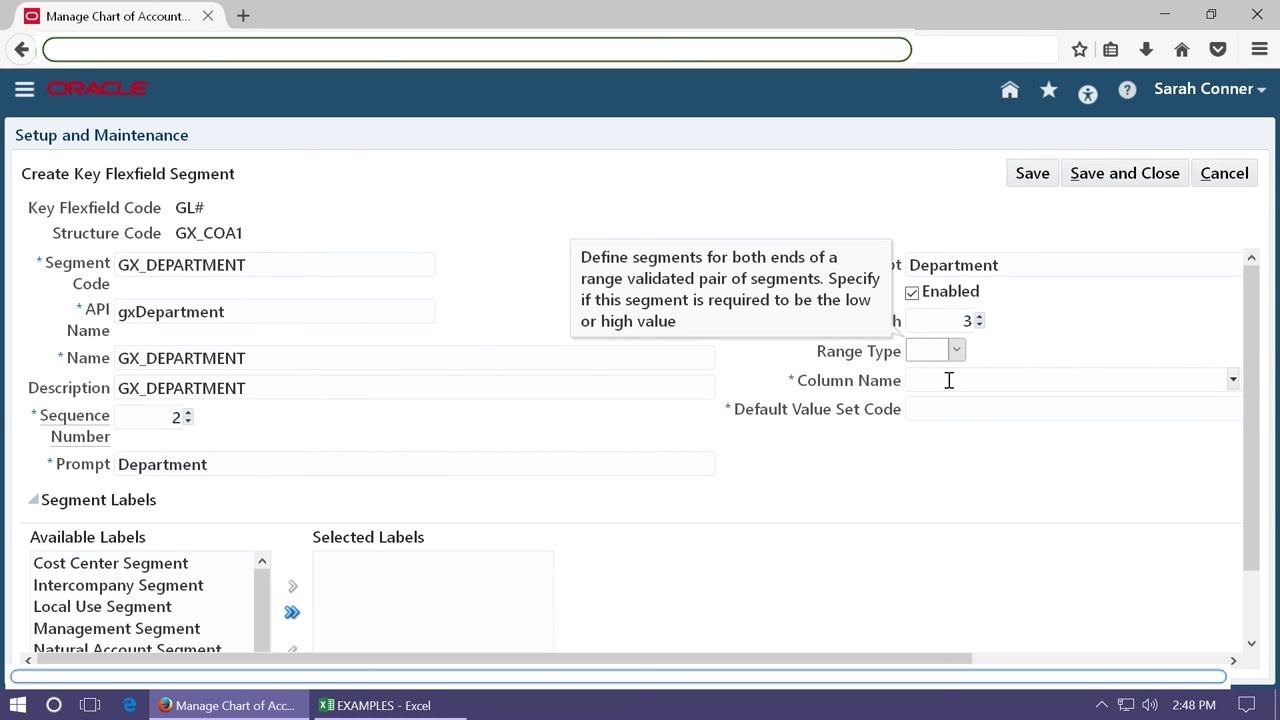
Click Save and Close to save the completed company segment. The system returns you to the segment list, ready for the next segment.
Define the Department segment
Click the plus (+) button to add a new segment and enter:
- Segment Code:
GX_DEPARTMENT - API Name:
gxDepartment - Name:
GX_DEPARTMENT - Description:
GX_DEPARTMENT - Sequence Number:
2 - Prompt:
Department - Short Prompt:
Department - Display Width:
3
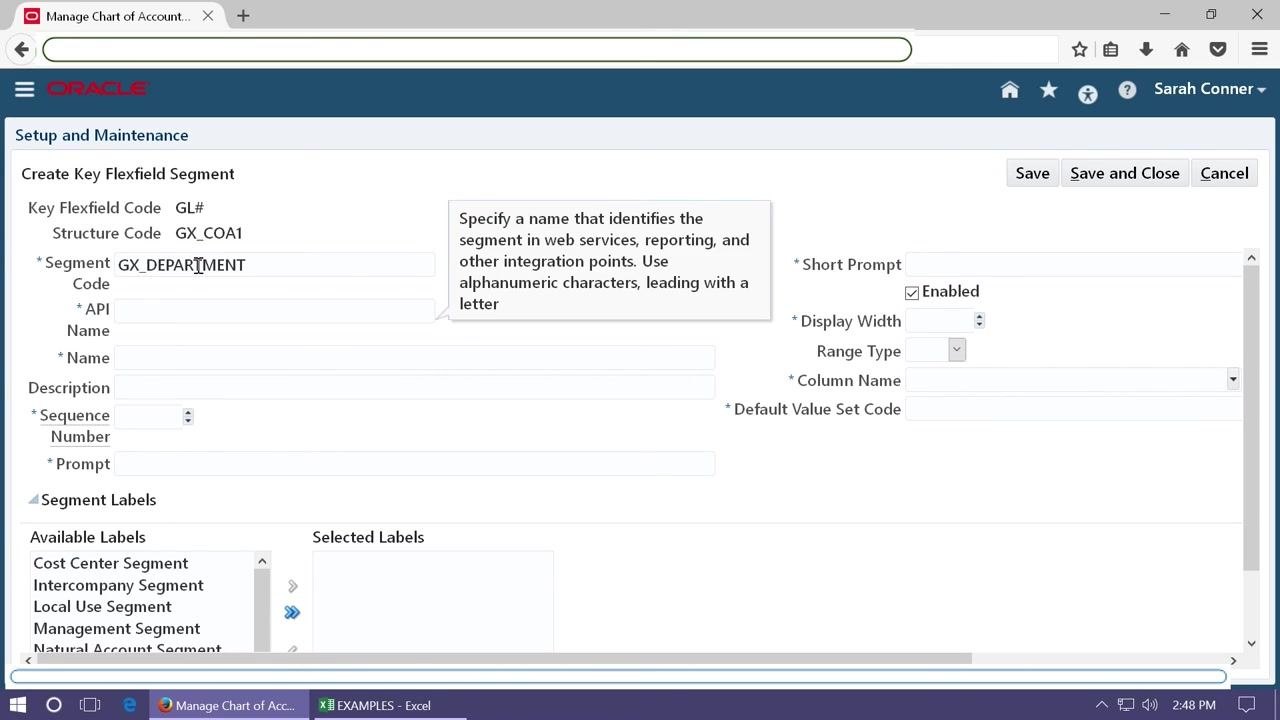
Make sure Enabled is checked. A tooltip may appear reminding you to use alphanumeric characters for the segment code and to specify whether the segment is required to be the low or high value.
Assign the column name and value set: select SEGMENT2 from the Column Name dropdown and select GX_DEPARTMENT as the Default Value Set Code.
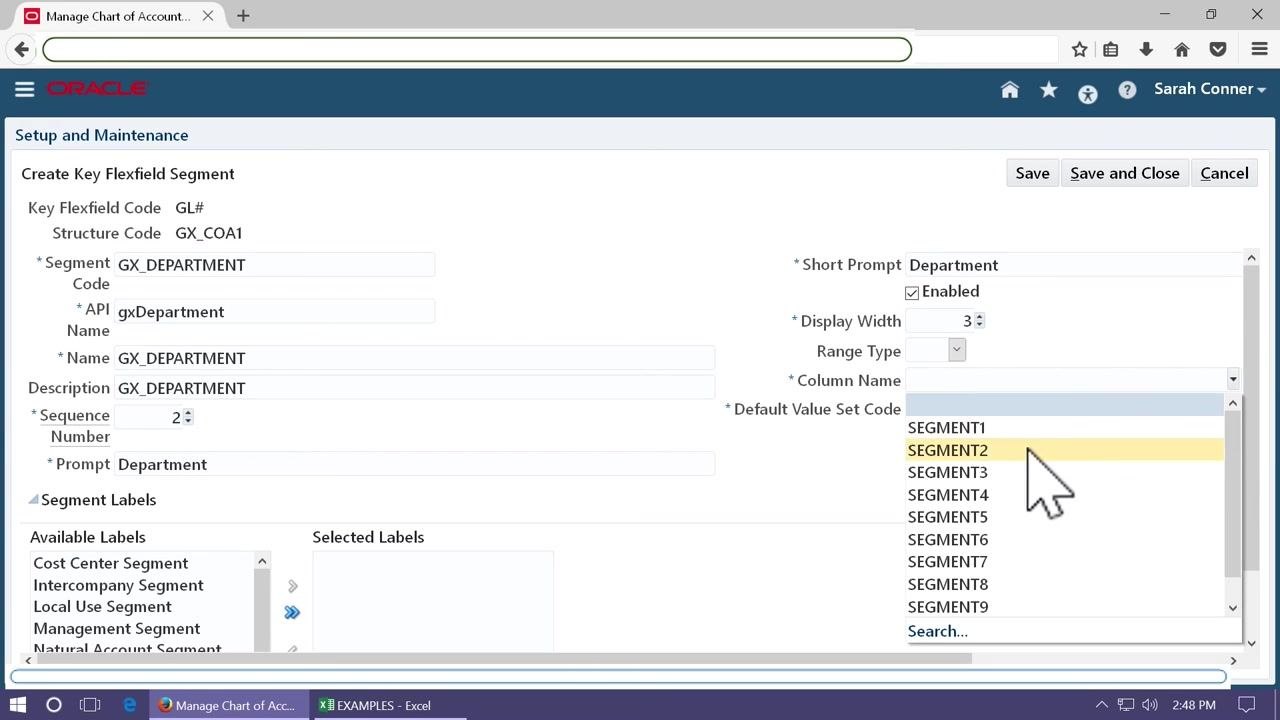
In the Available Labels list, select Cost Center Segment and move it to the Selected Labels list to flag this segment as the cost center.
Click Save and Close to save the completed department segment.
With the company and department segments configured — including their column names, value sets, and segment labels — you can continue this process for any additional segments required by your organization's chart of accounts design.
Define the Account segment
In the Create Key Flexfield Segment form, enter:
- Segment Code:
GX_ACCOUNT - API Name:
gxAccount - Name:
GX_ACCOUNT - Description:
GX_ACCOUNT - Sequence Number:
3 - Prompt:
Account - Short Prompt:
Account - Display Width:
5
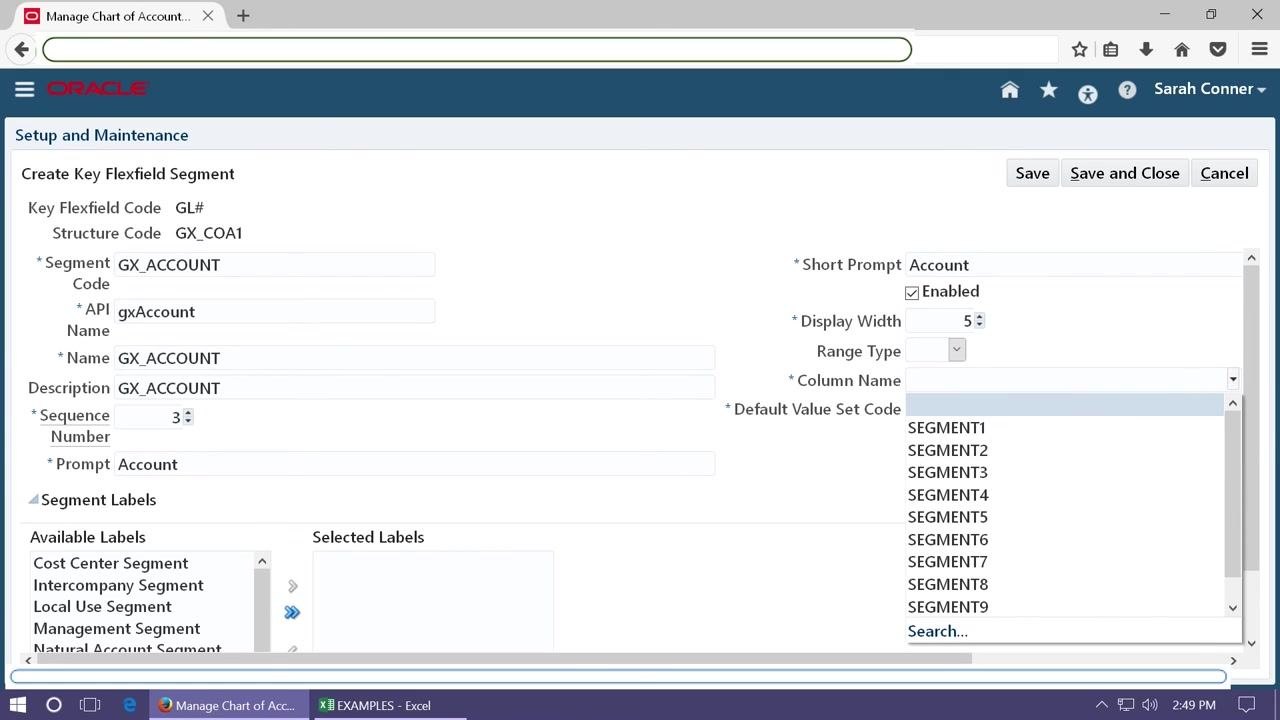
Make sure Enabled is checked. The form displays all entered values and required fields for the segment.
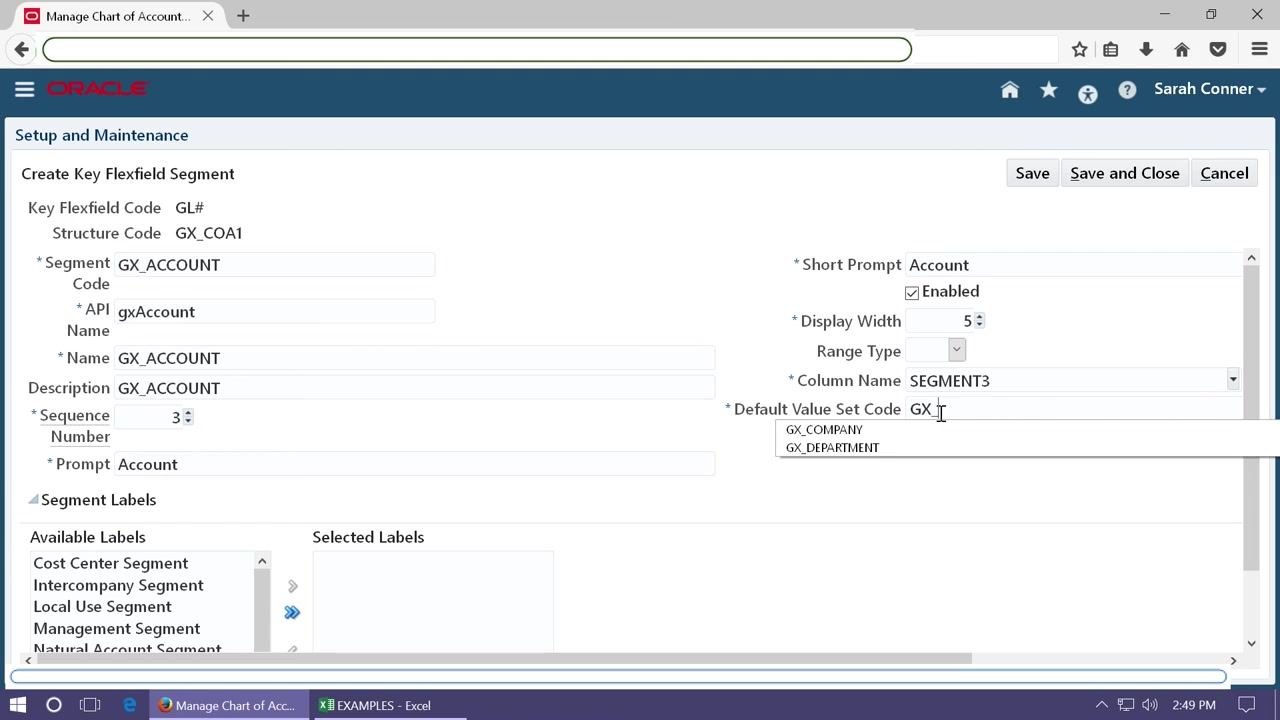
Assign the column name and value set: select SEGMENT3 from the Column Name dropdown and select GX_ACCOUNT as the Default Value Set Code. Confirm the correct value set is chosen for the account segment.
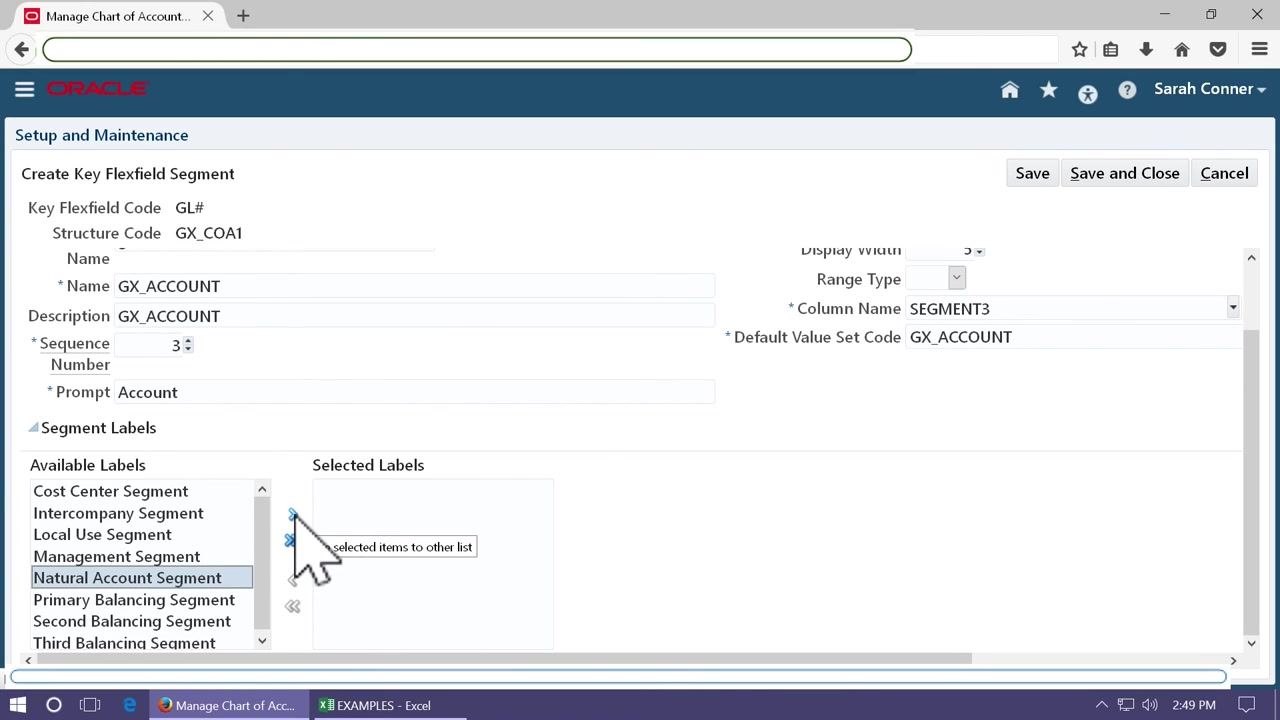
In the Available Labels list, select Natural Account Segment and move it to the Selected Labels list to flag this segment as the natural account segment. This step is critical for identifying the account segment in your chart of accounts structure.
Click Save and Close to save the completed account segment. The system returns you to the segment list, which now displays all defined segments:
- Sequence Number 1: GX_COMPANY (Company)
- Sequence Number 2: GX_DEPARTMENT (Department)
- Sequence Number 3: GX_ACCOUNT (Account)
Verify that the structure is saved
On the Manage Key Flexfield Structures screen, enter GX% in the Structure Code field and click Search to display the saved structure. Confirm that your structure appears in the search results.
With your chart of accounts structure created, you are ready to proceed to managing structure instances in Oracle Fusion.
Create a chart of accounts instance
Open Manage Structure Instances
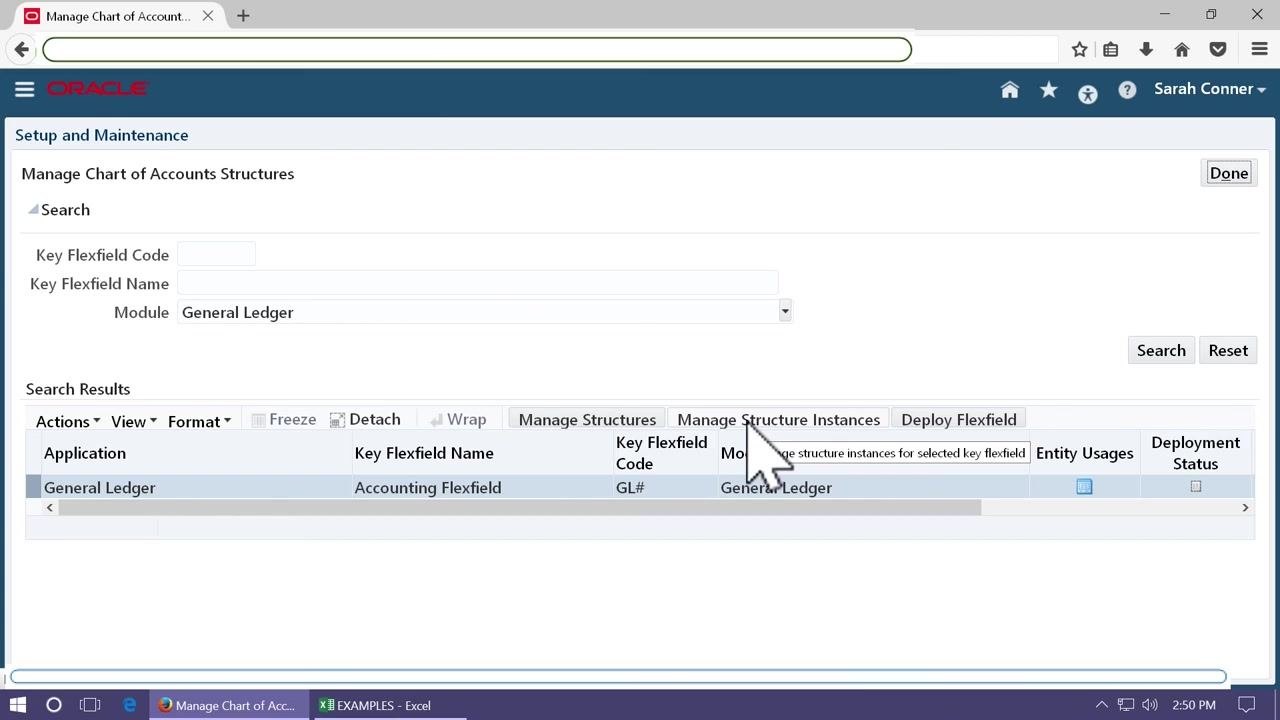
With your structure selected, click Manage Structure Instances to create and configure instances of your chart of accounts structure.
Open the Create Key Flexfield Structure Instance screen
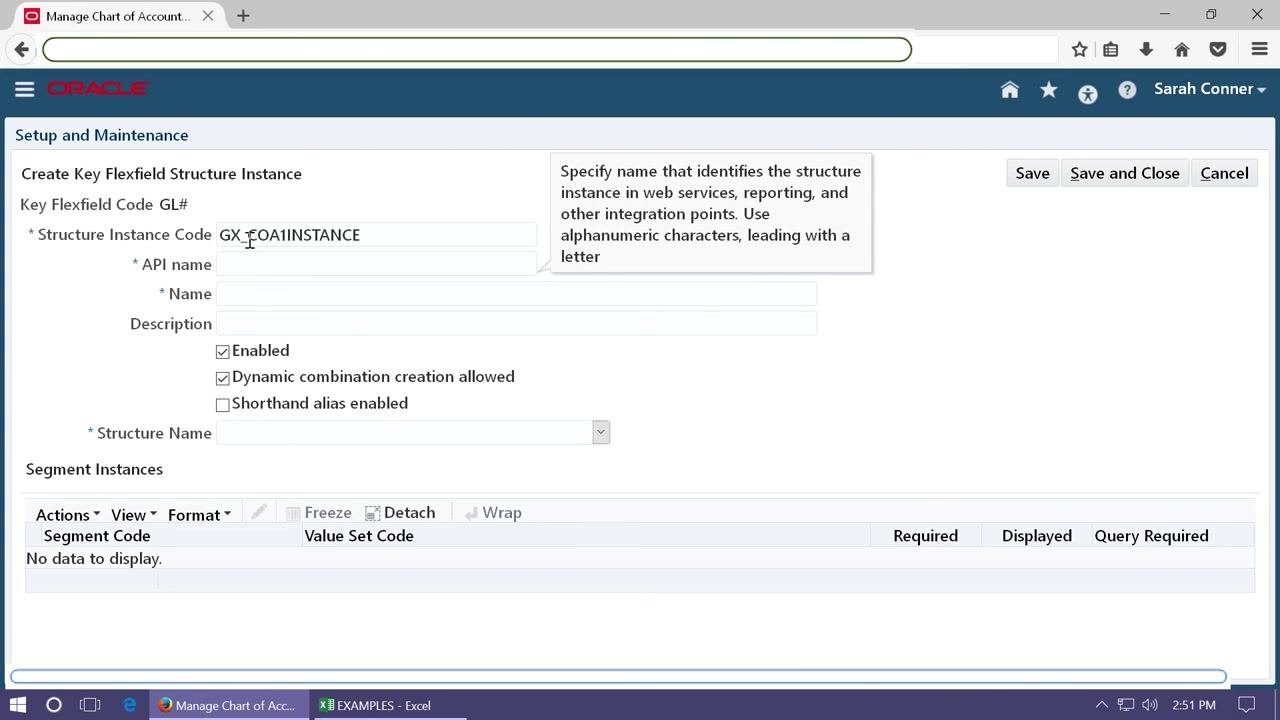
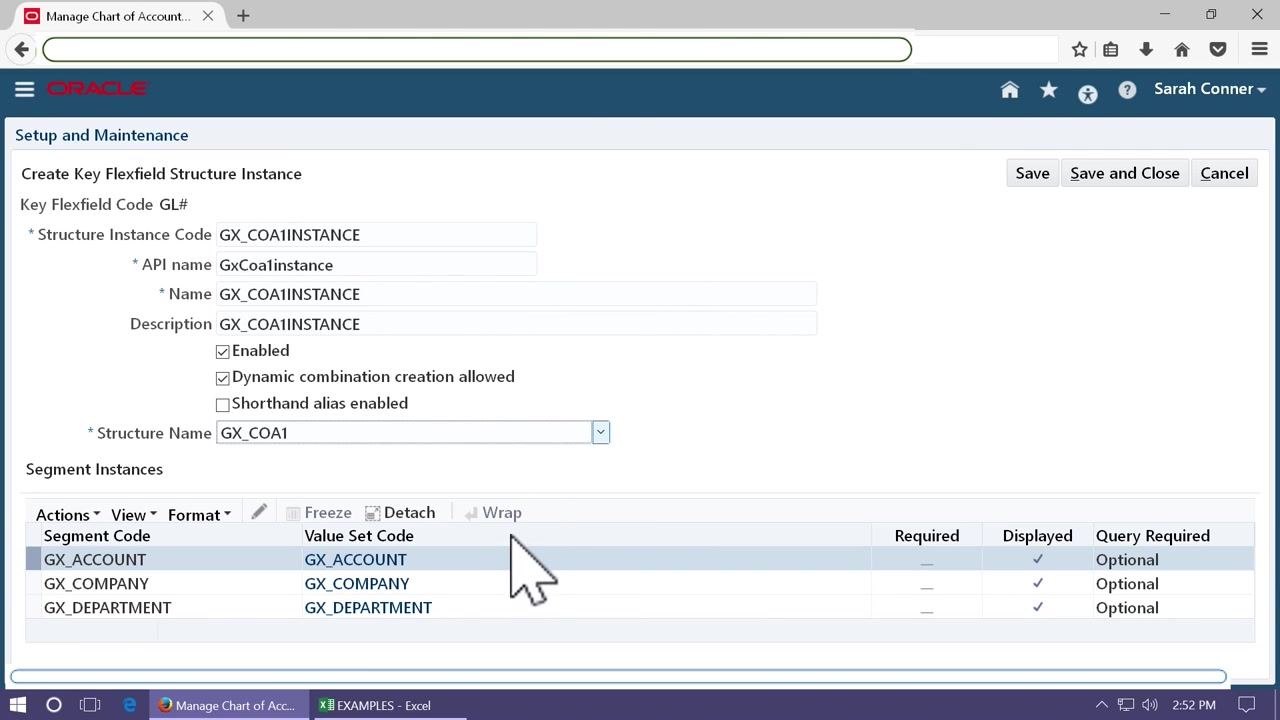
Navigate to the Create Key Flexfield Structure Instance screen under Setup and Maintenance. The screen displays fields for Key Flexfield Code (GL#), Structure Instance Code, API Name, Name, Description, checkboxes for Enabled, Dynamic combination creation allowed, and Shorthand alias enabled, along with the Structure Name dropdown and a Segment Instances table.
Enter a unique Structure Instance Code
Enter GX_COA1INSTANCE in the Structure Instance Code field. A tooltip may appear instructing you to use alphanumeric characters, starting with a letter.
Fill in the remaining instance fields
Enter the following:
- API name:
GxCoa1instance - Name:
GX_COA1INSTANCE - Description:
GX_COA1INSTANCE
Make sure the checkboxes for Enabled, Dynamic combination creation allowed, and Shorthand alias enabled are checked, then select GX_COA1 from the Structure Name dropdown. The Segment Instances table displays segment codes such as GX_ACCOUNT, GX_COMPANY, and GX_DEPARTMENT, each with their corresponding value set codes.
Configure the Account segment instance
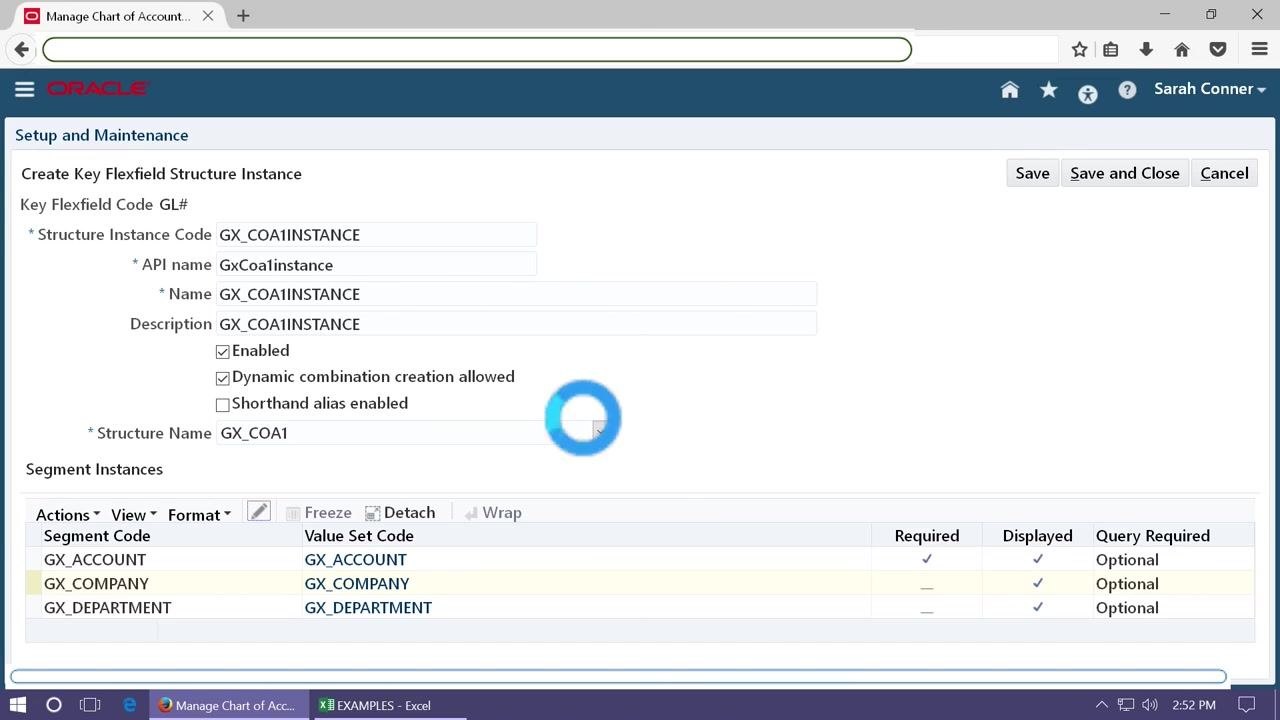
Click the GX_ACCOUNT segment row to open the Edit Key Flexfield Segment Instance dialog. Check the Required and Displayed boxes, set Default Type to "Constant" if you want a constant default value for this segment, and set Query Required as needed.
Configure the remaining segment instances
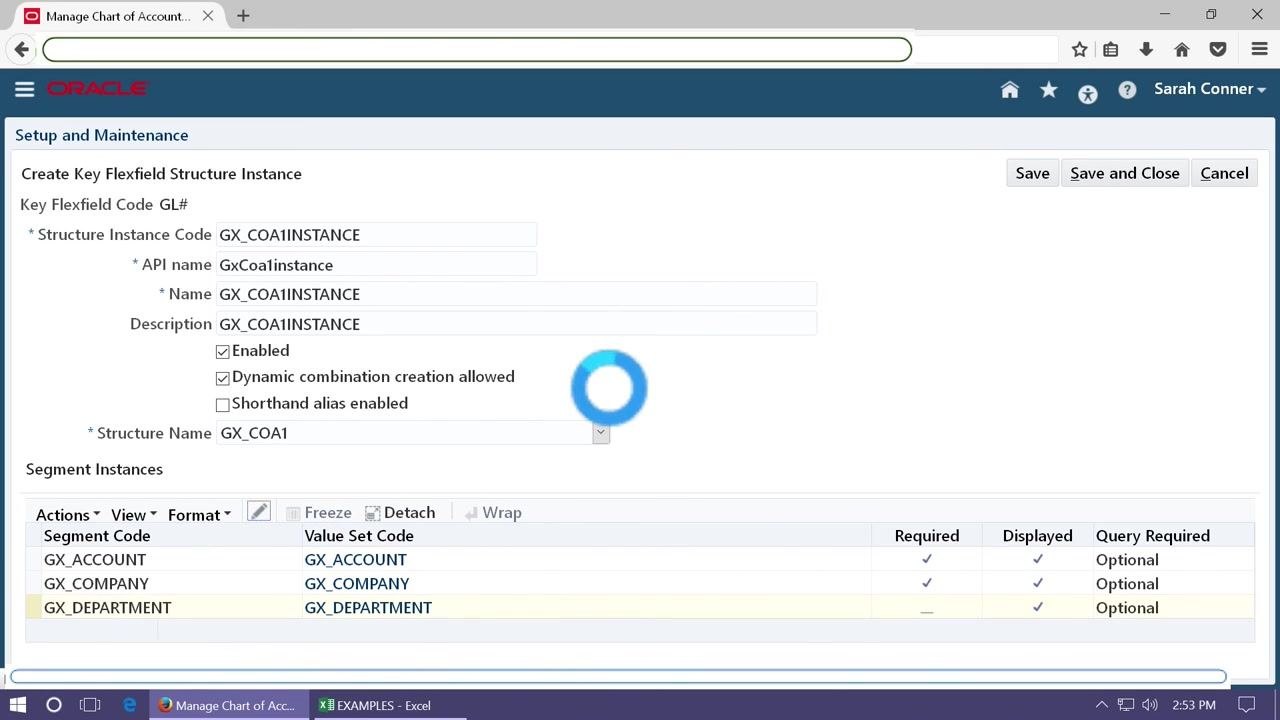
Repeat the process for GX_COMPANY and GX_DEPARTMENT: open the edit dialog for each, check Required if needed, configure other options as appropriate, and click OK. The main screen shows a loading indicator as changes are saved.
Save the structure instance
After configuring all segments, click Save and Close. Wait for the system to process the changes and return you to the Manage Chart of Accounts Structures screen.
Verify the new structure instance
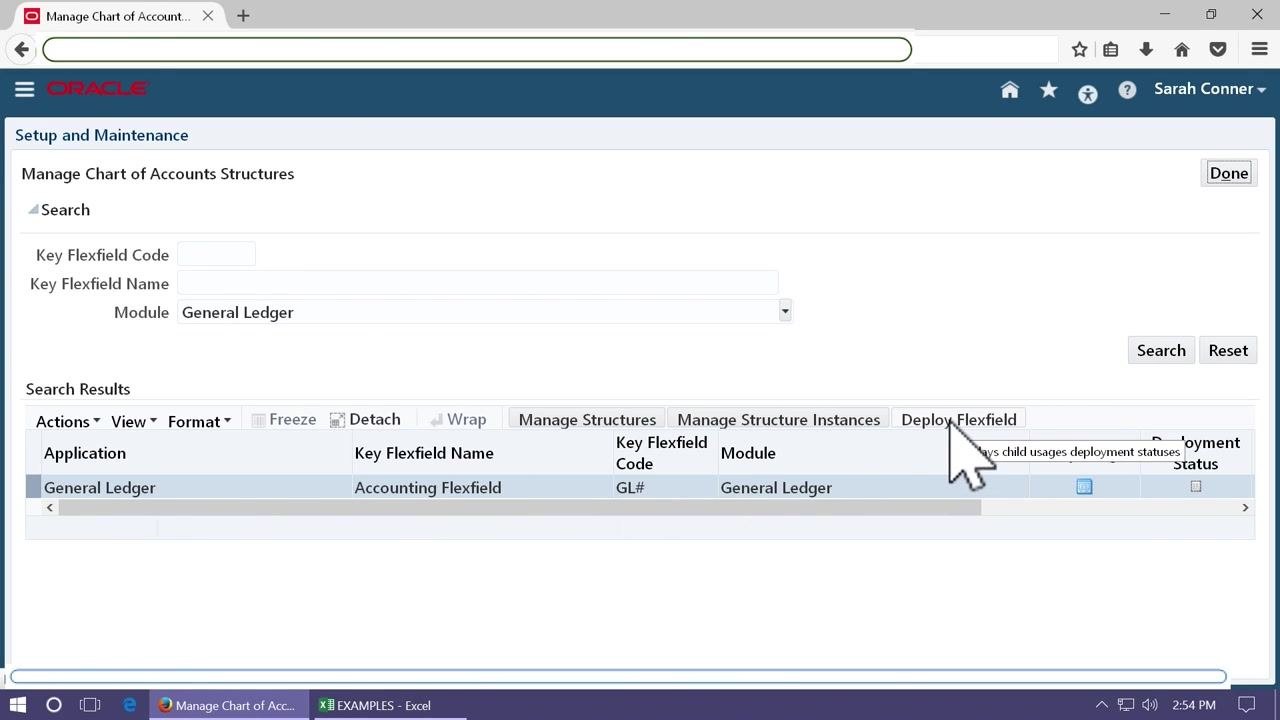
On the Manage Chart of Accounts Structures screen, confirm that the instance is listed under the appropriate Application, Key Flexfield Name, Key Flexfield Code, and Module.
You have now created and configured a Key Flexfield Structure Instance in Oracle Fusion, with all required fields and segment settings properly set.
Deploy the chart of accounts flexfield
Start the deployment
On the Manage Chart of Accounts Structures screen under Setup and Maintenance, locate the row where Application is "General Ledger", Key Flexfield Name is "Accounting Flexfield", Key Flexfield Code is "GL#", and Module is "General Ledger". Click Deploy Flexfield in the table header.
Monitor the deployment progress
A dialog titled "GL#: Processing" appears, displaying a progress bar labeled "Deployment in progress" with a percentage indicator and "Entity Usages Processed: 1 of 29". Review the Flexfield Metadata Validation section for errors or warnings (for example, "0 Errors, 5 Warnings"), and wait for the deployment to reach 100%.
Confirm deployment completion
When deployment finishes, a confirmation dialog titled "GL#: Confirmation" appears, stating: "Deployment completed successfully. Start a new session of the runtime application to view changes." The progress bar shows 100% and "Entity Usages Processed: 29 of 29." Confirm there are no errors in the Flexfield Metadata Validation section, then click OK to close the dialog.
Verify the deployment status
After closing the confirmation dialog, return to the Manage Chart of Accounts Structures screen. In the search results, verify that the Deployment Status column for your flexfield row displays a green checkmark, indicating successful deployment.
Enter value set values
With your chart of accounts deployed, it is now ready for use. The final step is to enter the actual values for each segment.
Open the Manage Chart of Accounts Value Set Values task
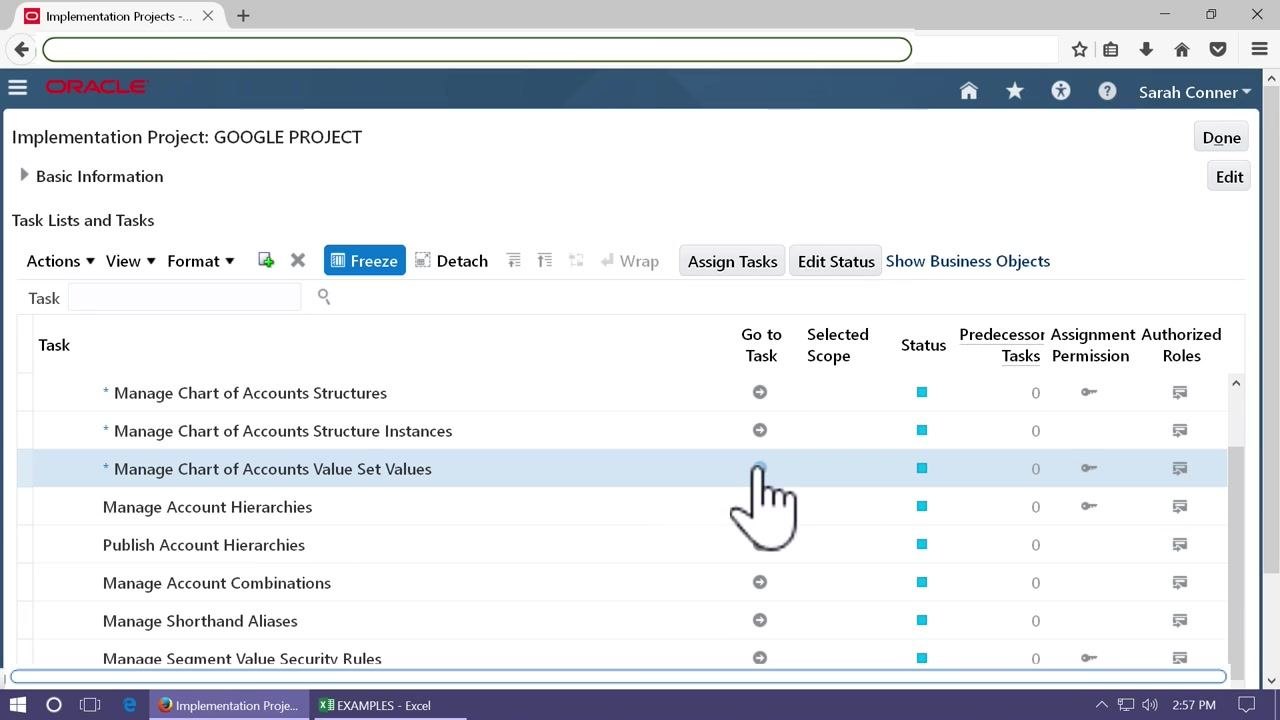
Navigate to the Implementation Project screen. In the Task Lists and Tasks section, locate Manage Chart of Accounts Value Set Values and click the Go to Task icon next to it.
Search for the value set
On the Manage Chart of Accounts Value Set Values screen, enter the desired Value Set Code in the search field (for example, "GX_COMPANY"). You can optionally enter additional criteria such as Validation Type, Value Data Type, Module, or Description, then click Search.
Open value management for the selected value set
In the search results, select the row for the desired value set code (for example, "GX_COMPANY") and click Manage Values above the results table to proceed to value entry and management.
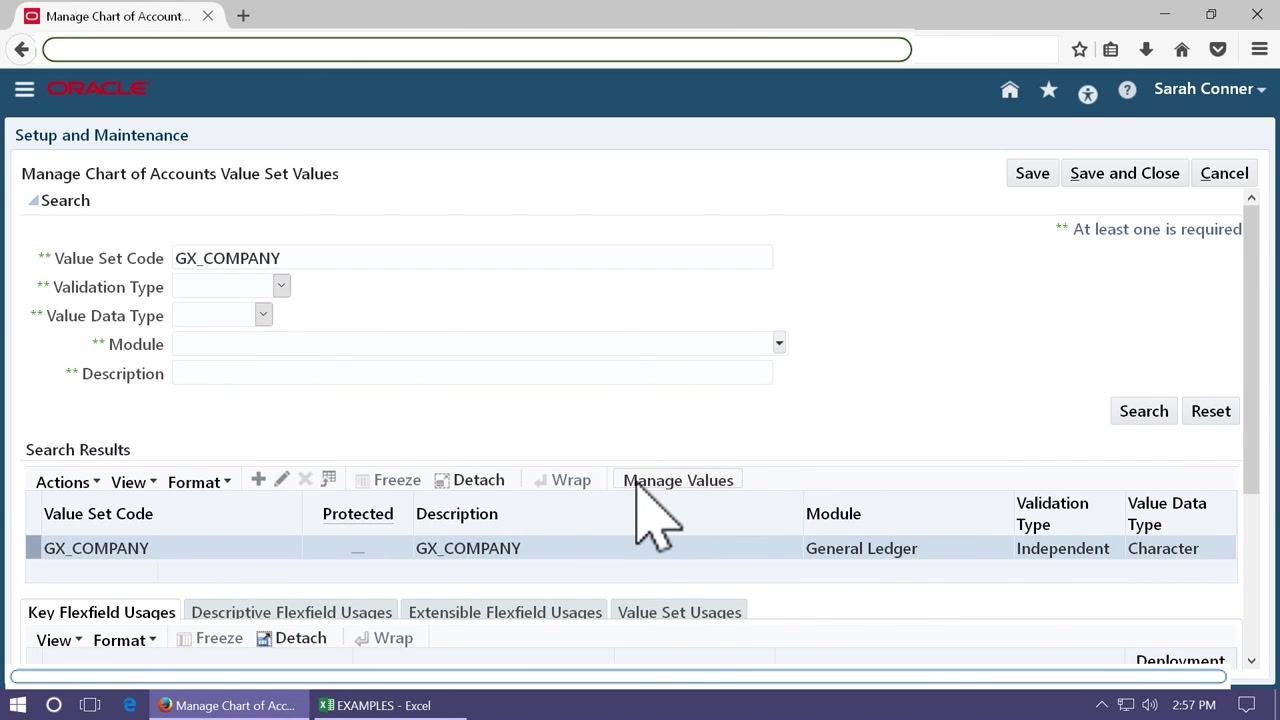
With the flexfield deployed and value management open, you are ready to enter values for each segment as required by your implementation.
Create a new value
On the Manage Chart of Accounts Value Set Values screen, begin creating a new value for the value set code "GX_COMPANY". In the Create Value section, enter:
- Value Set Code: GX_COMPANY (pre-filled)
- Description: GX_COMPANY (pre-filled)
- Value:
10 - Description:
GOOGLE OPERATIONS - Enabled: Checked
- Start Date: Leave blank unless a specific start date is required
- End Date: Leave blank unless a specific end date is required
- Sort Order: Leave blank unless a specific order is needed
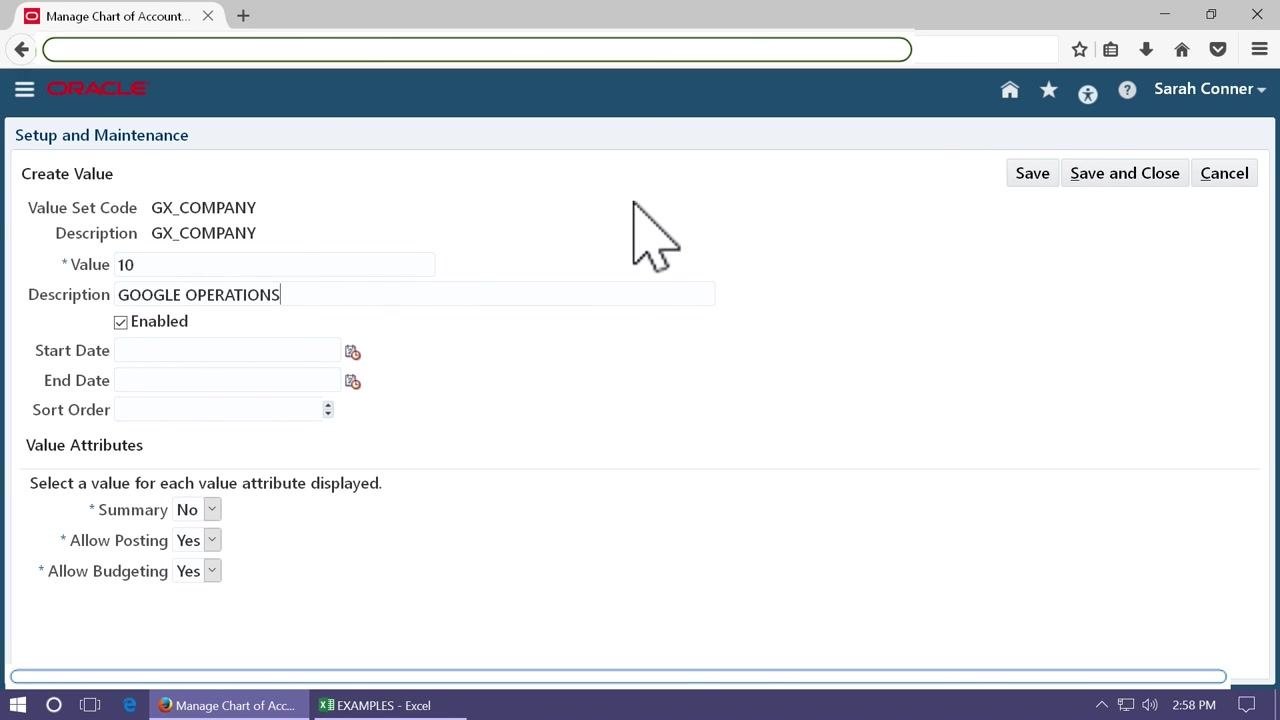
Under Value Attributes, set:
- Summary: No
- Allow Posting: Yes
- Allow Budgeting: Yes
Review all entered information for accuracy.
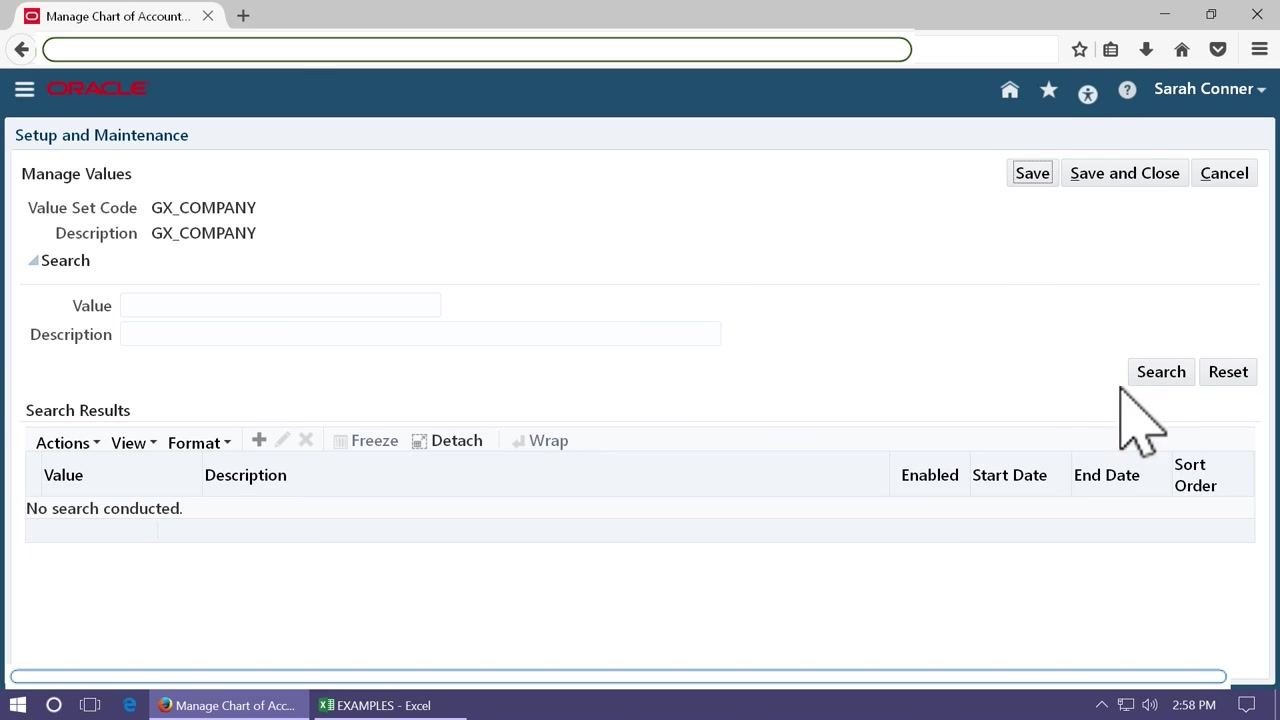
Search for the entered value
After saving the new value, return to the Manage Values screen for the value set "GX_COMPANY". In the Search section, leave the Value and Description fields blank to display all values, or enter specific criteria if needed, then click Search.
Verify the value appears in the results
In the Search Results table, confirm that the value you entered appears:
- Value: 10
- Description: GOOGLE OPERATIONS
- Enabled: Checked
- Start Date, End Date, Sort Order: As entered, or blank if not specified
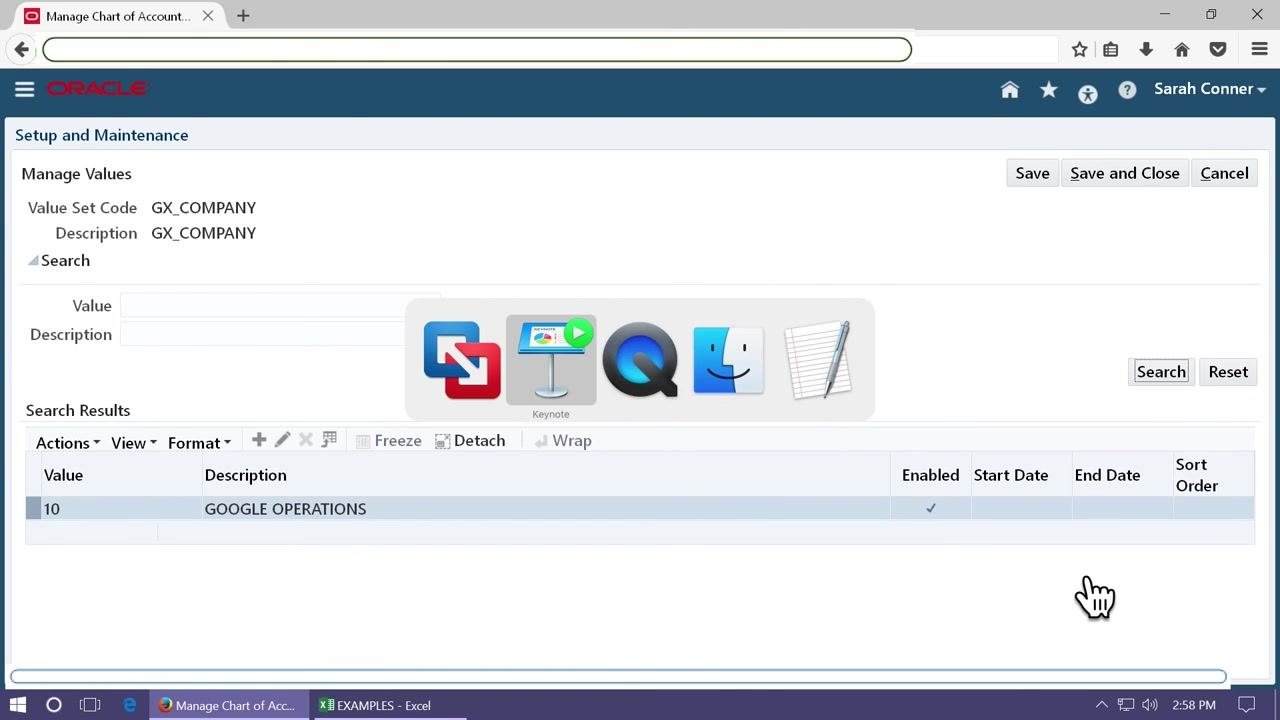
Ensure the value is correctly listed and enabled for use.
What's next
Repeat the value entry process for the remaining segments — Department and Account — using the same Manage Chart of Accounts Value Set Values task. Once all segment values are entered and enabled, your chart of accounts in Oracle Fusion is fully configured and ready for use in creating account combinations across your organization.
Generation details: cost, quality tiers
Docsie billed 7,500 credits ($5.25) to analyze this 15-minute video at standard quality. The rewrite, template fill and Word/PDF exports were included. The same video at each quality tier:
| Quality | Frames sampled | Credits | Approx. cost |
|---|---|---|---|
| Draft | every 16-30 s | 3,750 | $2.62 |
| Standard (this guide) | every 8-15 s | 7,500 | $5.25 |
| Detailed | every 4-7 s | 15,000 | $10.50 |
| Ultra | every 1-3 s | 30,000 | $21.00 |
Credits priced at $0.70 per 1,000; plans include a monthly allowance. Enterprise customers on on-premise or bring-your-own-model deployments run this on their own inference and pay no per-video credits.
Generated by Docsie Video-to-Docs on 2026-10-14 from a 14-minute video. Screenshots are frames from the source video and belong to their creator, CA SUHAS VAZE, whose original is embedded above. If you own this video and want the guide removed or credited differently, contact us and we will act within one business day.