
How to Create a Workflow in NetSuite
This guide walks you through how to create a workflow in NetSuite using the Workflow Manager. Using a Purchase Order approval process as an example, you'll learn how to define workflow properties, build states, configure actions, set up transitions, and validate the finished workflow. The goal is to give you the practical steps and insights you need to design your own workflows in NetSuite.
Video: NetSuite: How to create a Workflow (SuiteFlow) by SwissBear IT GmbH (2019). All credit for the demonstration goes to the creator; watch the original on YouTube. The written guide below was generated from this video by Docsie. Creator? Request a change or removal.
This guide walks you through how to create a workflow in NetSuite using the Workflow Manager. Using a Purchase Order approval process as an example, you'll learn how to define workflow properties, build states, configure actions, set up transitions, and validate the finished workflow. The goal is to give you the practical steps and insights you need to design your own workflows in NetSuite.
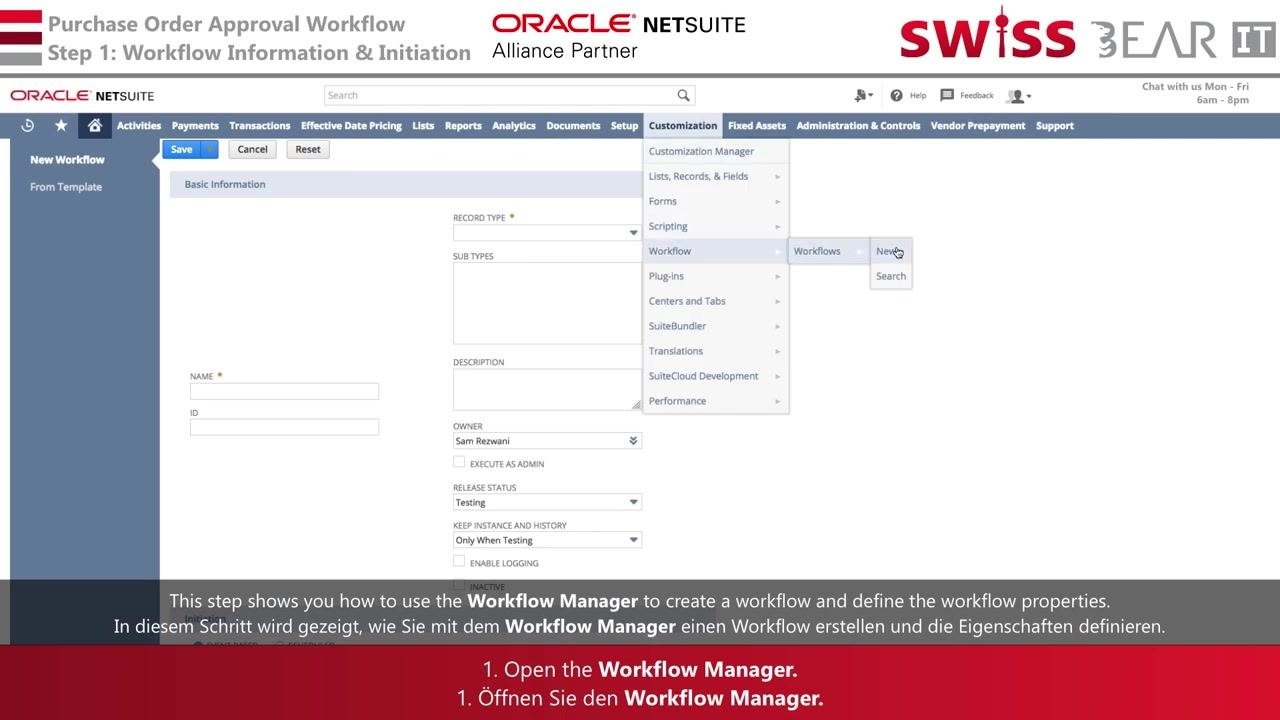
Open Workflow Manager and set workflow properties
-
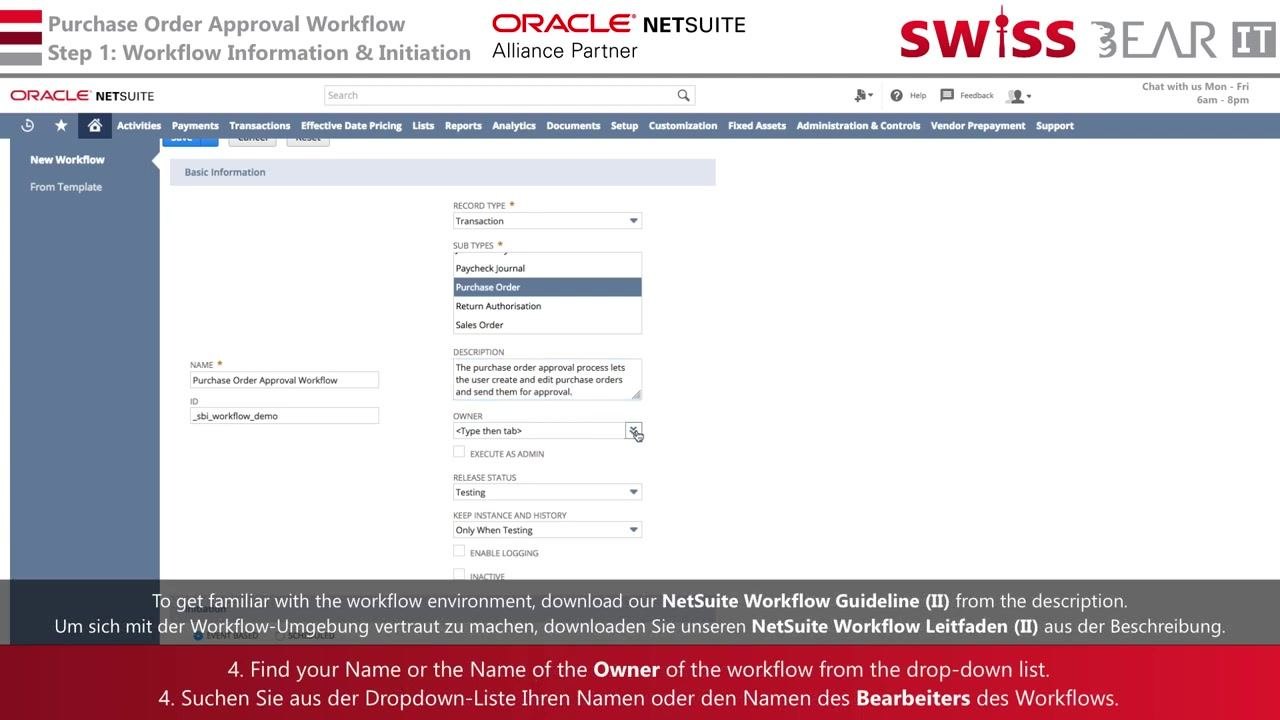
Navigate to Customization > Workflow > Workflows > New in the top menu. This opens the New Workflow creation screen.
-
Find the Owner field and select your name or the appropriate owner from the drop-down list. In this example, the owner is set to
Carol Morgan. Optionally, check Execute as Admin if required. -
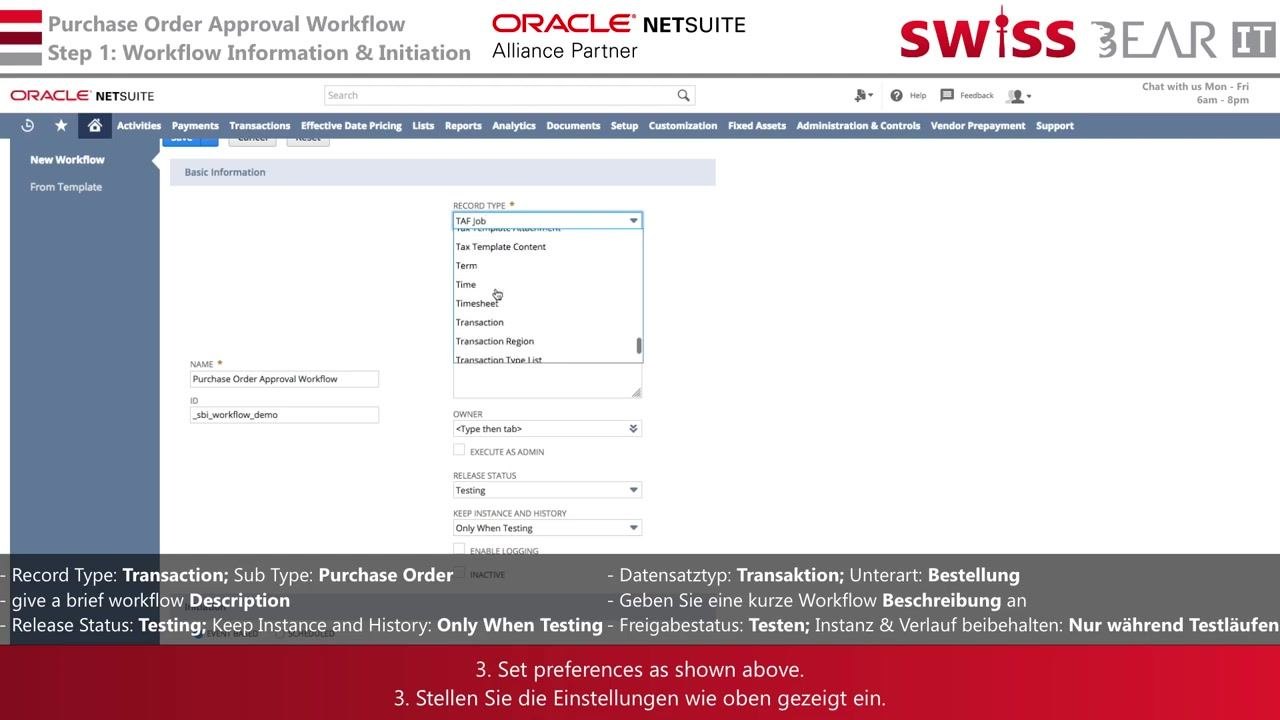
Set the remaining workflow properties:
- Record Type:
Transaction - Sub Type:
Purchase Order - Name:
Purchase Order Approval Workflow - ID:
_sbi_workflow_demo - Description:
The purchase order approval process lets the user create and edit purchase orders and send them for approval. - Release Status:
Testing - Keep Instance and History:
Only When Testing
- Record Type:
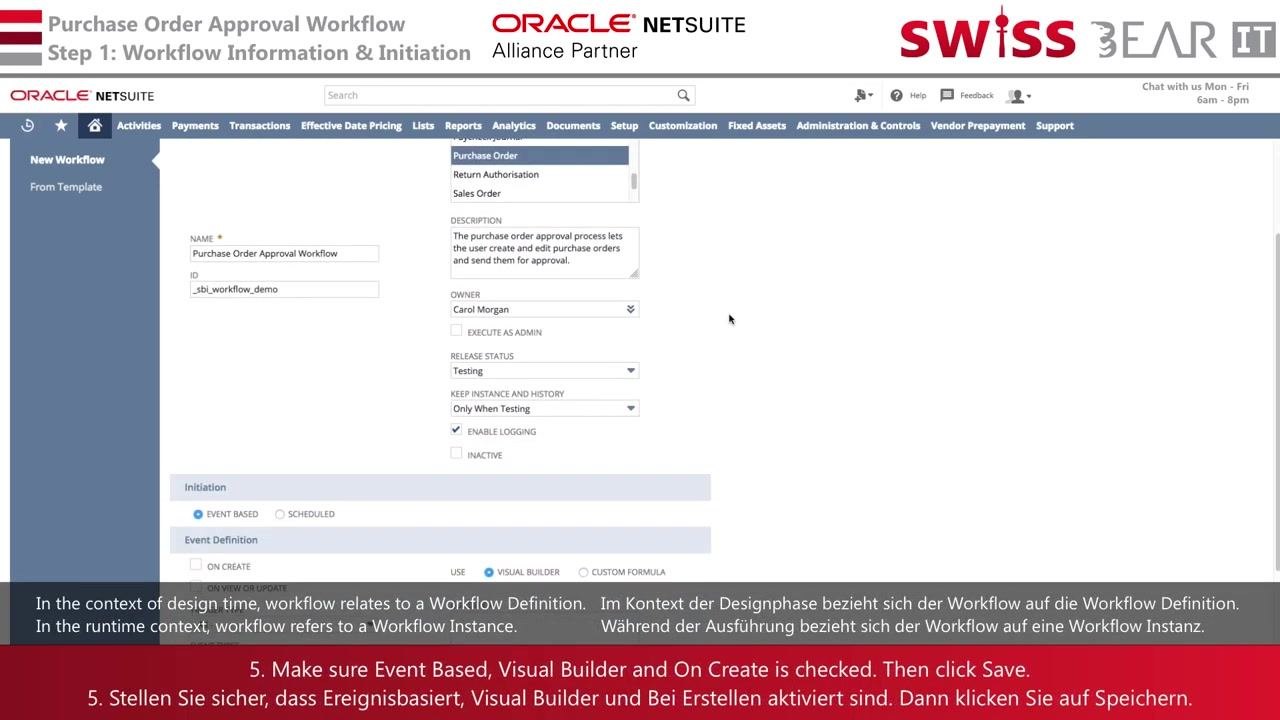
- Configure how the workflow starts:
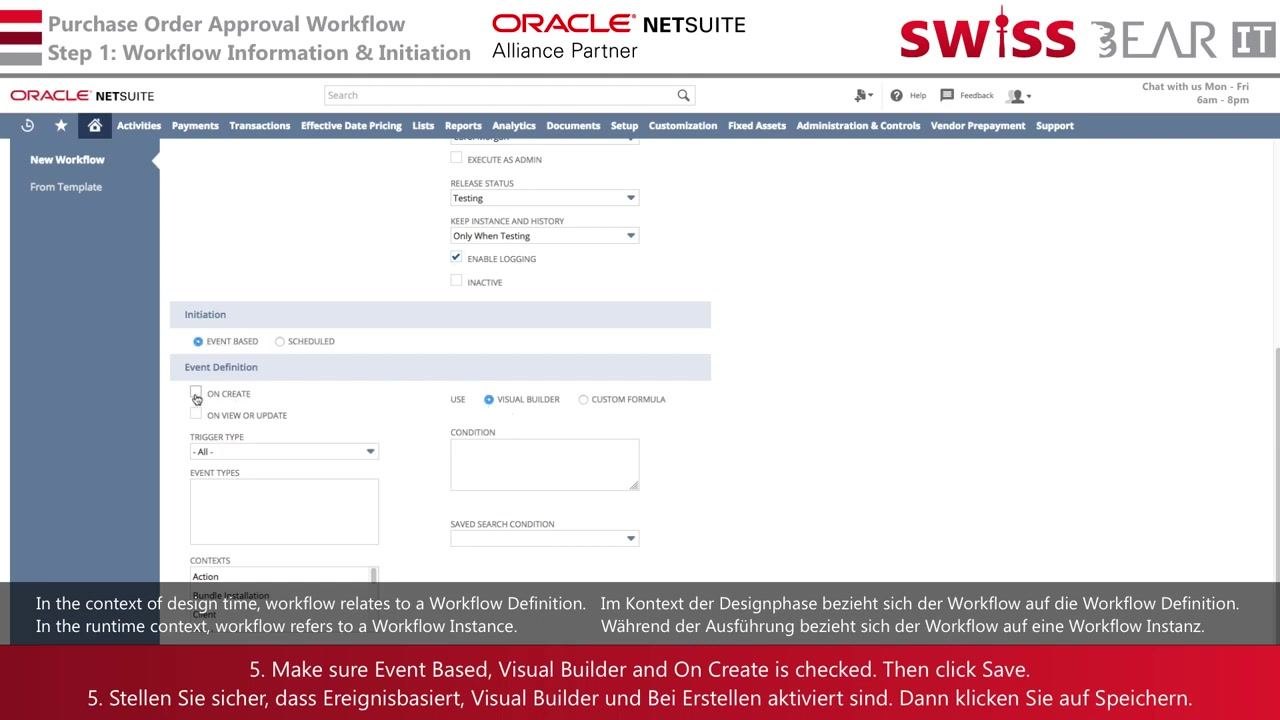
- Under Initiation, select Event Based.
- Under Event Definition, check On Create.
- Under Use, select Visual Builder.
- Click Save to create the workflow.
Create workflow states
- In the Workspace area, click New State to add each state your workflow needs. You must create states before you can add actions or transitions to them.
- Drag and drop the state boxes to arrange them in the workspace as you like. This example uses four states — State 1, State 2, State 3, and State 4. It's best to create all the states you need during the initial design phase, then return to each one to add its actions and transitions.
Add actions to the initiation state
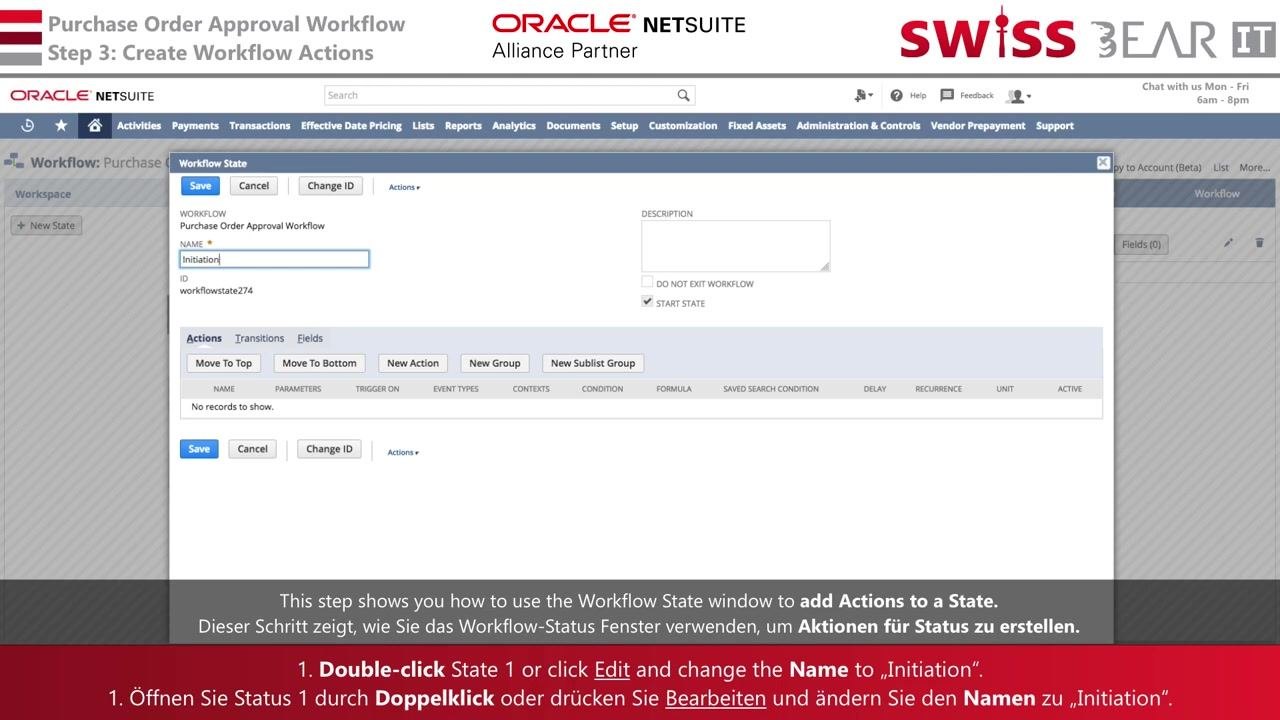
- Double-click State 1, or select it and click Edit, to open the state properties. Change the Name field from
State 1toInitiation. Confirm that Start State is checked. The Actions tab shows options for Move To Top, Move To Bottom, New Action, New Group, and New Sublist Group, with no actions listed yet.
-
Click New Action and choose Set Field Value. In the FIELD dropdown, select
Created Byand set the value toUser. Set Trigger On toEntry. This ensures that when the workflow enters this state, theCreated Byfield is automatically set to the current user. -
Click New Action again and choose Set Field Value. Set the FIELD to
Approval Statusand the value toPending Approval. Set Trigger On toEntry. This sets the approval status to pending as soon as the record enters the state. -
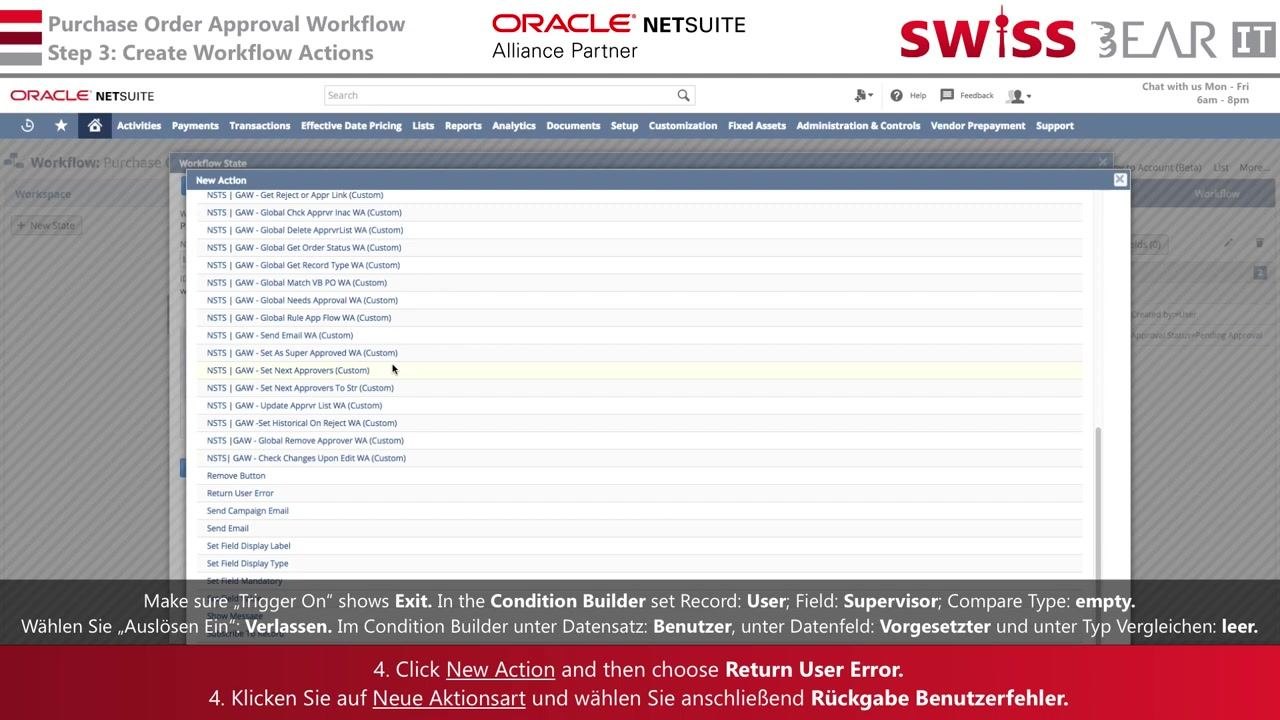
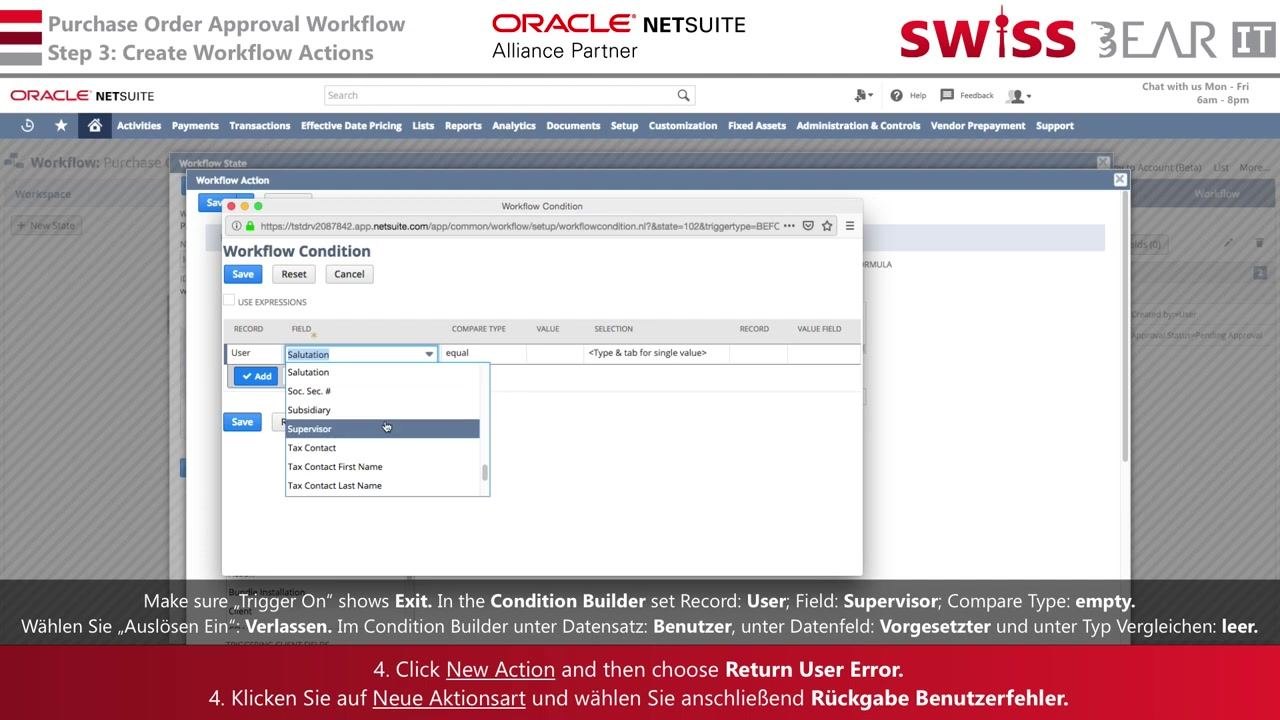
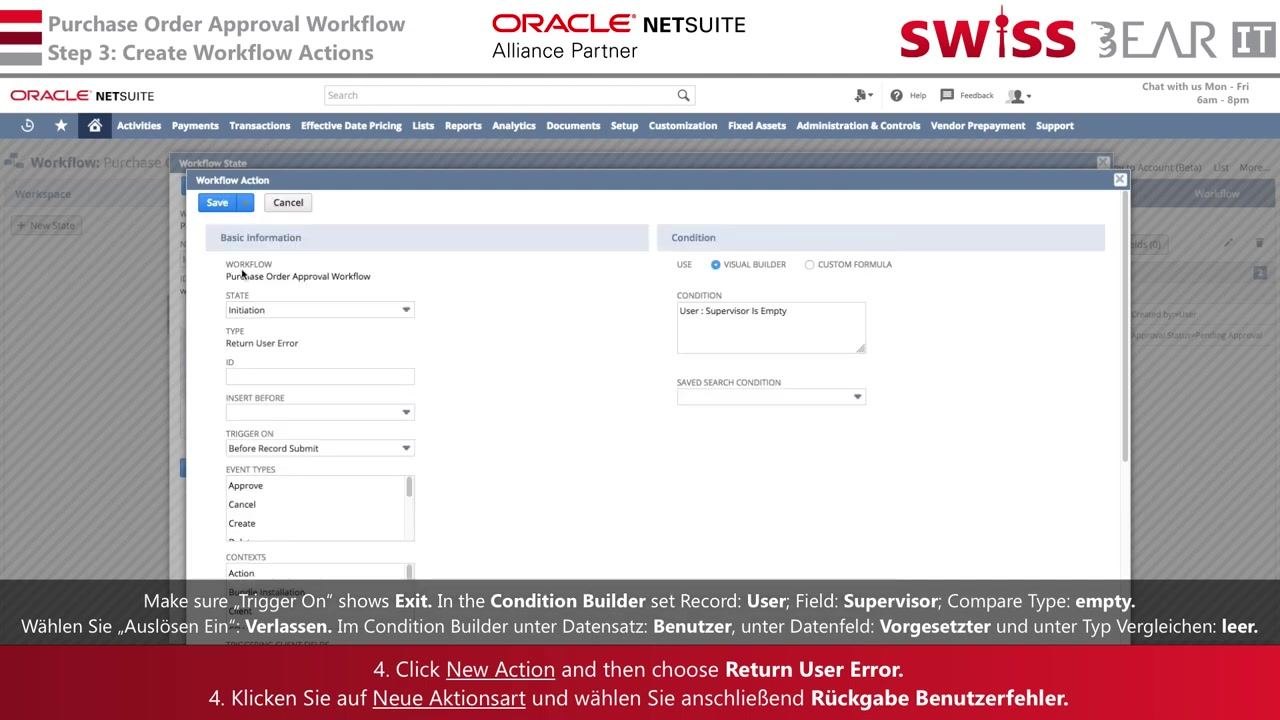
Click New Action and choose Return User Error to add a check for a missing supervisor. In the Workflow Condition window, set Trigger On to
Exit, then in the Condition Builder set Record toUser, Field toSupervisor, and Compare Type toempty. This triggers an error if the user has no assigned supervisor when trying to exit the state.
-
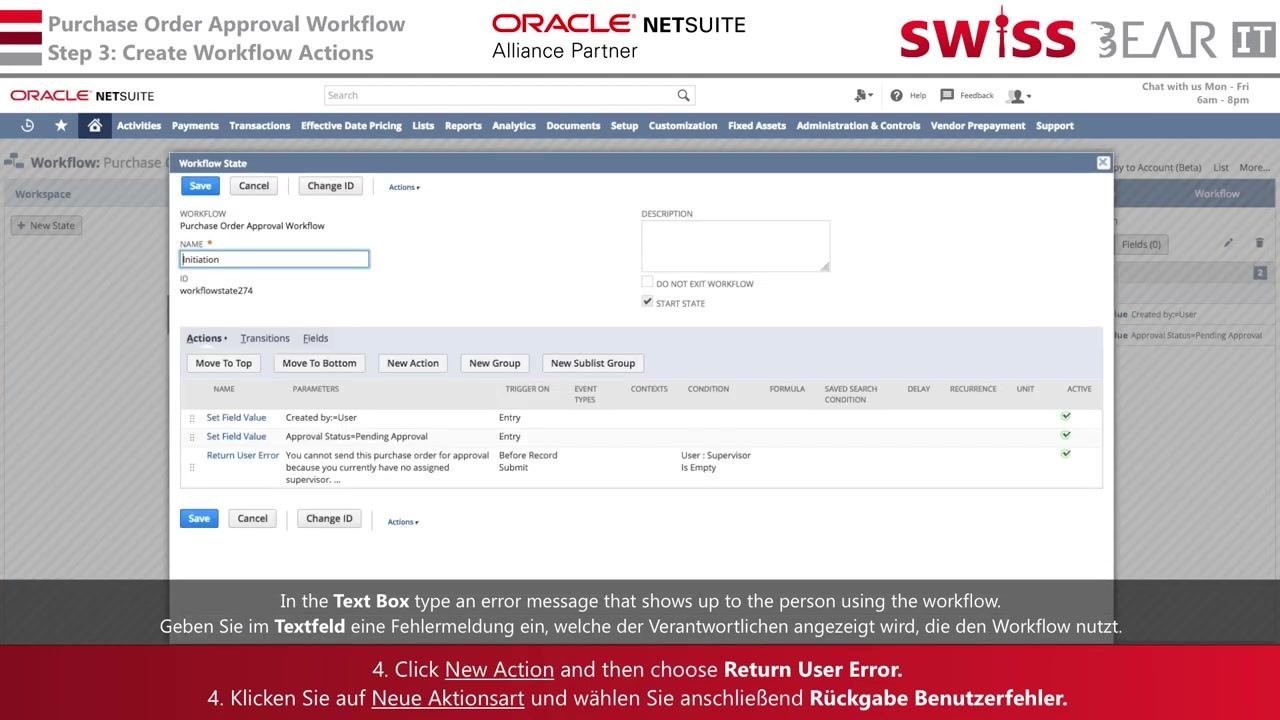
In the Return User Error action, enter the error message that should display to the user, for example: "You cannot send this purchase order for approval because you currently have no assigned supervisor." This message appears to any user who attempts to proceed without an assigned supervisor.
-
Click New Action and choose Set Field Value to define the next approver. Set Trigger On to
Exit, and set the parameter Next Approver toUser : Supervisor. This ensures that when exiting the state, the next approver is set to the current user's supervisor.
Configure buttons and field display types
- Click New Action and select Add Button to give users a way to submit the record for approval. In the Workflow Action window, set Trigger On to
Before Record Load. In the Parameters section, enter the Label asSubmit for Approval, and make sure Save Record First is checked. This adds a "Submit for Approval" button to the workflow form and requires the record to be saved before submission.
-
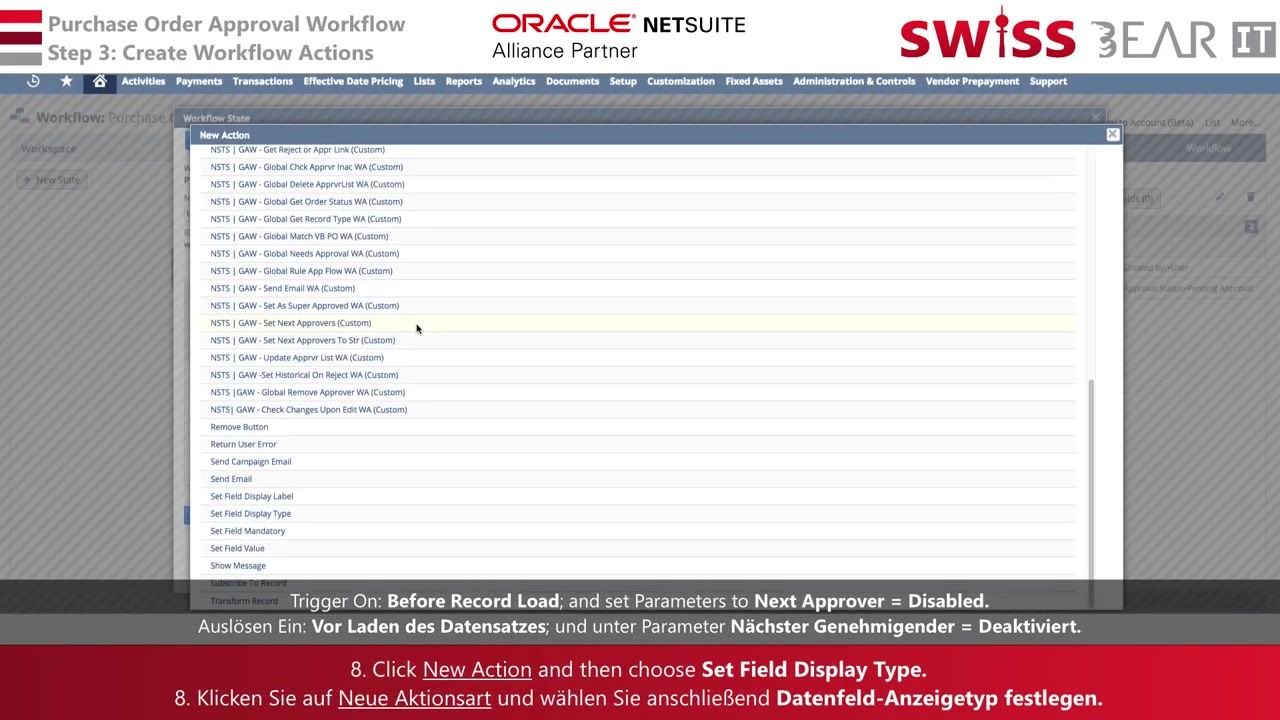
Click New Action and choose Set Field Display Type to lock the Next Approver field. Set Trigger On to
Before Record Load, select Next Approver as the field in the Parameters section, and set the Display Type toDisabled. This keeps the field visible but prevents users from editing it. -
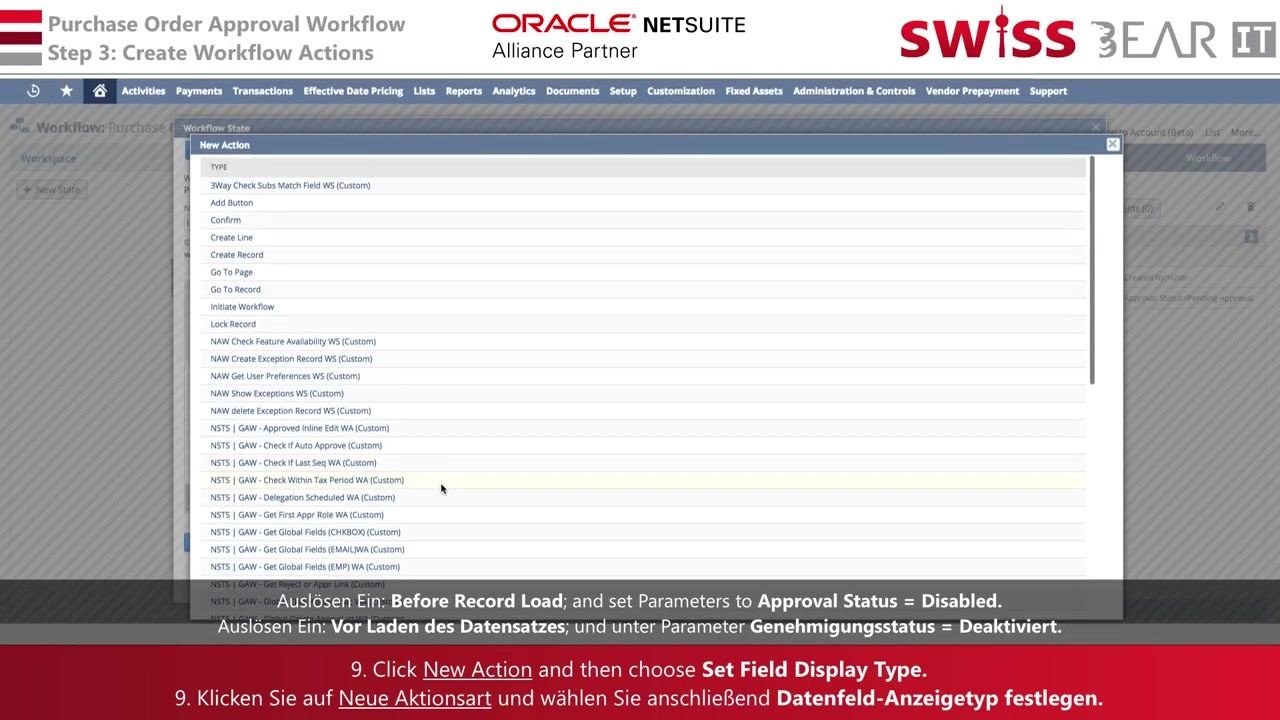
Repeat the same process for the Approval Status field: click New Action, choose Set Field Display Type, set Trigger On to
Before Record Load, select Approval Status as the field, and set the Display Type toDisabled. This makes the field visible but not editable by users. -
Review the full list of actions for the state to confirm everything is configured correctly:
- Set Field Value: Created By = User (Entry)
- Set Field Value: Approval Status = Pending Approval (Entry)
- Return User Error: Supervisor is empty (Exit)
- Set Field Value: Next Approver = User : Supervisor (Exit)
- Add Button: Label = Submit for Approval, Save Record First (Before Record Load)
- Set Field Display Type: Next Approver = Disabled (Before Record Load)
- Set Field Display Type: Approval Status = Disabled (Before Record Load)
Confirm that Start State is checked, then click Save to store the state and its actions.
Create transitions between workflow states
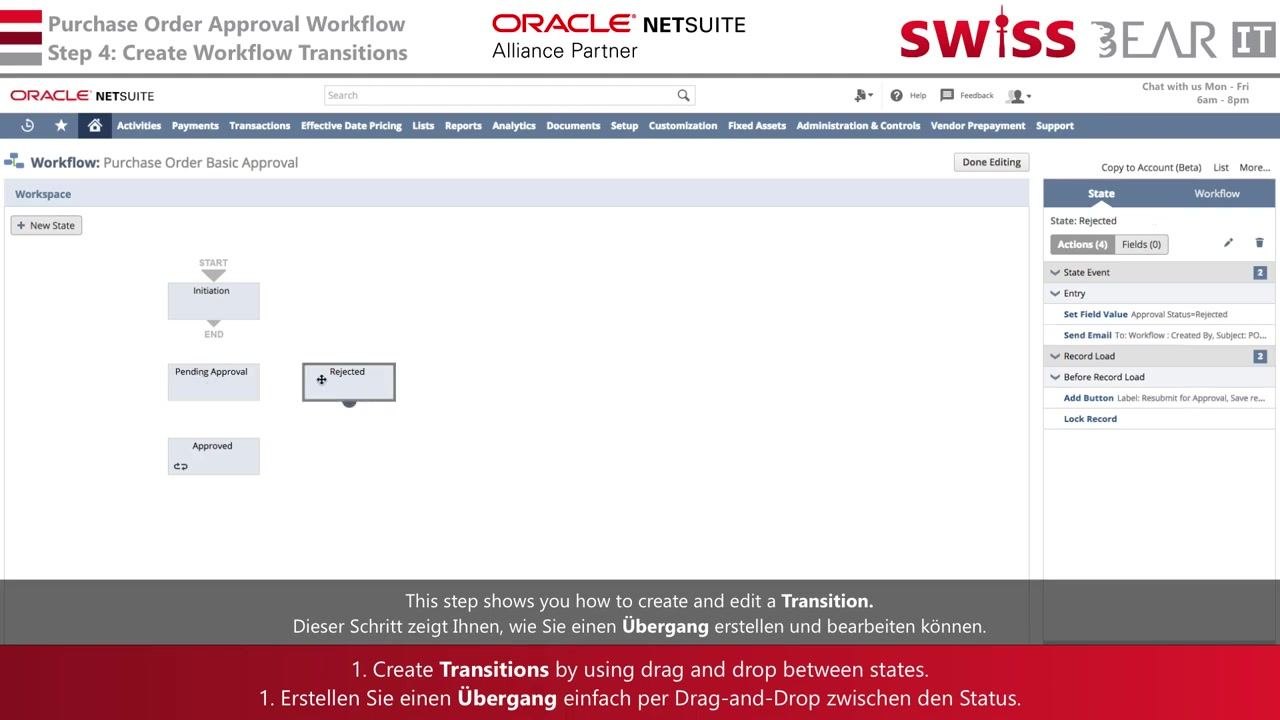
- In the workflow workspace, view your state diagram — in this example, Initiation (Start), Pending Approval, Rejected, and Approved. Drag and drop between state boxes (for example, from Initiation to Pending Approval) to create a transition. This defines how records move between the different approval states.
- To add further transitions, hover over the End icon of a state (for example, "Pending Approval") and drag the arrow to another state (such as "Rejected" or "Approved"). Releasing the mouse creates the transition, and the last state you edit becomes the End state. The right panel shows the actions configured for each state as you work.
Initiate and validate the workflow
-
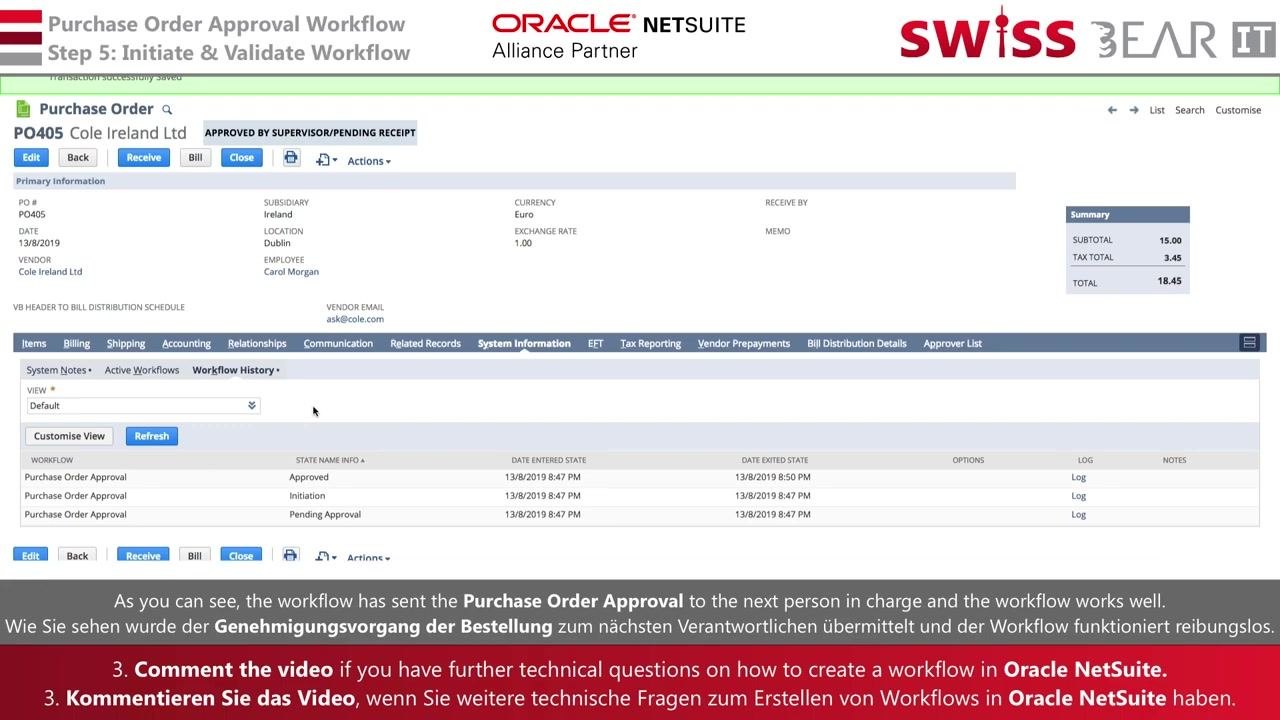
Open a purchase order record (for example, PO405 for Cole Ireland Ltd) and confirm the workflow status shown at the top, such as "APPROVED BY SUPERVISOR/PENDING RECEIPT." Review the Primary Information section for details like the PO number, date, vendor, employee, currency, and location. Navigate to the System Information tab, then click the Workflow History subtab to view the workflow's progress, including each state entered and exited with its date and time — for example, Initiation, Pending Approval, and Approved.
-
In the Workflow History subtab, verify that the purchase order moved through the expected states, such as Initiation → Pending Approval → Approved. This confirms that the workflow sent the purchase order approval to the next person in charge and that it is operating correctly.
Summary
By following these steps, you have learned how to create a workflow in NetSuite for a purchase order approval process. You set up the workflow's properties and initiation settings, created and arranged states, configured actions to automate field values and enforce approval requirements, added a custom submit button, set field display types, built transitions between states, and validated the finished workflow on an actual purchase order record.
What's next
With the basic approval workflow in place, you can continue refining it by adding more states, actions, or transitions to match your organization's specific approval process. Review the Workflow History subtab regularly to confirm that records are moving through the states as expected.
Generation details: cost, quality tiers
Docsie billed 3,000 credits ($2.10) to analyze this 6-minute video at standard quality. The rewrite, template fill and Word/PDF exports were included. The same video at each quality tier:
| Quality | Frames sampled | Credits | Approx. cost |
|---|---|---|---|
| Draft | every 16-30 s | 1,500 | $1.05 |
| Standard (this guide) | every 8-15 s | 3,000 | $2.10 |
| Detailed | every 4-7 s | 6,000 | $4.20 |
| Ultra | every 1-3 s | 12,000 | $8.40 |
Credits priced at $0.70 per 1,000; plans include a monthly allowance. Enterprise customers on on-premise or bring-your-own-model deployments run this on their own inference and pay no per-video credits.
Generated by Docsie Video-to-Docs on 2026-09-14 from a 5-minute video. Screenshots are frames from the source video and belong to their creator, SwissBear IT GmbH, whose original is embedded above. If you own this video and want the guide removed or credited differently, contact us and we will act within one business day.