
How to Enter Grades in Infinite Campus
This guide walks you through the full process of entering grades in Infinite Campus, from switching to the correct school building to posting final grades and comments for each student. Whether you teach at a single school or work across multiple buildings as a special or virtual teacher, these steps will help you complete report card grading accurately.
Video: How to Post Grades in Infinite Campus- Elementary Level - Tiger Tech Tips 042 by Tiger Tech. All credit for the demonstration goes to the creator; watch the original on YouTube. The written guide below was generated from this video by Docsie. Creator? Request a change or removal.
This guide walks you through the full process of entering grades in Infinite Campus, from switching to the correct school building to posting final grades and comments for each student. Whether you teach at a single school or work across multiple buildings as a special or virtual teacher, these steps will help you complete report card grading accurately.
Prerequisites
- Access to Infinite Campus with teacher-level permissions.
- Knowledge of which school building, term, and section you need to grade.
- If you work across multiple buildings, confirm you have access to each relevant school context before starting.
Locate the building selector
If you teach at more than one school, you'll first need to confirm you're working in the correct building context.
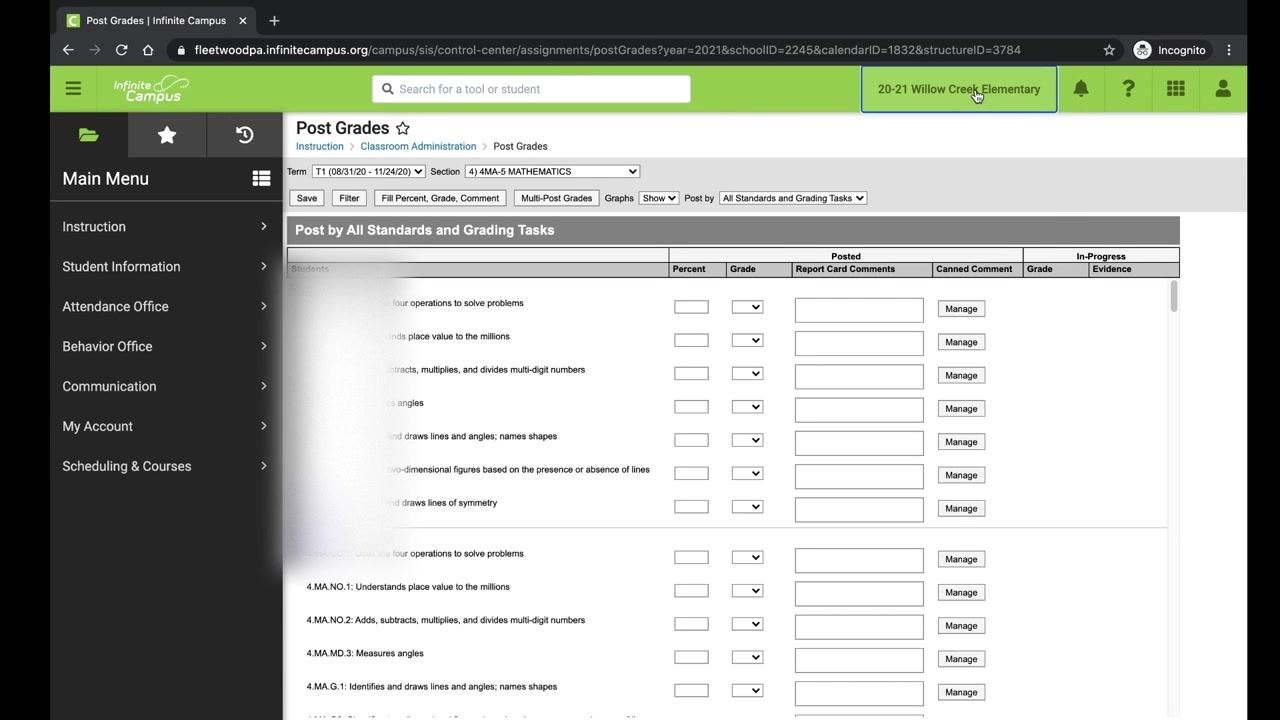
- At the top right of the Infinite Campus screen, find the green bar displaying your current school (for example, "20-21 Willow Creek Elementary"). This is the building selector.
- Click on the building name in the green bar to open the school selection menu. A Context pop-up window will appear, letting you change your school and other context settings.
Select the desired school
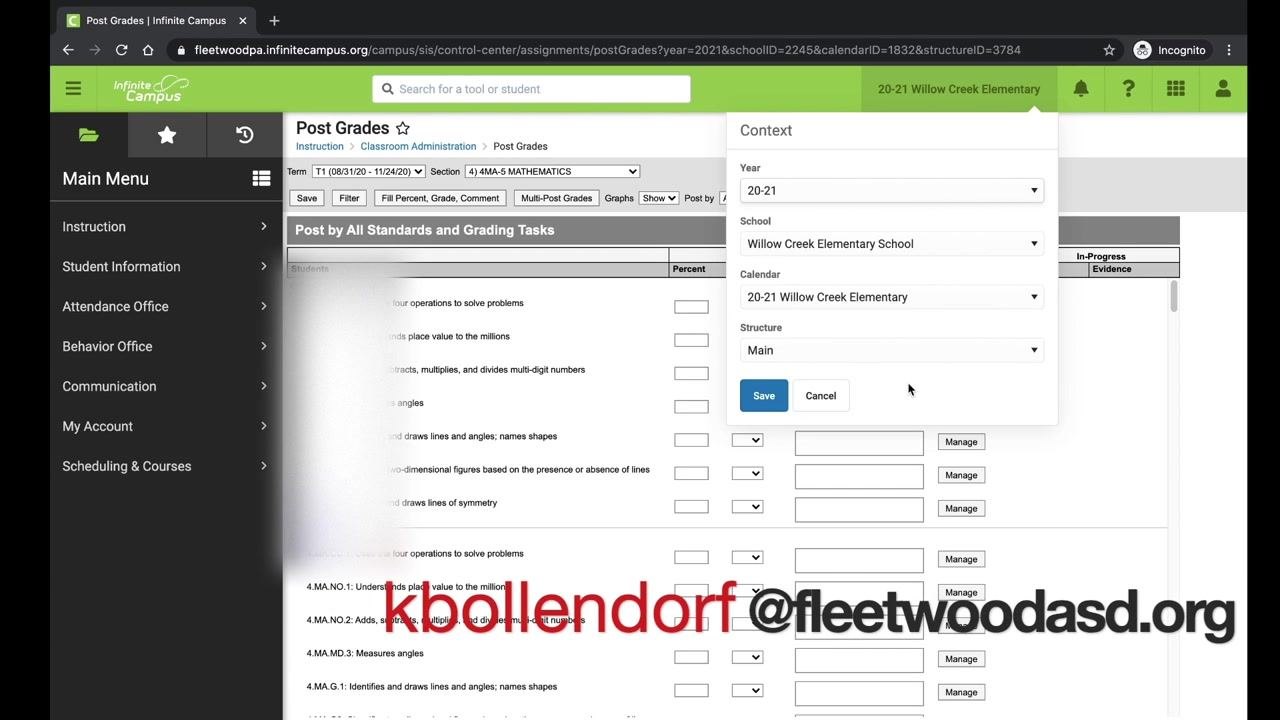
In the Context window, use the drop-down menus to set:
- Year (for example, "20-21")
- School (for example, "Willow Creek Elementary School" or another available school)
- Calendar (for example, "20-21 Willow Creek Elementary")
- Structure (for example, "Main")
Make sure all selections match the school you want to switch to before continuing.
Save your school selection
Click the blue Save button in the Context window to confirm your new school selection. If you decide not to change schools, click Cancel instead.
Verify account settings and enable canned comments
Before entering grades, confirm your account is set up to use canned comments.
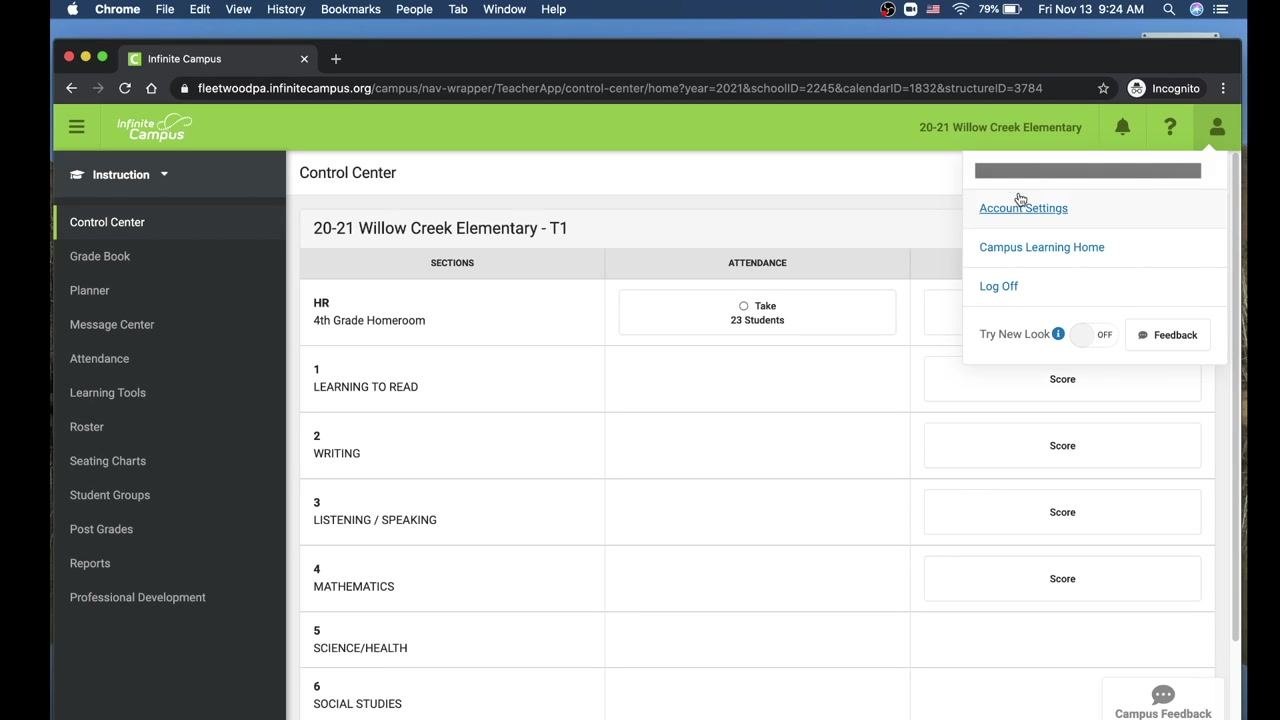
- Click the person icon (user menu) in the upper right corner of the Infinite Campus interface.
- From the dropdown, select Account Settings.
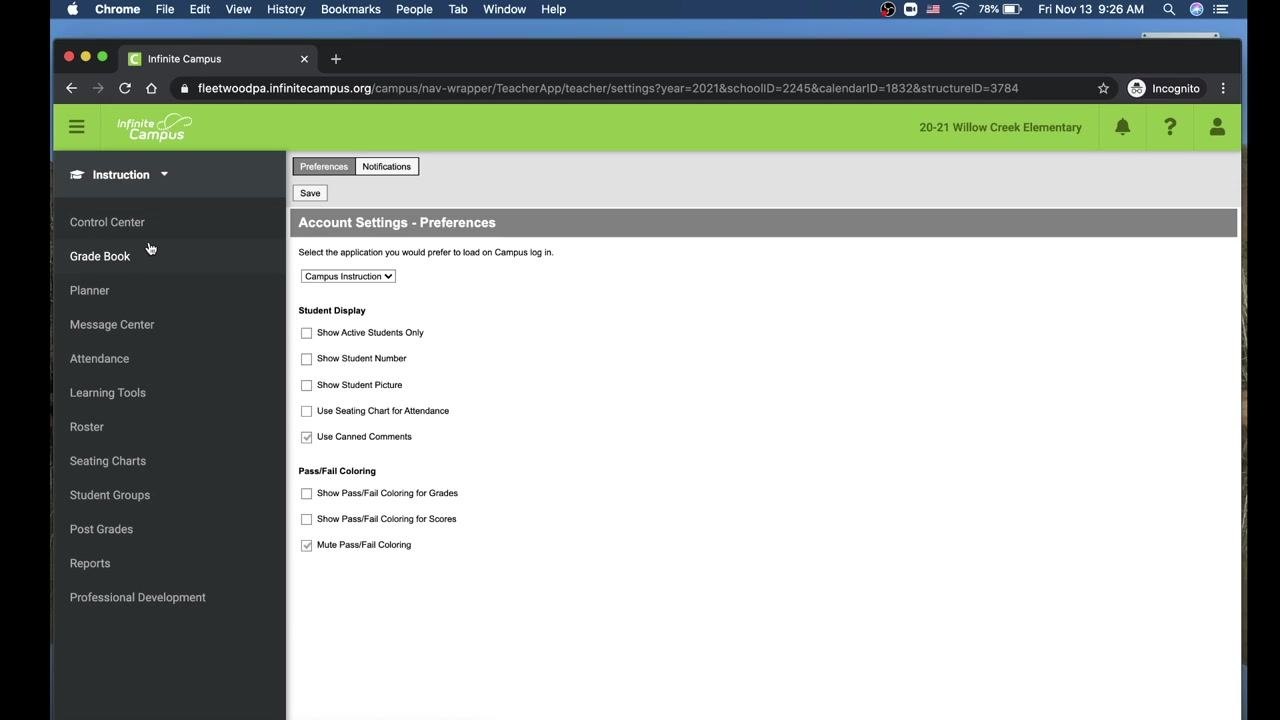
- On the Account Settings - Preferences screen, make sure the checkbox for Use Canned Comments is checked under the "Student Display" section.
- Click the Save button at the top of the preferences panel to apply your changes.
Navigate to Post Grades (old look)
- On the left-hand side menu, scroll down and locate the Post Grades option. It appears under "Student Groups" and above "Reports."
- Click Post Grades to proceed to the grade entry screen.
Switch to the new look (optional)
If you prefer the updated interface, you can switch at any time:
- Return to the user menu (person icon).
- Toggle the Try New Look switch to ON.
-
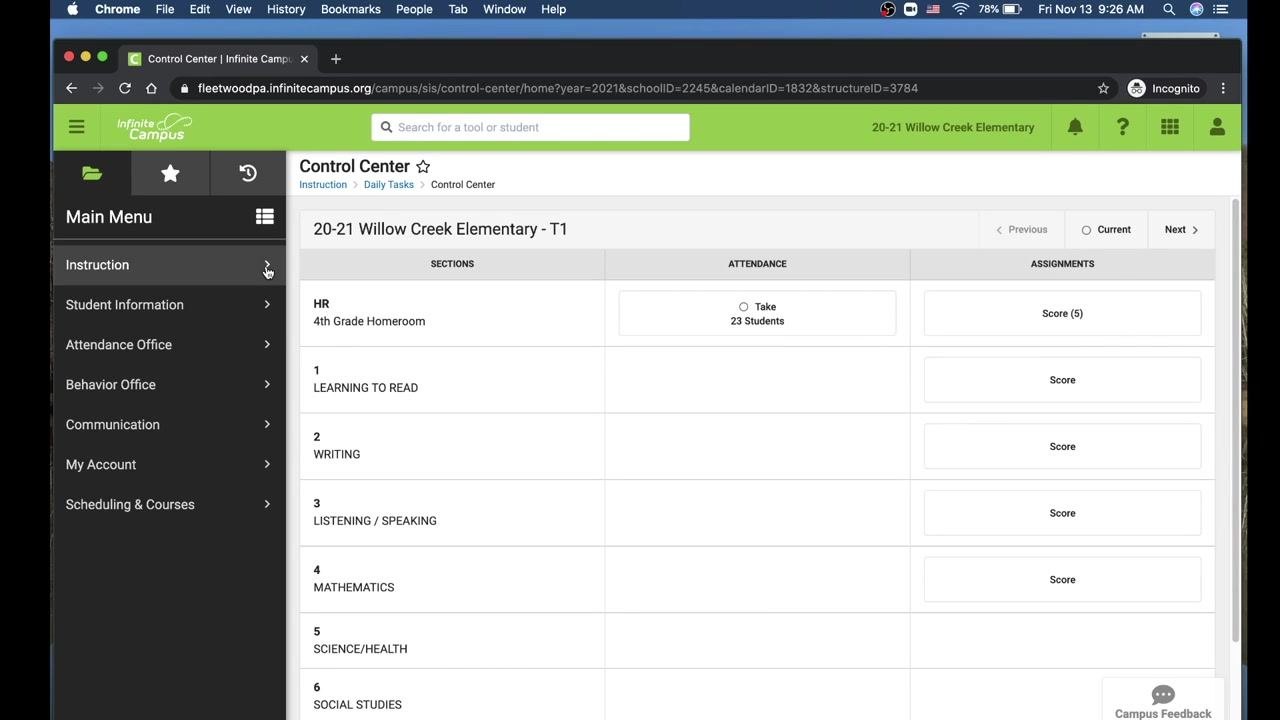
In the new look, use the left menu to select Instruction.
-
Navigate to Classroom Administration, then click Post Grades.
Access the Post Grades screen
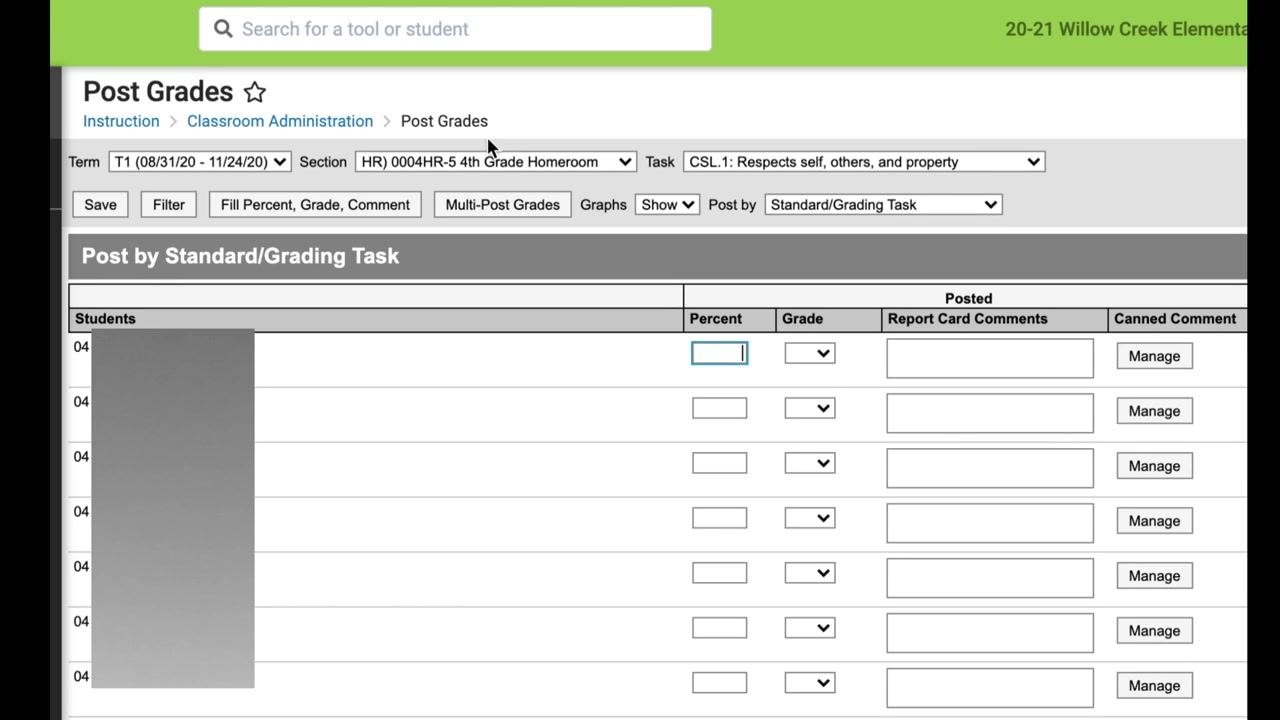
After selecting Post Grades in either the Old Look or New Look, you'll arrive at the grade entry screen. Confirm the following settings:
- Term is set correctly (for example, "T1 (08/31/20 - 11/24/20)" or the current term).
- Section is set to your desired class or subject (for example, "HR 0004HR-5 4th Grade Homeroom").
- Task displays the relevant grading task (for example, "CSL.1: Respects self, others, and property").
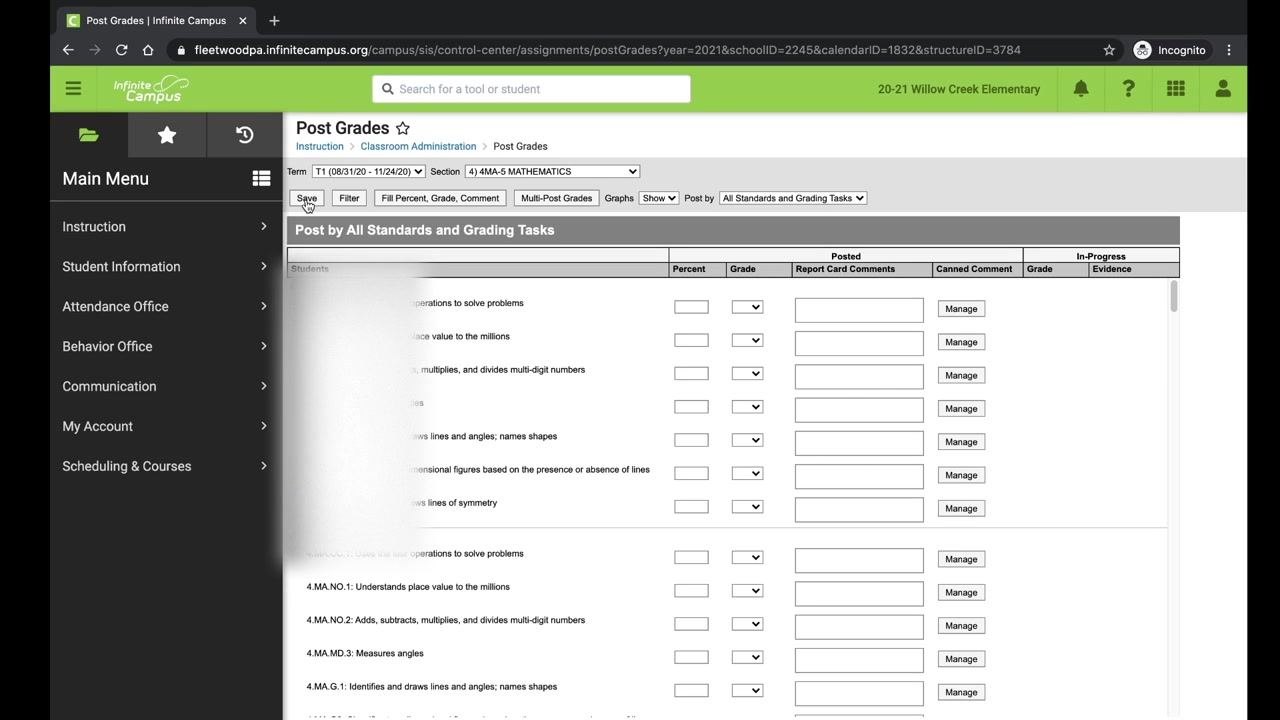
The grade entry table will show columns for Percent, Grade, Report Card Comments, and Canned Comment, each with a "Manage" button per student.
Set the Post By option
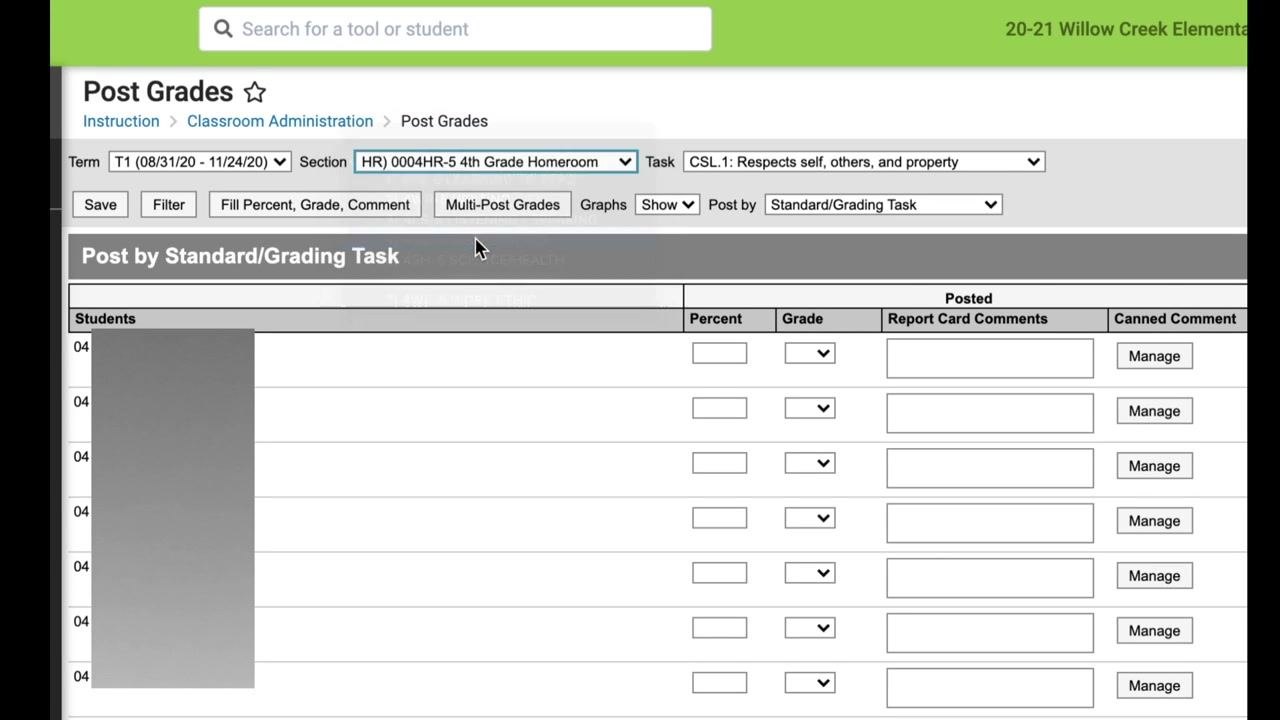
- Locate the Post by dropdown above the grade entry table.
- Change it to All Standards and Grading Tasks so you can view and enter grades for all relevant standards and tasks at once.
You're now ready to begin entering grades and comments for your students.
Review the grade entry table
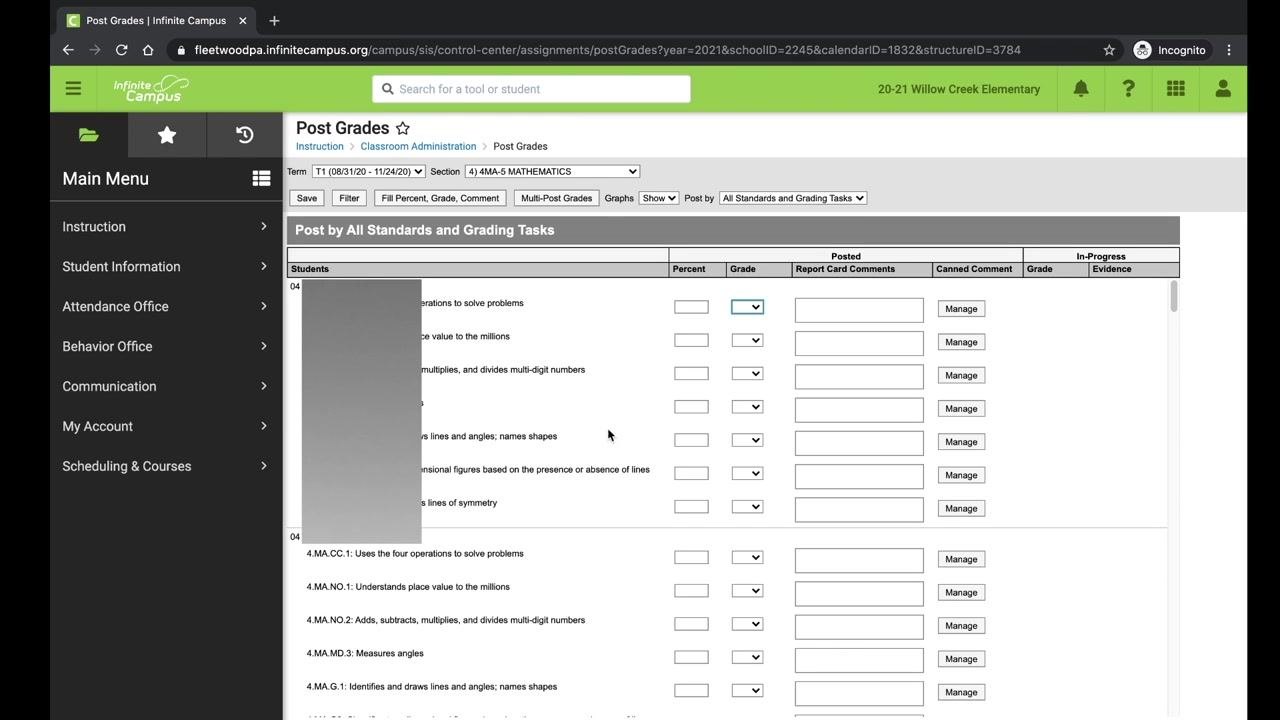
The grade entry table lists each student (names may be grayed out for privacy) along with their standards or grading tasks, such as "4.MA.CC.1: Uses the four operations to solve problems." Each standard or task includes the following columns:
- Percent
- Grade (with a drop-down arrow)
- Report Card Comments
- Canned Comment (with a "Manage" button)
If you have more students than fit on one page, use the navigation at the bottom of the table to move between pages.
Enter grades for each standard
For each student and each standard, click the Grade drop-down arrow and select the appropriate grade from the list. Repeat this for all standards and all students as needed.
Enter percentages (if required)
If applicable, enter the percentage score in the Percent field for each standard.
Add report card comments
Type any specific comments for the student directly in the Report Card Comments field.
Add canned comments
- Click the Manage button under the Canned Comment column for the desired standard and student.
- In the pop-up, check off the comments you want to include for that category.
- Click Save in the pop-up to apply the canned comments.
Save your work frequently
After entering grades and comments for a student or group of students, click the Save button at the top of the screen to ensure your changes aren't lost. Save often, especially before taking a break or navigating away from the page.
Acknowledge the navigation warning
If you attempt to leave the page, a pop-up will warn you to save any changes before moving on.
- Click OK if you haven't made any changes.
- Click Save if you've entered data you want to keep.
Finish and log out
Once all grades and comments are entered and saved, you can close the window or log out of Infinite Campus. All saved changes will remain in the system.
Getting help
If you have questions or run into issues while switching schools or entering grades, contact support at:
- Email: kboellendorf@fleetwoodasd.org
You can also refer to your district's Infinite Campus support resources for further assistance.
What's next
You have now completed the process for entering grades in Infinite Campus. Remember to save your work frequently and before switching buildings, and reach out for help whenever needed.
Generation details: cost, quality tiers
Docsie billed 2,000 credits ($1.40) to analyze this 4-minute video at standard quality. The rewrite, template fill and Word/PDF exports were included. The same video at each quality tier:
| Quality | Frames sampled | Credits | Approx. cost |
|---|---|---|---|
| Draft | every 16-30 s | 1,000 | $0.70 |
| Standard (this guide) | every 8-15 s | 2,000 | $1.40 |
| Detailed | every 4-7 s | 4,000 | $2.80 |
| Ultra | every 1-3 s | 8,000 | $5.60 |
Credits priced at $0.70 per 1,000; plans include a monthly allowance. Enterprise customers on on-premise or bring-your-own-model deployments run this on their own inference and pay no per-video credits.
Generated by Docsie Video-to-Docs on 2026-10-12 from a 3-minute video. Screenshots are frames from the source video and belong to their creator, Tiger Tech, whose original is embedded above. If you own this video and want the guide removed or credited differently, contact us and we will act within one business day.