
How to Discharge a Patient in Cerner
Discharging a patient in Cerner involves documenting discharge diagnoses, arranging follow-up care, reconciling medications, and completing the discharge summary. This guide walks you through how to discharge a patient in Cerner, from entering the primary diagnosis to the final refresh that confirms the discharge is complete.
Video: How-to discharge a patient using Cerner electronic health record (EHR) by MicrobiomeMD. All credit for the demonstration goes to the creator; watch the original on YouTube. The written guide below was generated from this video by Docsie. Creator? Request a change or removal.
Discharging a patient in Cerner involves documenting discharge diagnoses, arranging follow-up care, reconciling medications, and completing the discharge summary. This guide walks you through how to discharge a patient in Cerner, from entering the primary diagnosis to the final refresh that confirms the discharge is complete.
Prerequisites
- You must have the patient's chart open before starting the discharge process.
- The patient should be ready for discharge, with all relevant diagnoses, medications, and follow-up details available.
Navigate to the Depart section
Make sure you are in the patient's chart before beginning. On the left navigation panel, click Depart to start the discharge process. If you are currently viewing the Orders section, switch over to Depart instead.
Enter the primary discharge diagnosis
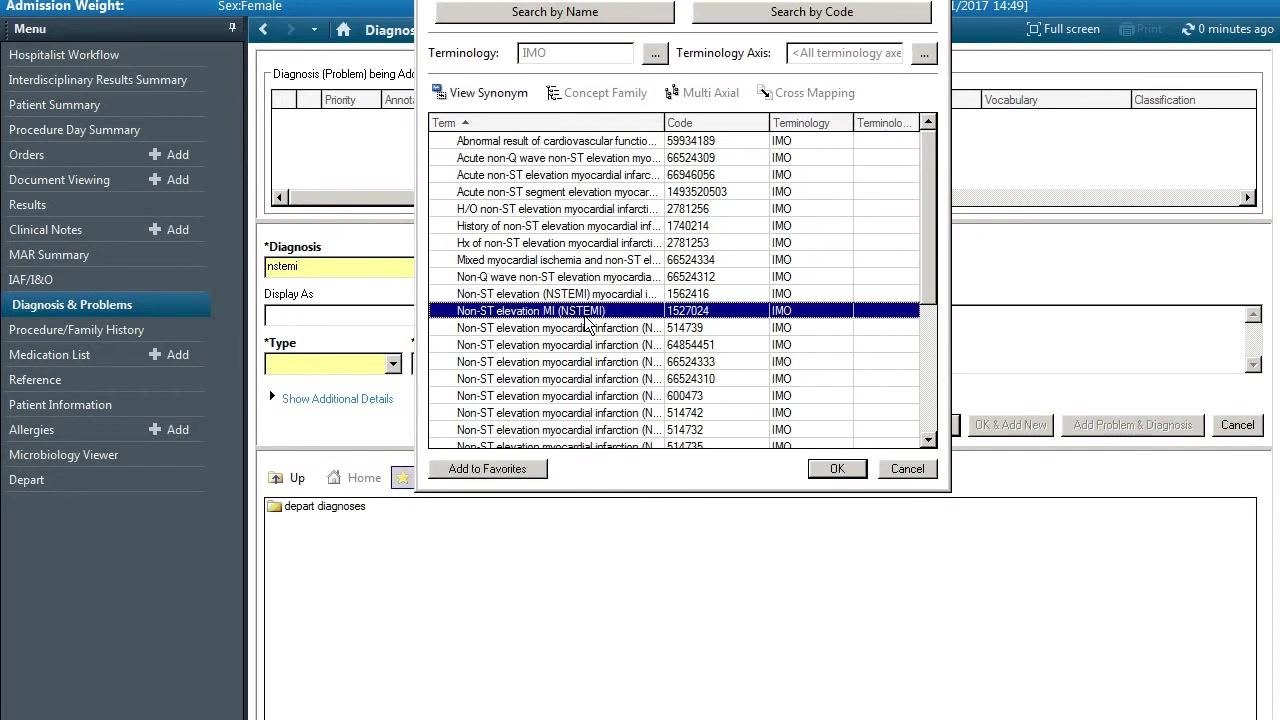
Under the Depart section, you need to enter a diagnosis for the patient. For example, if the patient is on the cardiology service, enter the admitting diagnosis as Non-ST elevation myocardial infarction (NSTEMI).
Press Return after typing to bring up a list of matching diagnoses, then double-click Non-ST elevation MI (NSTEMI) to select it. Set the Type to Discharge to indicate this is the discharge diagnosis, and click OK to confirm.
Add additional diagnoses
If the patient has other relevant diagnoses, such as Atrial Fibrillation, repeat the process:
- Search for the diagnosis in the Diagnosis field.
- Use a Favorites folder if you have pre-selected common diagnoses for quick access.
- Select Atrial Fibrillation from the list.
- Set the Type to Discharge.
- Click OK to add it.
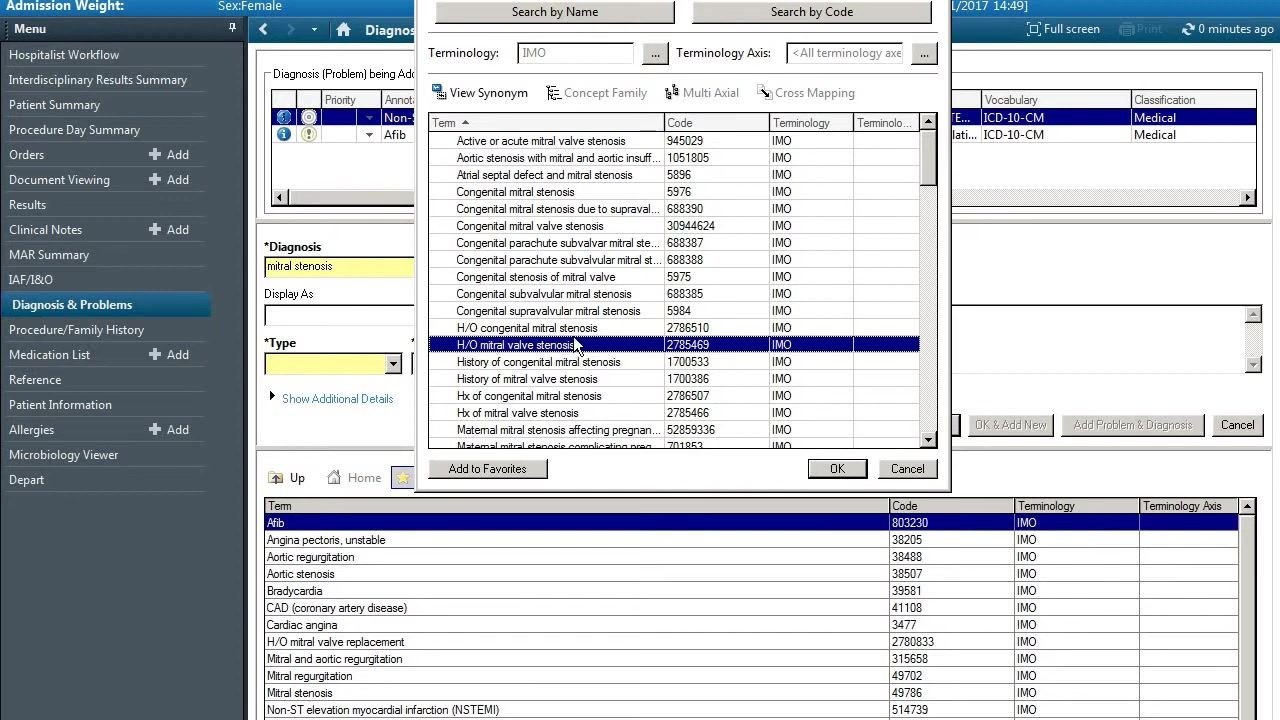
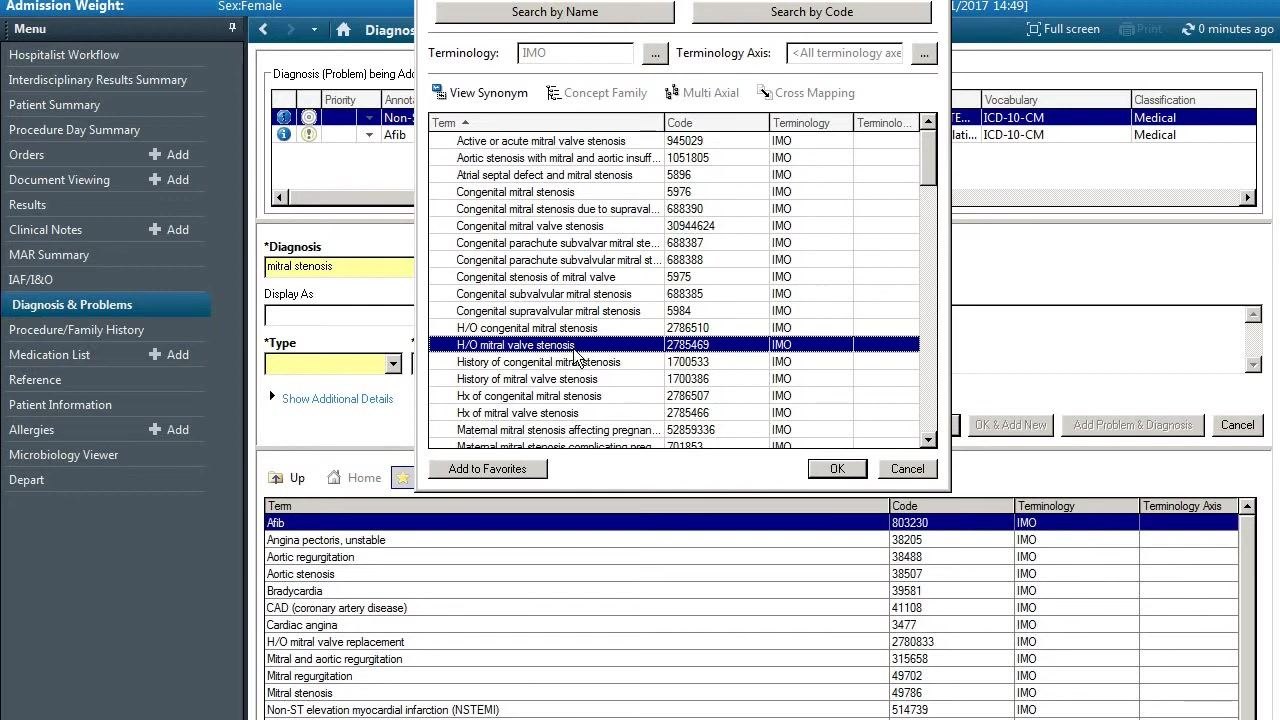
To add another diagnosis, such as Mitral Stenosis, search for it in the terminology list, select the appropriate entry (for example, "H/O mitral valve stenosis" or "Mitral stenosis"), set the Type to Discharge, and click OK.
Refresh the diagnoses list
After adding all necessary diagnoses, return to the top of the Diagnosis & Problems section and click Refresh. This ensures all newly added diagnoses appear in the list. Confirm that every diagnosis you entered, such as Non-ST elevation MI (NSTEMI) and Atrial Fibrillation, is now listed under the current visit.
Add follow-up instructions
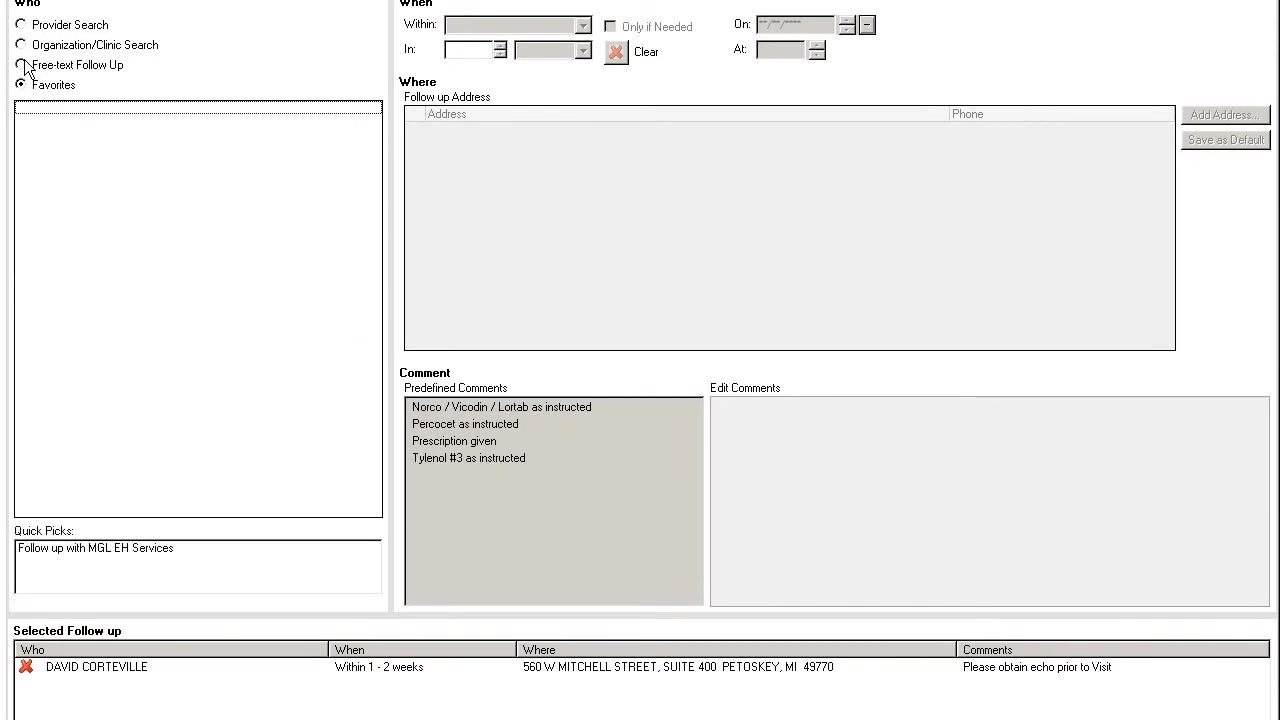
In the Depart section, locate the area for follow-up instructions and click the plus arrow (+) to add a new follow-up. You can have the patient follow up with their usual primary care physician or a specific clinic or service.
Use the Provider Search, Organization/Clinic Search, or Favorites to select the appropriate follow-up provider. Enter any additional details such as address, phone, and comments—for example, "Follow up with MGL EH Services"—using predefined comments or custom instructions as needed.
Use free-text and favorites for follow-up
If the provider search does not return the result you need, use the Free-text Follow Up option to manually enter instructions, such as "Follow up with primary care physician." Alternatively, click the Favorites button to quickly select a provider that has already been set up, such as the patient's primary care physician.
Specify follow-up timing and add comments
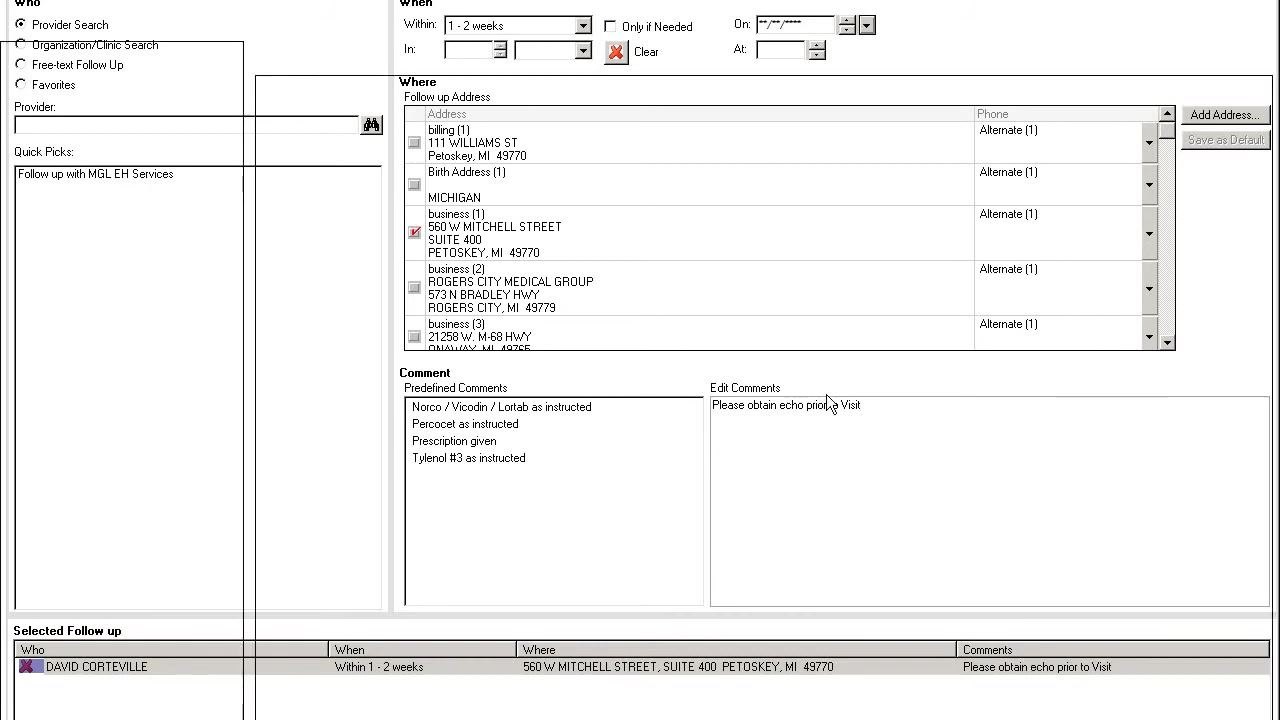
In the Follow Up section, set the timing for the appointment by clicking the Within dropdown menu and selecting 1 - 2 weeks to indicate when the patient should follow up.
In the Edit Comments box, enter any special instructions for the office staff—for example, "Please obtain echo prior to visit." Click OK at the bottom of the screen to save the follow-up details.
Add exit care education
Under the Exit Care Education section, search for relevant diagnoses to provide the patient with education materials. Enter the diagnosis—for example, atrial fibrillation—in the search bar. If no results populate, which can happen with test patients, proceed to the next step.
Perform medication reconciliation
Click the Medication Reconciliation button and review all medications the patient has received, both as an inpatient and as an outpatient. For each medication, choose to Continue or Discontinue as appropriate for discharge.
Complete the discharge process
In the Discharge Summary screen, ensure all required sections are completed:
- Diagnosis
- Discharge Orders
- Medication Reconciliation
- Follow Up
- Exit Care Instructions
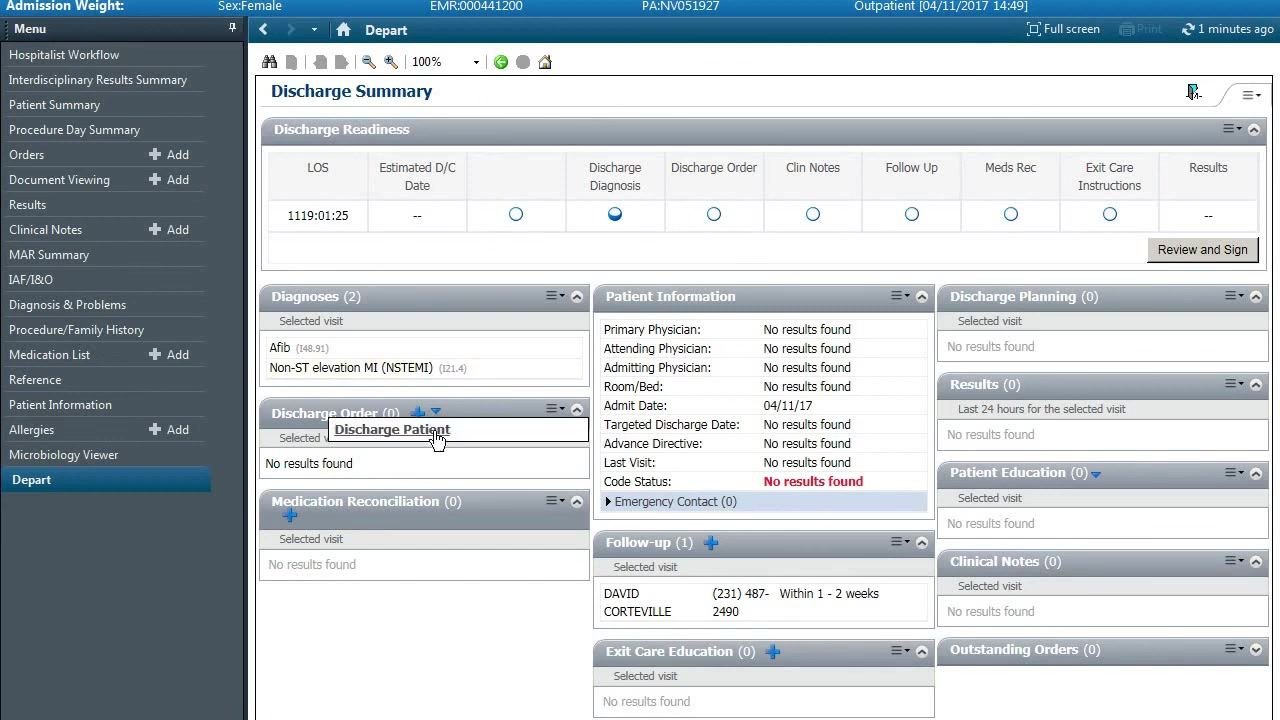
Each section fills in blue as you complete it, giving you a visual indicator of your progress. To discharge the patient, click the down arrow in the Discharge Order section and select Discharge Patient from the dropdown menu.
Verify the final discharge summary and refresh
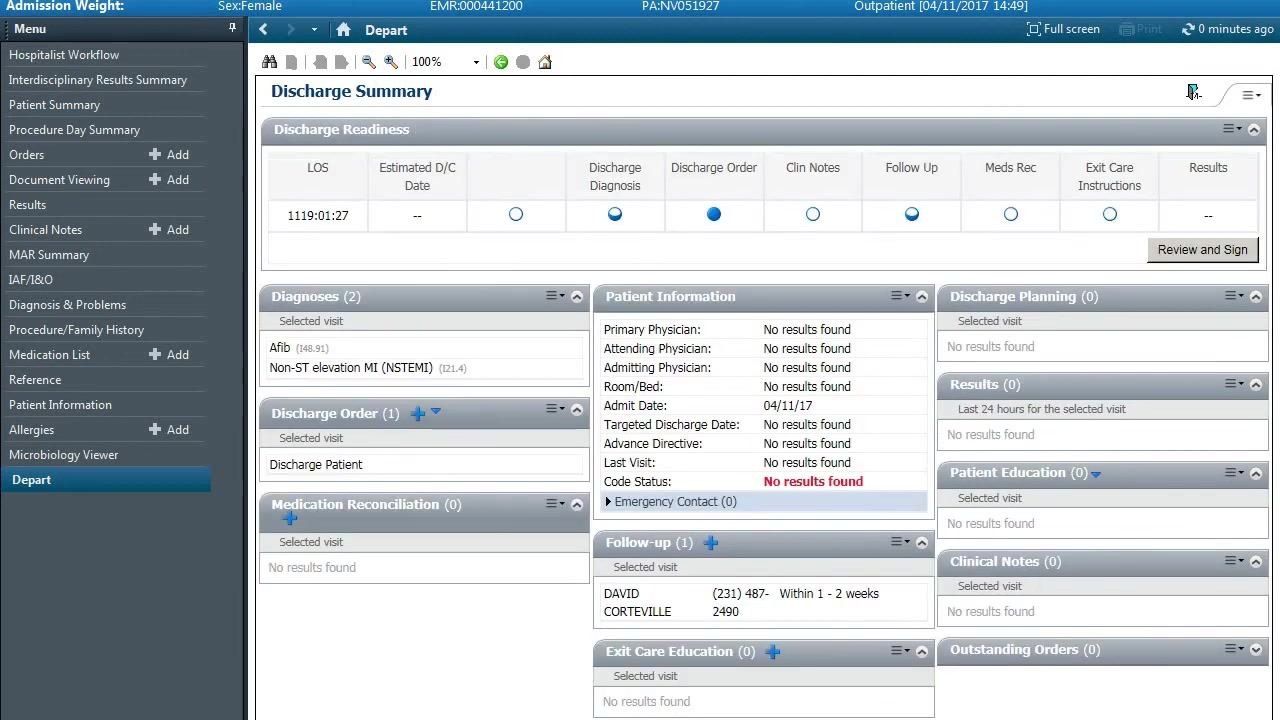
Review the Discharge Summary screen one more time to confirm every required section is complete and up to date:
- Discharge Readiness: Check that all circles under Discharge Diagnosis, Discharge Order, Clin Notes, Follow Up, Meds Rec, and Exit Care Instructions are filled in blue, indicating completion.
- Diagnoses: Confirm that all relevant diagnoses are listed (for example, Afib and Non-ST elevation MI (NSTEMI)).
- Discharge Order: Ensure "Discharge Patient" is selected.
- Medication Reconciliation: Verify that all medications have been reviewed and reconciled.
- Follow-up: Confirm the follow-up provider and timing are entered (for example, DAVID CORTEVILLE, within 1-2 weeks).
- Exit Care Education: Check that any patient education materials are documented.
- Patient Information: Review for completeness, noting any missing data (for example, "No results found" for some fields).
If any section is incomplete or missing information, address it before proceeding. Click the Refresh button—the circular green arrow icon at the top of the screen—to update the summary and ensure all recent changes are reflected in the EMR. Do not skip this final refresh, as it guarantees all information is current and accurately saved.
Summary
By following these steps, you accurately document discharge diagnoses, arrange appropriate follow-up care, reconcile medications, and complete the full discharge process for a patient in Cerner. Completing the final refresh ensures all patient information is current and that the EMR accurately reflects the patient's status and follow-up instructions.
Generation details: cost, quality tiers
Docsie billed 2,000 credits ($1.40) to analyze this 4-minute video at standard quality. The rewrite, template fill and Word/PDF exports were included. The same video at each quality tier:
| Quality | Frames sampled | Credits | Approx. cost |
|---|---|---|---|
| Draft | every 16-30 s | 1,000 | $0.70 |
| Standard (this guide) | every 8-15 s | 2,000 | $1.40 |
| Detailed | every 4-7 s | 4,000 | $2.80 |
| Ultra | every 1-3 s | 8,000 | $5.60 |
Credits priced at $0.70 per 1,000; plans include a monthly allowance. Enterprise customers on on-premise or bring-your-own-model deployments run this on their own inference and pay no per-video credits.
Generated by Docsie Video-to-Docs on 2026-10-12 from a 3-minute video. Screenshots are frames from the source video and belong to their creator, MicrobiomeMD, whose original is embedded above. If you own this video and want the guide removed or credited differently, contact us and we will act within one business day.