
How to Torque Aircraft Fasteners
This procedure explains how to torque aircraft fasteners correctly and consistently, using approved standards, calibrated tools, and verified torque values. Improperly tightened fasteners are one of the leading causes of maintenance-related incidents, and following this procedure reduces the risk of over-torquing, under-torquing, or leaving fasteners incomplete.
Video: Aircraft Fasteners & Torque to Boeing Standard Specification BAC5009 by Crucial Knowledge (2013). All credit for the demonstration goes to the creator; watch the original on YouTube. The written guide below was generated from this video by Docsie. Creator? Request a change or removal.
Purpose
This procedure explains how to torque aircraft fasteners correctly and consistently, using approved standards, calibrated tools, and verified torque values. Improperly tightened fasteners are one of the leading causes of maintenance-related incidents, and following this procedure reduces the risk of over-torquing, under-torquing, or leaving fasteners incomplete.
Scope
This procedure applies to any maintenance task involving the installation and tightening of aircraft nuts and bolts, including work performed with torque wrench adapters, extensions, or crow's feet. It covers hole inspection, torque table reference, correct tool use, and torque correction calculations for non-standard wrench configurations.
Required equipment and reference materials
- Calibrated torque wrench (correct type for the fastener being installed)
- Torque wrench adapters, extensions, or crow's feet, as required
- Reference to Boeing's BAC 5009 standard (Assembly and Installation Manual)
- FAA Advisory Circular 43-13 torque value tables for nuts and bolts
- Applicable torque tables for fine and coarse thread fasteners
- Comparison plates or reference standards for hole surface inspection
Understand why fastener torque accuracy matters
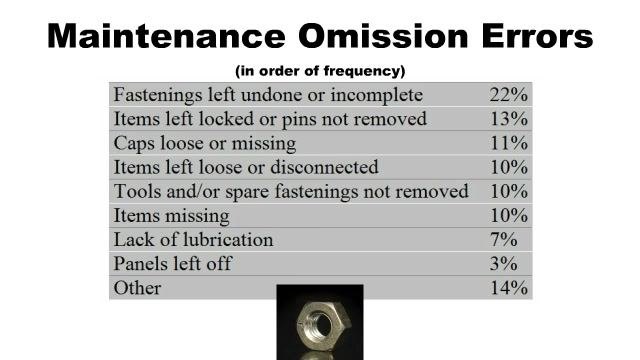
Before starting any fastener installation, review the most common maintenance omission errors. Fastenings left undone or incomplete account for 22% of incident reports, making it the single most frequent maintenance error. Other frequent errors include items left locked or pins not removed (13%), loose or missing caps (11%), and items left loose or disconnected (10%).
Consult the BAC 5009 standard
Reference Boeing's BAC 5009 standard for detailed guidance on bolt and nut installation quality attributes. This standard, part of Boeing's Assembly and Installation Manual (AIM), dedicates 35 pages specifically to aircraft nuts, bolts, and the holes they pass through. You can view this standard on screen or print it by clicking the student guide button on the lower left of your screen.
Review the key torque topics before starting work
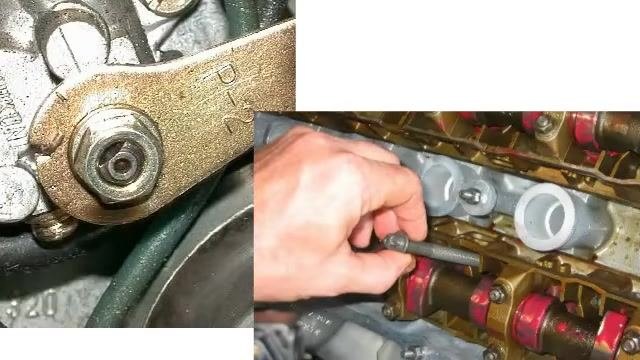
Before performing any torque procedure, familiarize yourself with the following areas: hole quality, metal strength and bolt strength designations, types of torque wrenches, safety wiring practices, and torque conversion formulas for wrench extensions. Reviewing case studies of real-world fastener issues also helps reinforce correct technique.
Inspect hole quality before installing the fastener
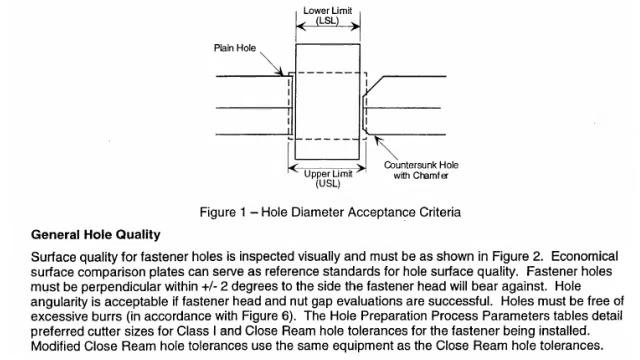
Visually inspect the surface quality of each fastener hole before installation. The surface must match reference standards or comparison plates, and holes must be perpendicular within ±2 degrees to the surface the fastener head will bear against. Minor angularity is acceptable if the fastener head and nut gap evaluations pass. Remove all excessive burrs, and use the preferred cutter sizes specified for Class I and Close Ream hole tolerances.
Position the torque wrench correctly
Confirm the torque wrench is positioned correctly relative to the fastener before applying force. Reference diagrams that illustrate correct and incorrect wrench positions, marked with dimensions A and B, to avoid inaccurate torque readings caused by improper wrench angle or alignment.
Recognize the role fasteners play in structural integrity
Fasteners are essential to flight safety and aircraft integrity. Whether installed in small components or large structural assemblies, every fastener plays a role in holding a structure together safely.
Identify real-world dynamic environments
Stationary and static fasteners generally hold well without issue, but fasteners used in dynamic, real-world structures — such as bridges — require special attention because they are subject to ongoing mechanical stress.
Account for the dynamic conditions aircraft fasteners face
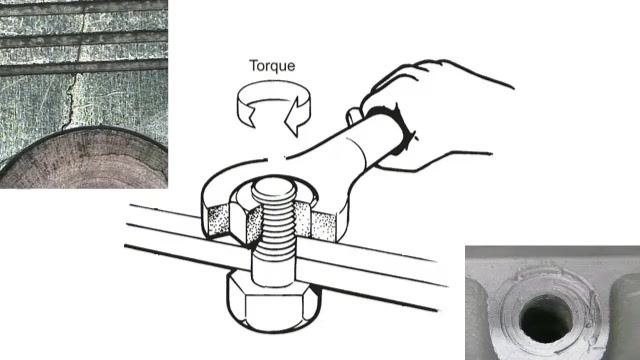
Aircraft fasteners must be properly torqued to withstand dynamic environments, including vibration, rotation, temperature extremes, pressure extremes, and fluctuating loads. Failing to account for these conditions increases the risk of the fastener loosening in service.
Avoid over-torquing and under-torquing
Safety note: Over-torquing stresses both the material surrounding the fastener and the bolt itself, while under-torquing leaves the fastener insecure and prone to failure. Under-tightening also causes excessive wear to both the hardware and the joined parts. Always apply the specified torque value — never more, never less.
Apply torque using a calibrated tool
Always use a calibrated torque wrench to achieve the specified torque value — never rely on estimation or feel. Refer to FAA Advisory Circular 43-13 for the applicable table of torque values for nuts and bolts before tightening any fastener.
Understand the consequences of incorrect torque
Improper torque application can lead to severe mechanical failures and safety hazards. Reviewing examples of hardware damage, failed fasteners, and improper installations reinforces why precise torque control is critical.
Reference the correct torque limit table
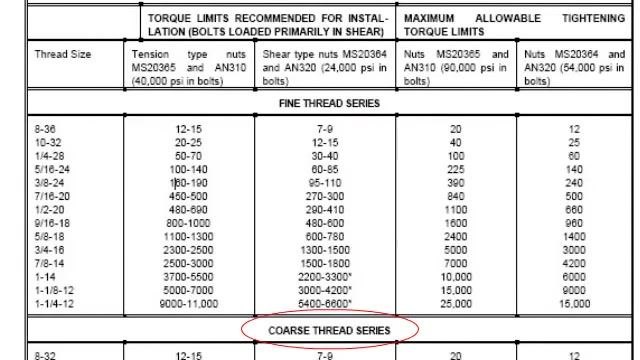
Consult the torque table for both fine thread and coarse thread fastener series to identify the minimum and maximum torque limits, given in inch-pounds, for the specific thread size you are working with. The table lists torque limits for tension type nuts (MS20365 and AN310, 40,000 psi in bolts), shear type nuts (MS20384 and AN320, 24,000 psi in bolts), and maximum allowable tightening torque for each nut type.
As an example, for a 1/4-28 fine thread: the tension type nut torque range is 100–140 in-lb, the shear type nut torque range is 60–85 in-lb, and the maximum allowable torque is 225 in-lb (MS20385/AN310) or 140 in-lb (MS20384/AN320).
Understand how fastener resistance is tested
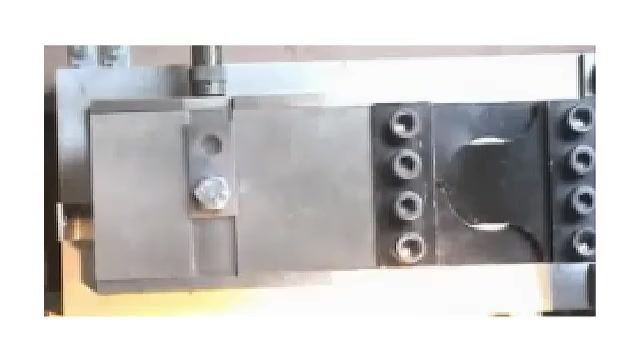
Fastener resistance to self-loosening under dynamic conditions is tested using a transverse vibration test machine, originally developed in the 1960s. This testing method simulates the vibration, rotation, temperature extremes, pressure extremes, and fluctuating loads that aircraft fasteners experience — conditions second in severity only to those faced by spacecraft fasteners.
Visualize the dynamic forces acting on installed fasteners
Constant, long-term harmonic vibrations and rotations from reciprocating parts are common in aircraft, and fasteners must withstand vast temperature, pressure, and load extremes while remaining secure. Schematic diagrams of the forces and motion applied during testing help illustrate these conditions.
Observe fastener behavior under simulated conditions
Reviewing how fasteners behave under simulated aircraft conditions reinforces the importance of proper installation and correct torque in preventing self-loosening over time.
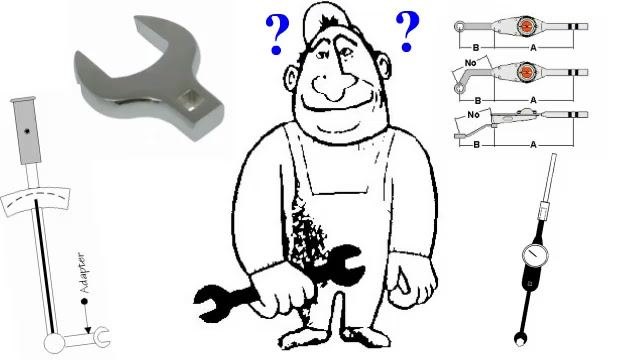
Use torque wrench adapters and extensions correctly
Safety note: Improper use of torque wrench adapters, extensions, and crow's feet leads to incorrect torque application at the fastener. Review correct and incorrect usage before adding any adapter to your torque wrench.
Apply the torque correction formula
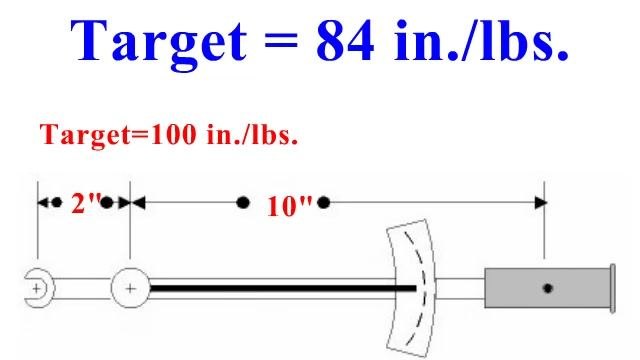
When using an adapter or extension, calculate the correct torque wrench setting using the formula:
Correction = Lw / (Lw + La)
Where Lw is the length of the wrench in inches, and La is the length of the adapter in inches. Always measure both lengths accurately before applying the formula, to avoid over- or under-torquing the fastener.
Calculate the correction factor for your setup
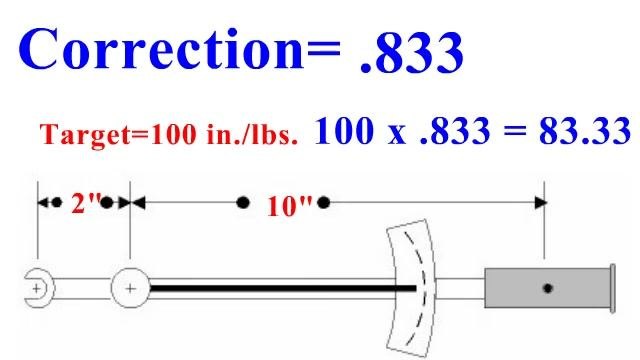
To calculate the correction factor, add the wrench length (Lw) and adapter length (La) together to get the total length. For example, with a 10-inch wrench and a 2-inch adapter, the total length is 12 inches.
Apply the formula: Correction = 10 / 12 = 0.833. Multiply your target torque by this correction factor to determine the torque wrench setting. For a target torque of 100 in-lb: 100 × 0.833 = 83.33 in-lb, which rounds to 84 in-lb on the wrench dial.
Confirm the final torque wrench setting
If the specification calls for 100 in-lb of torque at the fastener, and you are using a 10-inch wrench with a 2-inch adapter, set the torque wrench dial to 84 in-lb. This adjustment compensates for the added length of the adapter and ensures the fastener receives the correct 100 in-lb of torque.
Verification and summary
Before considering any fastener installation complete, verify the following:
- The hole has been inspected and meets surface and perpendicularity requirements.
- The correct torque value has been confirmed against the applicable torque table (BAC 5009, FAA AC 43-13, or fine/coarse thread torque tables).
- A calibrated torque wrench, positioned correctly, was used to apply torque — never estimation or feel.
- Any adapter or extension length was accounted for using the correction formula (Correction = Lw / (Lw + La)).
- Each fastener has been marked or recorded as properly installed and tightened.
- A final inspection has been performed before closing out the task.
Following this procedure and consistently referencing the appropriate standards significantly reduces the risk of maintenance errors related to fasteners and helps ensure the safety and reliability of assembled aircraft components.
Generation details: cost, quality tiers
Docsie billed 3,000 credits ($2.10) to analyze this 6-minute video at standard quality. The rewrite, template fill and Word/PDF exports were included. The same video at each quality tier:
| Quality | Frames sampled | Credits | Approx. cost |
|---|---|---|---|
| Draft | every 16-30 s | 1,500 | $1.05 |
| Standard (this guide) | every 8-15 s | 3,000 | $2.10 |
| Detailed | every 4-7 s | 6,000 | $4.20 |
| Ultra | every 1-3 s | 12,000 | $8.40 |
Credits priced at $0.70 per 1,000; plans include a monthly allowance. Enterprise customers on on-premise or bring-your-own-model deployments run this on their own inference and pay no per-video credits.
Generated by Docsie Video-to-Docs on 2026-09-14 from a 5-minute video. Screenshots are frames from the source video and belong to their creator, Crucial Knowledge, whose original is embedded above. If you own this video and want the guide removed or credited differently, contact us and we will act within one business day.