
How to Terminate an Employee in Workday
Terminating an employee in Workday involves more than submitting a single form. The termination business process lets you capture essential data, assign termination reasons, collect exit interview feedback, and manage position continuity through job overlap. This guide walks you through understanding the configurable options and then completing the actual termination for an employee.
Video: How to Manage Terminations | Workday HCM by Workday (2026). All credit for the demonstration goes to the creator; watch the original on YouTube. The written guide below was generated from this video by Docsie. Creator? Request a change or removal.
Terminating an employee in Workday involves more than submitting a single form. The termination business process lets you capture essential data, assign termination reasons, collect exit interview feedback, and manage position continuity through job overlap. This guide walks you through understanding the configurable options and then completing the actual termination for an employee.
Prerequisites
Before you terminate an employee, confirm that your organization has set up the following:
- Termination categories and local termination reasons for the relevant country or region
- Localization settings that define which fields are required by location
- An exit interview method (Complete Questionnaire step or To Do step)
- Job overlap settings on the position, if a replacement needs to be trained before the position is vacated
Understanding the termination business process
Review the configurable options available in the termination process
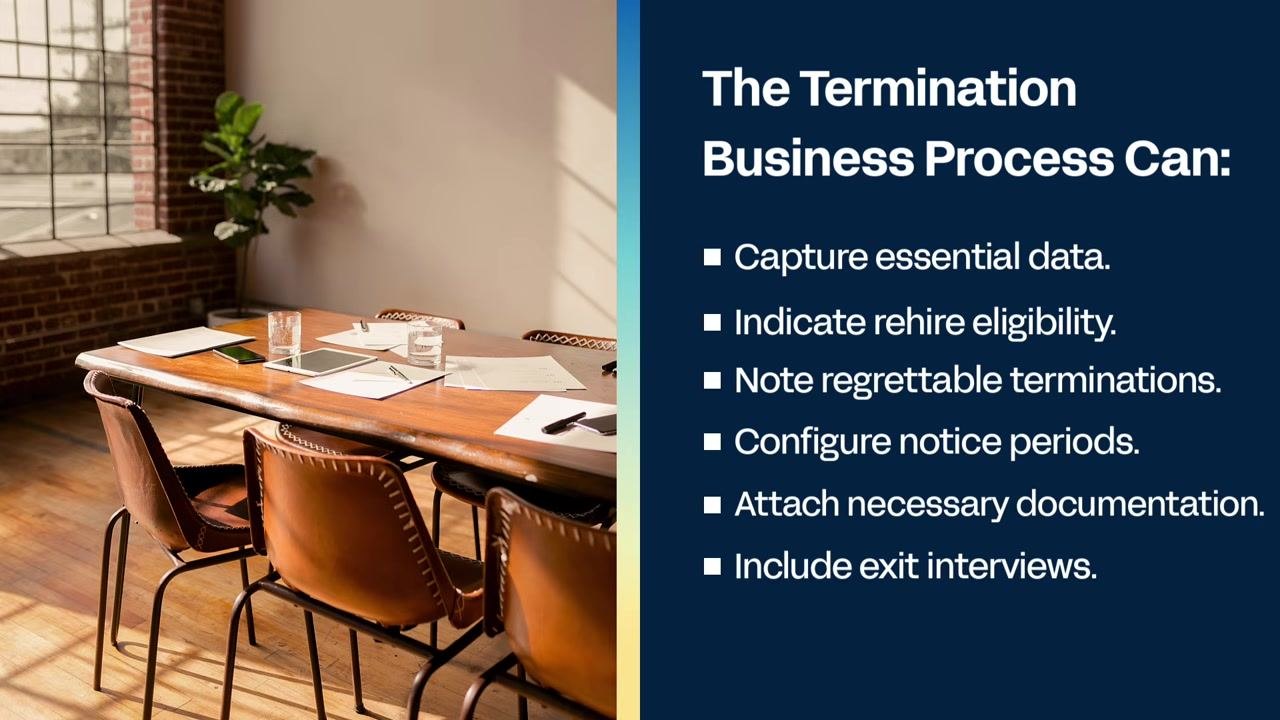
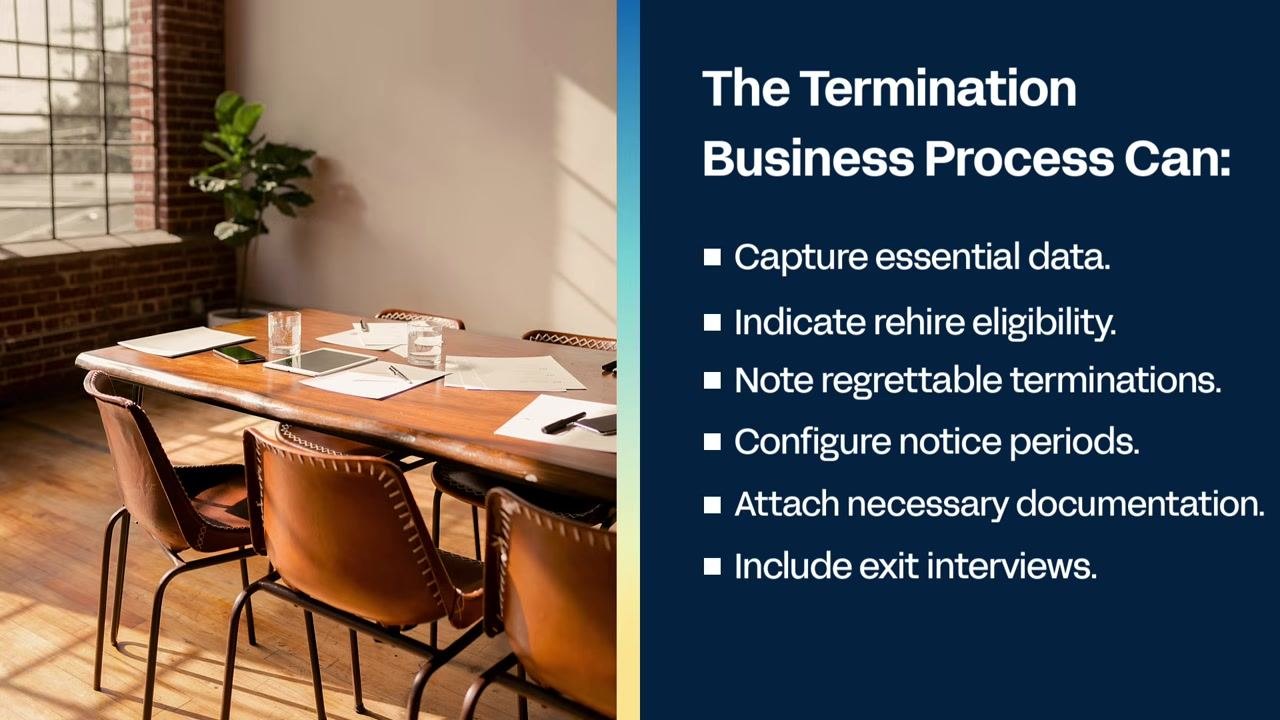
The termination business process in Workday supports a range of configurable options that let you:
- Capture essential data
- Indicate rehire eligibility
- Note regrettable terminations
- Configure notice periods
- Attach necessary documentation
- Include exit interviews (questionnaires)
Maintain termination categories
Capturing specific details during termination allows your organization to track and report on turnover data. By analyzing these multi-layered reasons, you can understand trends and develop more effective retention strategies.
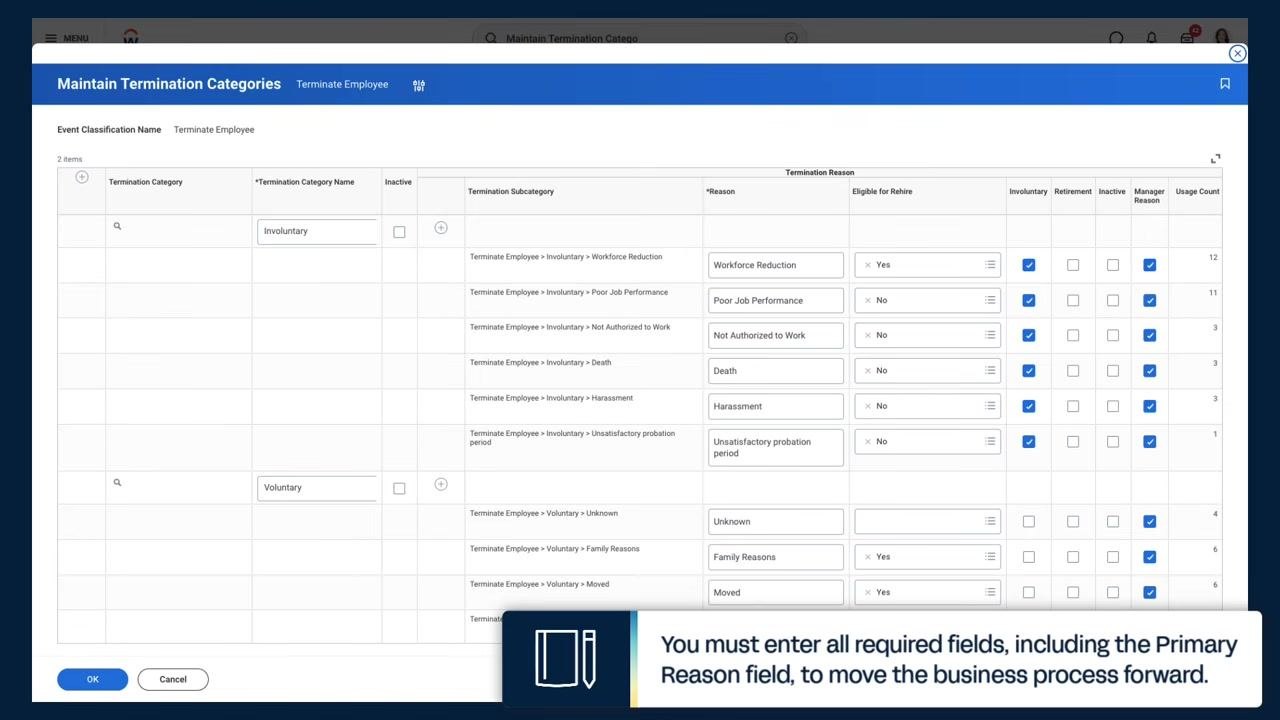
Use the Maintain Termination Categories task to group individual termination reasons into categories such as "Involuntary" and "Voluntary." This organizes the options available when a termination is initiated.
- Example involuntary reasons: Workforce Reduction, Poor Job Performance, Not Authorized to Work, Death, Harassment, Unsatisfactory Probation Period
- Example voluntary reasons: Unknown, Family Reasons, Moved, Commute Time
Select a category and enter a primary termination reason
When you initiate a termination, select the appropriate category and enter at least one Primary Termination Reason to proceed with the business process. For example, choose "Workforce Reduction" for an involuntary termination or "Moved" for a voluntary one. Workday requires all mandatory fields, including the Primary Reason, to be completed before you can move forward.
Configure local termination reasons by location
To meet reporting requirements specific to a location, use the Maintain Local Termination Reasons task. This lets you create termination reasons that reflect unique legal or administrative requirements for a specific country or region.
Example for the United Kingdom:
- Death
- Dismissal on the ground of capability
- Dismissal on the ground of conduct
- Dismissal on the ground of redundancy
- Dismissal on the ground of some other substantial reason
- Dismissal on the ground of statutory restriction
- Expiry of fixed term contract
- Resignation
- Retirement
Manage field requirements by location
Use the Maintain Localization Settings task to designate the termination reason as a required field for specific countries. For example, you can make the field required for Argentina while leaving it optional for the U.S. In the "Local Termination Reason (Worker)" section, select the countries where the field is required or optional.
Setting up exit interviews
Choose an exit interview method
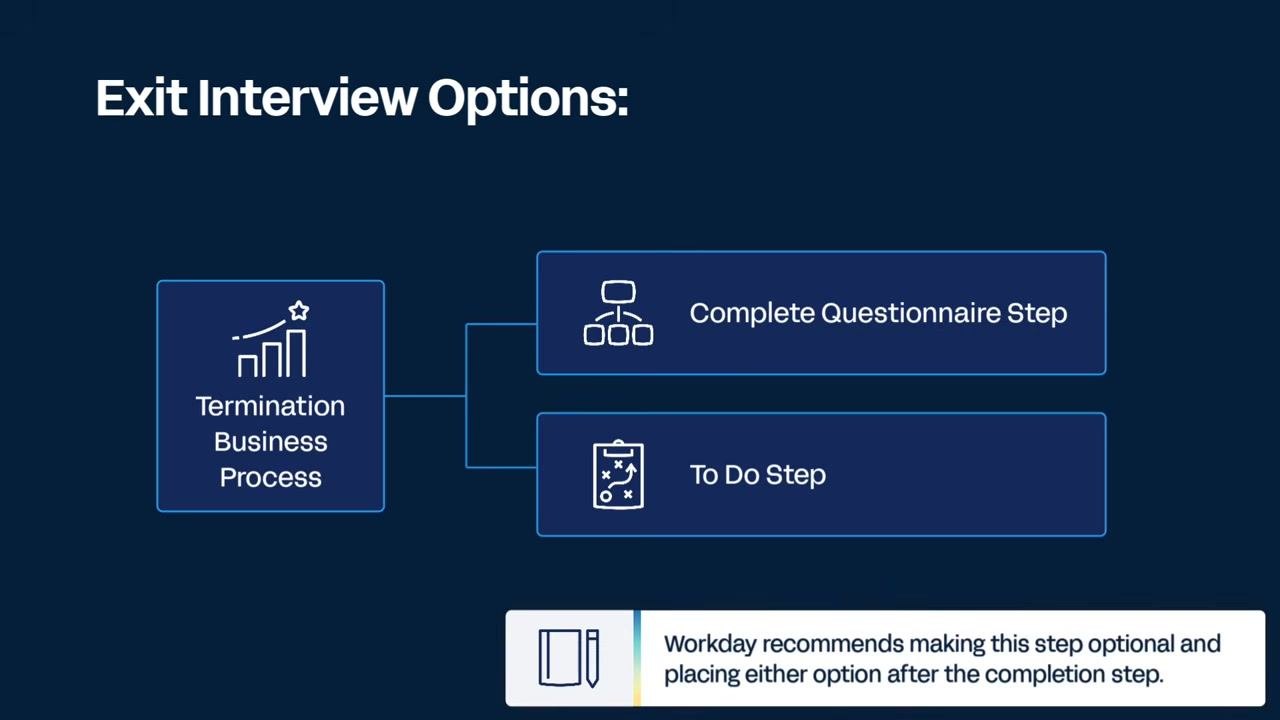
Workday provides exit interview options as a step in the termination business process so you can record valuable feedback from departing employees. There are two methods for conducting exit interviews:
- Complete Questionnaire Step
- To Do Step
The Complete Questionnaire step is highly configurable. It lets you:
- Directly capture feedback from the terminating employee or another participant using a custom-built questionnaire
- Customize questionnaires with various question types and mark questions as required
- Report on questionnaire results for analysis and compliance
The To Do step initiates the Workday-delivered "Create Exit Interview" task. This task captures information such as the interviewer's comments and any property a worker returns. Administrators and managers typically complete this type of exit interview for involuntary terminations, and results can be viewed in the exit interview report.
Decide which exit interview method fits your process
Choose between the complete questionnaire and the to-do step based on your organization's process requirements. To prevent transaction delays, Workday recommends making the exit interview step optional and placing it after the completion step.
Configure the Complete Questionnaire step
Consider a business scenario: Brian Sullivan, HR Partner for the Marketing Services Group, needs to terminate Jason Boyle while enabling job overlap. To do this, Brian will first configure the "Complete Questionnaire" step, then initiate the termination.
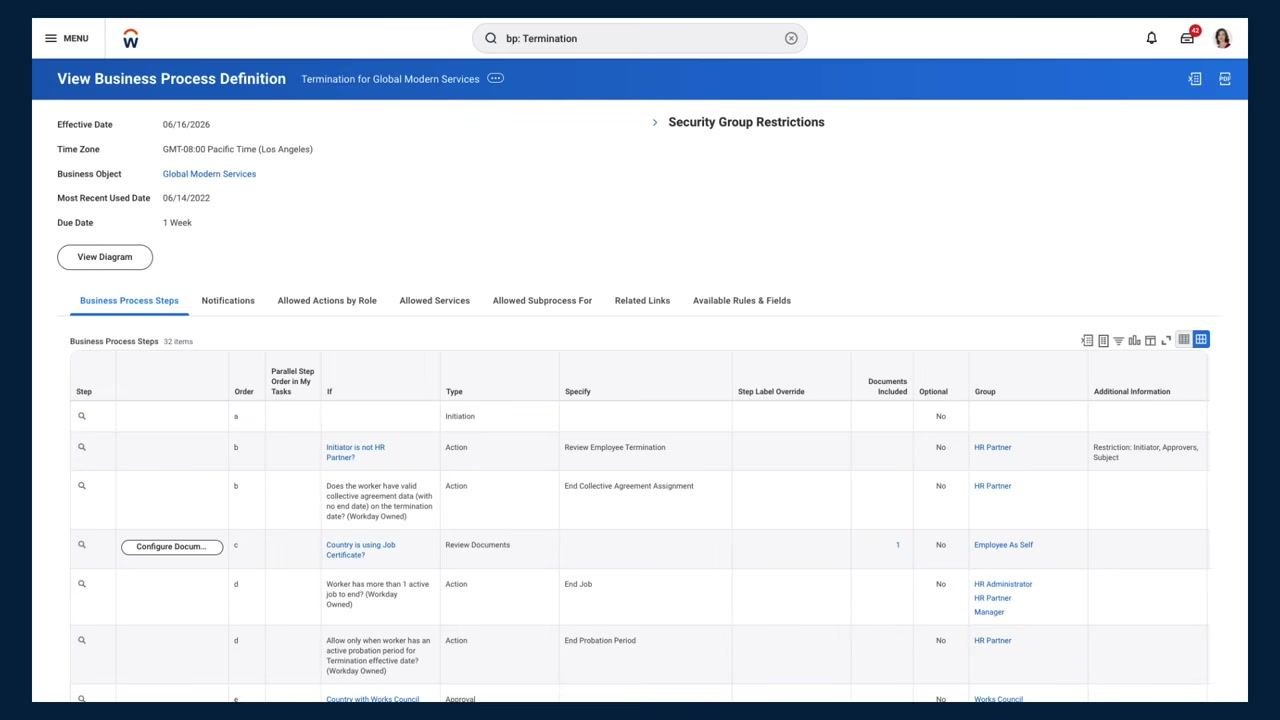
To review and add the Complete Questionnaire step, open the View Business Process Definition page for the relevant termination process and confirm the following details at the top of the page:
- Effective Date: 06/03/2026
- Time Zone: GMT-08:00 Pacific Time (Los Angeles)
- Business Object: Global Modern Services
- Most Recent Used Date: 06/14/2022
- Due Date: 1 Week
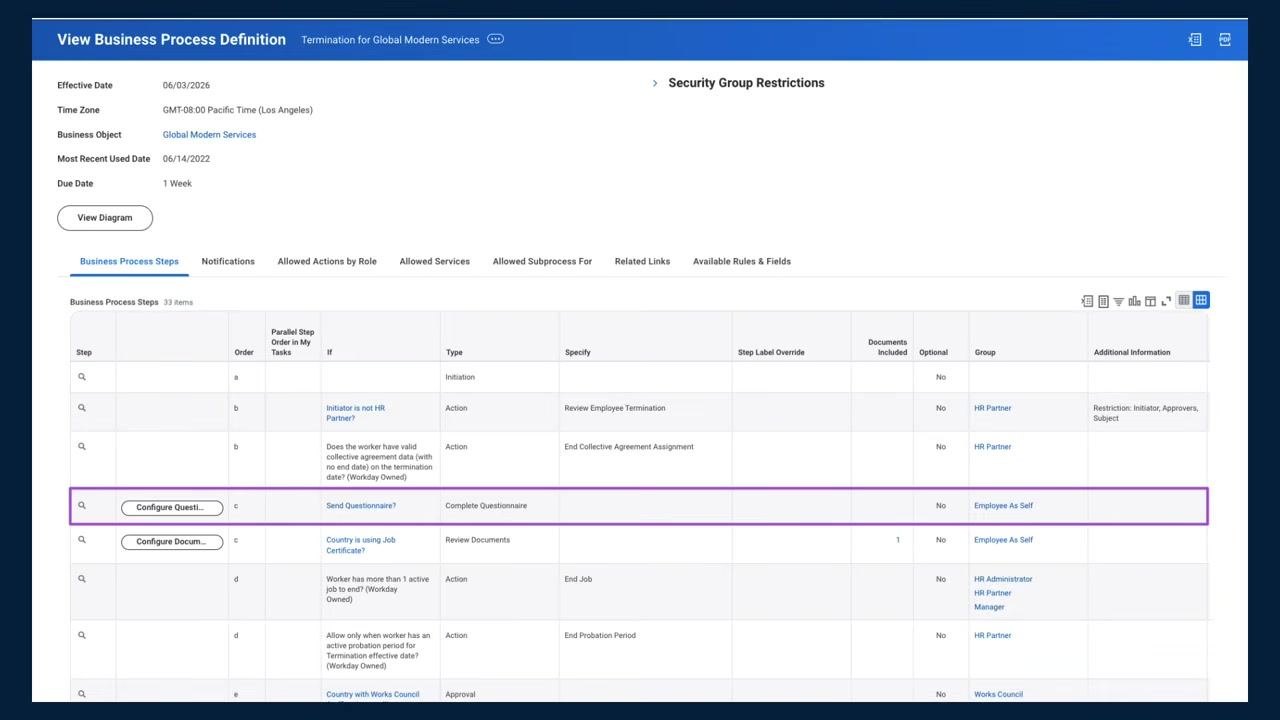
In the Business Process Steps tab, locate the step labeled "Complete Questionnaire" and confirm it is configured as follows:
- Order: c
- Type: Complete Questionnaire
- Specify: Send Questionnaire?
- Group: Employee As Self
- Documents Included: No
This configuration ensures that a questionnaire is sent to the employee as part of the termination process.
Configuring job overlap
Enable job overlap on a position
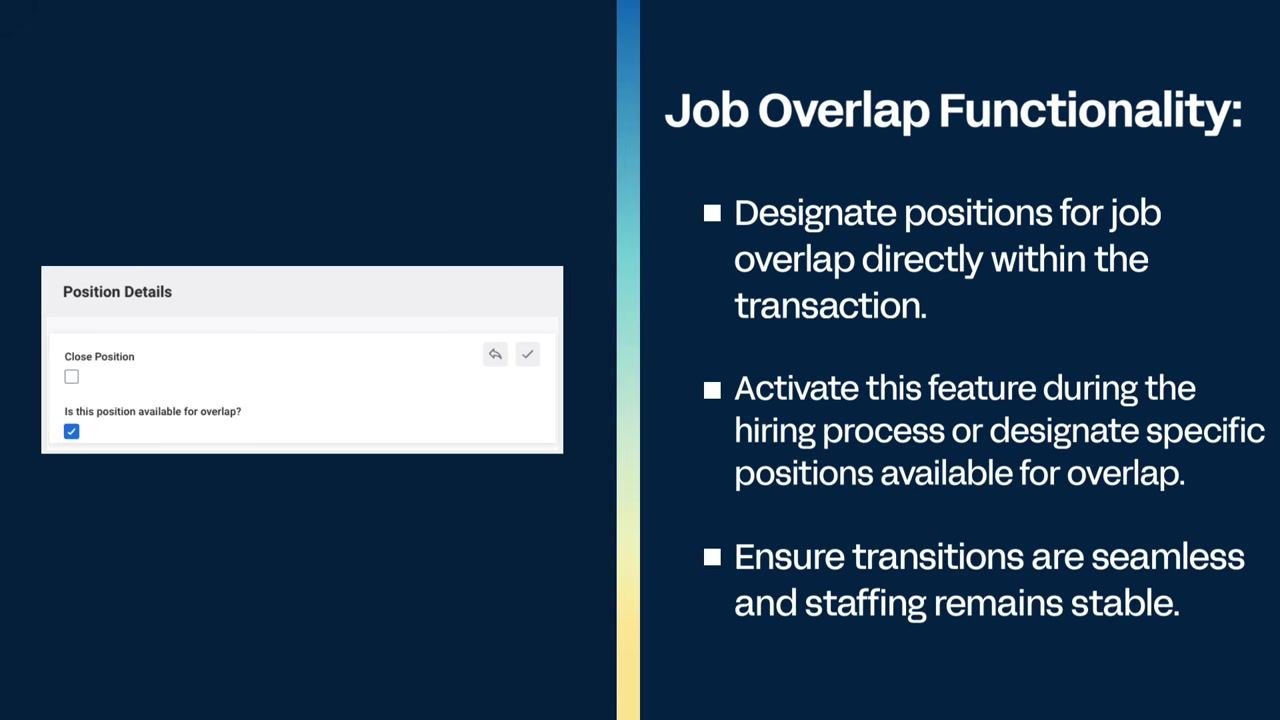
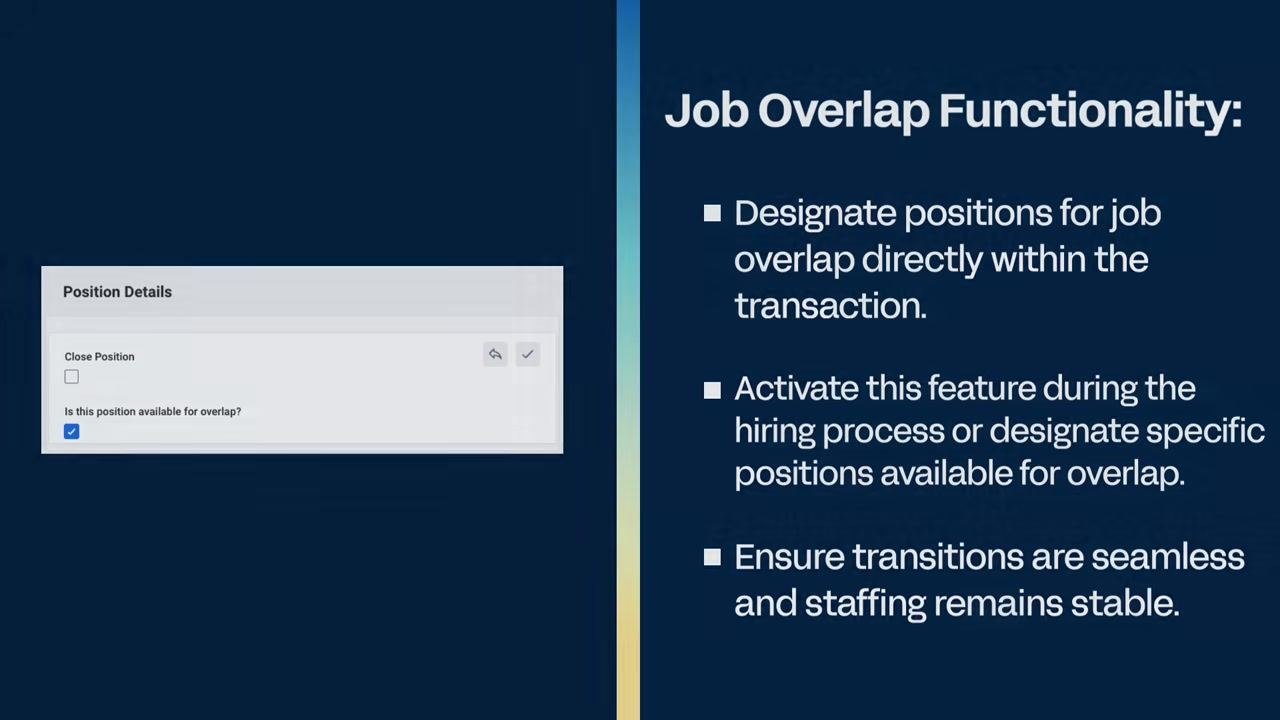
The job overlap functionality allows two workers to occupy the same position for a defined period. Use this configuration to support organizational continuity, such as training a replacement for a departing worker or backfilling a position during a leave of absence.
To designate a position for overlap, navigate to the Position Details section for the relevant job position and locate the option labeled "Is this position available for overlap?" Check the box to make the position eligible for overlap. You can activate this setting during the hiring process or by designating specific positions as available for overlap, which helps ensure seamless transitions and stable staffing.
When job overlap is enabled, Workday identifies the new hire as the "overlapping worker" and the original worker as the "primary worker." Both individuals share all security roles associated with the position restrictions.
Review overlapping positions in the organization
Go to the relevant supervisory organization (for example, "Marketing Services Group") and review the Members tab to see the list of workers and their positions. Overlapping positions are clearly labeled, such as "Web Content Manager (Overlap)" for the new hire and "Web Content Manager (Position Vacate: [date])" for the outgoing worker. Both workers' contact information, email, instant messenger, and location are listed.
Any changes made to organization assignments apply only to the specific position you select, ensuring accurate tracking and reporting for each individual in overlapping roles. Workday may display a reminder: "Any changes you make to organization assignments will only apply to the specific position you select."
Terminating the employee
Start the termination action
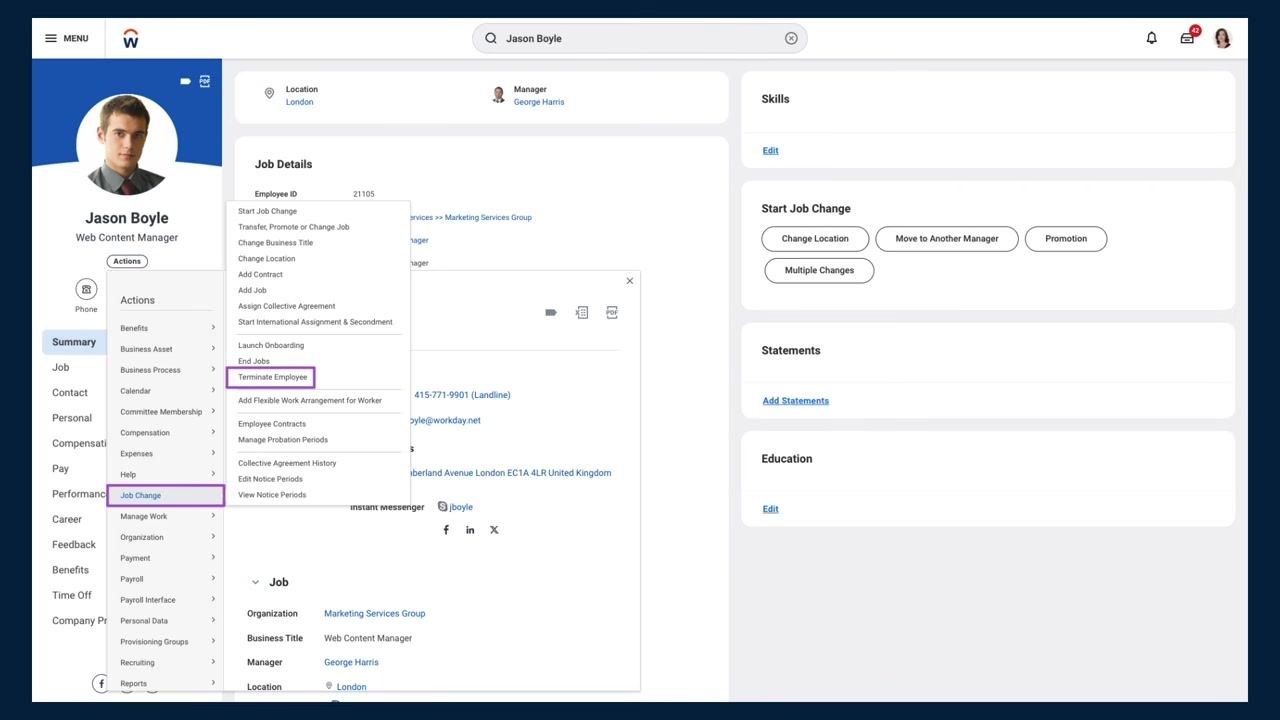
Navigate to the employee's profile (for example, Jason Boyle, Web Content Manager). In the left navigation, select Actions > Job Change, then choose Terminate Employee from the Job Change menu. This action begins the termination workflow for the selected employee.
Enter termination details
When initiating the termination, specify a termination reason and enter the termination date based on the worker's local time zone. Make sure the worker's last day of work does not occur after the termination date.
Example values:
- Termination Date: 06/03/2026
- Last Day of Work: 06/03/2026
- Pay Through Date: 06/03/2026
- Resignation Date: (if applicable)
Workday maintains the individual's status as an active worker until midnight on the effective termination date, which preserves data integrity throughout the process.
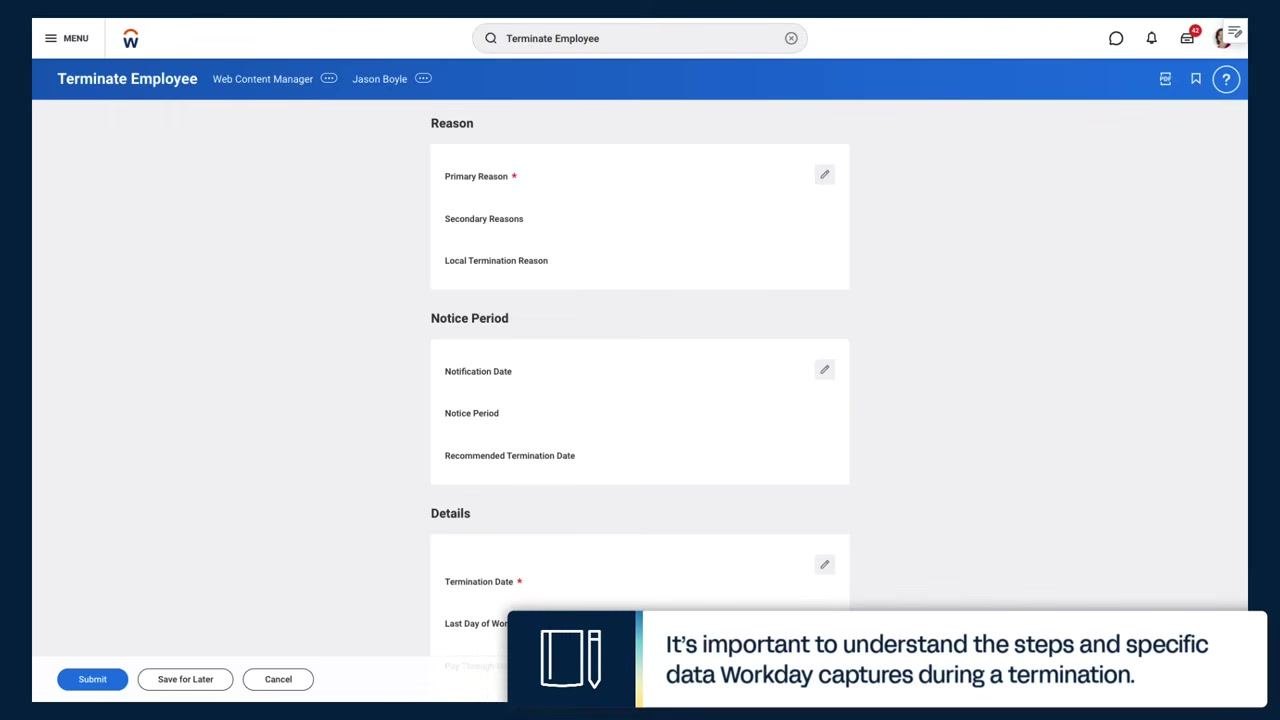
On the Terminate Employee screen, fill in all required fields:
- Reason
- Primary Reason: Voluntary > Moved
- Secondary Reasons (if applicable)
- Local Termination Reason (if applicable)
- Notice Period
- Notification Date (if required)
- Notice Period (if required)
- Recommended Termination Date (if required)
- Details
- Termination Date: 06/03/2026
- Last Day of Work: 06/03/2026
- Pay Through Date: 06/03/2026
- Resignation Date (if applicable)
- Regrettable: Yes
- Eligibility: Eligible for Rehire: Yes
Review all information for accuracy before continuing.
Set position overlap options
In the Position Details section at the bottom of the form, set:
- Close Position: No
- Is this position available for overlap?: Yes
This setting allows a replacement to be hired before the position is vacated, enabling job overlap.
Submit the termination task
Click Submit to finalize the termination request. Workday automatically triggers any remaining steps in the business process, such as sending a questionnaire to the employee, based on your configuration.
After submission, review the Details and Process page to confirm:
- Overall Process: Terminate: Jason Boyle (Terminated)
- Overall Status: Successfully Completed
- Process History: shows each step, its status, completion date, due date, and responsible person (for example, Brian Sullivan)
If additional steps remain, such as questionnaires or approvals, they appear as "Awaiting Action" or "Not Required" as appropriate.
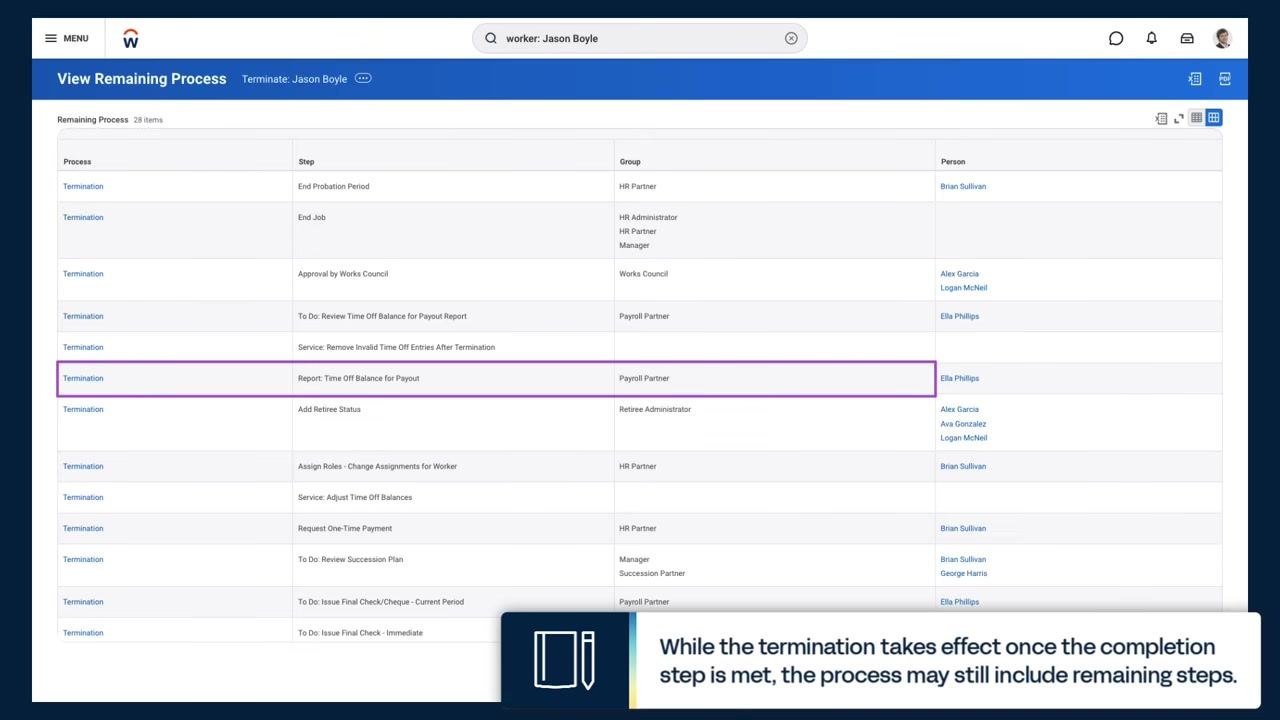
Review remaining process steps
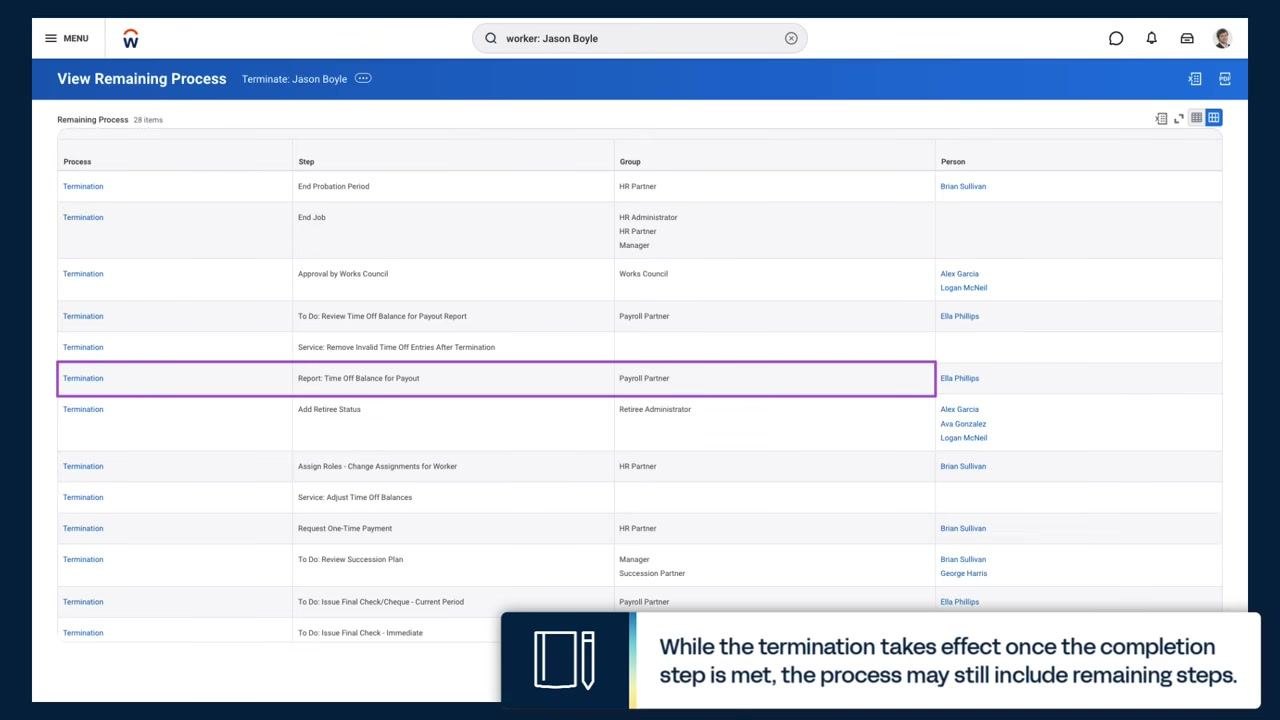
After submitting the termination, navigate to the View Remaining Process page for the employee (for example, Jason Boyle). Each row in the list of outstanding steps displays:
- Process: the type of process (for example, Termination)
- Step: the specific action required (for example, "To Do: Review Time Off Balance for Payout Report")
- Group: the responsible group or role (for example, Payroll Partner, HR Partner)
- Person: the individual assigned to the step (for example, Ella Phillips, Brian Sullivan)
Additional steps may include:
- Service: Remove Invalid Time Off Entries After Termination
- Report: Time Off Balance for Payout (assigned to Payroll Partner, for example, Ella Phillips)
- Add Retiree Status (if applicable)
- Assign Roles – Change Assignments for Worker
- Service: Adjust Time Off Balances
- To Do: Issue Final Check/Cheque (Current Period or Immediate)
Workday notes: "While the termination takes effect once the completion step is met, the process may still include remaining steps."
What's next
Once the termination is submitted, monitor the Details and Process page and the View Remaining Process page to ensure outstanding steps, such as payroll reviews, time off adjustments, and final pay issuance, are completed by the responsible teams. If you configured a job overlap, continue to track both the primary and overlapping worker's assignments in the supervisory organization until the position is fully transitioned.
Generation details: cost, quality tiers
Docsie billed 4,500 credits ($3.15) to analyze this 9-minute video at standard quality. The rewrite, template fill and Word/PDF exports were included. The same video at each quality tier:
| Quality | Frames sampled | Credits | Approx. cost |
|---|---|---|---|
| Draft | every 16-30 s | 2,250 | $1.57 |
| Standard (this guide) | every 8-15 s | 4,500 | $3.15 |
| Detailed | every 4-7 s | 9,000 | $6.30 |
| Ultra | every 1-3 s | 18,000 | $12.60 |
Credits priced at $0.70 per 1,000; plans include a monthly allowance. Enterprise customers on on-premise or bring-your-own-model deployments run this on their own inference and pay no per-video credits.
Generated by Docsie Video-to-Docs on 2026-10-11 from a 8-minute video. Screenshots are frames from the source video and belong to their creator, Workday, whose original is embedded above. If you own this video and want the guide removed or credited differently, contact us and we will act within one business day.