
How to Monitor Background Jobs with SM37 in SAP S/4HANA
This guide walks you through scheduling a report as a background job in SAP and shows you how to monitor background jobs with SM37 once they are running. You will create a variant with dynamic date logic, define the job in SM36 using the Job Wizard, configure email delivery of the output, and then confirm execution and review results in SM37 and SAPconnect.
Video: SAP Background Jobs: Job Scheduling & Monitoring Using SM36 & SM37 | Step by Step by Sap Studio Ease Learning (2026). All credit for the demonstration goes to the creator; watch the original on YouTube. The written guide below was generated from this video by Docsie. Creator? Request a change or removal.
This guide walks you through scheduling a report as a background job in SAP and shows you how to monitor background jobs with SM37 once they are running. You will create a variant with dynamic date logic, define the job in SM36 using the Job Wizard, configure email delivery of the output, and then confirm execution and review results in SM37 and SAPconnect.
Prerequisites
- Access to the SAP Easy Access screen with the appropriate client and system credentials.
- Authorization to run transaction codes
SM36andSM37. - Knowledge of the report you want to schedule and its transaction code (in this guide, the "SALE REGISTER NEW" report, transaction
ysd4). - A valid recipient email address for output distribution.
Open the report input screen
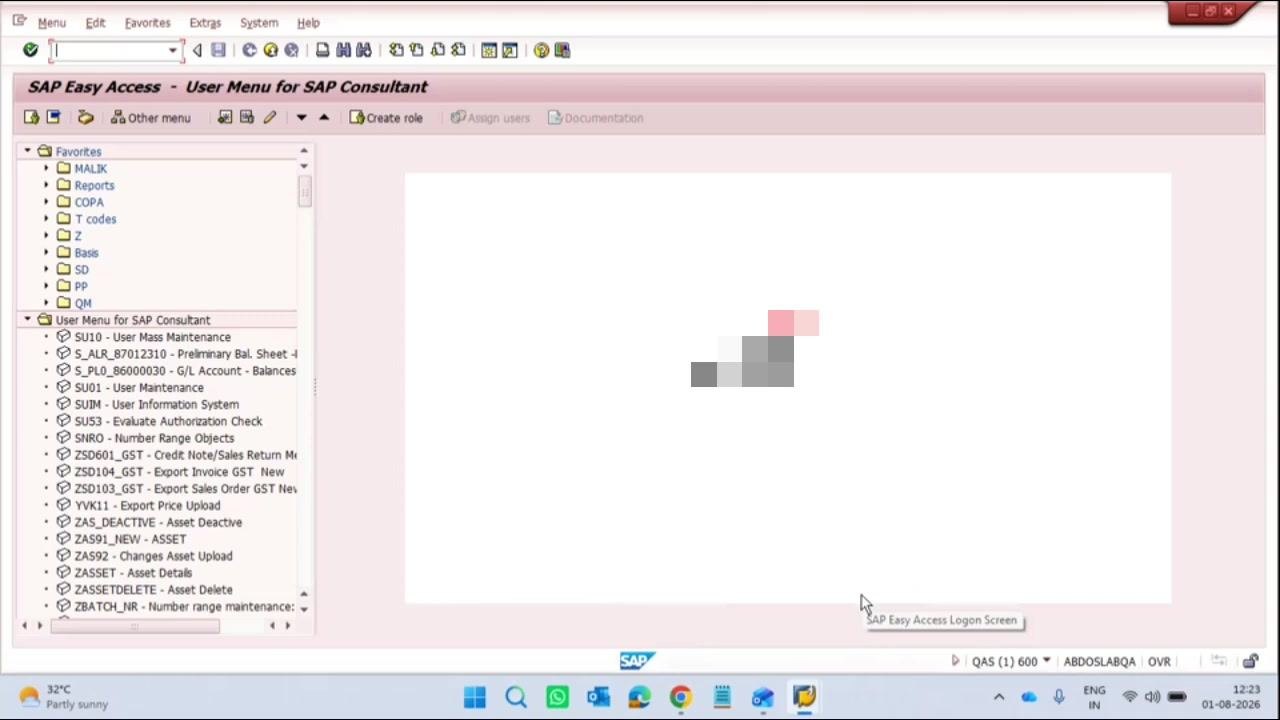
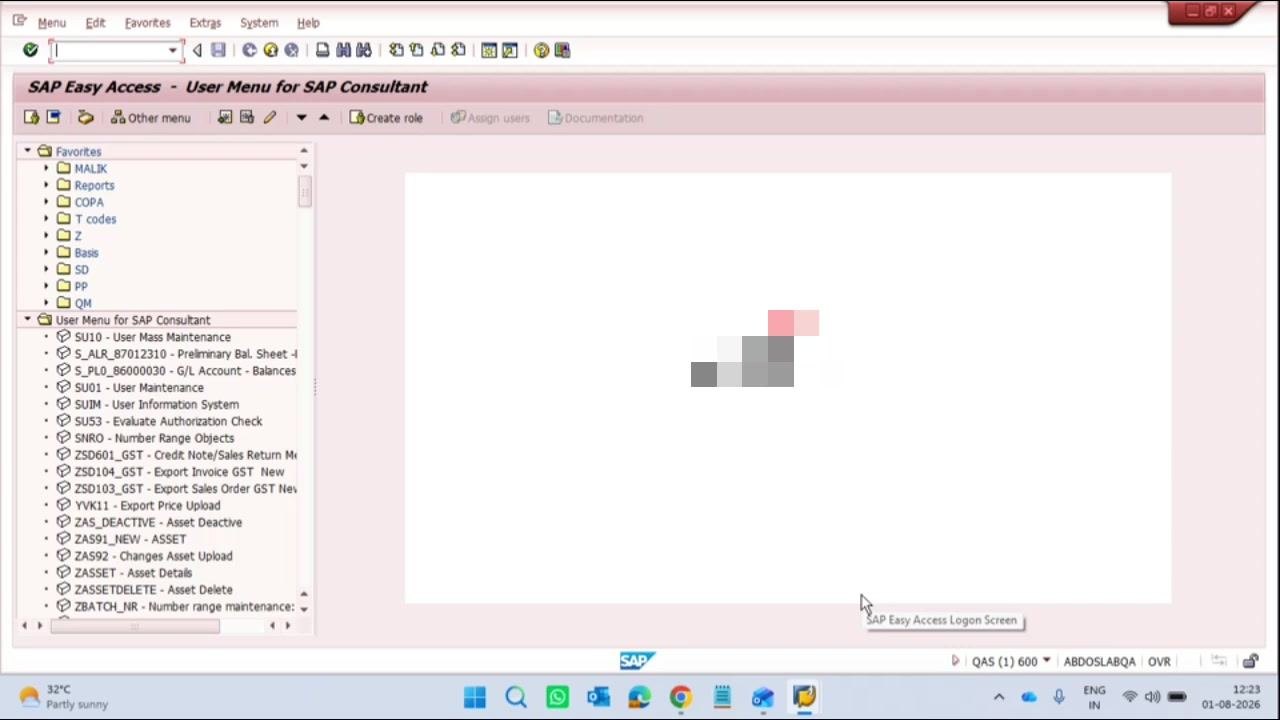
Log in to SAP and go to the SAP Easy Access screen. This screen displays your user menu and favorites on the left, with folders and transaction codes available for navigation. Confirm you are on the correct client and system by checking the status bar at the bottom, where the system tray also shows the SAP icon along with the current date, time, and weather information.
Identify the report to schedule
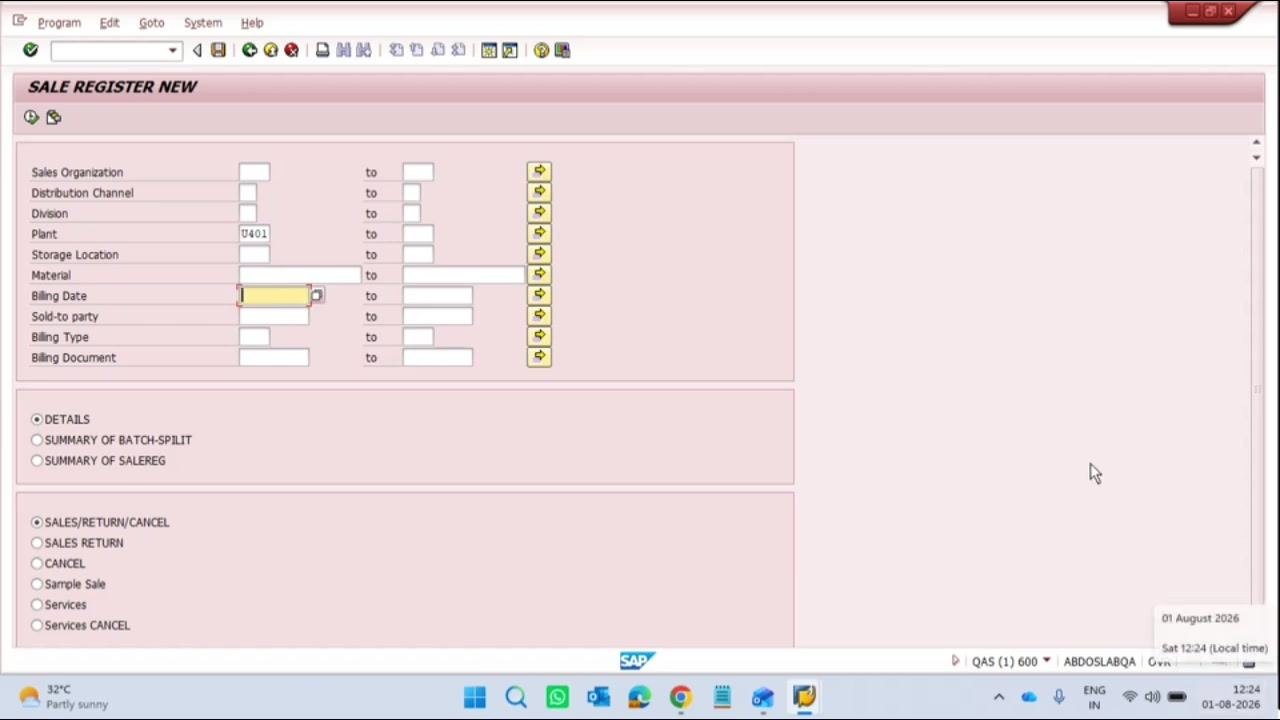
Enter the transaction code for your report (for example, ysd4) in the command field at the top of the SAP Easy Access screen. The "SALE REGISTER NEW" screen opens, prompting you to enter selection criteria such as Sales Organization, Distribution Channel, Division, Plant, Storage Location, Material, Billing Date, Sold-to party, Billing Type, and Billing Document. You can also choose the output type (Details, Summary of Batch-Split, Summary of Salereg) and the sales/return/cancel type (Sales Return, Cancel, Sample Sale, Services, Services Cancel).
Enter selection criteria for the variant
A variant lets you predefine input values for the report, which is essential for automation and scheduling. For this example, the goal is to have the report always fetch sales data up to the previous day. In the "SALE REGISTER NEW" input screen, enter U401 in the Plant field and set the Billing Date field to the desired range (for example, up to the 25th of the month, or a dynamic date for automation).
Start the variant creation process
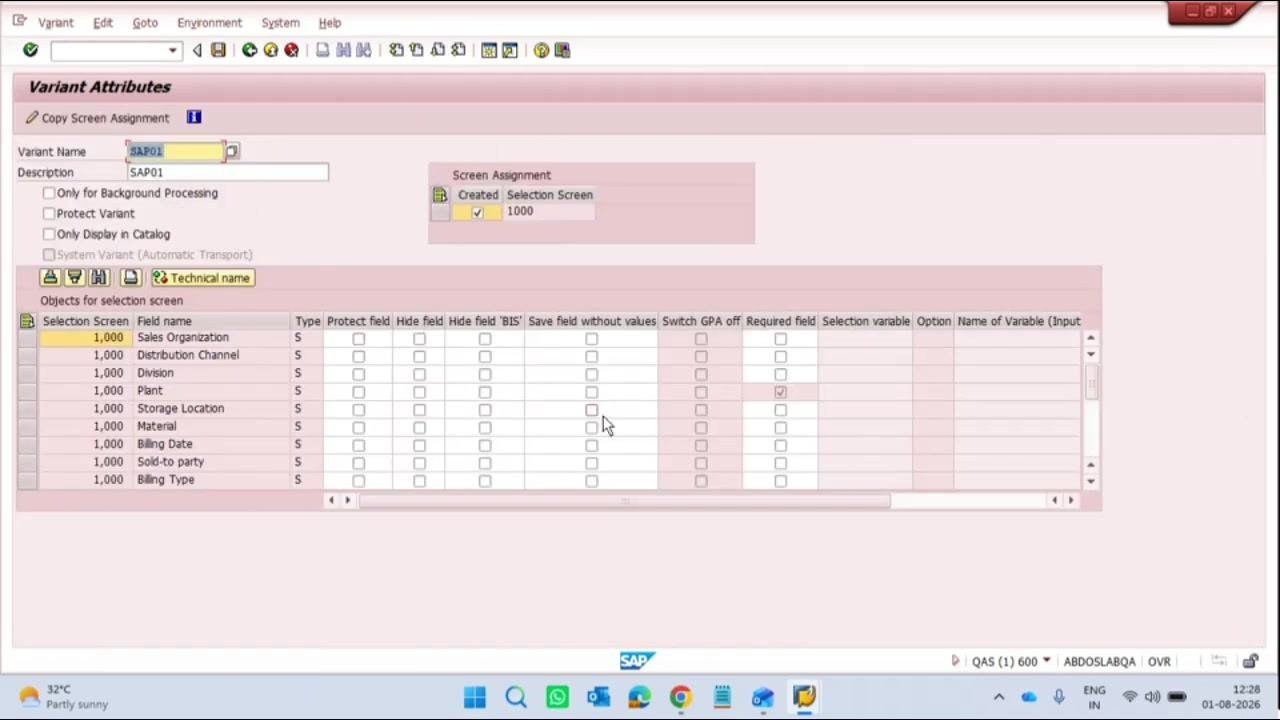
Click Save as Variant (represented by a disk icon or available via the menu). The Variant Attributes screen opens, prompting you to define the new variant.
Define the variant details
Enter a Variant Name (for example, CONSULTANT) and a matching Description. Make sure the Created checkbox is selected under Screen Assignment. The table on this screen lists all input fields from the report selection screen, which you can configure individually.
Set the Billing Date to a dynamic variable
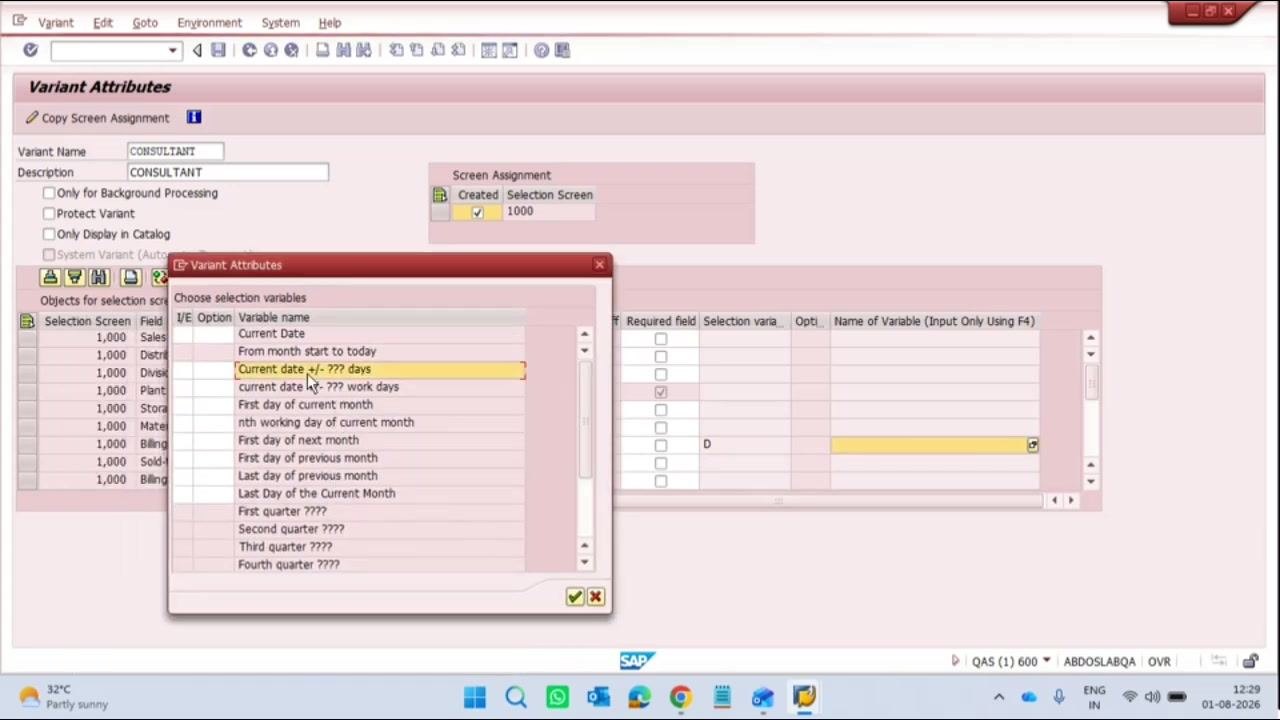
In the "Objects for selection screen" table, locate the Billing Date row and click the input help (dropdown or F4) in the Selection variable column. The Choose selection variables dialog appears. Select Current date +/- ??? days from the list.
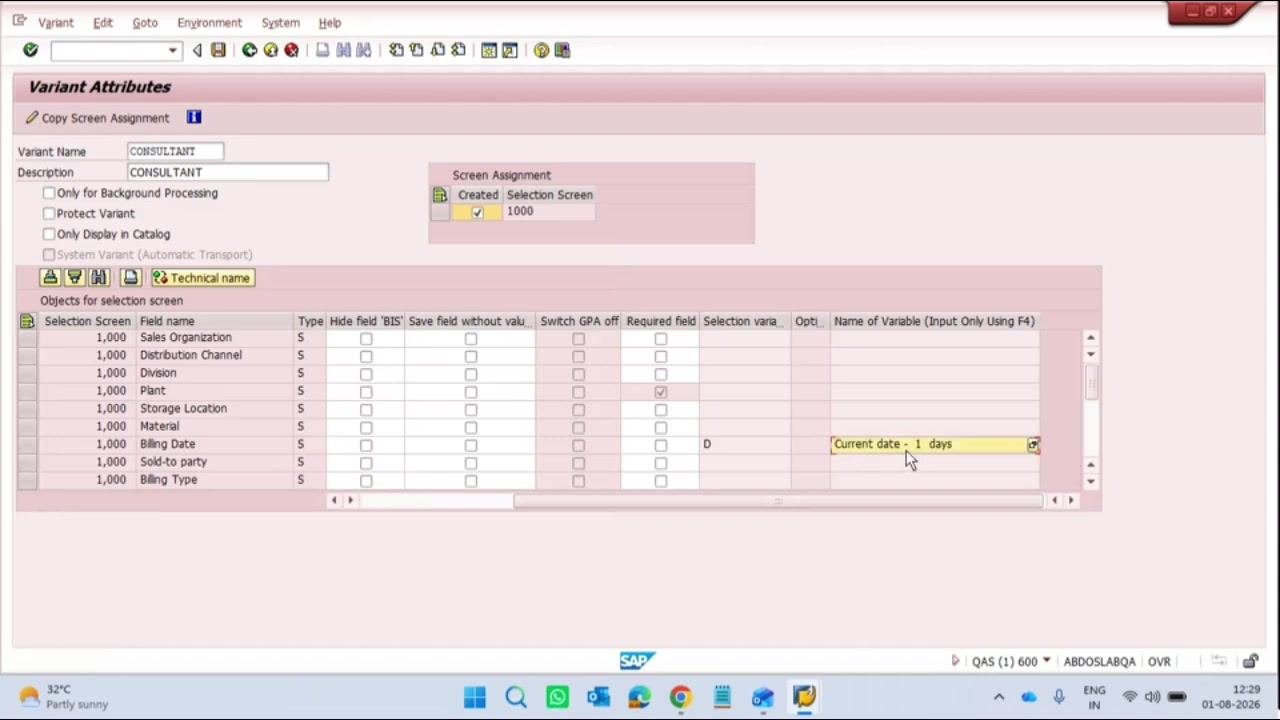
In the Name of Variable or value field, enter -1 to set "current date minus 1 day." This ensures the report always runs against the previous day's data whenever it is scheduled. Confirm your selection to return to the Variant Attributes screen.
Save the variant
Review all entries for correctness, then click the save icon to save the variant with the dynamic date logic applied. The variant is now ready for use in background job scheduling.
Select and check the variant
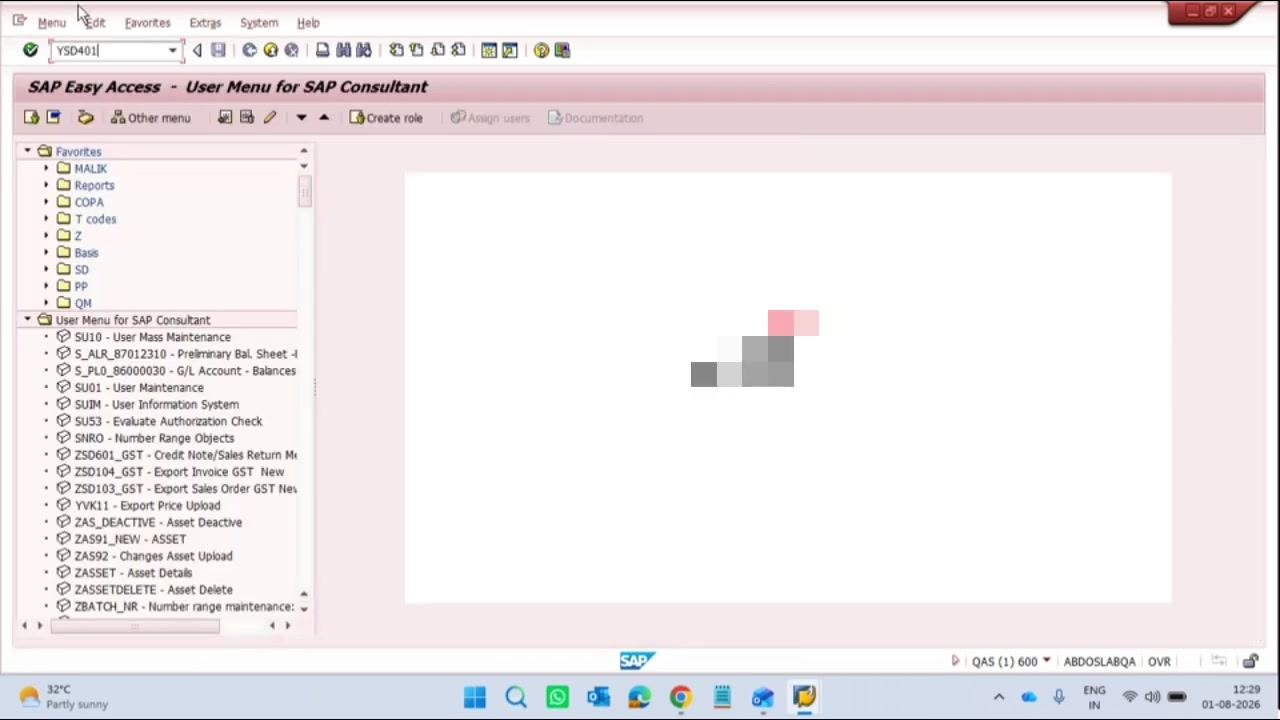
Return to the "SALE REGISTER NEW" report input screen and open the Find Variant dialog. Enter CONSULTANT in the Variant field and confirm the selection.
Execute the variant
With the CONSULTANT variant selected, execute the report. The system automatically applies the dynamic date logic (current date minus 1 day) to the Billing Date field.
Review the variant attributes
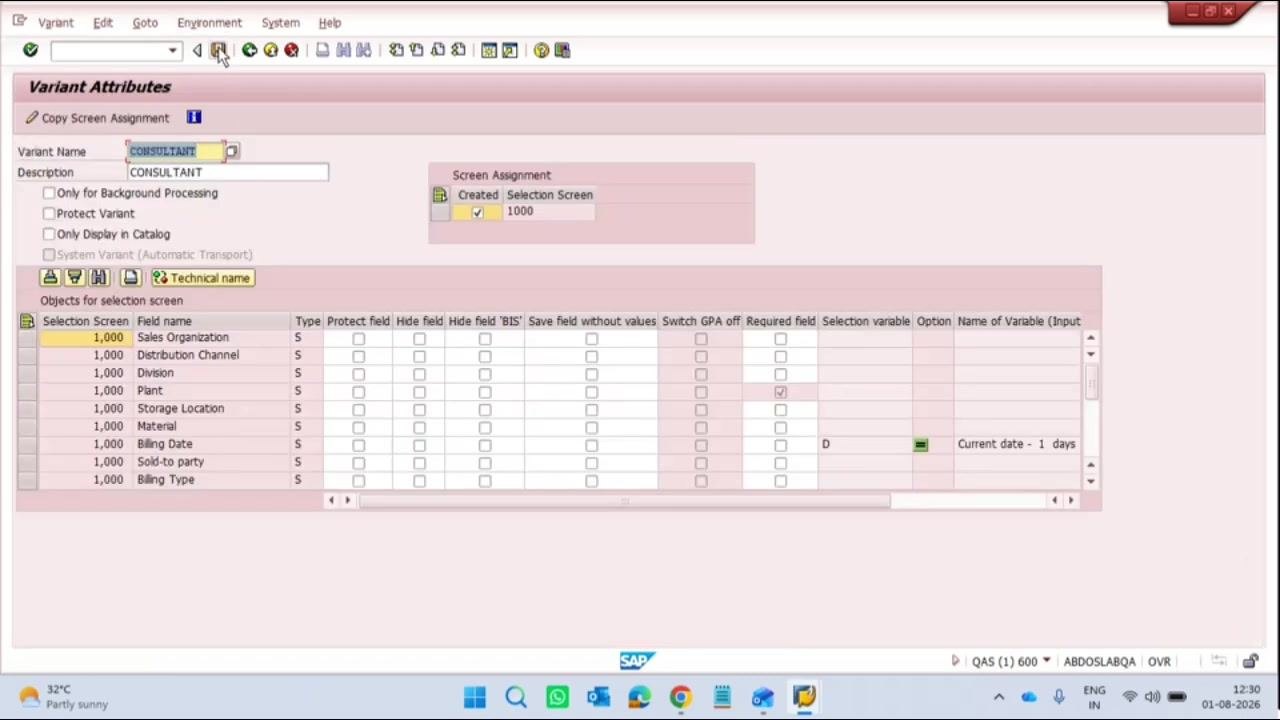
Open the Variant Attributes screen for CONSULTANT and confirm that the Billing Date field uses the selection variable "Current date - 1 days." Verify that all other fields are set as required.
Identify the program name
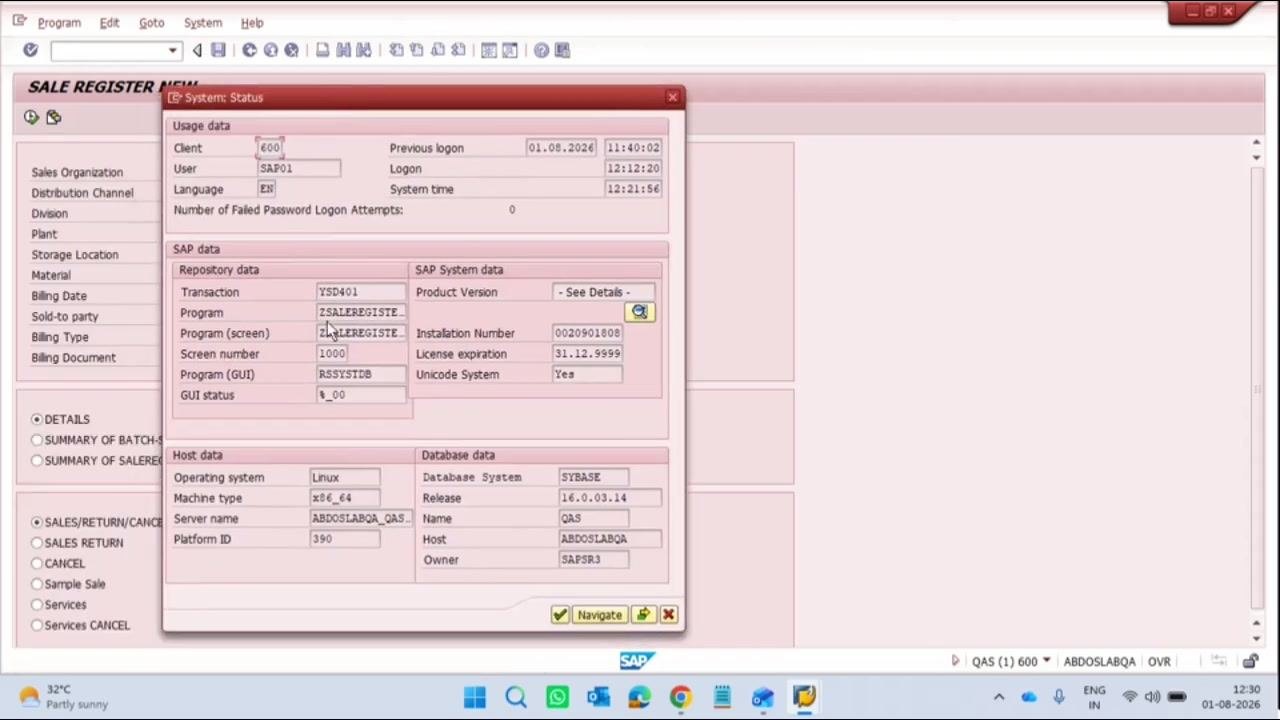
Go to the System menu and select Status. In the System: Status dialog, locate and copy the Program name (for example, ZSALEREGISTER_NEW1). Also note the transaction code (for example, YSD401) for reference, as you will need both when defining the job.
Open the Job Wizard in SM36
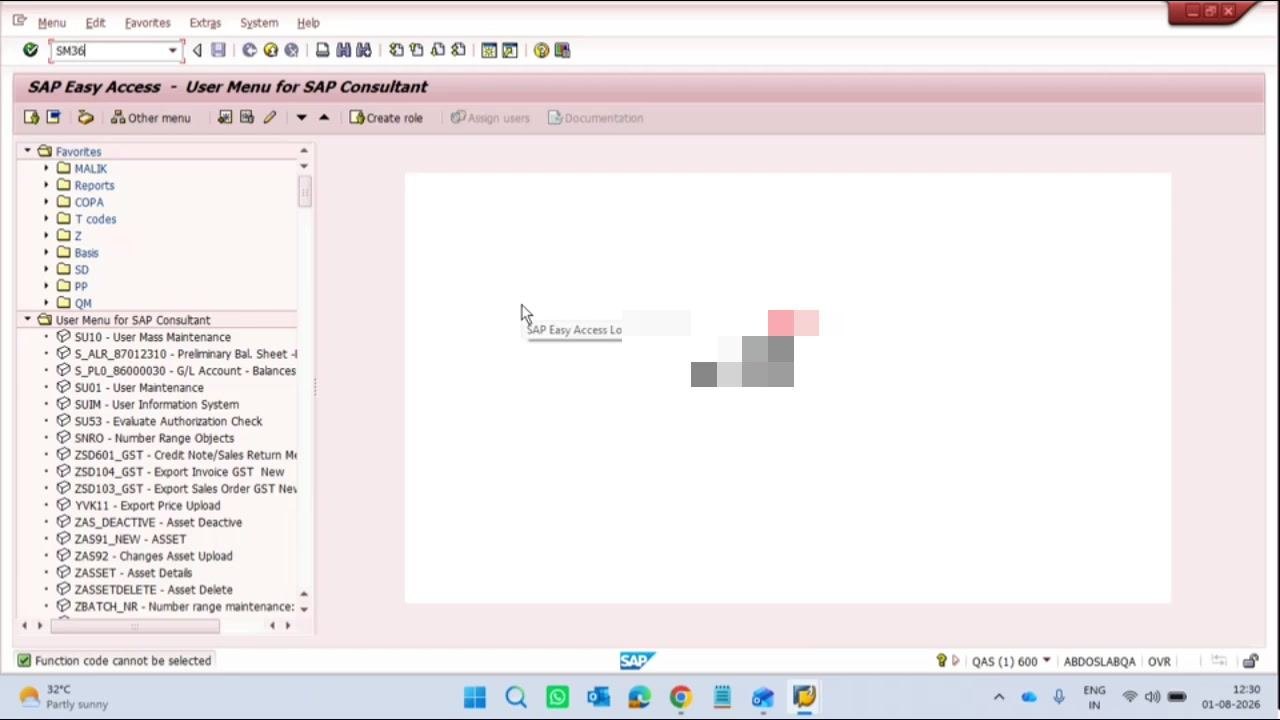
Return to the SAP Easy Access screen and enter transaction code SM36 in the command field, then press Enter to open the job scheduling interface.
In the SM36 screen, click Job Wizard to start the guided job creation process.
Enter general job information
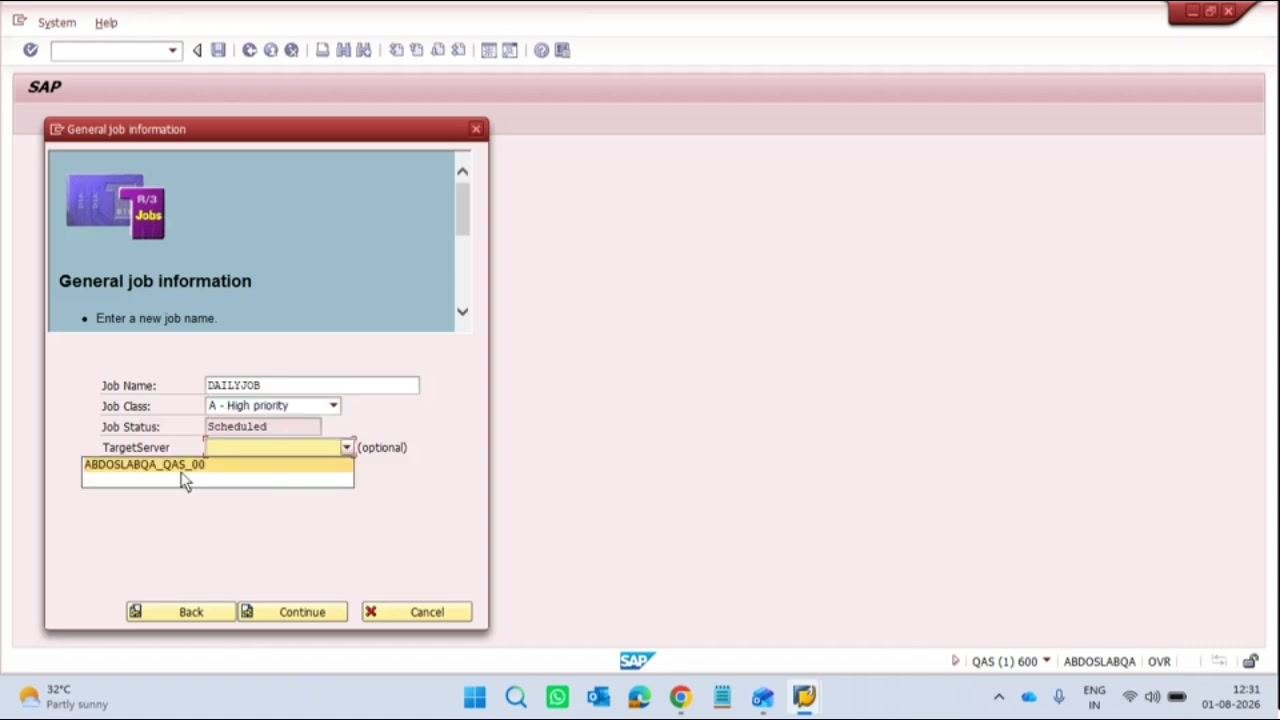
In the "General job information" window, enter the following:
- Job Name:
DAILYJOB - Job Class:
A - High priority - Job Status:
Scheduled - TargetServer (optional):
ABDOSLABQA_QAS_00
Click Continue to proceed.
Define the ABAP program job step
In the "Define an ABAP Program Job Step" window, enter the required ABAP program name (the program identified in Step 11). Leave the Variant field blank for now and confirm that Execution language is set to EN. Use the Print Parameters or Spool list recipients button as needed.
Select the variant
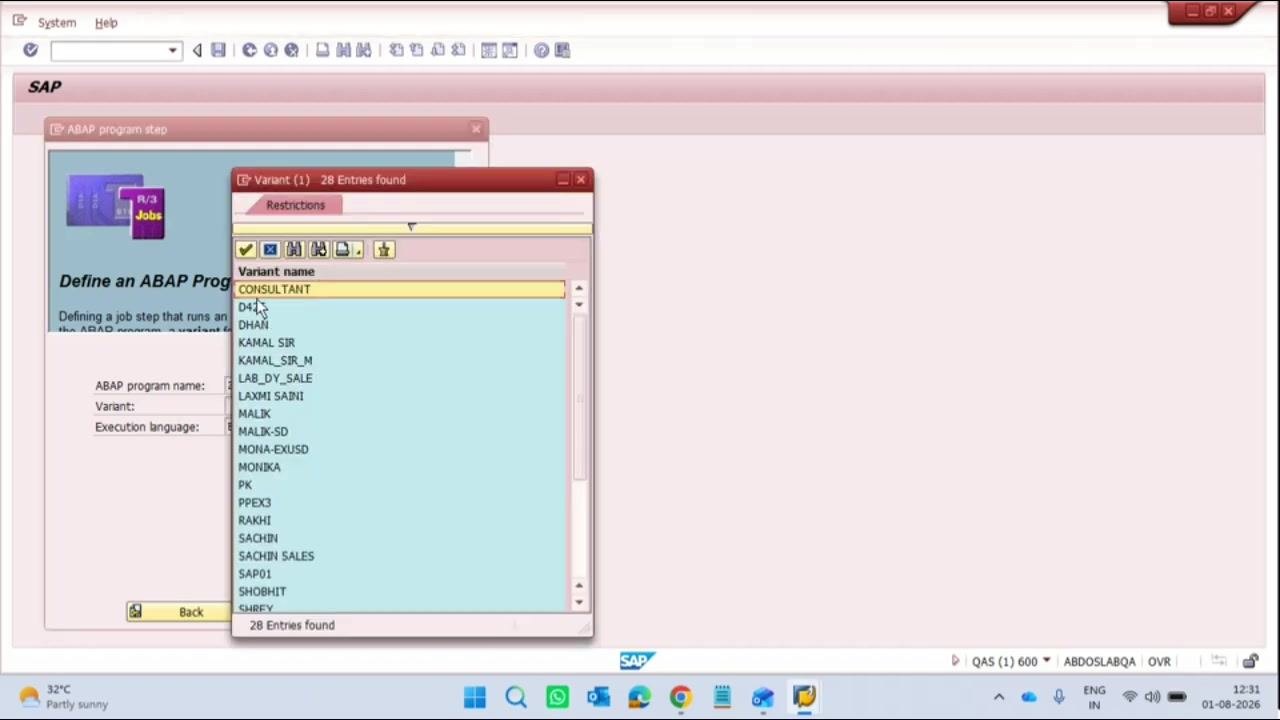
When the Variant selection window appears, choose CONSULTANT from the list of available variants, which may also include options such as D425, DHAN, KAMAL SIR, KAMAL_SIR_M, LAB_DY_SALE, LAXMI SAINI, MALIK, MALIK-SD, MONA-EXUSD, MONIKA, PK, PPEX3, RAKHI, SACHIN, SACHIN SALES, SAP01, SHOBHIT, and SHREY. Double-click CONSULTANT to select it.
Set up the distribution list
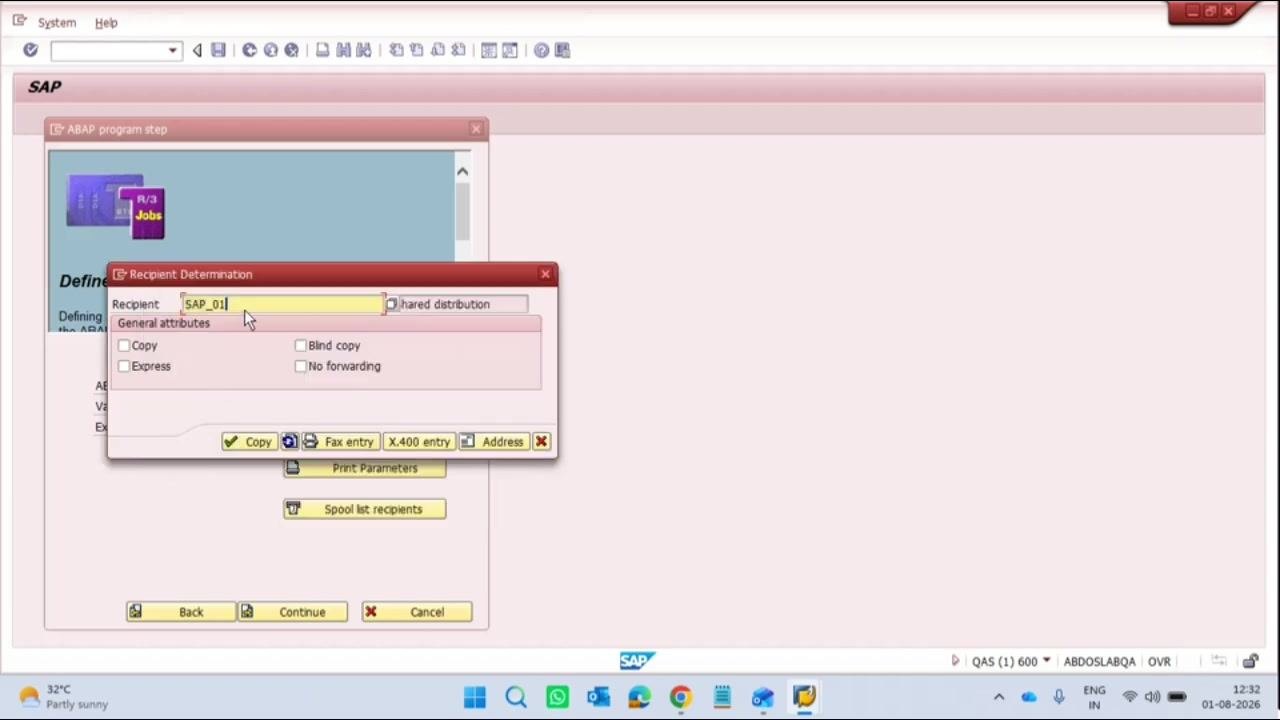
In the Recipient Determination dialog, enter or select SAP_01 as the Recipient. You can also check options such as Copy, Express, Blind copy, or No forwarding as needed. Click Address to view or edit the distribution list.
Verify email recipients
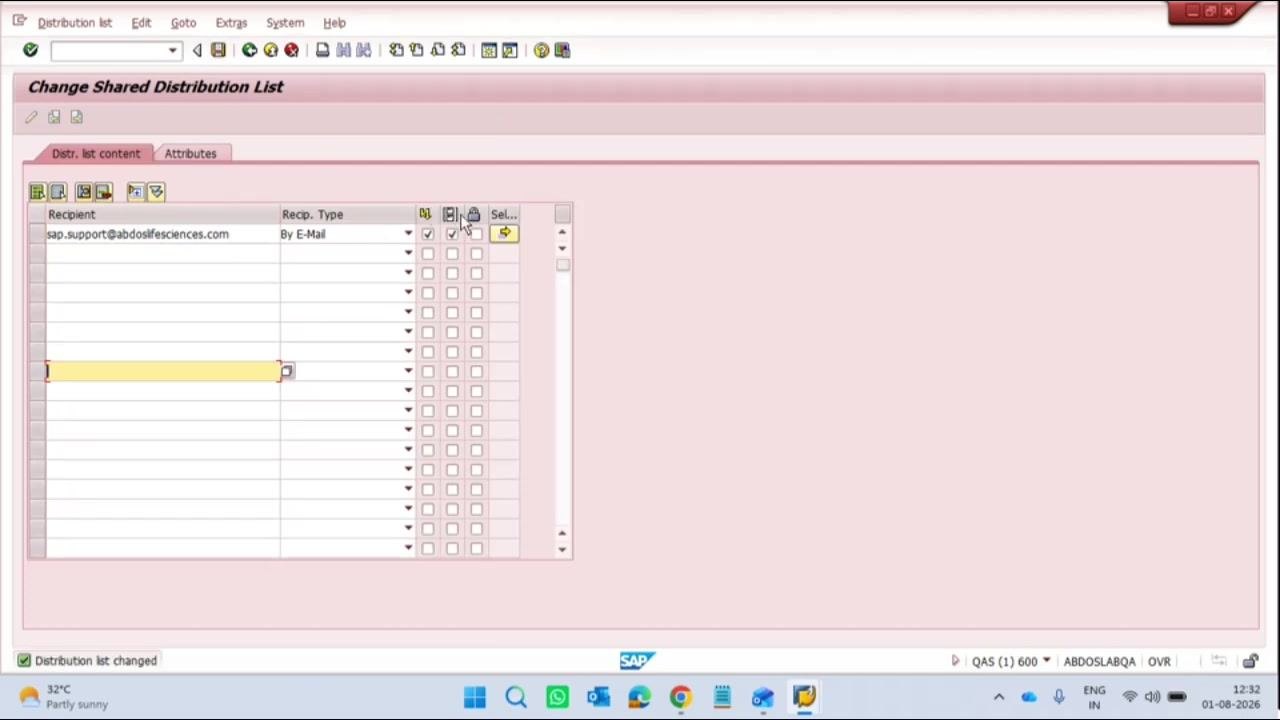
In the Change Shared Distribution List window, confirm that the recipient email (for example, sap.support@abdoslifesciences.com) appears under the "Recipient" column with the type set to "By E-Mail." Do not use the Copy function here, as this can create duplicate entries.
Return to Recipient Determination
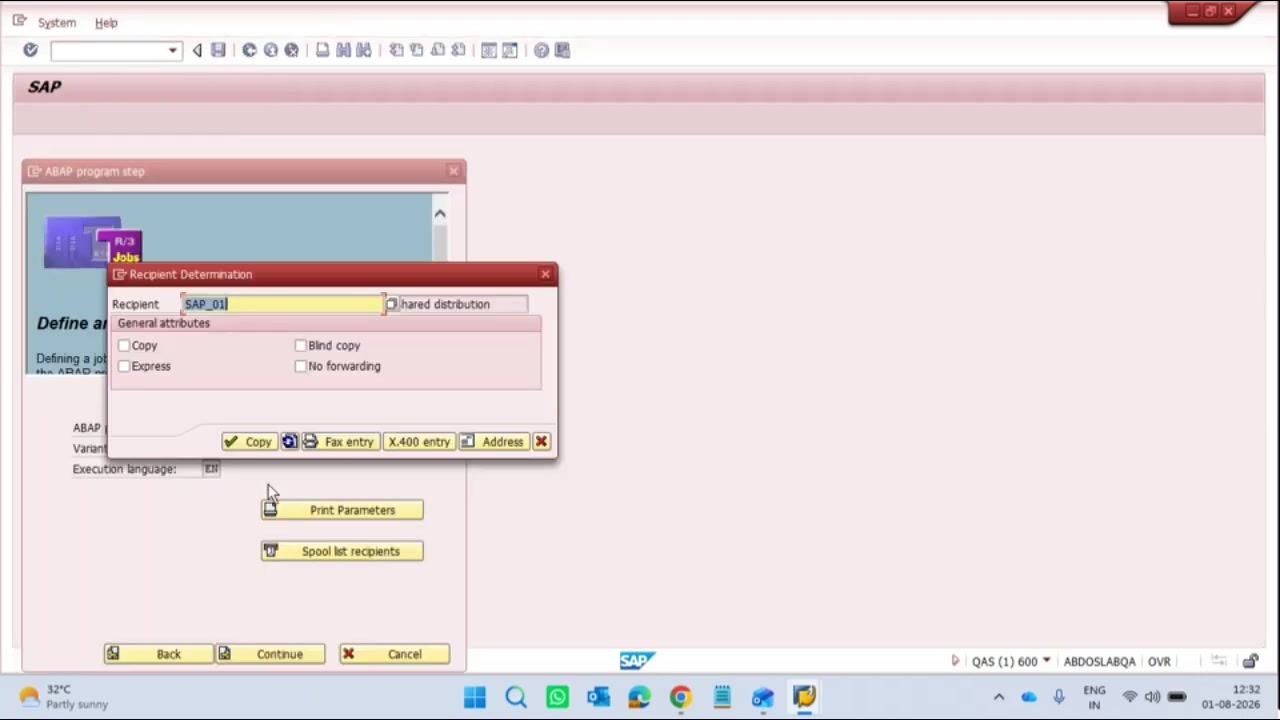
After verifying the distribution list, return to the Recipient Determination dialog. Confirm that SAP_01 is still entered as the recipient, then click Continue to proceed.
Set job start conditions
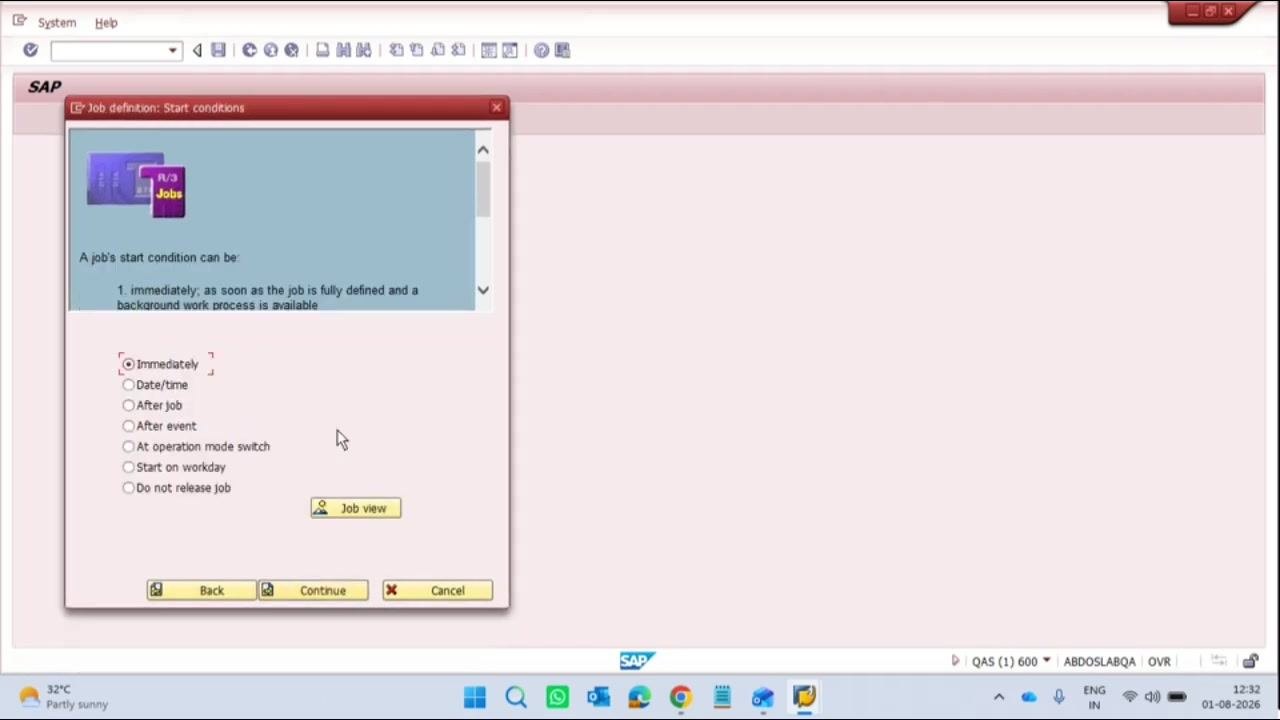
In the "Job definition: Start conditions" window, choose when the job should start. Available options include:
- Immediately (selected by default)
- Date/time
- After job
- After event
- At operation mode switch
- Start on workday
- Do not release job
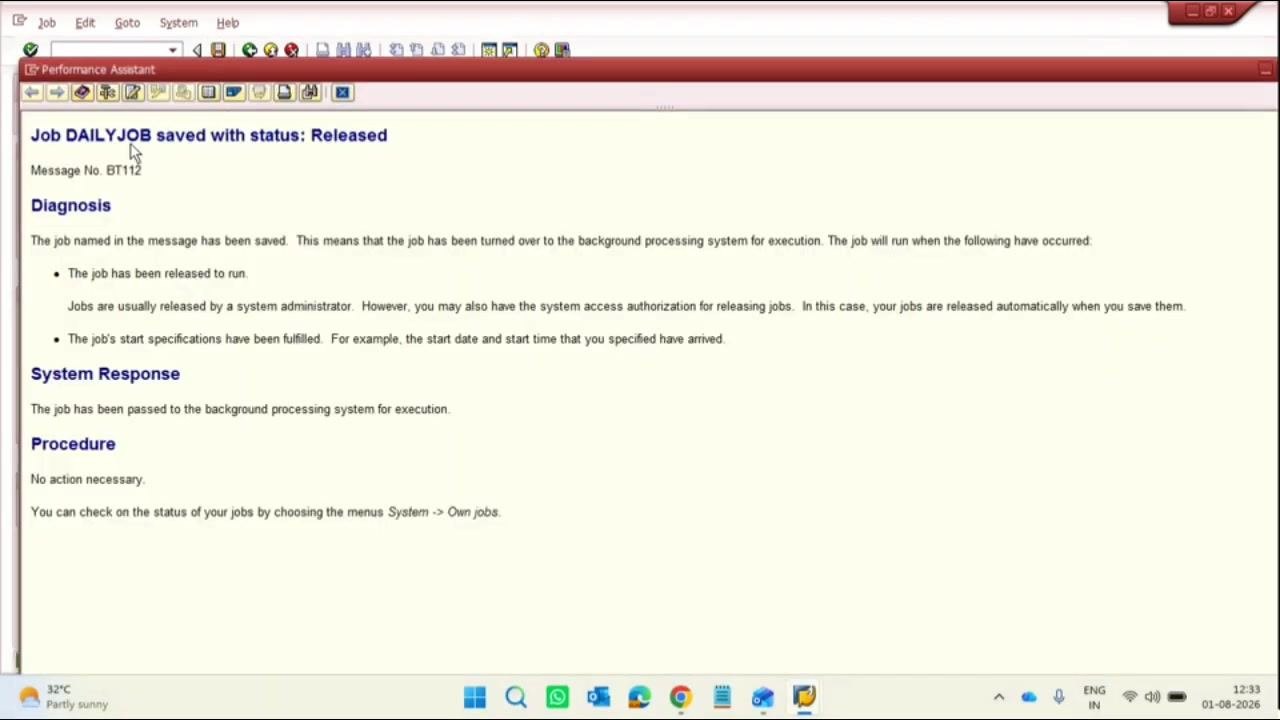
Select the option that fits your scheduling needs, then click Continue to finalize the job scheduling.
Set the job's start date and time
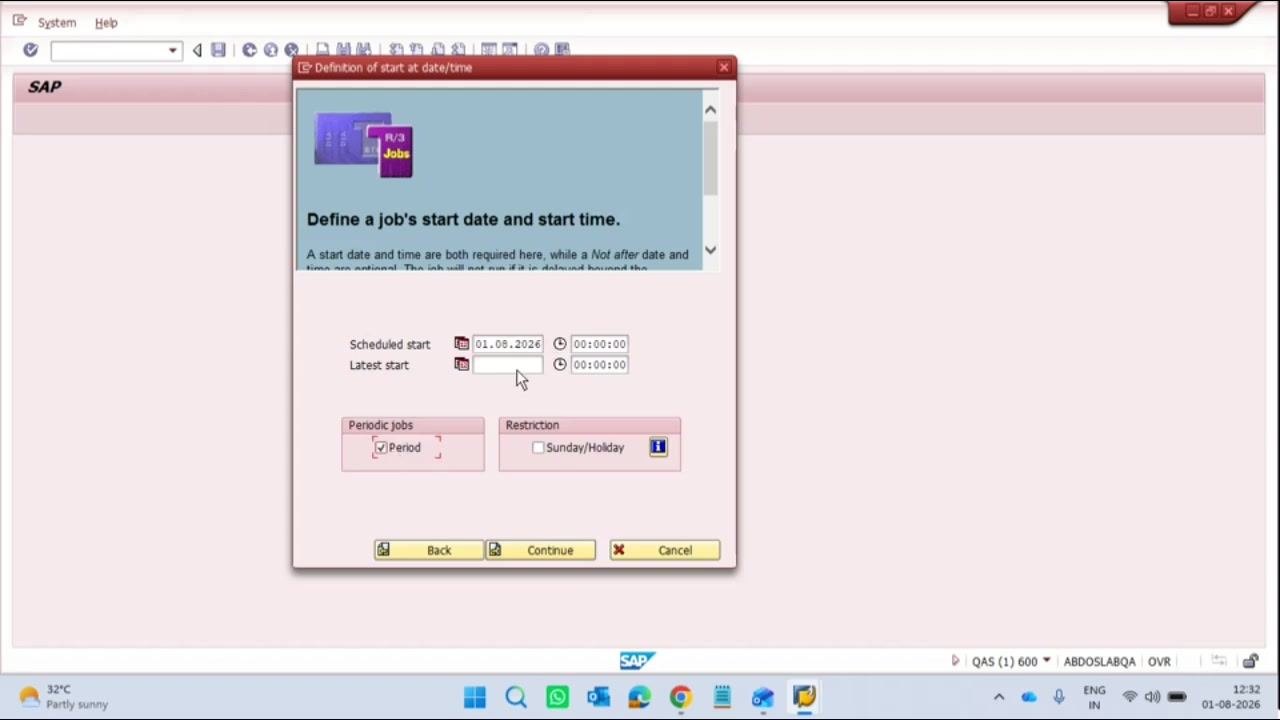
In the "Definition of start at date/time" window, enter the Scheduled start date (for example, 01.08.2026) and time (for example, 00:00:00). You can optionally set a Latest start time. To make the job recurring, check the Period box under "Periodic jobs." To skip execution on holidays, check the Sunday/Holiday box under "Restriction."
Set the job to trigger at a specific time
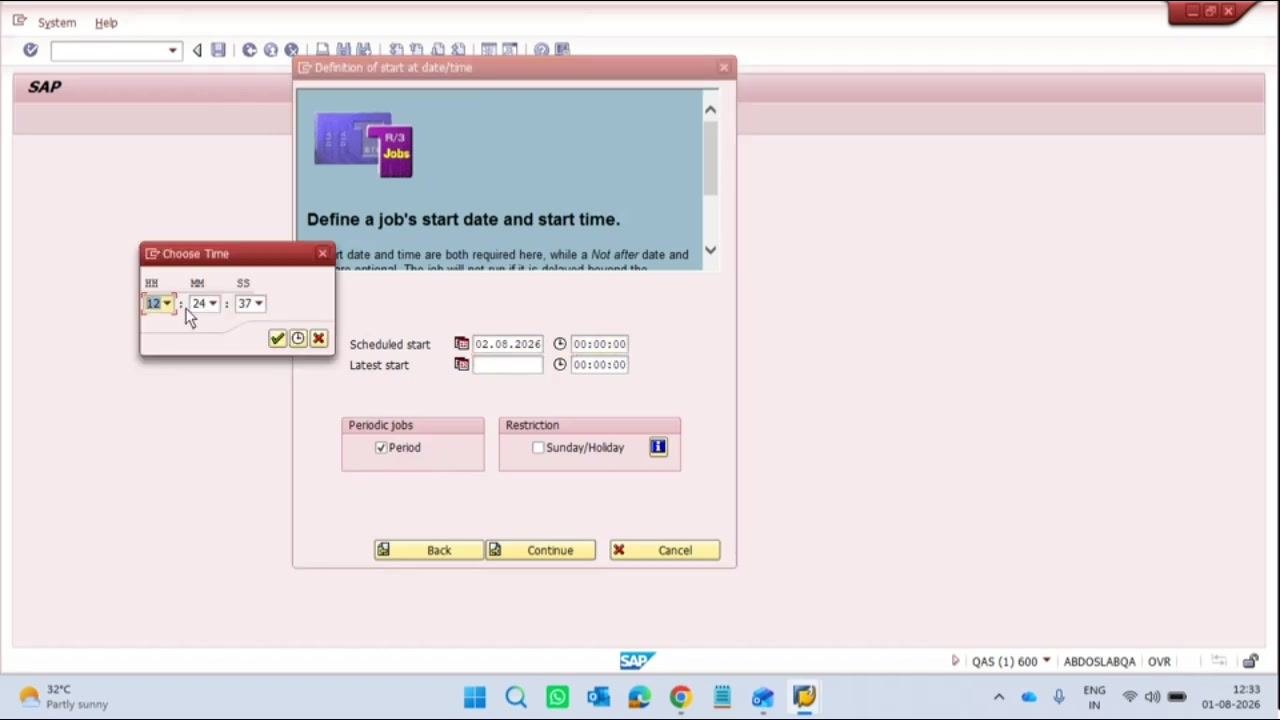
If you want the job to trigger automatically at a specific time (for example, 12:00 PM), click the time selection icon next to the Scheduled start time. In the Choose Time dialog, set the hour to 12 and adjust minutes and seconds as needed, then confirm the selection. If you do not set a specific time, the job triggers automatically at 12 PM by default.
Optionally start the job immediately
If you choose to start the job right away instead of scheduling it, review the background resources in the "Def. of start immediately" window. Confirm the total number of background work processes (WPs) and how many are currently free. You can also set periodic or restriction options here. Click Continue to start the job immediately.
Complete the job definition
After setting the date and time, proceed to the summary screen to review the job details:
- Job name: DAILYJOB
- Job class: A - High priority
- Target server: ABDOSLABQA_QAS_00
- Step(s) defined: 1. ZSALEREGISTER_NEW1
- Start condition: Start at date/time: 02.08.2026–00:00:00
Click Complete to finalize and create the job in the system.
Monitor the job in SM37
Once the job is created, open transaction SM37 to monitor background jobs with SM37 in SAP. Locate DAILYJOB in the job list and check the Status column, which should display Finished once the job has completed. The list also shows the job creator, start date, start time, duration, and any delay, confirming that the job has been triggered successfully.
View job details and output
Double-click the DAILYJOB entry in the Job Overview to open its details. Review the following sections:
- General Data: Job Name, Class, Status, Exec. Target
- Job Start: Planned Start date/time
- Job Steps: Step(s) successfully completed
- Detailed Information: Class, Priority, Schedule Job, Last Changed, Release, Scheduled Start, Execute From/To, Client, ID, Target Server, Executing Server, WP Number/PID
Review email send requests in SAPconnect
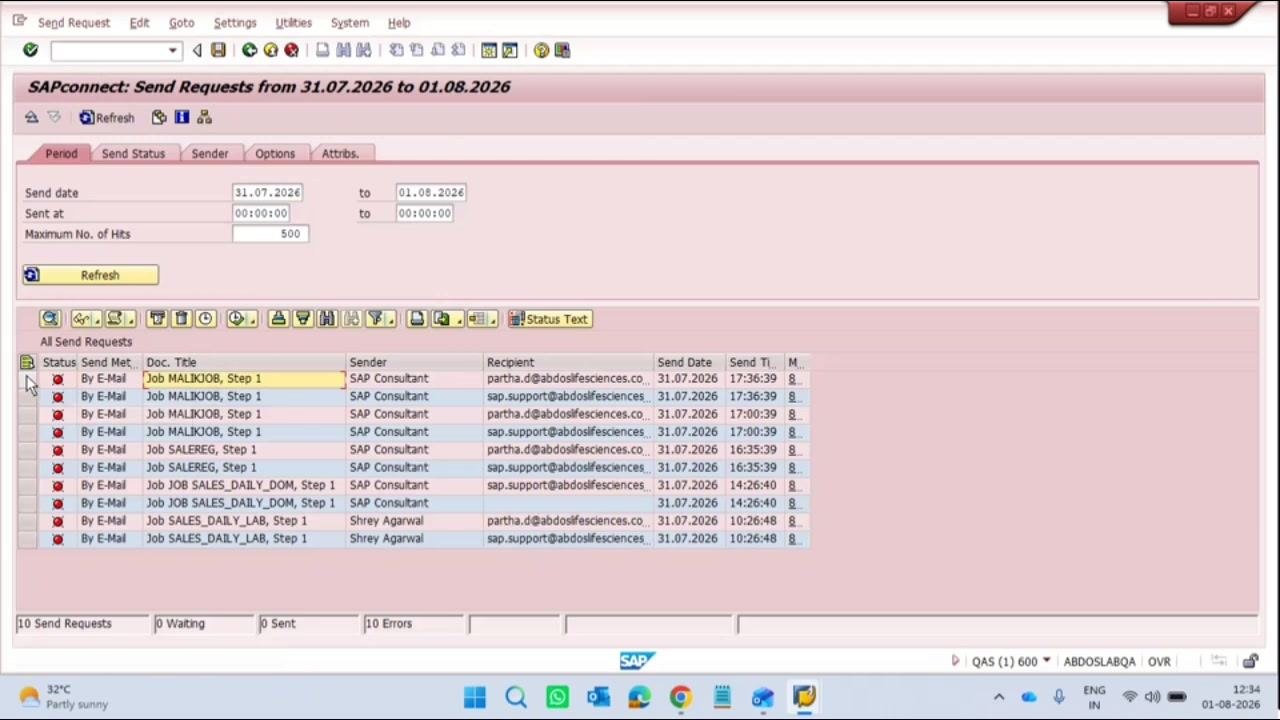
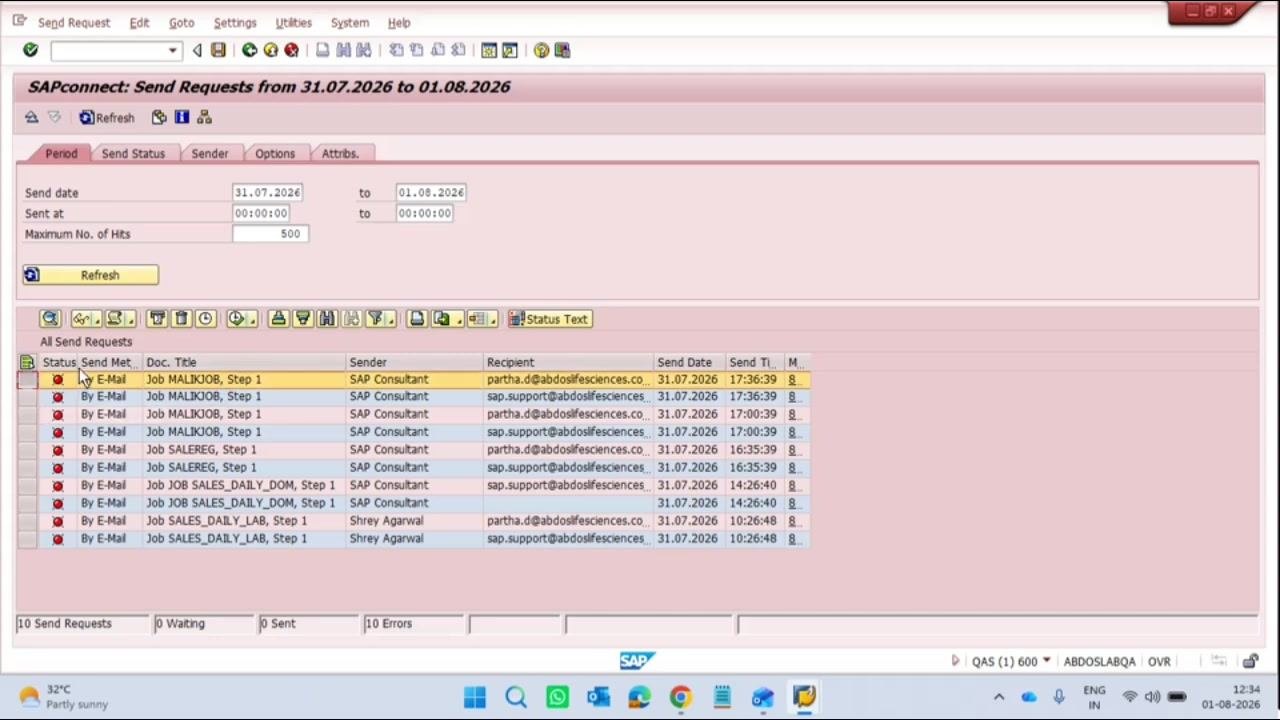
Open the SAPconnect: Send Requests screen. Set the Send date range (for example, from 31.07.2026 to 01.08.2026) and the Sent at time range (for example, from 00:01:00 to 00:01:00). Set Maximum No. of Hits to 500, then click Refresh to display the latest send requests.
Review the list under "All Send Requests," which includes the following columns:
- Status
- Send Method (for example, By E-Mail)
- Doc. Title (for example, Job MALIKJOB, Step 1)
- Sender (for example, SAP Consultant)
- Recipient (for example, partha.d@abdoslifesciences.com)
- Send Date
- Send Time
Confirm that the intended recipients and jobs are listed correctly. If the job is set up correctly, no errors appear in this list.
View and verify job output
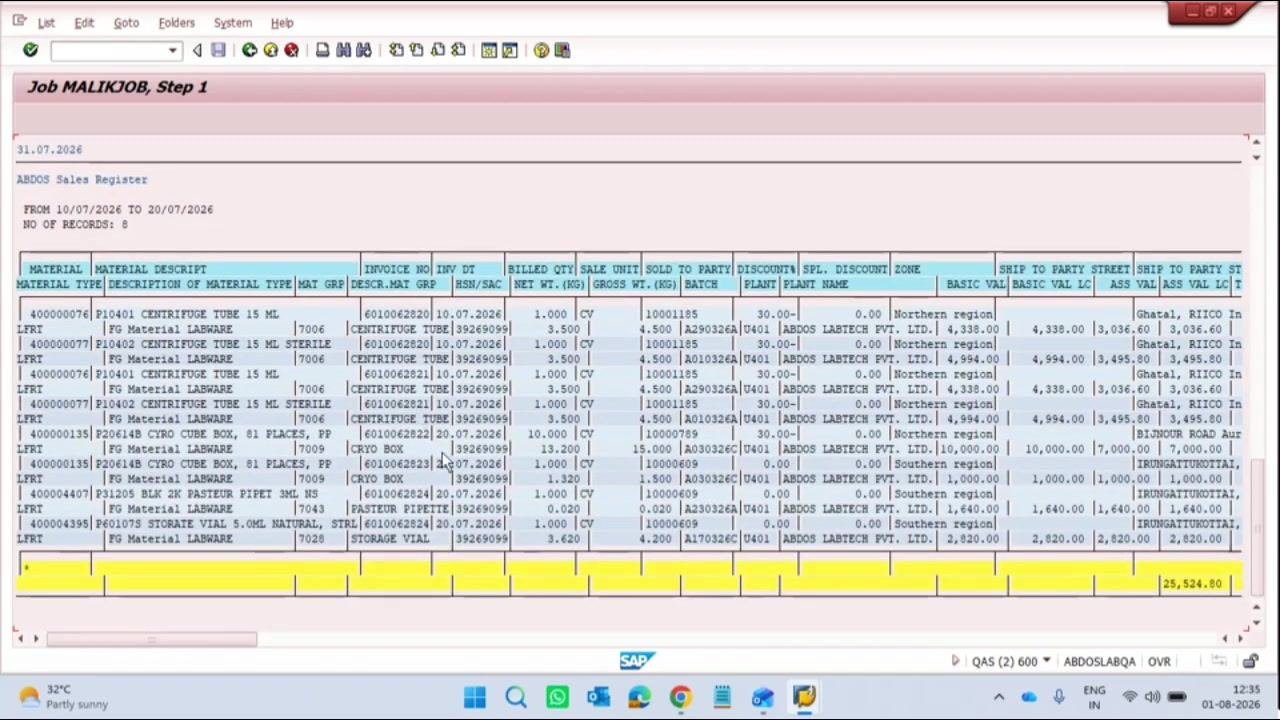
Double-click a job entry (for example, Job MALIKJOB, Step 1) to open the job output window. Review the output report, which includes:
- Header with job name, step, and date (for example,
31.07.2026) - Report title: ABDOS Sales Register
- Date range (for example,
FROM 10/07/2026 TO 20/07/2026) - A results table with columns such as MATERIAL, MATERIAL DESCRIPT, INVOICE NO, INV DT, BILLED QTY, SALE UNIT, SOLD TO PARTY, DISCOUNT%, ZONE, BASIC VAL, PLANT NAME, and SHIP TO PARTY STREET
This confirms that the job executed successfully and retrieved the expected data.
Review the complete output and totals
Scroll through the output to review all records. At the bottom of the report, verify the total value (for example, 25,524.80) to confirm that all expected data is present and the totals match your expectations.
What's next
With the job scheduled and verified, the report will continue to run automatically according to the start conditions you configured, using the dynamic date logic in the variant to always pull the previous day's data. You can return to SM37 at any time to monitor background jobs with SM37 in SAP and confirm each run's status, and use SAPconnect to check that output emails are being delivered to the correct recipients.
Generation details: cost, quality tiers
Docsie billed 5,000 credits ($3.50) to analyze this 10-minute video at standard quality. The rewrite, template fill and Word/PDF exports were included. The same video at each quality tier:
| Quality | Frames sampled | Credits | Approx. cost |
|---|---|---|---|
| Draft | every 16-30 s | 2,500 | $1.75 |
| Standard (this guide) | every 8-15 s | 5,000 | $3.50 |
| Detailed | every 4-7 s | 10,000 | $7.00 |
| Ultra | every 1-3 s | 20,000 | $14.00 |
Credits priced at $0.70 per 1,000; plans include a monthly allowance. Enterprise customers on on-premise or bring-your-own-model deployments run this on their own inference and pay no per-video credits.
Generated by Docsie Video-to-Docs on 2026-10-11 from a 9-minute video. Screenshots are frames from the source video and belong to their creator, Sap Studio Ease Learning , whose original is embedded above. If you own this video and want the guide removed or credited differently, contact us and we will act within one business day.