
How to Display Customer Line Items with FBL5N in SAP S/4HANA
This guide explains how to display customer line items with FBL5N in SAP, from opening the SAP Easy Access screen through entering your selection criteria, running the report, and customizing and saving your layout. Follow the steps below to view open, cleared, and all customer line items for a given customer account and company code.
Video: FBL5N: How to Display Customer Line Items in SAP by Simple SAP S/4 HANA FICO (2024). All credit for the demonstration goes to the creator; watch the original on YouTube. The written guide below was generated from this video by Docsie. Creator? Request a change or removal.
This guide explains how to display customer line items with FBL5N in SAP, from opening the SAP Easy Access screen through entering your selection criteria, running the report, and customizing and saving your layout. Follow the steps below to view open, cleared, and all customer line items for a given customer account and company code.
Prerequisites
- Access to the SAP Easy Access main menu with valid logon credentials.
- The relevant customer account number and company code for the report you want to run.
Step-by-step guide
Access the SAP Easy Access screen
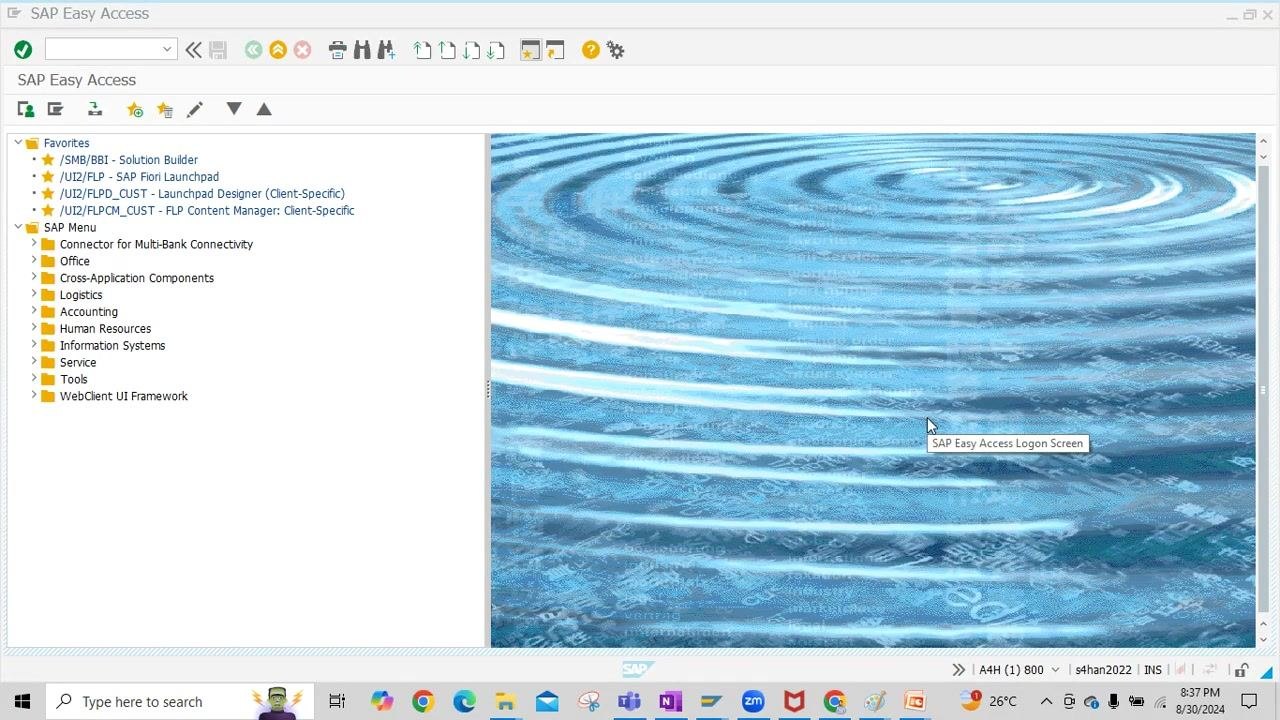
Launch SAP and log in to reach the SAP Easy Access main menu. The screen displays the SAP Menu on the left side and a background image in the main area. Confirm that you are on the SAP Easy Access logon screen before continuing.
Enter the transaction code
Click the command field at the top of the SAP Easy Access screen. Type FBL5N into the command field and press Enter to open the Customer Line Item Display screen.
Enter the customer account and company code
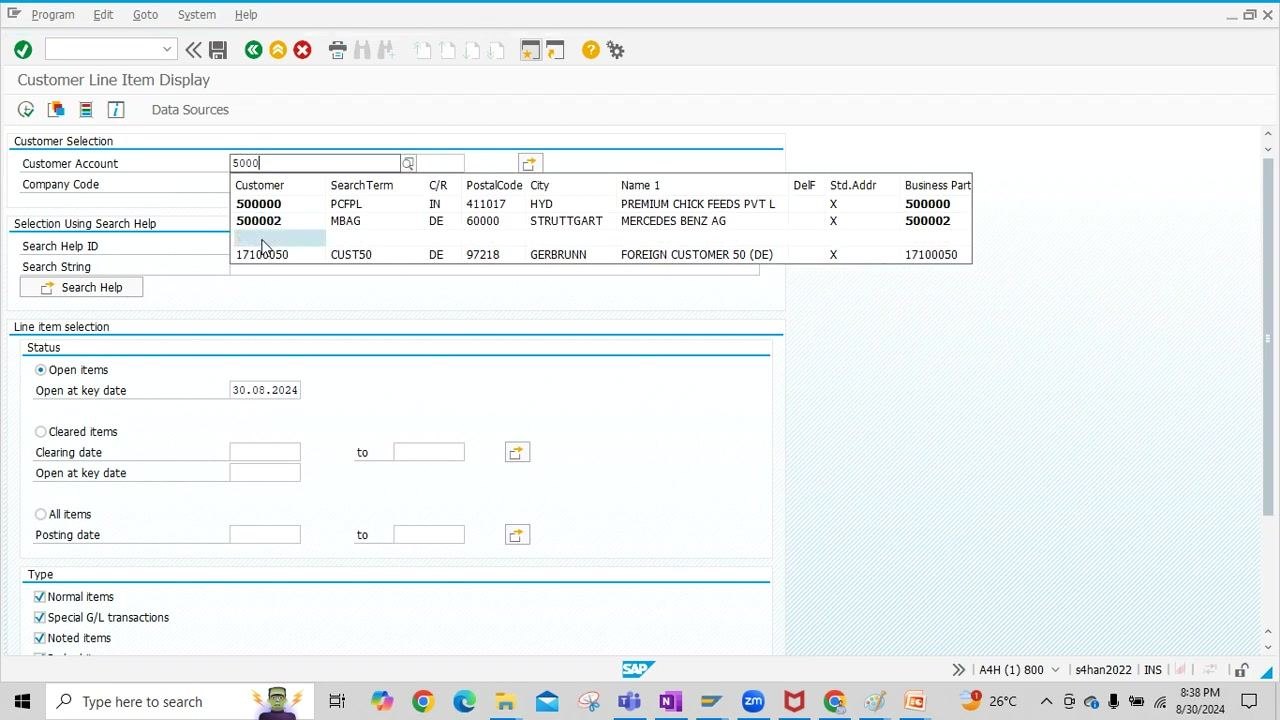
On the Customer Line Item Display screen, locate the Customer Account field under Customer Selection. You can enter a single customer account (for example, 500005) or a range of accounts if you need to report on more than one customer. In this example, only one customer account is selected.
In the Company Code field, enter the relevant company code (for example, 1000). You can also specify a range of company codes if required.
Select the line item status
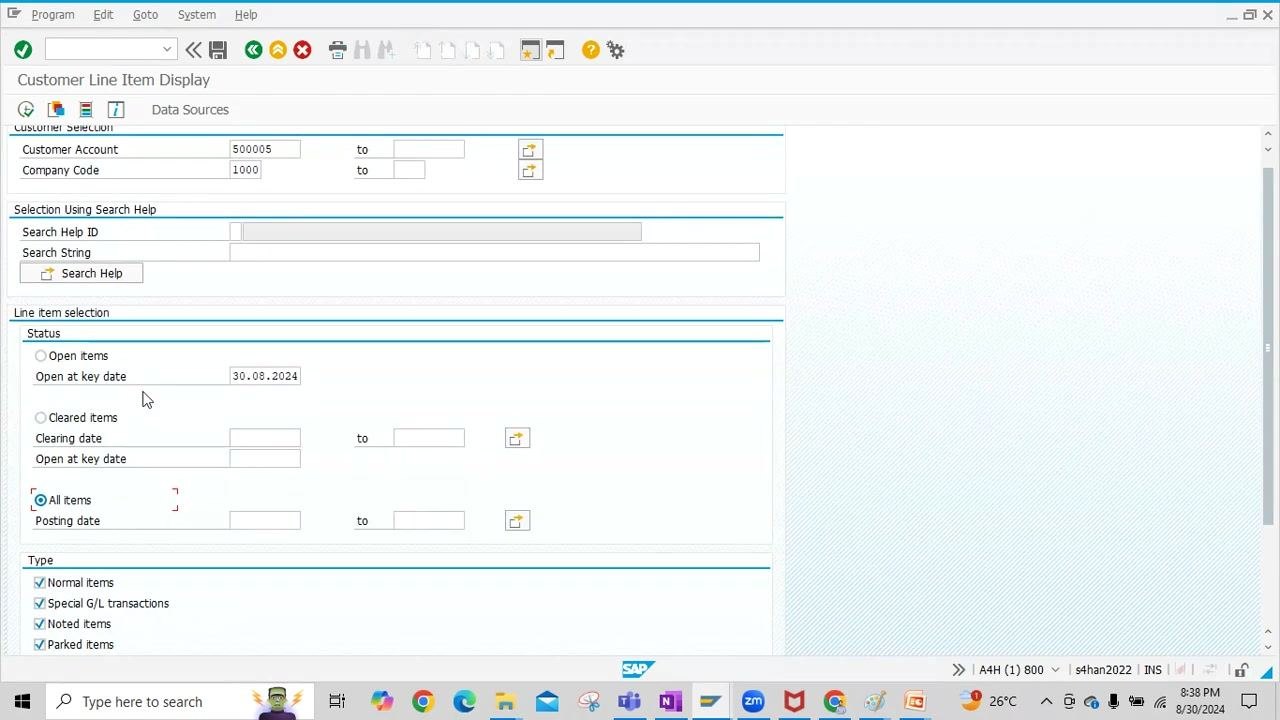
Under Line item selection, choose which line items you want to display:
- Open items: shows customer line items for which payment has not been received or cleared. Set the Open at key date (for example,
30.08.2024). - Cleared items: shows line items for which payment has been received. Specify a clearing date range if needed.
- All items: displays both open and cleared items. You can set a posting date range if required.
Choose the line item types
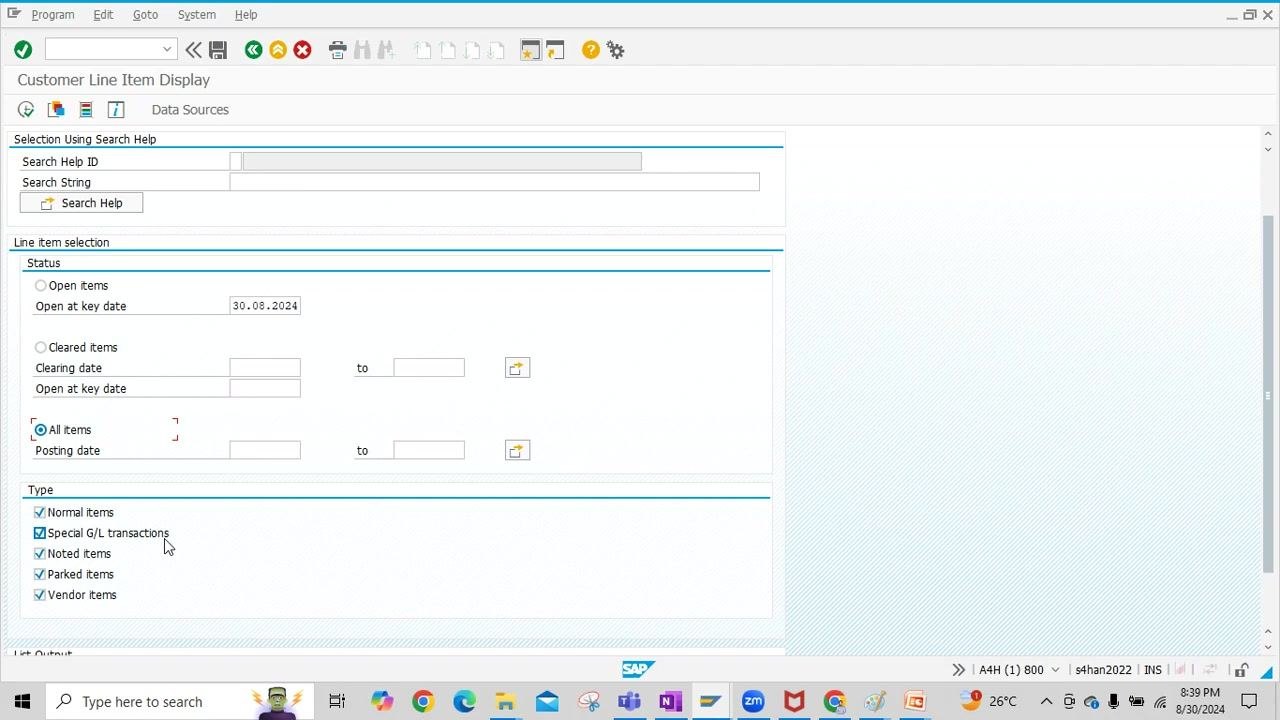
In the Type section, select the types of line items to include in the display:
- Normal items: includes customer invoices, credit memos, and debit memos.
- Special G/L transactions: includes customer down payments or security deposits.
- Noted items: includes customer down payment requests.
- Parked items and Vendor items: select these as relevant to your reporting needs.
Make sure the appropriate checkboxes are marked according to the data you want to see.
Execute the report
Click the Execute button (the green checkmark or clock icon) at the top of the screen to run the report using your selected criteria.
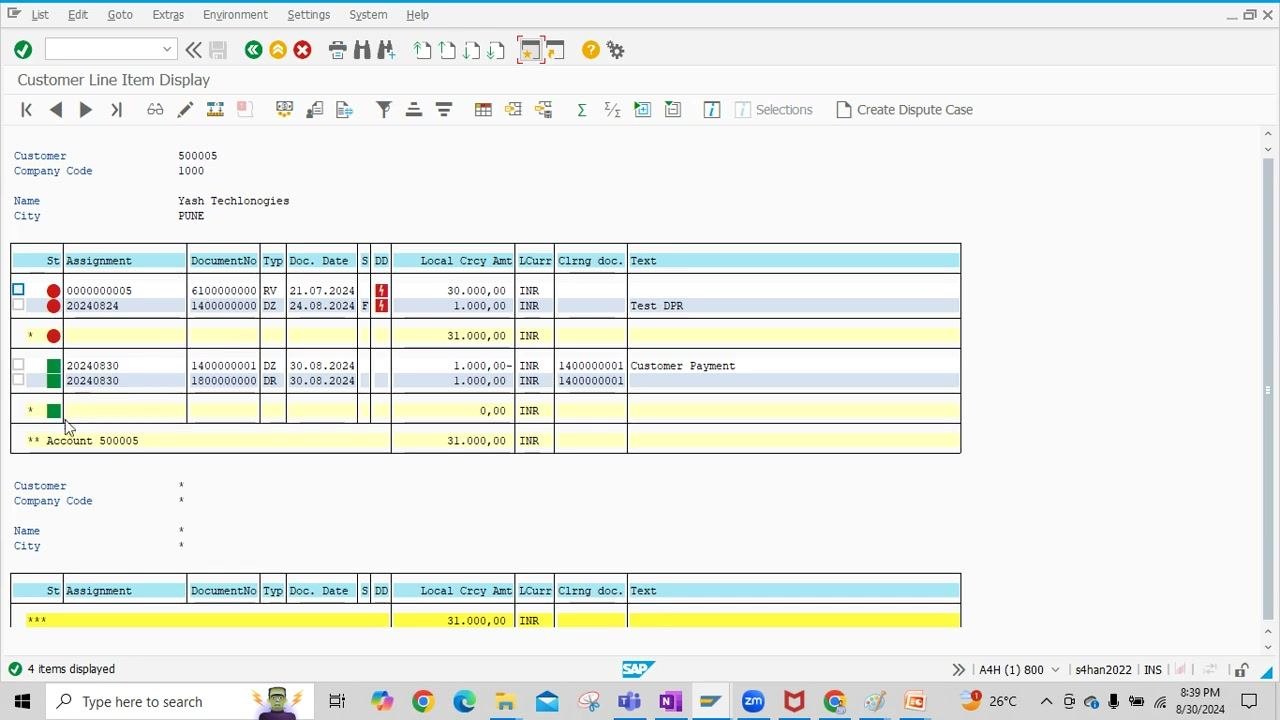
Review the customer line items
The results screen shows all customer line items that match your criteria. Review the following details:
- Open items are marked with red circles, indicating payments not received or not cleared.
- Cleared items are marked with green squares, indicating payments received and cleared.
- Overdue items are visually flagged.
- The table displays columns such as Assignment, Document Number, Type, Document Date, Local Currency Amount, Clearing Document, and Text.
In this example, the results include four items: two open and two cleared.
Review the final line item display
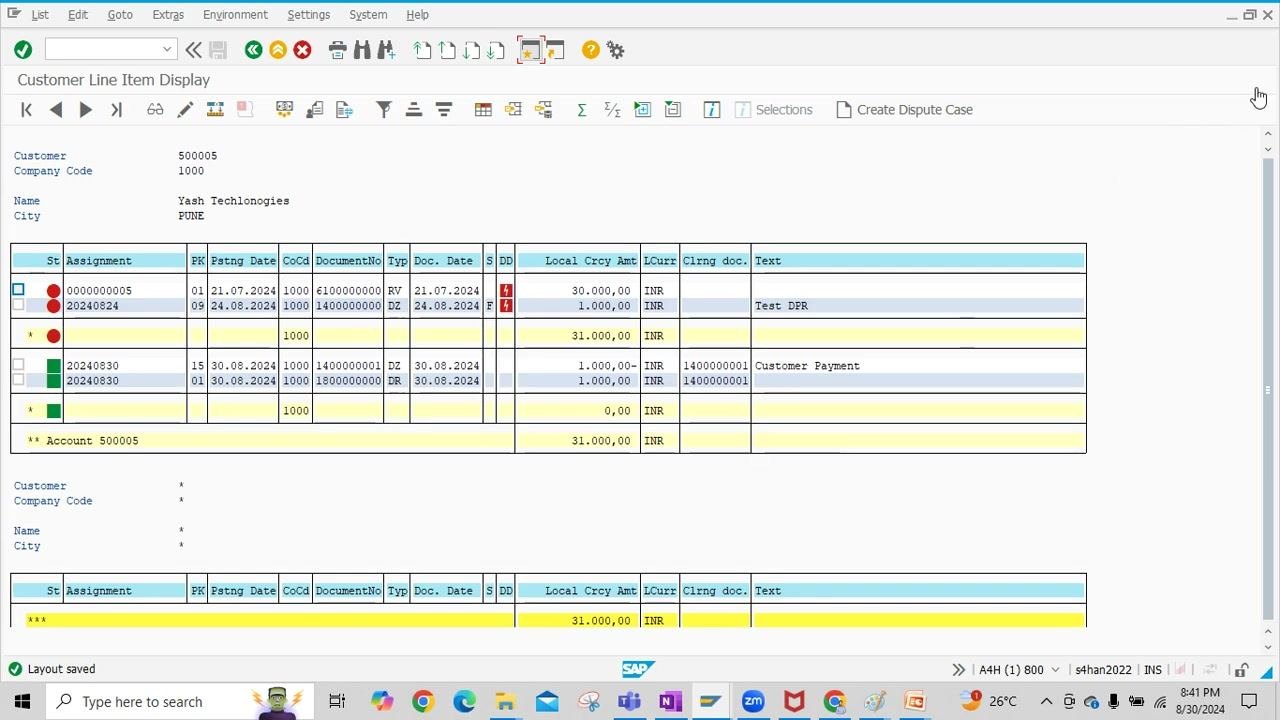
Confirm that you are viewing the final results screen for the customer line item display, generated using transaction code FBL5N. The header shows the customer details:
- Customer: 500005
- Company Code: 1000
- Name: Yash Technologies
- City: PUNE
The line item table includes columns such as St (Status), Assignment, PK (Posting Key), Pstng Date (Posting Date), CoCd (Company Code), DocumentNo, Typ (Type), Doc. Date (Document Date), S, DD, Local Crcy Amt (Local Currency Amount), LCurr (Local Currency), Clrng doc. (Clearing Document), and Text.
Status indicators on this screen are:
- Red circles for open items.
- Green squares for cleared items.
- Red warning icons for overdue items.
Example entries include:
- Assignment 0000000005, PK 01, Pstng Date 21.07.2024, DocumentNo 6100000001, Typ RV, Local Crcy Amt 30,000.00 INR.
- Assignment 20240824, PK 09, Pstng Date 24.08.2024, DocumentNo 1400000000, Typ DZ, Local Crcy Amt 1,000.00 INR, Text "Test DPR".
- Cleared items with Clrng doc. 1400000001 and text "Customer Payment."
The total amount for the account, 31,000.00 INR, appears at the bottom of the screen. A "Layout saved" message in the bottom-left corner confirms that the layout has been saved.
Add fields to the display
To customize the columns shown in your results:
- Click the Change Layout button (the table icon with a pencil).
- In the Change Layout dialog, select additional fields (for example, Posting Key, Posting Date, Company Code) from the Hidden fields list.
- Choose where to insert the new field, such as before Document Number or after Assignment.
- Use the arrow buttons to move the selected field to the desired position in the Column content list.
- Click Copy to apply the new layout.
Verify the updated layout
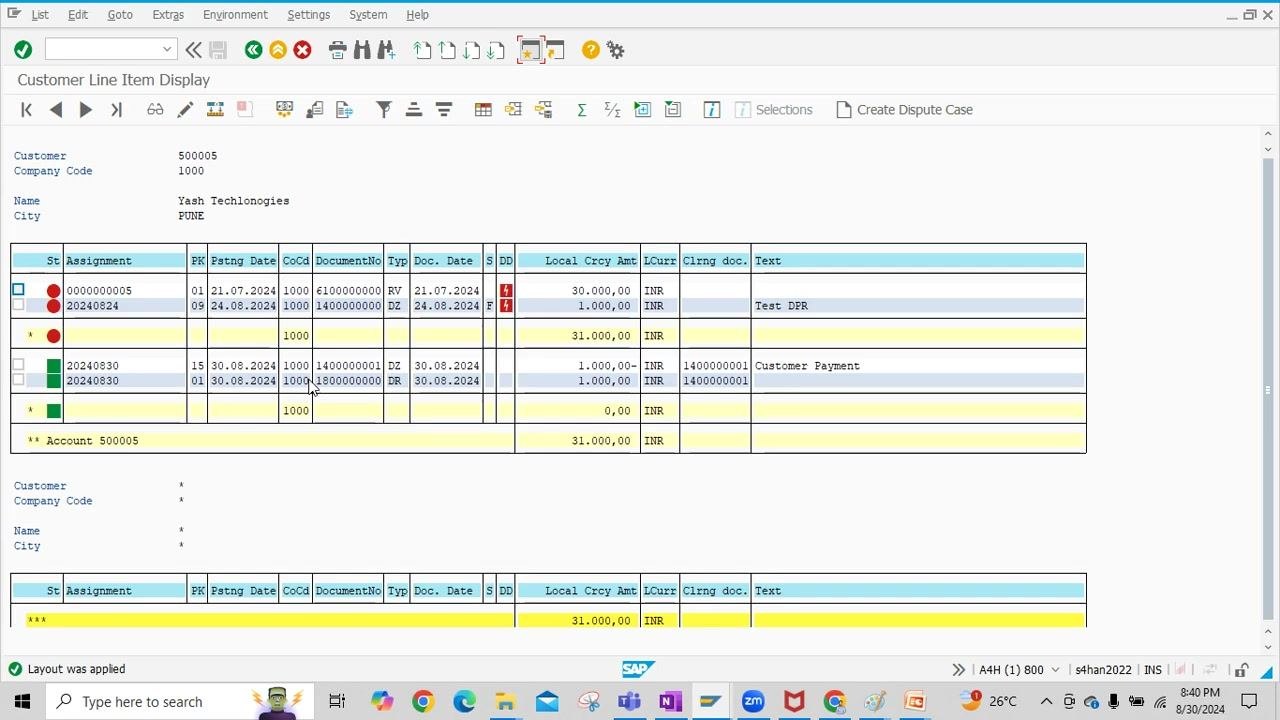
Confirm that the new fields — such as PK (Posting Key), Pstng Date, and CoCd (Company Code) — are now visible in the results table. Review the updated information for each line item to make sure it matches what you selected.
Save the custom layout
To reuse your custom column arrangement in future reports:
- Click the Save Layout button (the disk icon or layout save option).
- Enter a layout name and a description.
- Click Save to store your layout for future use.
Summary
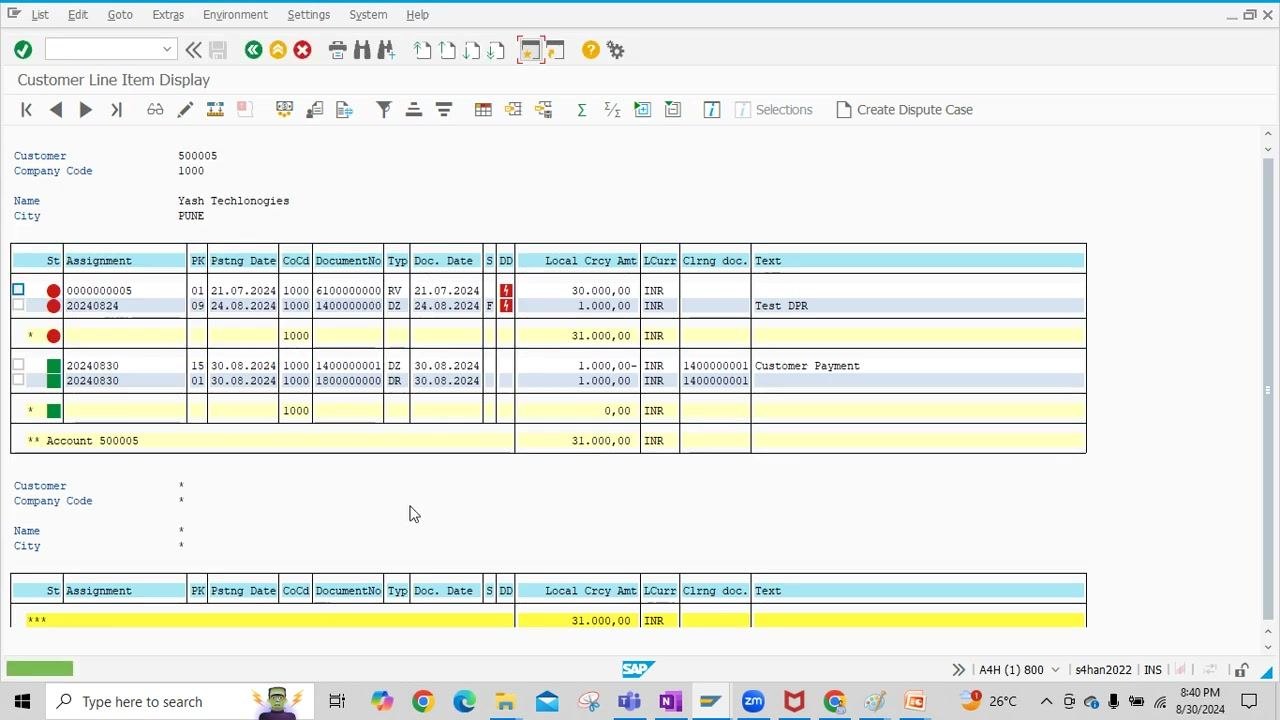
You have now completed the process of displaying, customizing, and saving customer line item reports in SAP using transaction code FBL5N. This guide covered how to select customer and company code criteria, include open, cleared, and all item types, add parked and vendor items where relevant, adjust the display layout, and save your preferred view for future use. The final screen confirms successful configuration and review of the customer account data.
What's next
Use your saved layout the next time you run FBL5N to quickly display customer line items with the same column arrangement, without needing to reconfigure the fields each time.
Generation details: cost, quality tiers
Docsie billed 2,000 credits ($1.40) to analyze this 4-minute video at standard quality. The rewrite, template fill and Word/PDF exports were included. The same video at each quality tier:
| Quality | Frames sampled | Credits | Approx. cost |
|---|---|---|---|
| Draft | every 16-30 s | 1,000 | $0.70 |
| Standard (this guide) | every 8-15 s | 2,000 | $1.40 |
| Detailed | every 4-7 s | 4,000 | $2.80 |
| Ultra | every 1-3 s | 8,000 | $5.60 |
Credits priced at $0.70 per 1,000; plans include a monthly allowance. Enterprise customers on on-premise or bring-your-own-model deployments run this on their own inference and pay no per-video credits.
Generated by Docsie Video-to-Docs on 2026-10-11 from a 3-minute video. Screenshots are frames from the source video and belong to their creator, Simple SAP S/4 HANA FICO, whose original is embedded above. If you own this video and want the guide removed or credited differently, contact us and we will act within one business day.