
How to Create a Role with PFCG in SAP S/4HANA
Creating a role with PFCG in SAP is the standard way to control which transactions and authorizations a user can access. This guide walks you through creating a custom role, assigning SAP menu transactions, configuring authorizations, assigning the role to a new user, and troubleshooting authorization issues using SU53. Functional consultants should understand this process even though role and authorization assignment is typically managed by the BASIS team, since it directly affects system security and user access control.
Video: How to Create a Role in SAP | Roles and Authorizations | PFCG | SU53 by All About SAP (2020). All credit for the demonstration goes to the creator; watch the original on YouTube. The written guide below was generated from this video by Docsie. Creator? Request a change or removal.
Creating a role with PFCG in SAP is the standard way to control which transactions and authorizations a user can access. This guide walks you through creating a custom role, assigning SAP menu transactions, configuring authorizations, assigning the role to a new user, and troubleshooting authorization issues using SU53. Functional consultants should understand this process even though role and authorization assignment is typically managed by the BASIS team, since it directly affects system security and user access control.
Prerequisites
- Access to the SAP Easy Access screen with authorization to use transaction PFCG.
- Knowledge of the transactions you want to assign to the role (for example, VA01, VA02, VA03 for sales order processing).
- Access to transaction SU01 (Maintain Users) to assign the role once it is created.
- Access to transaction SU53 to troubleshoot authorization issues.
Creating a role for a user in SAP
Open the SAP Easy Access screen
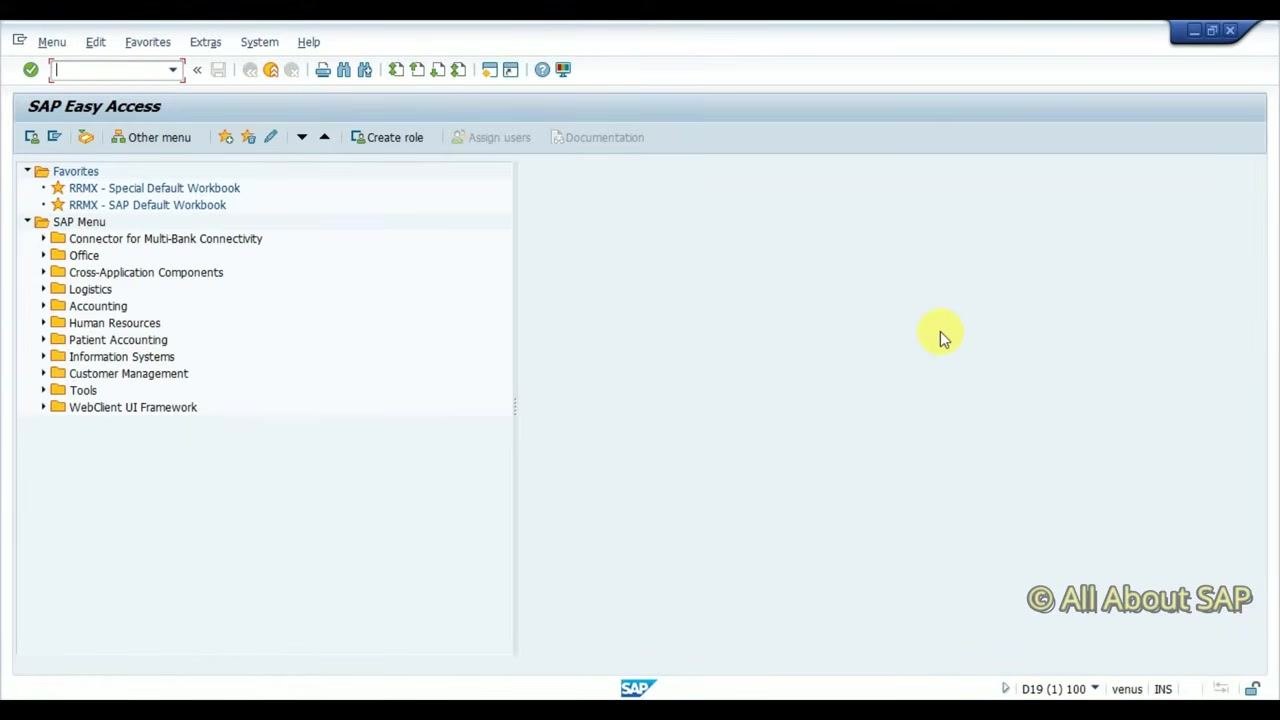
Launch SAP and make sure you are on the SAP Easy Access screen. The left pane displays the SAP Menu with folders such as "Connector for Multi-Bank Connectivity," "Office," "Logistics," "Accounting," and "Human Resources." The top menu bar includes Menu, Edit, Favorites, Extras, System, and Help, and the toolbar contains icons for common actions such as save, back, and exit. The Create role button is visible on this screen but is not used yet.
Understand the importance of roles
Assigning a role and authorization to a user is essential for system security and access control. These activities are mainly managed by the BASIS team, but functional consultants should be aware of the process.
Access the role maintenance screen
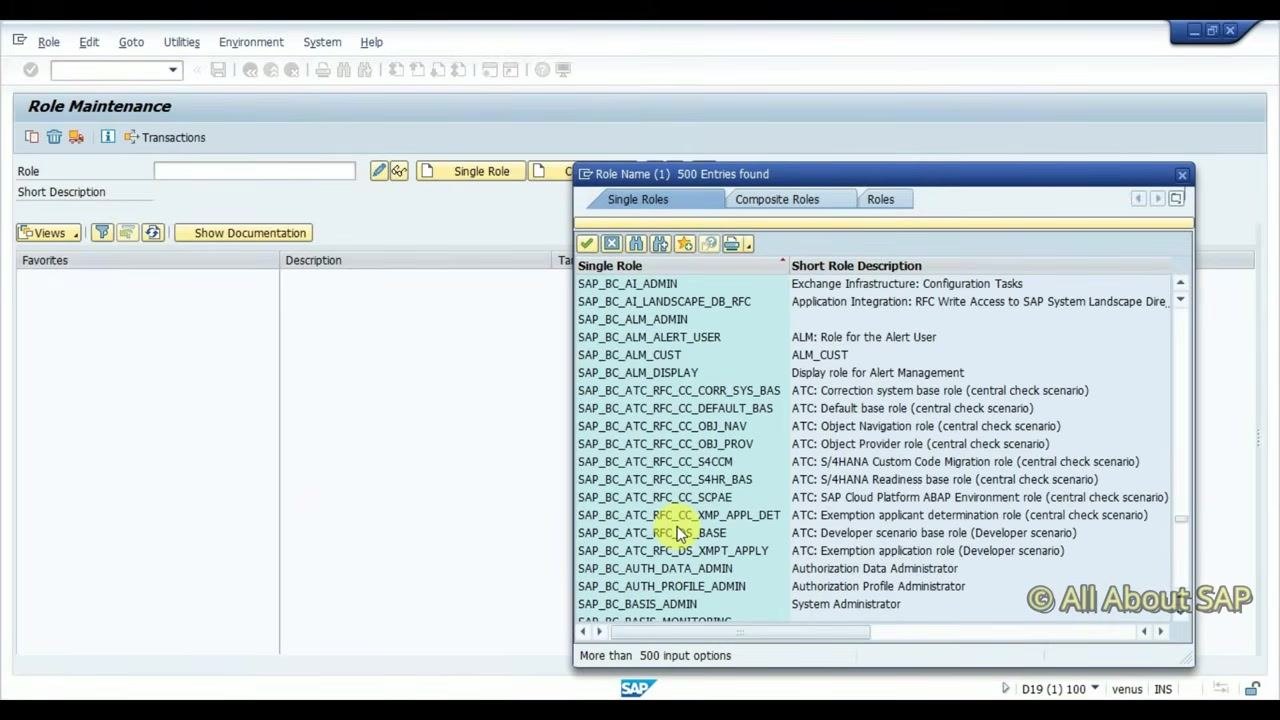
The transaction code to create or maintain roles in SAP is PFCG. Enter PFCG in the command field and press Enter. The Role Maintenance screen opens, displaying fields for Role and Short Description, along with options for Single Role and Composite Role.
Create a custom role
Instead of using a standard role, create a custom role for your specific needs — for example, a sales user who handles VA01 transactions. In the Role field, enter the custom role name using the recommended naming convention, such as Z_SD_SALES_USER. The "Z_" prefix indicates a custom object in SAP.
Provide a short description
Enter a meaningful short description for the role to clarify its purpose, for example "Sales Order User Role."
Choose the role type
Select whether the role is a Single Role or a Composite Role. For most user-specific authorizations, choose Single Role.
Save the role
Click the save icon (diskette) in the toolbar to save the role details. Confirm that the status bar displays "Data saved" at the bottom of the screen.
Assigning SAP menu transactions
Navigate to the Menu tab
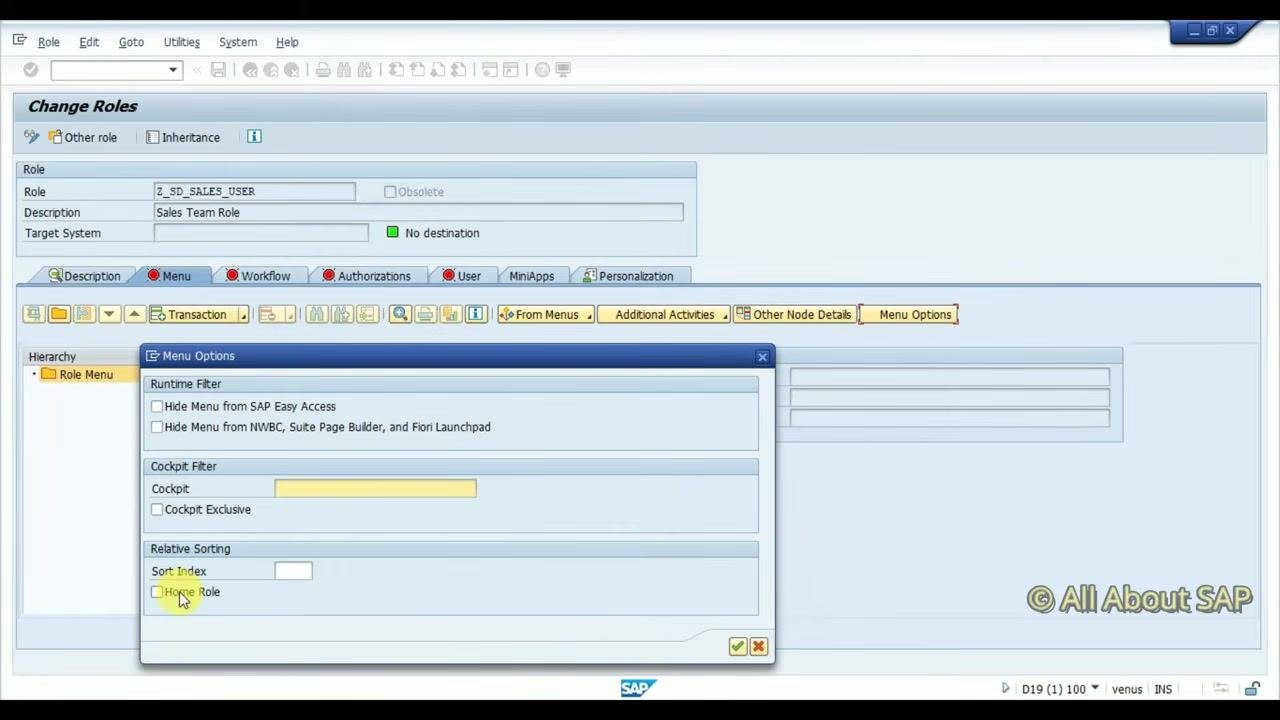
Click the Menu tab to begin assigning SAP menu items to the role. The tab is highlighted, and the screen updates to show the Role Menu hierarchy.
Add menu items from the SAP menu
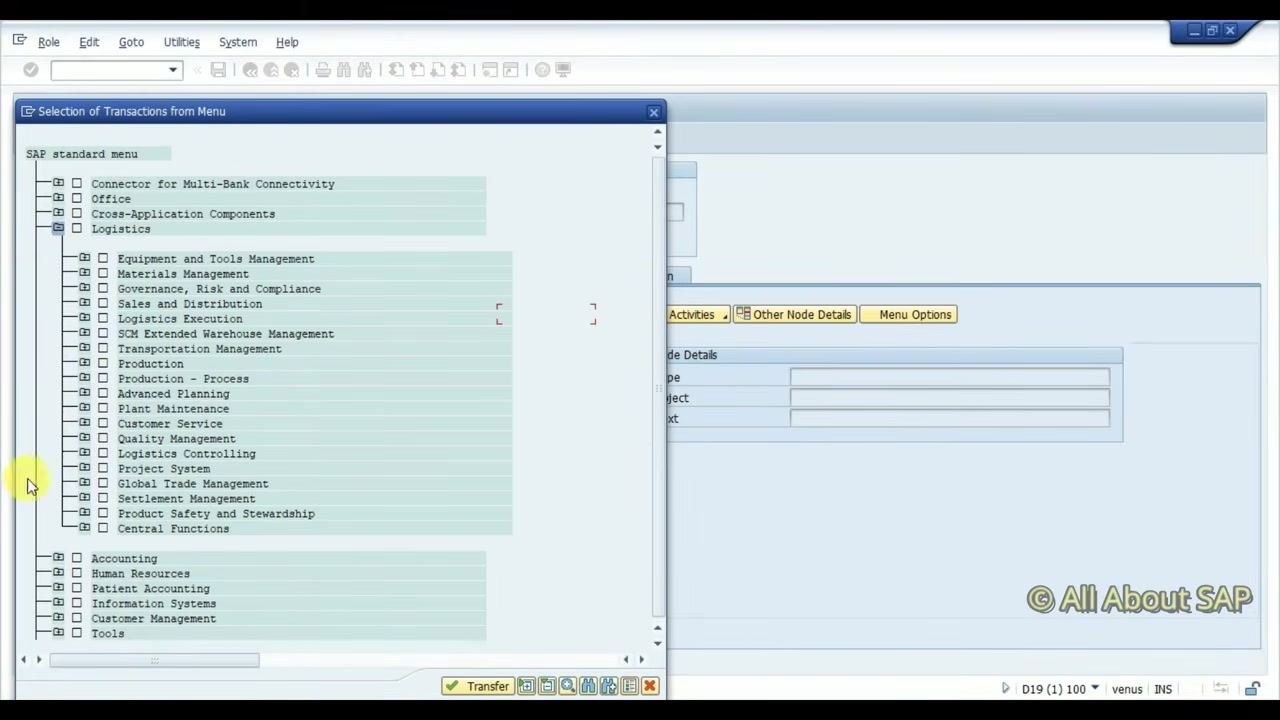
Click From Menus in the toolbar to open the SAP standard menu selection dialog. The Selection of Transactions from Menu window appears, displaying the SAP standard menu tree.
In the menu tree, expand Logistics and then Sales and Distribution. Under Sales and Distribution, review sub-areas such as Master Data, Sales, Shipping and Transportation, and Billing. For this example, expand Sales to access transaction types like Inquiry, Quotation, and Order.
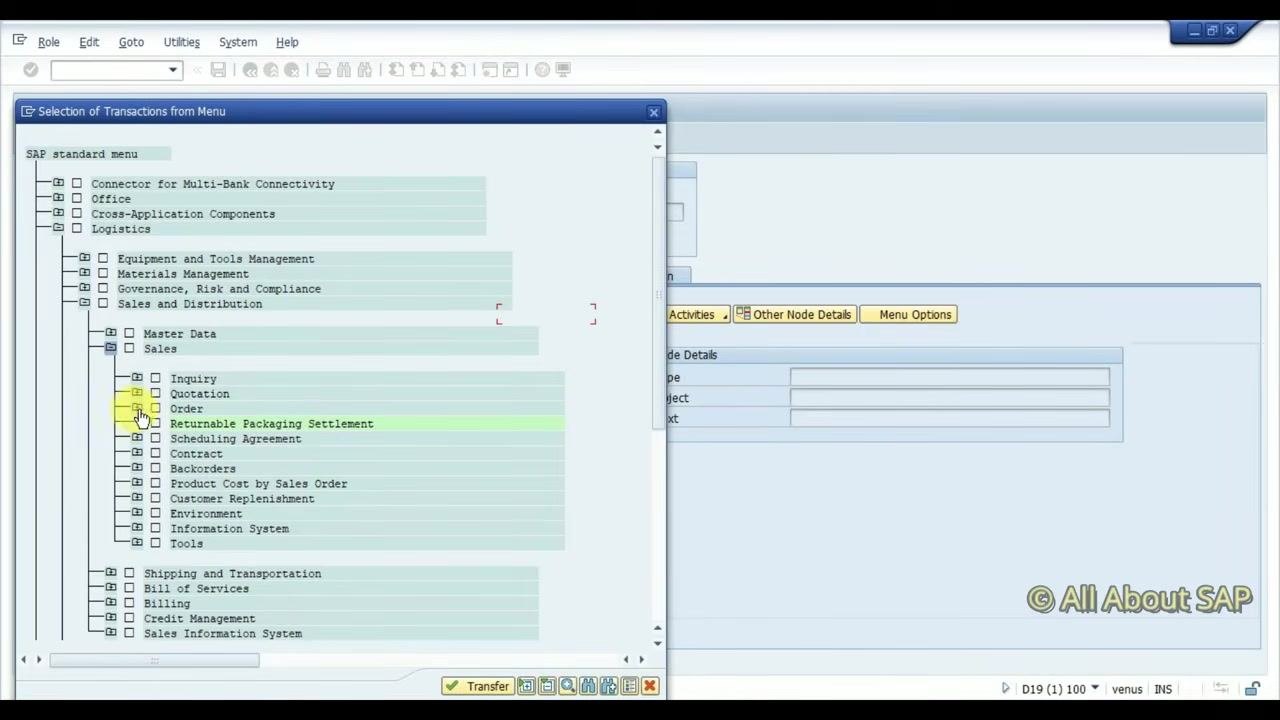
Select only the required transactions
In the Selection of Transactions from Menu window, review the available functions under Order, such as Create, Change, Display, Outbound Delivery, and Billing Document. Select only the transactions you need:
- Create
- Change
- Display
Do not select other functions such as Outbound Delivery or Billing Document.
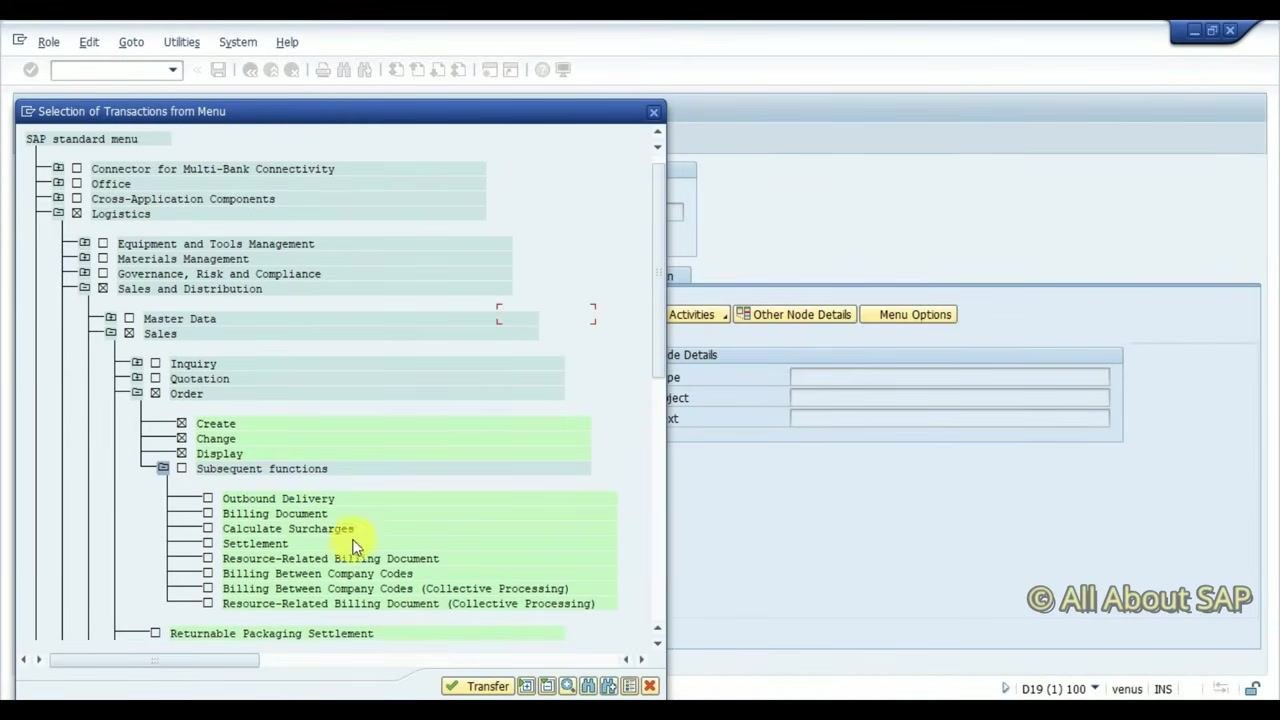
Transfer the selected transactions to the role
Click Transfer (also labeled "Apply Selected Menu Nodes," shortcut Ctrl+F4) at the bottom of the window. This adds the selected transactions — Create, Change, and Display — to the role's menu structure.
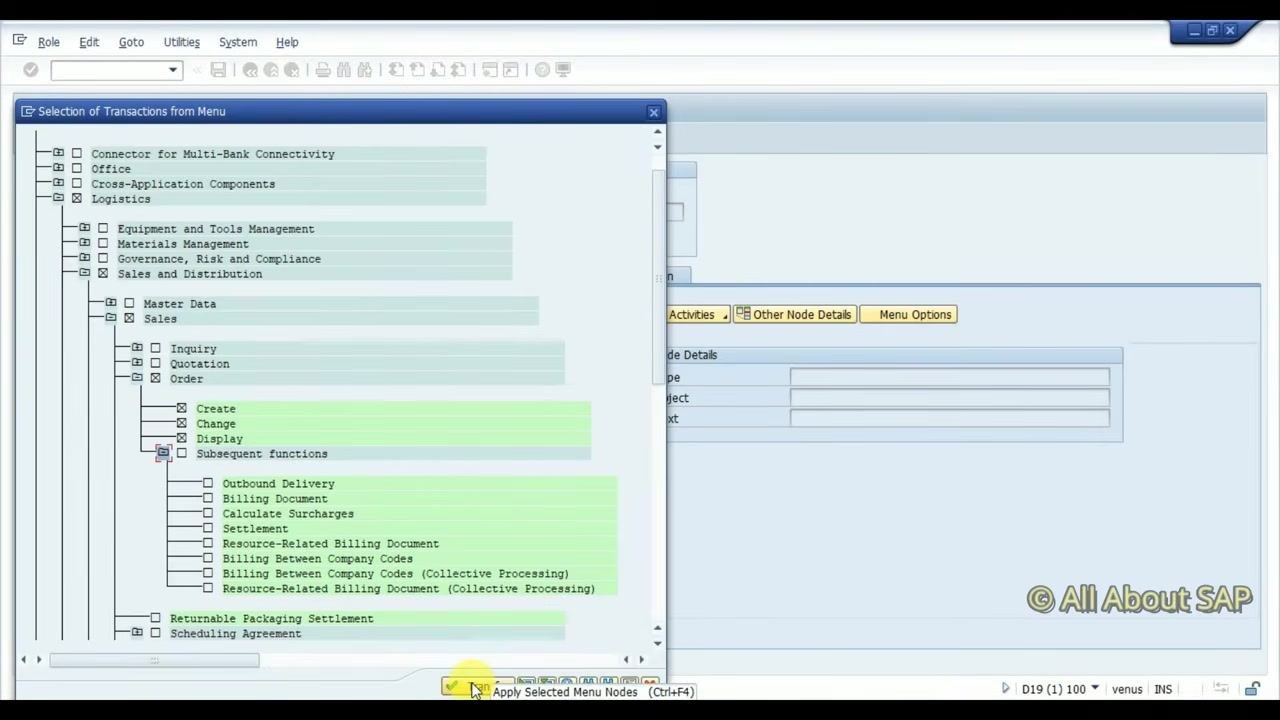
Save the role
Click the Save icon in the toolbar to save the updated role menu. Confirm that the status bar displays "Data saved" at the bottom of the screen.
Configuring authorizations
Proceed to the Authorizations tab
Click the Authorizations tab to begin configuring authorizations for the role. If prompted, note that the system does not let you proceed until a profile name is created.
Generate or accept a profile name
On the Change Roles screen, under "Information About Authorization Profile," either enter a profile name manually or click the button that lets the system propose and generate one, for example T-D9110084. The profile text is filled in automatically, such as "Profile for role Z_SD_SALES_USER."
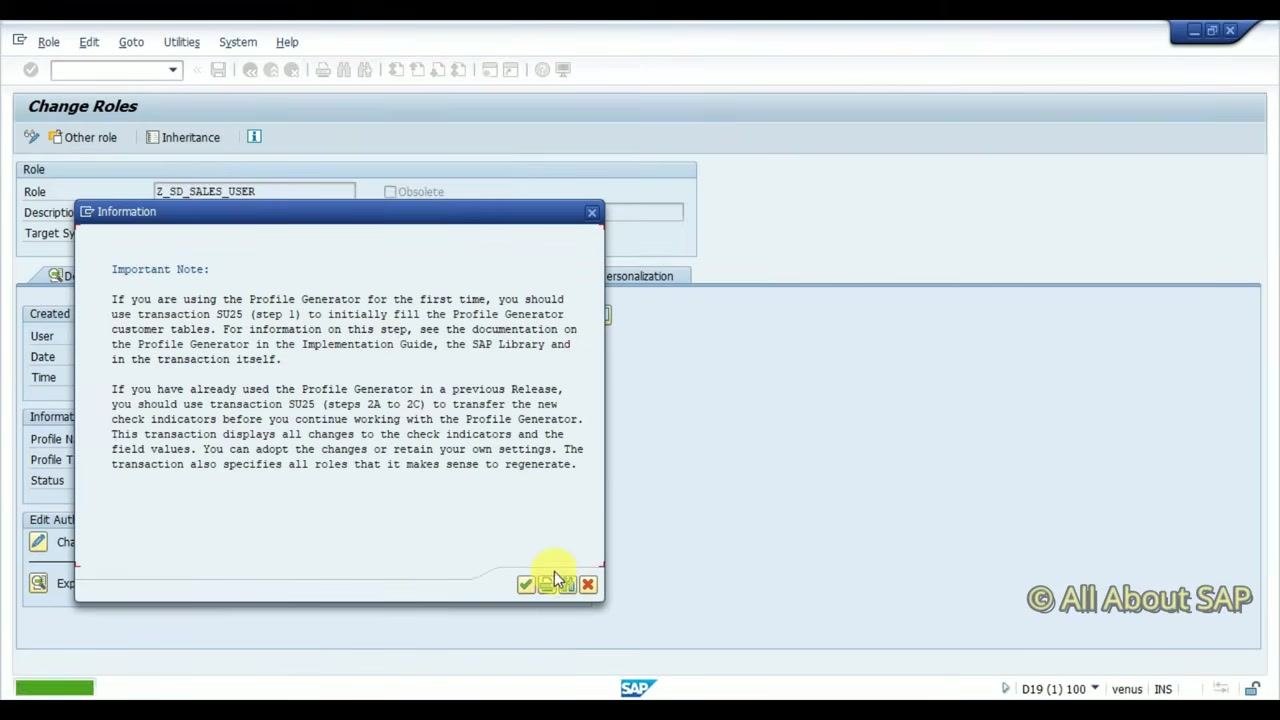
Save the role again
After the profile is generated, click the Save icon once more to ensure all changes are stored.
Acknowledge the SAP notes
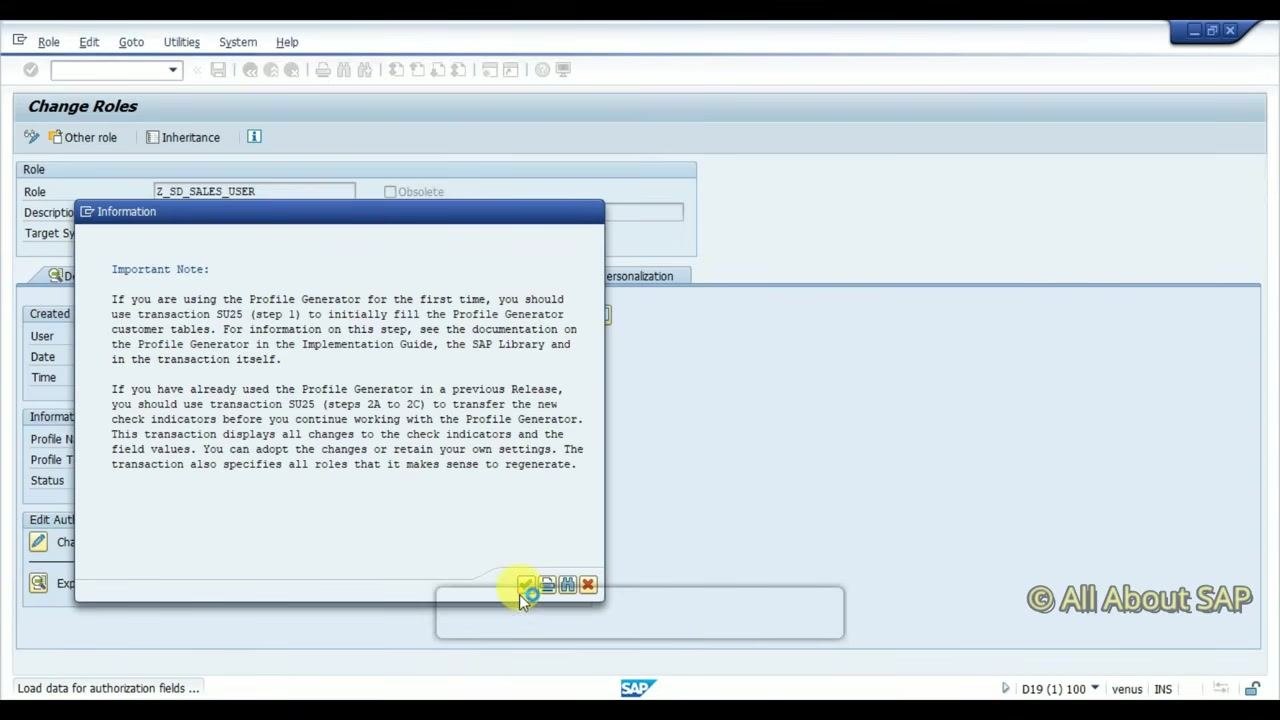
If an "Information" dialog appears with notes about the Profile Generator — such as instructions for first-time use or updates via transaction SU25 — read the message. Click the green checkmark to acknowledge and close the dialog.
Review the authorization objects
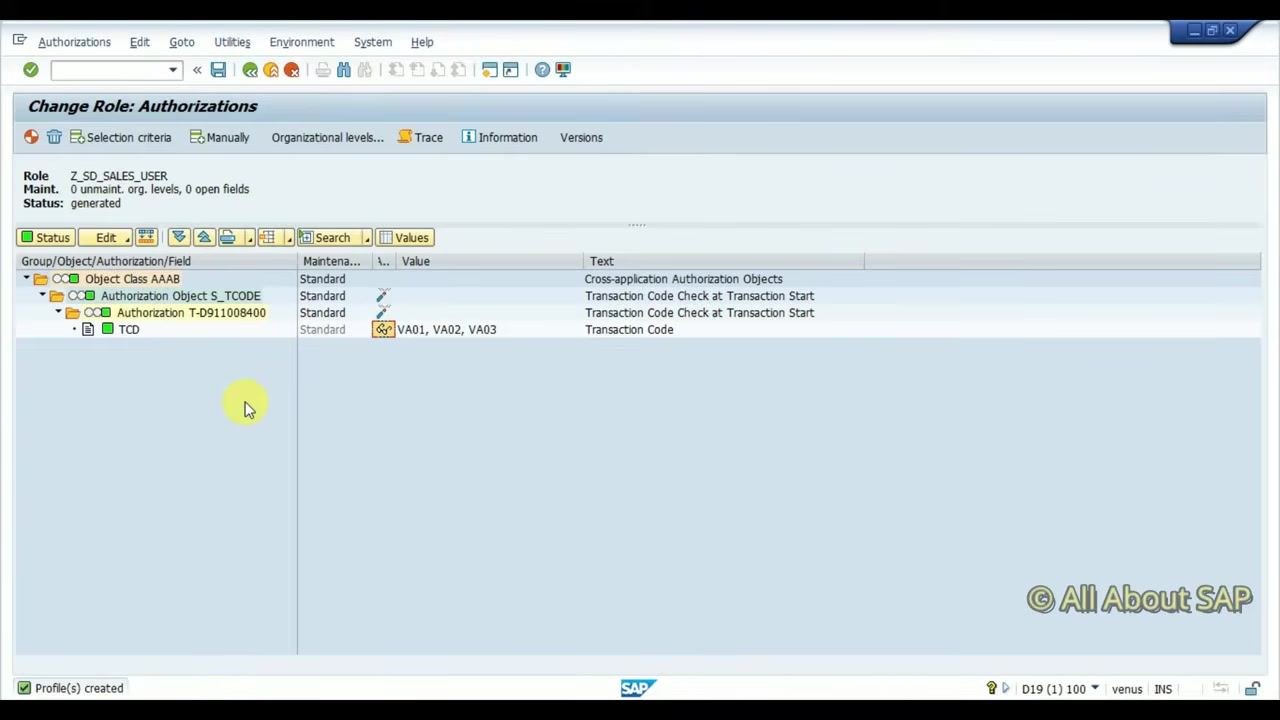
On the Change Role: Authorizations screen, verify that the correct authorization objects are present: S_TCODE (Transaction Code Check at Transaction Start) and the generated authorization profile, such as T-D9110084. These objects ensure that only the assigned transactions (for example, VA01, VA02, VA03) are accessible to users with this role.
Verifying authorization field values
This section explains how to review the specific authorization field values assigned to your role, to confirm that only the intended transaction codes are permitted.
Expand the authorization object hierarchy
In the left pane, expand the tree under Object Class AAAB, then expand Authorization Object S_TCODE, and then expand the node for the generated authorization profile, for example Authorization T-D911008400.
Verify the assigned transaction codes
Under the authorization profile, locate the field labeled TCD. Hovering over this field may display a tooltip such as "Maintained Field," indicating that values have been set. In the right pane, under the "Value" column for TCD, confirm that the following transaction codes are listed:
- VA01
- VA02
- VA03
These codes correspond to the allowed transactions for this role: Create, Change, and Display Sales Orders. Check that the "Maintenance" column shows "Standard," and that the "Text" column describes the field as "Transaction Code."
Review the role authorization details
Confirm that the role (for example, Z_SD_SALES_USER) has been generated with the correct authorization objects and transaction codes. On the Change Role: Authorizations screen, verify that S_TCODE includes VA01, VA02, and VA03, and that the status at the bottom indicates "Profile(s) created."
Assigning the generated role to a new user
Open the Maintain Users screen
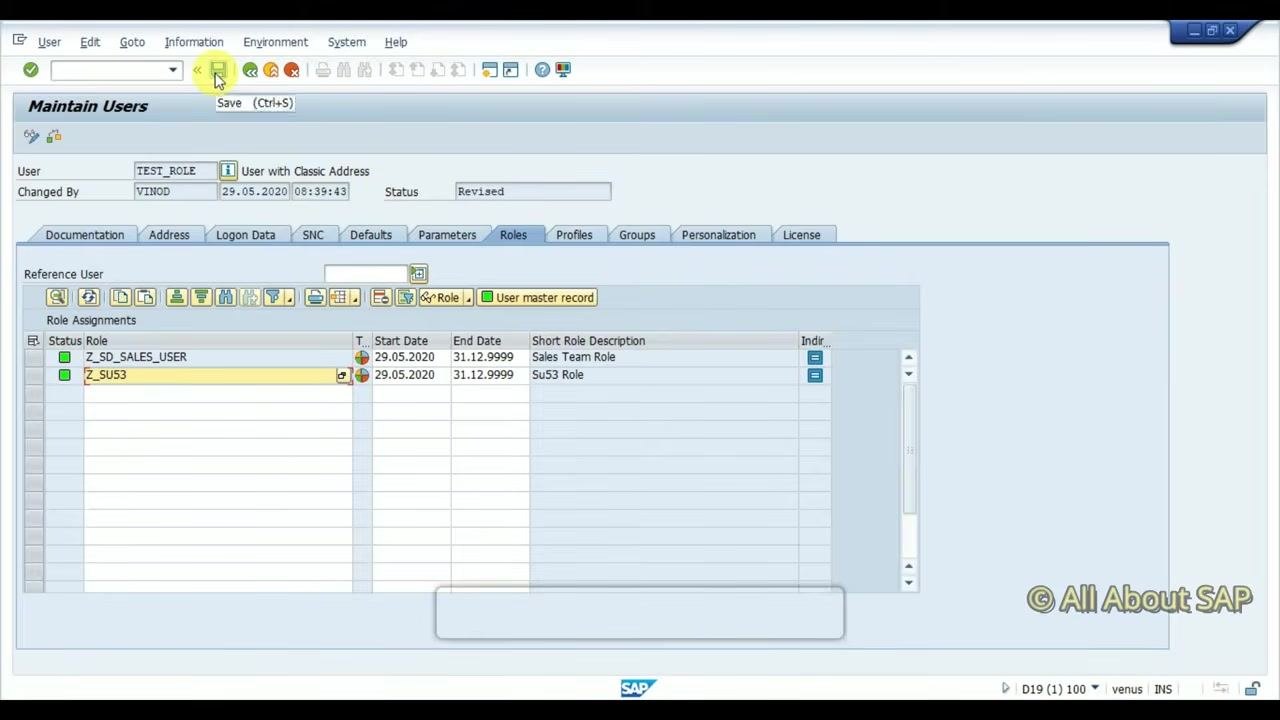
Access the Maintain Users screen and enter the new user details:
- User:
TEST_ROLE - Last name:
TEST_ROLE - First name: leave blank or fill in as required
- Full Name:
TEST_ROLE - Changed By:
VINOD
The date and time of change are displayed automatically. Click the Roles tab to proceed with role assignment.
Assign the generated role to the user
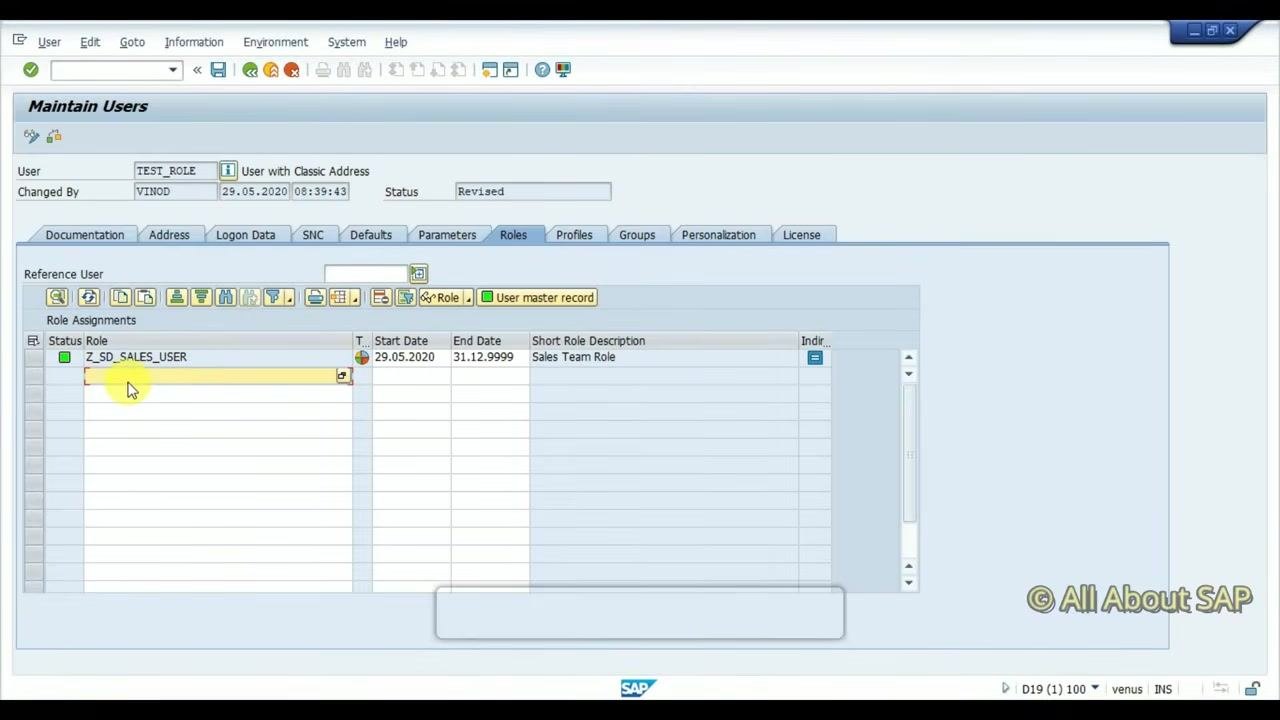
On the Roles tab, under "Role Assignments," enter the role name Z_SD_SALES_USER. Set the Start Date to 29.05.2020 and the End Date to 31.12.9999. Confirm the Short Role Description shows "Sales Team Role."
Add additional roles if required
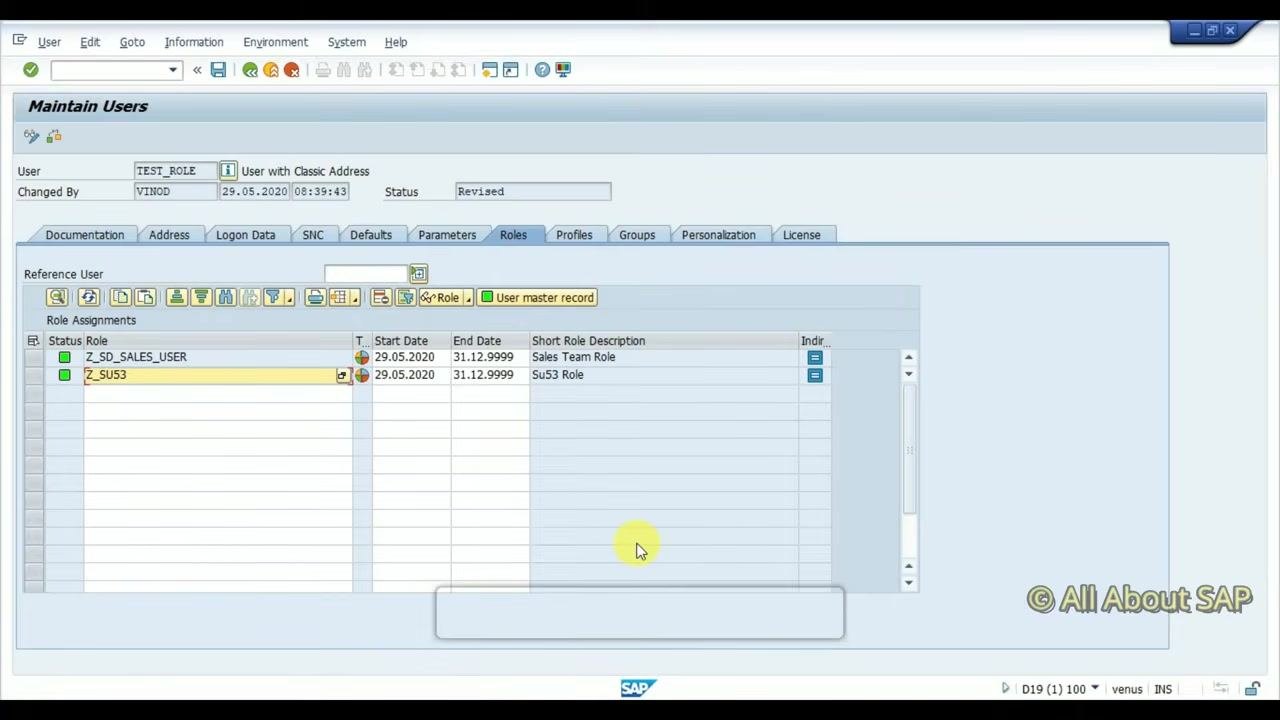
If needed, add another role, such as Z_SU53, for the user. Enter the role name, set the same start and end dates, and provide a short description, for example "Su53 Role." Make sure both roles are listed under "Role Assignments" for the user.
Save the user role assignments
On the Maintain Users screen, ensure both roles — Z_SD_SALES_USER and Z_SU53 — are assigned to user TEST_ROLE. Click the save icon in the toolbar to save the changes, and confirm that the roles are listed with Start Date 29.05.2020, End Date 31.12.9999, and the short role descriptions "Sales Team Role" and "Su53 Role."
Testing the role assignment and troubleshooting authorization issues
Log in as the new user
Switch to the SAP Easy Access screen and verify at the bottom right that the current user is TEST_ROLE (System: D19, Client: 100). The SAP Easy Access menu should be visible, showing available modules and favorites.
Attempt to create a sales document
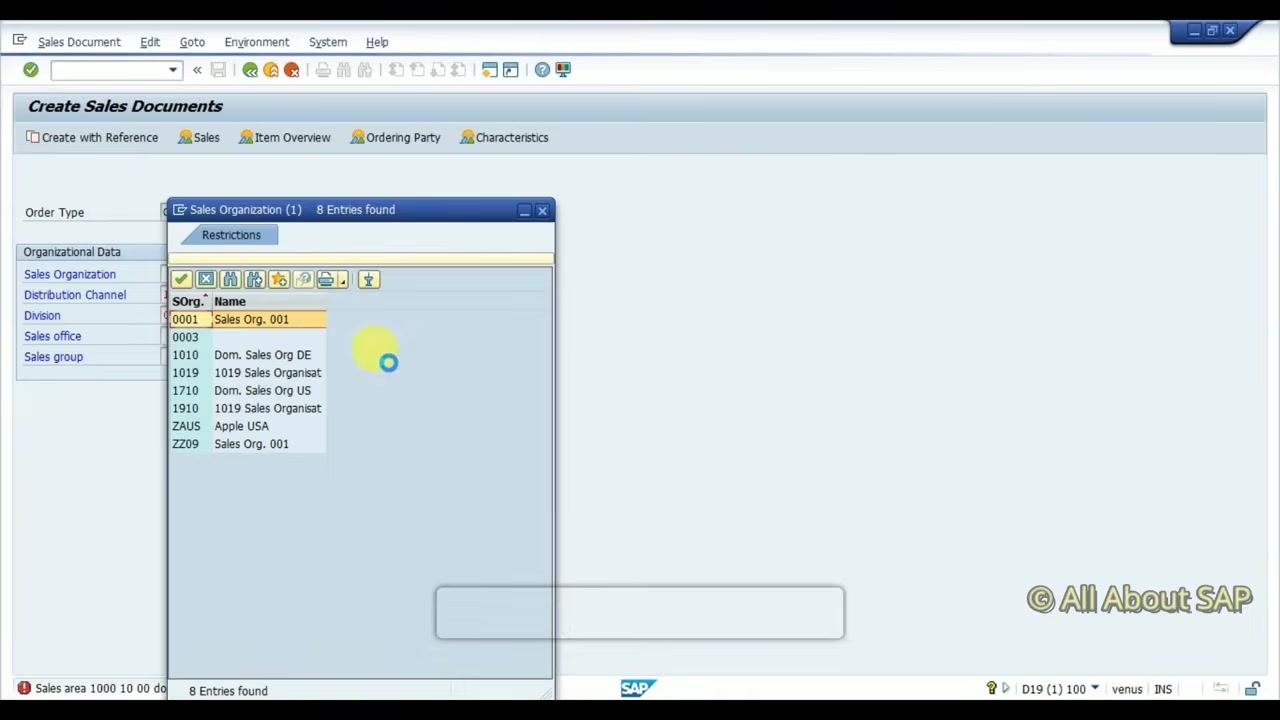
Navigate to the transaction for creating sales documents, such as VA01. The Create Sales Documents screen appears. In the "Organizational Data" section, select or enter the Sales Organization (for example, 2031, 1001, or 1000), Distribution Channel (for example, TTC or ATC), and Division (for example, Product Division 00). Select the appropriate values from the dropdown lists if prompted.
When prompted, select a Sales Organization from the list (for example, 0001, 1010, or ZAUS), a Distribution Channel (for example, 10 for Direct Sales), and a Division (for example, 00 for Product Division 00).
Observe the authorization error
After entering the organizational data, an error message appears at the bottom of the screen: "No authorization for maintaining sales documents in 1010 10 00." The Create Sales Documents screen displays the entered values: Sales Organization 1010, Distribution Channel 10 (Direct Sales), and Division 00 (Product Division 00).
Check authorization failures using SU53
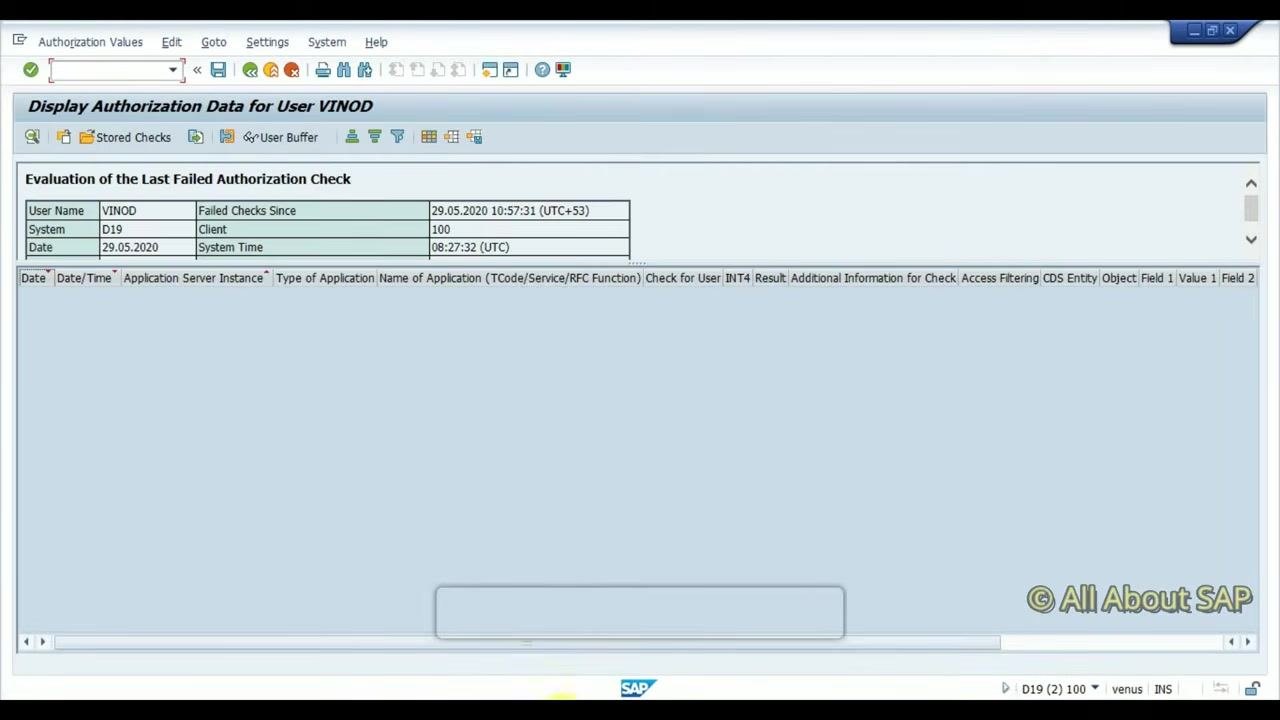
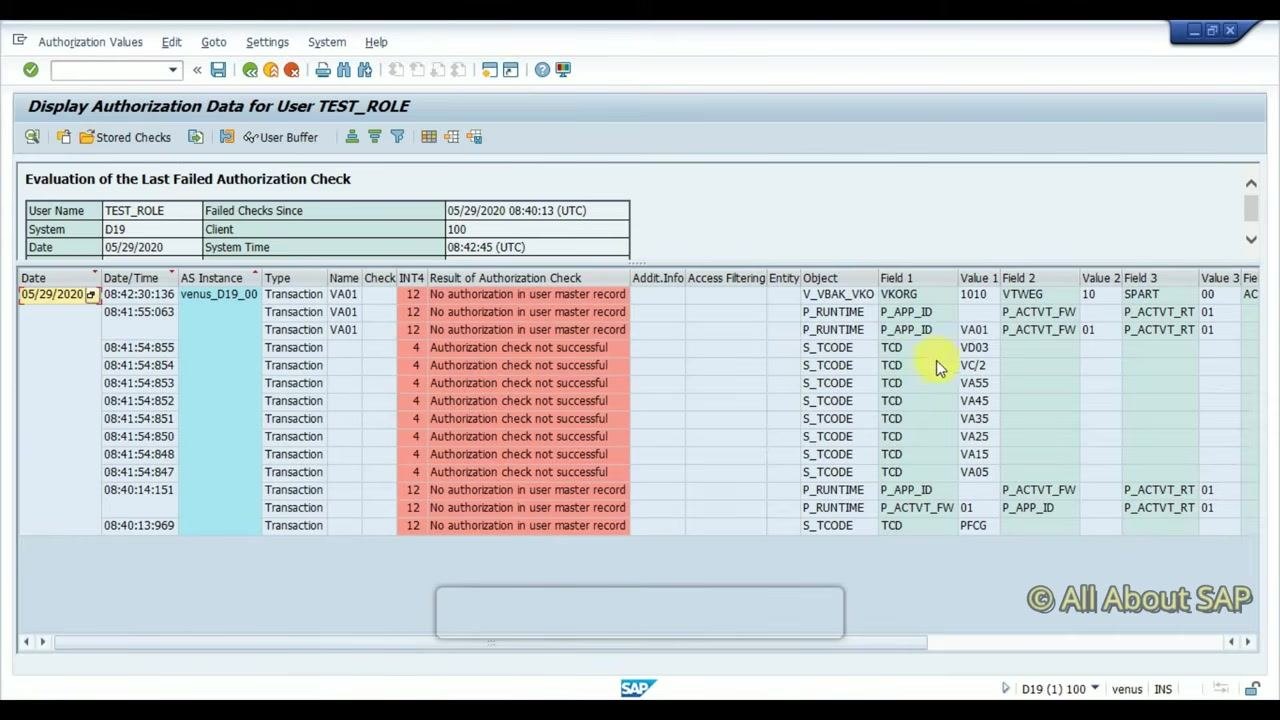
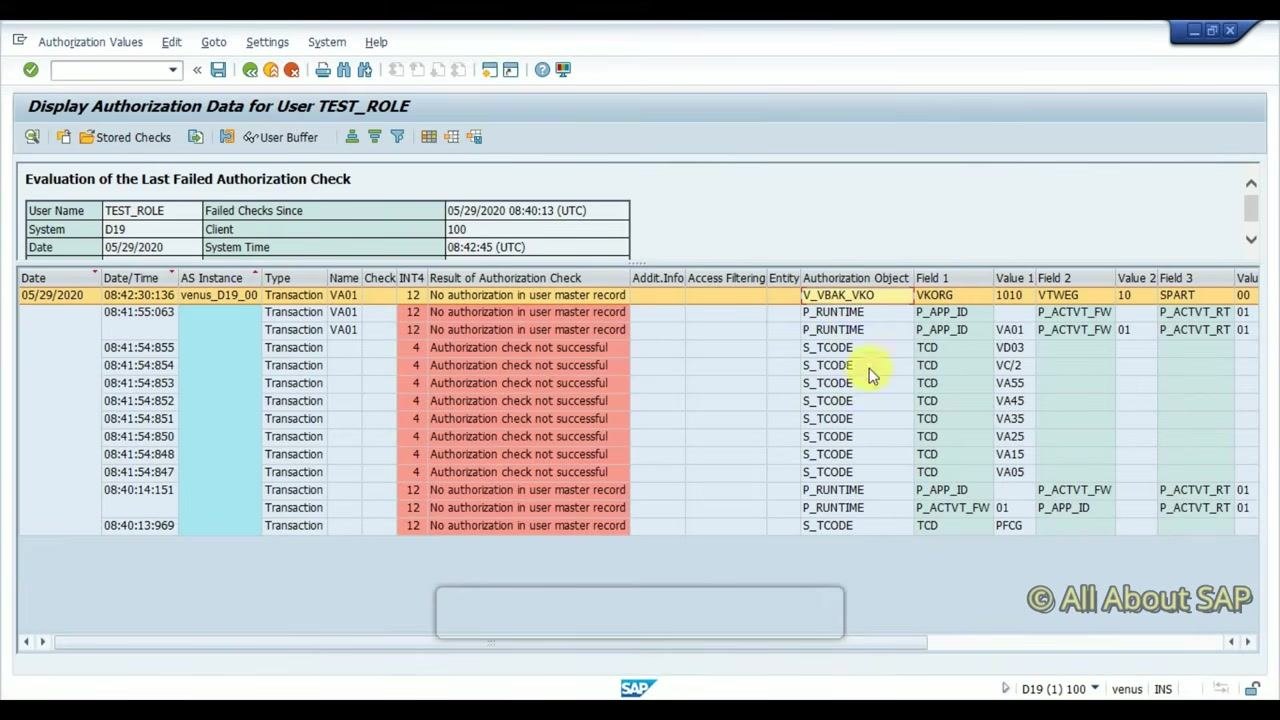
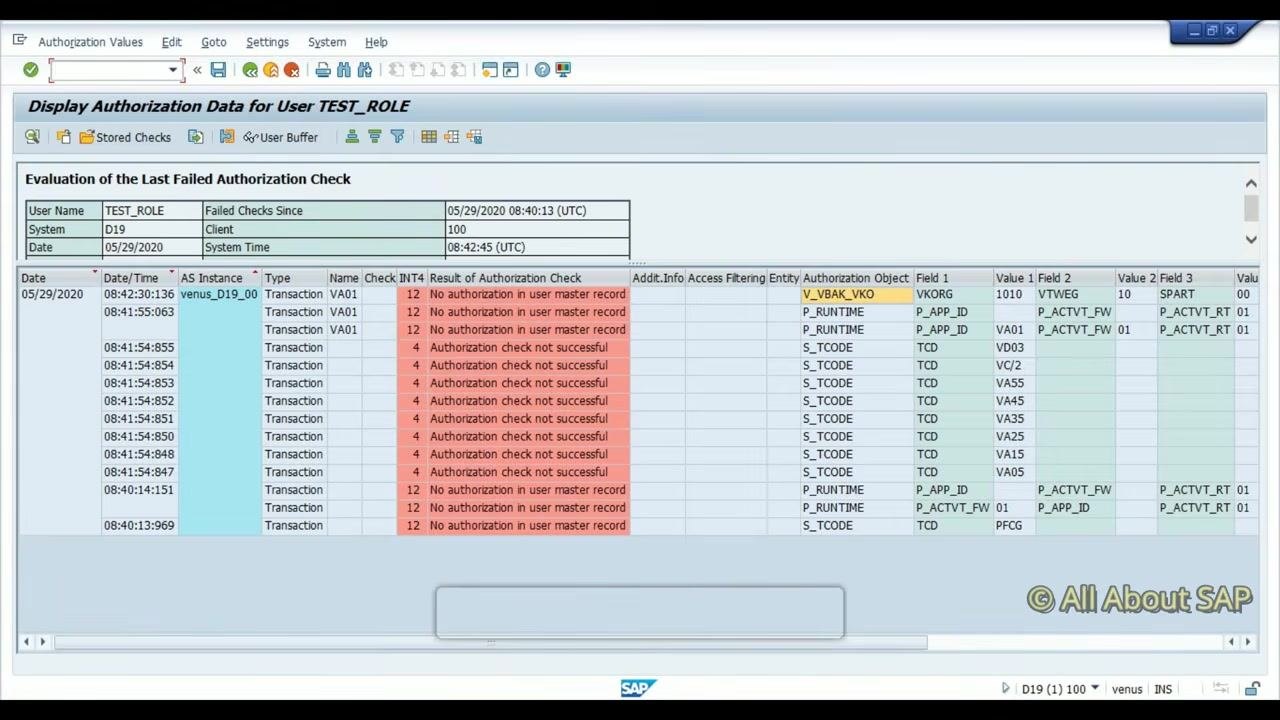
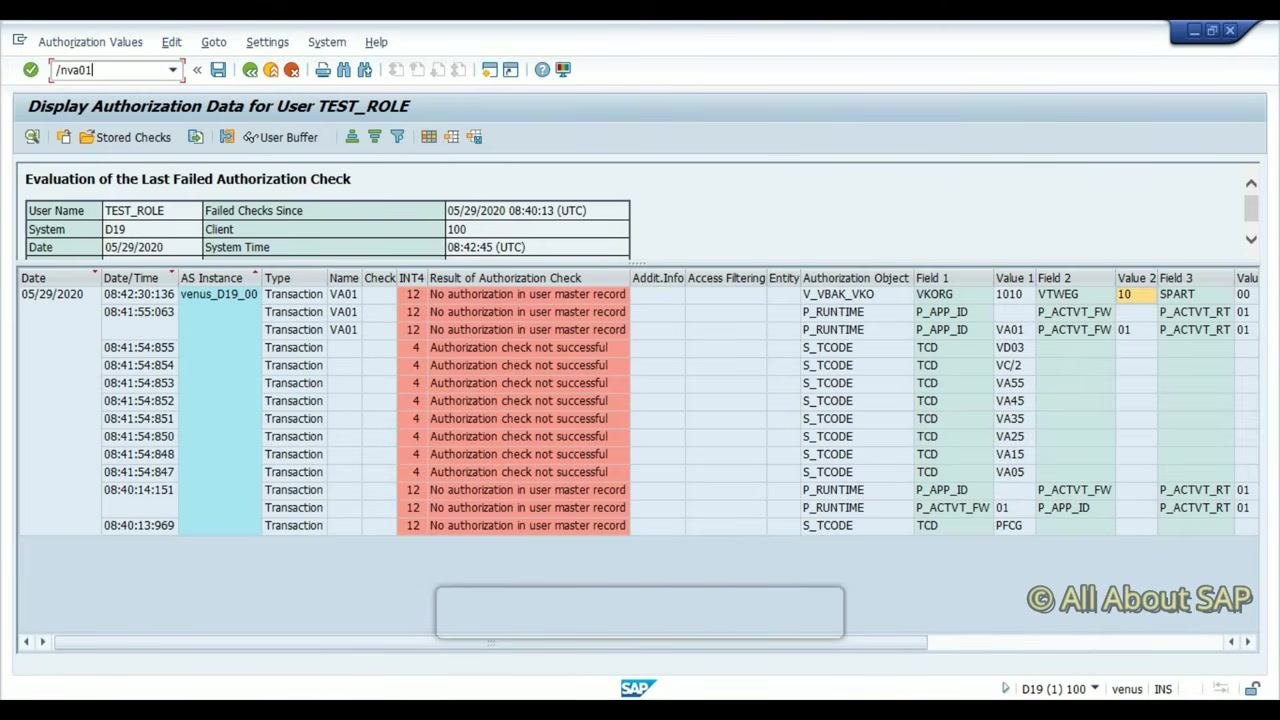
Execute transaction SU53 to analyze the failed authorization check for user TEST_ROLE. The Display Authorization Data for User TEST_ROLE screen appears. Review the "Evaluation of the Last Failed Authorization Check" section, which shows the User Name, System, Client, and date/time of the failure, along with a list of failed checks, including:
- Transaction:
VA01 - Result: "No authorization in user master record" or "Authorization check not successful"
- Authorization Objects:
V_VBAK_VKO,S_TCODE, and others - Field values, for example VKORG: 1010, VTWEG: 10, SPART: 00
In the SU53 results, locate the specific authorization object that is missing, such as V_VBAK_VKO for Sales Organization, and note the field values required for successful authorization — for example, VKORG = 1010, VTWEG = 10, SPART = 00. Use this information to update the role or user authorizations.
Updating role authorizations to resolve missing authorization objects
Access role change mode
Navigate to the Role Maintenance screen. In the Role field, enter or select Z_SD_SALES_USER from the dropdown list, and confirm the Short Description shows "Sales Team Role."
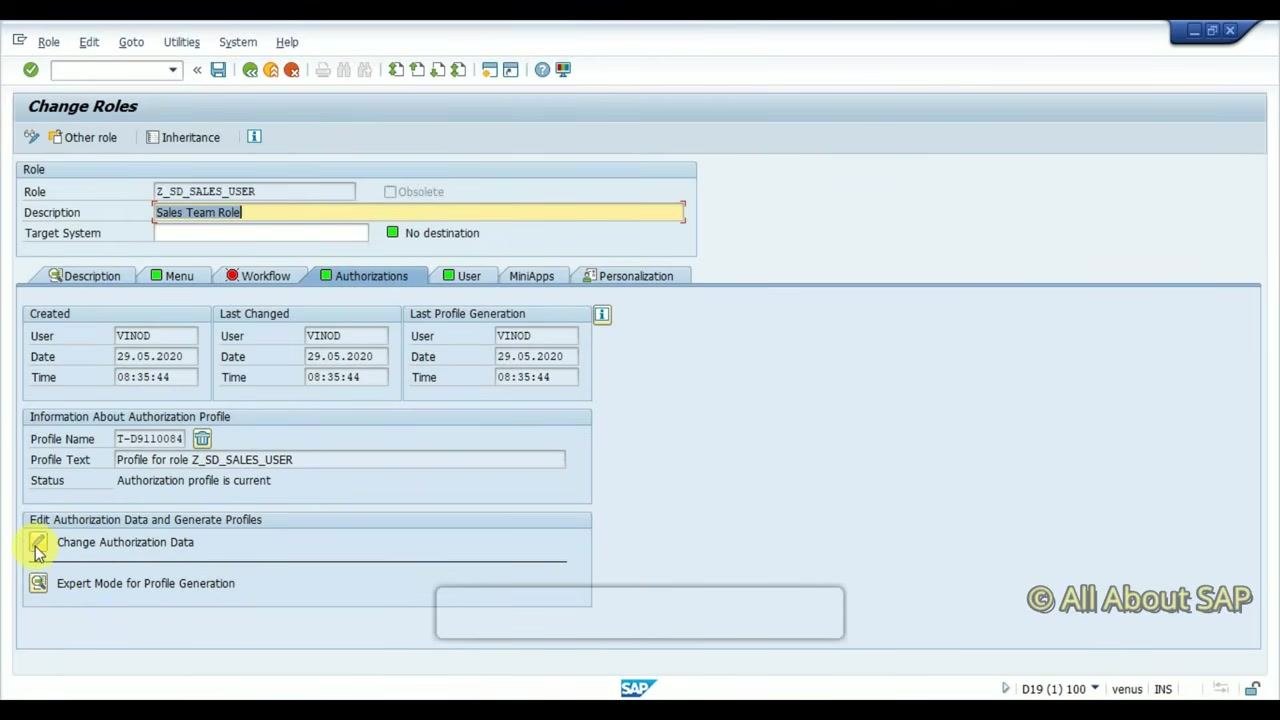
Click the edit icon or double-click the role to enter change mode. The Change Roles screen appears, showing tabs such as Description, Menu, Workflow, Authorizations, User, MiniApps, and Personalization. Confirm the role details: Role Z_SD_SALES_USER, Description "Sales Team Role," Created/Changed by VINOD, Date 29.05.2020, Time 08:32:28 (created) and 08:35:44 (changed).
Acknowledge the information prompts
If an "Information" popup appears, read the notes regarding the Profile Generator and transaction SU25. Click the green checkmark or continue button to proceed.
Manually add the missing authorization object
On the Change Role: Authorizations screen, select Manually to add authorization objects. In the "Manual selection of authorizations" popup, enter the missing authorization object, for example V_VBAK_VKO, in the first field, and click the green checkmark to confirm.
Edit the authorization field values
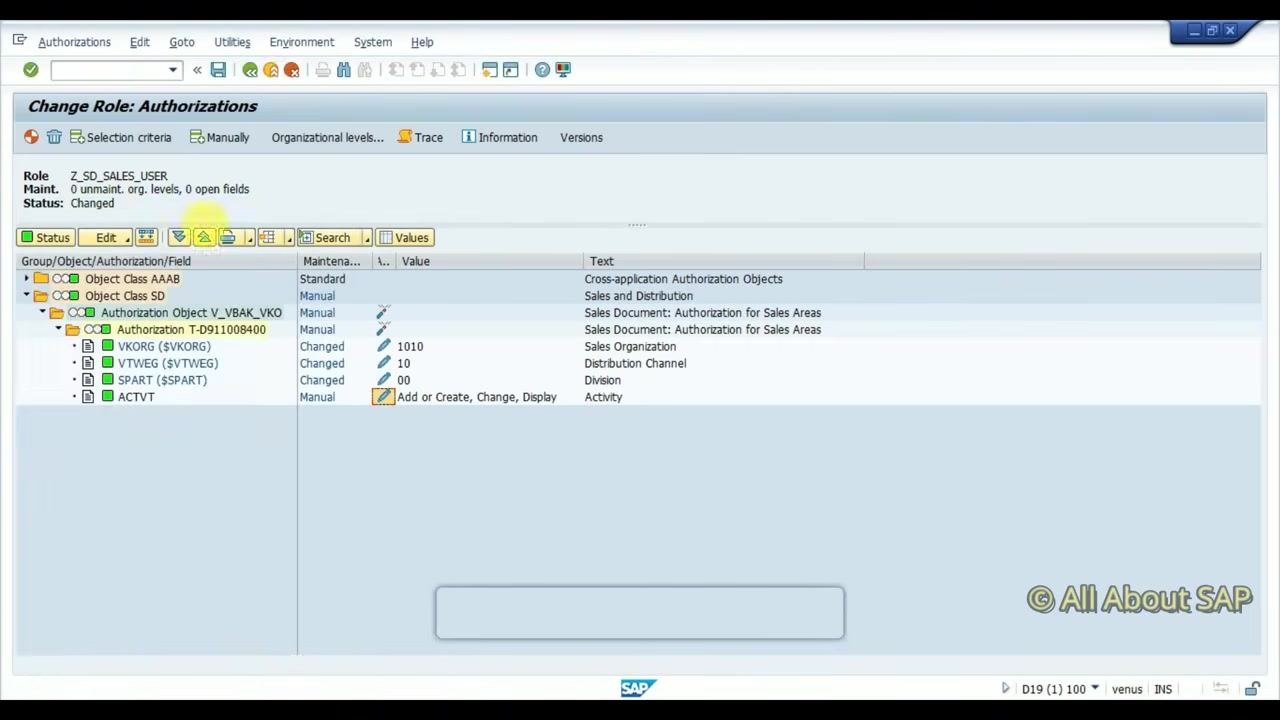
Expand the relevant object class and authorization object — for example, Object Class SD > Authorization Object V_VBAK_VKO. For each field (VKORG, VTWEG, SPART), click the "Manual" link or pencil icon to edit the value. Enter the required values as identified in the SU53 analysis:
- VKORG (Sales Organization):
1010 - VTWEG (Distribution Channel):
10 - SPART (Division):
00
You can also specify a range or full authorization if needed.
Acknowledge the organizational field maintenance prompt
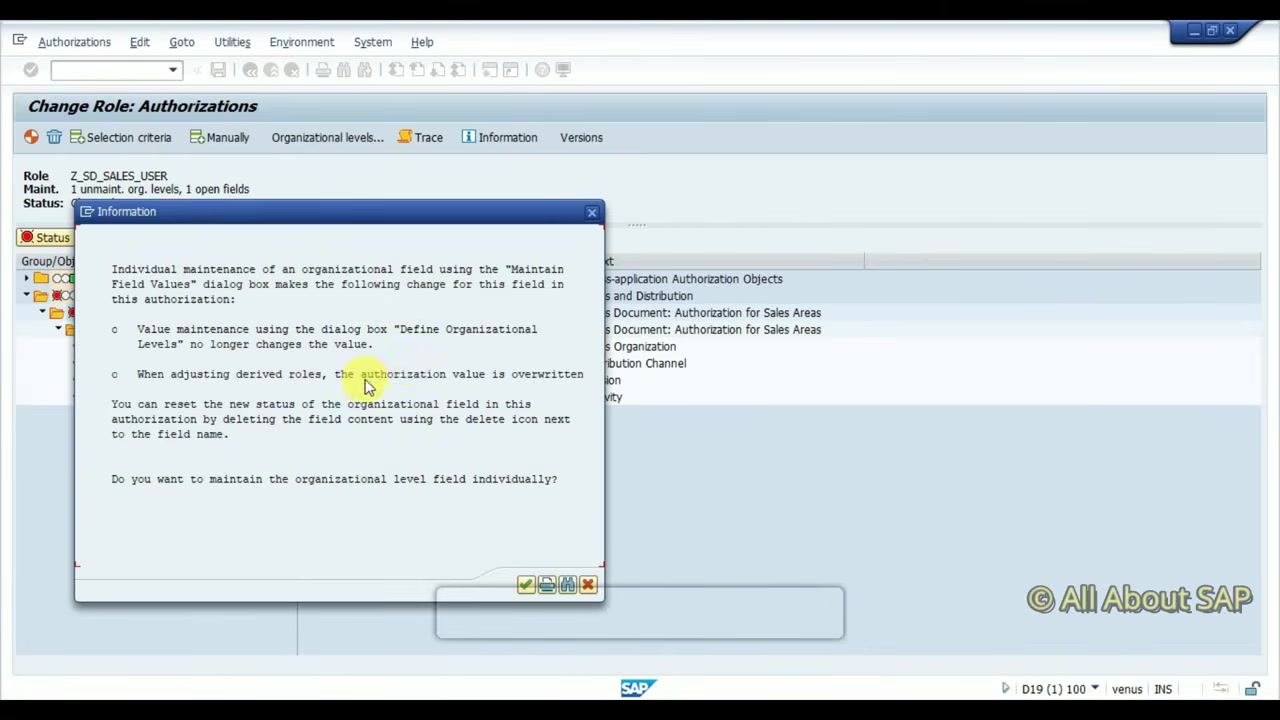
If an "Information" popup appears regarding individual maintenance of organizational fields, read the message carefully. It explains that value maintenance using the "Define Organizational Levels" dialog no longer changes the value once set individually, that adjusting derived roles overwrites the authorization value, and that you can reset the field status by deleting its content. You are prompted to decide whether to maintain the organizational level field individually. Click the green checkmark or continue button to proceed.
Review and set the authorization activities
On the main Change Role: Authorizations screen, review the list of authorization objects and their fields. Ensure the following values are set: VKORG (Sales Organization) 1010, VTWEG (Distribution Channel) 10, SPART (Division) 00, and ACTVT (Activity) Add, Create, Change, or Display as needed. Hover over the activity field to confirm the available actions.
Check the object activation status
Verify whether the authorization object is active or inactive. Inactive objects are indicated by a specific icon or status in the list. If the object is inactive, activate it as required.
Review the authorization object maintenance status
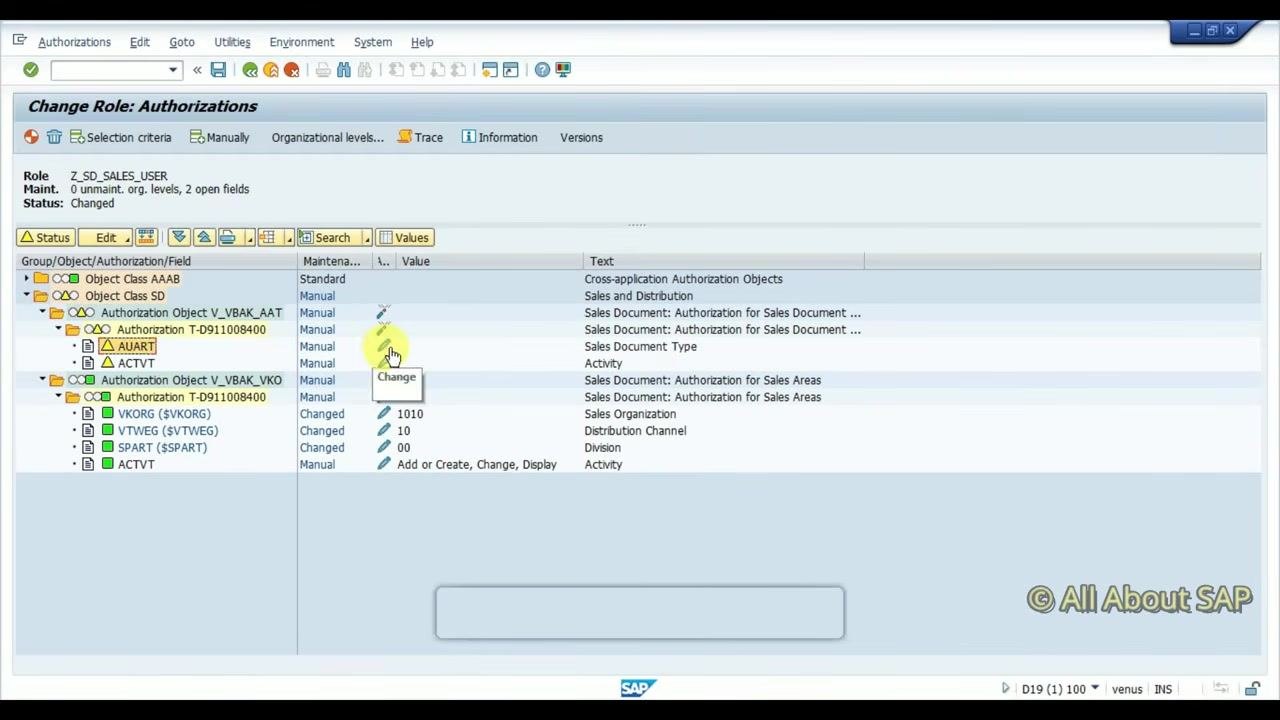
On the Change Role: Authorizations screen, check the status of each authorization object. Ensure that all required fields for V_VBAK_VKO (Sales Document: Authorization for Sales Areas) are set to "All maintained," indicated by a green square. Confirm that the following values are present: VKORG 1010, VTWEG 10, SPART 00, and ACTVT Add, Create, Change, or Display.
Save the authorization changes
After making the necessary changes, save the role. Confirm that the status at the top of the screen changes to "Saved" and the "Data saved" message appears at the bottom.
Generate the authorization profile
After updating the authorization objects and field values, generate the authorization profile for the role. Confirm that the status of the authorization profile is current and reflects the latest changes.
Setting and troubleshooting SAP authorization objects
Test authorization with transaction VA01
Attempt to execute transaction VA01 (Create Sales Order). If an authorization issue occurs, a message such as "No maintenance authorization for document type OR" appears at the bottom of the screen. The Create Sales Documents screen displays the entered organizational data: Order Type OR (Standard Order), Sales Organization 1010, Distribution Channel 10, and Division 00.
Analyze the authorization failure using SU53
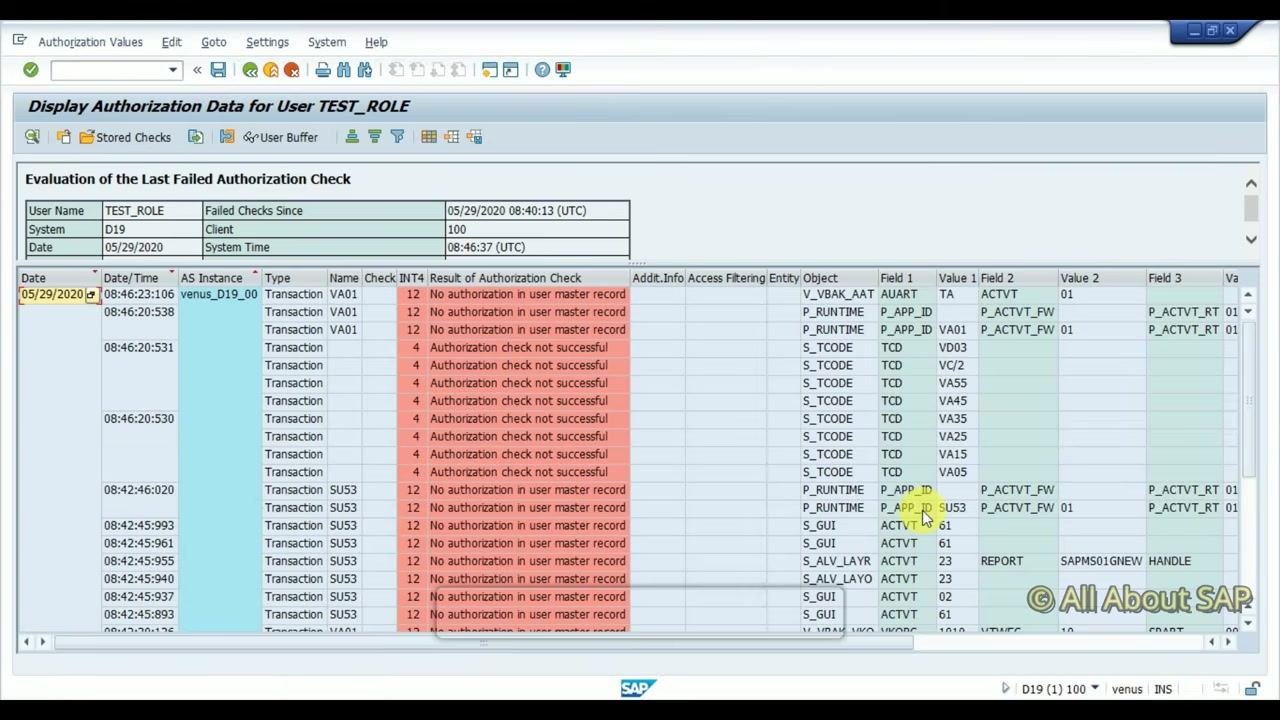
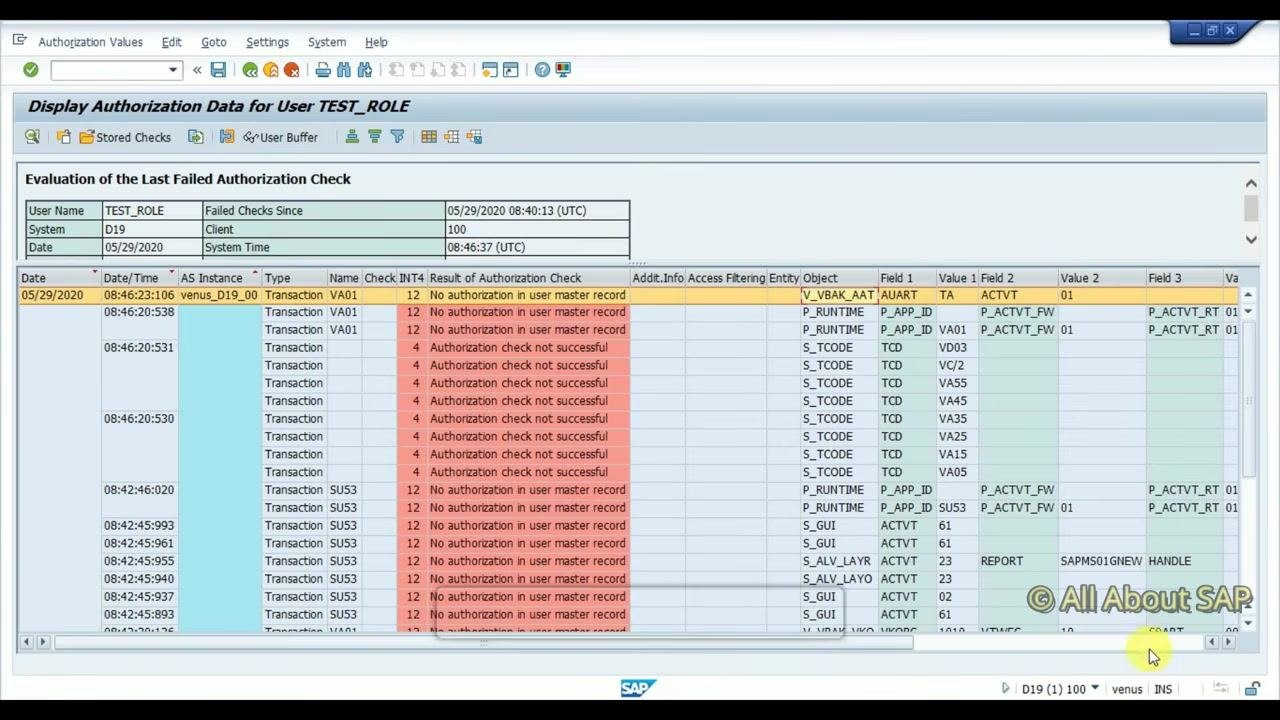
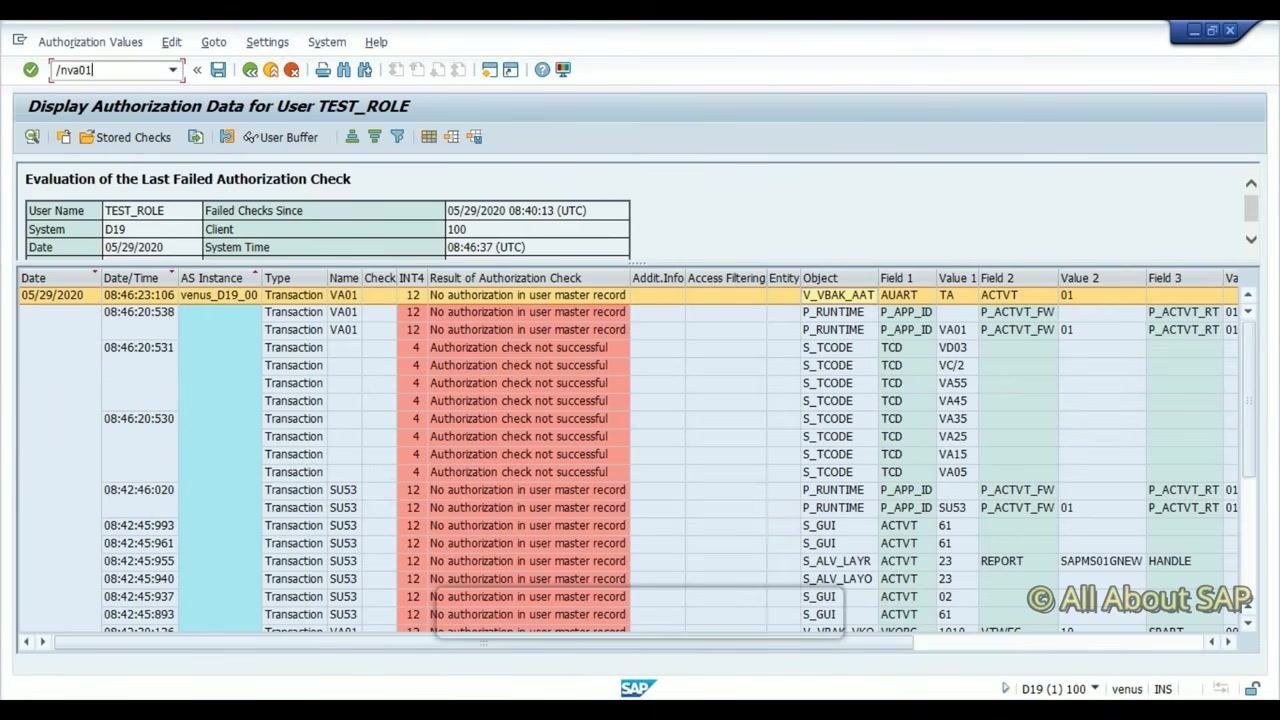
Run transaction SU53 to display the last failed authorization check. Review the Display Authorization Data for User screen for failed checks, focusing on the relevant authorization object and fields, such as Authorization Object V_VBAK_AAT, Field AUART (Document Type), and Activity 01. The result column indicates "No authorization in user master record" for failed checks.
From the SU53 output, note the specific authorization object required, such as V_VBAK_AAT, and use this information to update the role with the necessary authorization for the document type and activity.
Finalizing and verifying authorization objects
Add and configure authorization for the sales document type
Locate the authorization object V_VBAK_AAT (Sales Document: Authorization for Sales Document Type). Add or edit the authorization entry to include AUART (Sales Document Type), for example OR for Standard Order, and ACTVT (Activity), set to Add, Create, Change, or Display. Ensure the maintenance status for these fields is set to "Manual" or "Changed" as appropriate.
Select the authorization entry for the document type and ensure it is activated, not deactivated. The maintenance status should indicate "Manual" or "Changed" for all relevant fields.
Verify all authorizations are maintained
Confirm that all required authorizations for both V_VBAK_AAT and V_VBAK_VKO are fully maintained, shown with a green status. The screen should show no open fields or maintenance warnings.
Re-test authorization with transaction VA01
Execute transaction VA01 again to verify that the user can now access the required functionality. If authorization is still missing, the system displays a message indicating "No authorization in user master record" for the relevant object and field. Use transaction SU53 to check the last failed authorization check if needed.
Confirm successful access to sales document creation
If authorizations are correctly configured, the Create Sales Documents screen displays without error. Verify that the organizational data fields are populated as follows: Order Type OR (Standard Order), Sales Organization 1010, Distribution Channel 10, and Division 00.
Proceed to create a standard order
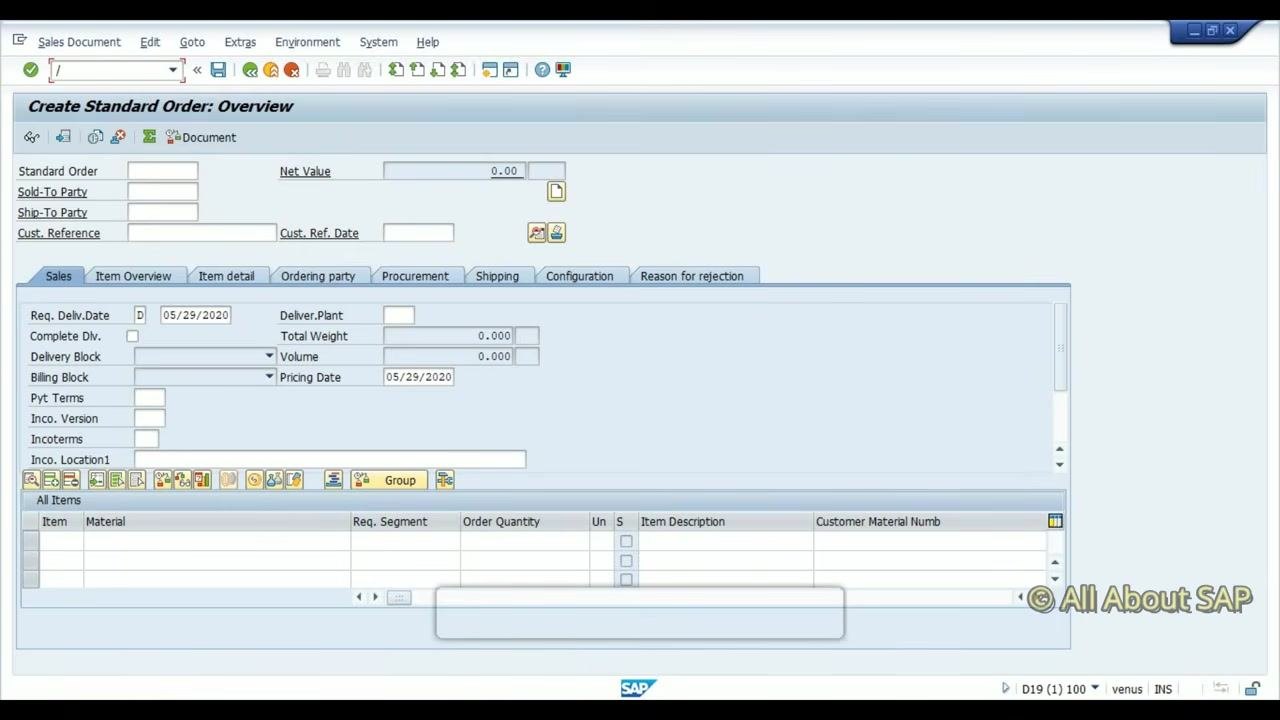
On the Create Standard Order: Overview screen, enter the required sales order details, such as Sold-To Party and Ship-To Party, along with other relevant fields. Confirm that you can proceed without authorization errors.
Finalize and exit
Once the configuration and testing are complete, exit the transaction or continue with further order processing as needed. The system now allows the user to perform all authorized actions for the specified sales document types and sales areas.
What's next
With the role fully configured and verified, the user TEST_ROLE can access the assigned transactions and create, change, or display sales orders within the authorized sales areas without encountering authorization errors. If you need to extend access further, repeat the authorization update process in PFCG to add new objects or field values, and use SU53 to diagnose any new authorization failures as they arise.
Generation details: cost, quality tiers
Docsie billed 7,000 credits ($4.90) to analyze this 14-minute video at standard quality. The rewrite, template fill and Word/PDF exports were included. The same video at each quality tier:
| Quality | Frames sampled | Credits | Approx. cost |
|---|---|---|---|
| Draft | every 16-30 s | 3,500 | $2.45 |
| Standard (this guide) | every 8-15 s | 7,000 | $4.90 |
| Detailed | every 4-7 s | 14,000 | $9.80 |
| Ultra | every 1-3 s | 28,000 | $19.60 |
Credits priced at $0.70 per 1,000; plans include a monthly allowance. Enterprise customers on on-premise or bring-your-own-model deployments run this on their own inference and pay no per-video credits.
Generated by Docsie Video-to-Docs on 2026-10-11 from a 13-minute video. Screenshots are frames from the source video and belong to their creator, All About SAP, whose original is embedded above. If you own this video and want the guide removed or credited differently, contact us and we will act within one business day.