
How to Create a PO in SAP
This guide walks you through how to create a PO in SAP, from locating the purchase order creation options in the SAP Easy Access menu to entering mandatory fields, resolving common system prompts, and saving the completed document. Whether you create the purchase order manually or use a transaction code shortcut, the process below covers the full workflow you will see on screen.
Video: How to create a Purchase Order in SAP - SAP MM basic Video by BHUPAL REDDY (2016). All credit for the demonstration goes to the creator; watch the original on YouTube. The written guide below was generated from this video by Docsie. Creator? Request a change or removal.
This guide walks you through how to create a PO in SAP, from locating the purchase order creation options in the SAP Easy Access menu to entering mandatory fields, resolving common system prompts, and saving the completed document. Whether you create the purchase order manually or use a transaction code shortcut, the process below covers the full workflow you will see on screen.
Prerequisites
- Access to the SAP Easy Access screen.
- Knowledge of the vendor, material number, plant, and storage location you intend to use.
- Appropriate authorization to create purchase orders in your SAP system.
Access the purchase order creation options
Step 1: Navigate to the SAP Easy Access menu
Start on the SAP Easy Access screen and locate the navigation tree on the left side of the screen.
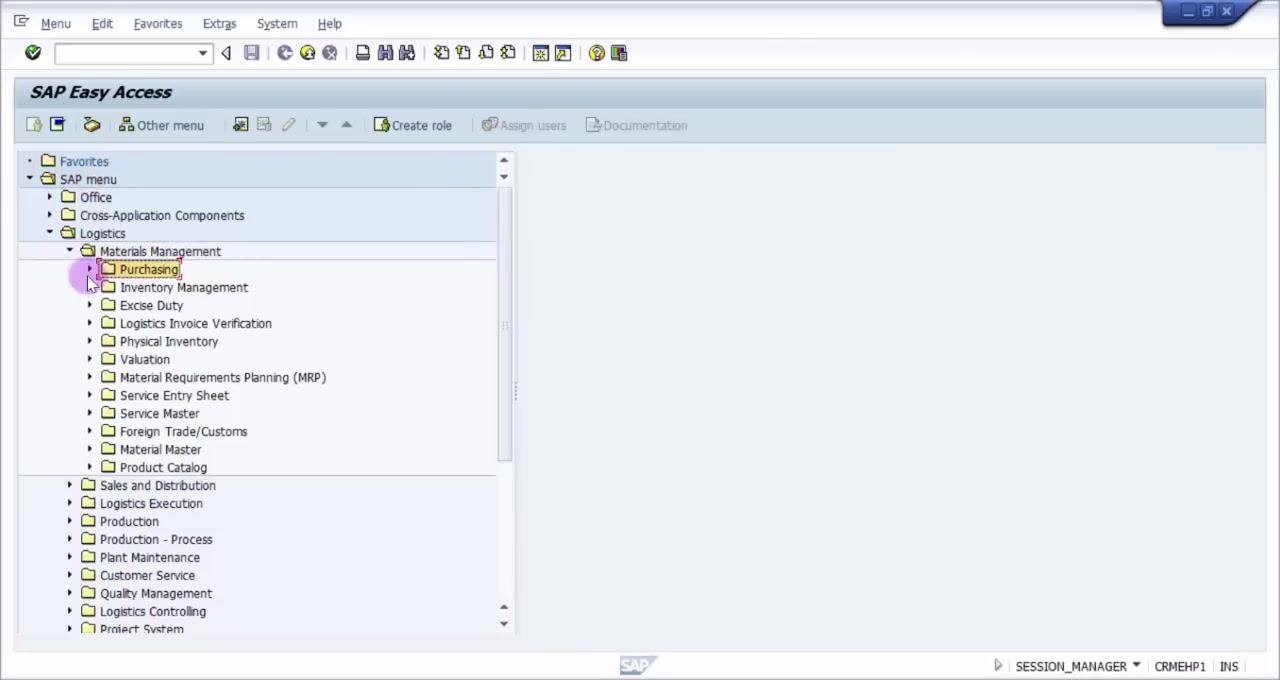
Expand the Logistics node:
- Click the arrow next to SAP menu to expand it.
- Click the arrow next to Logistics to expand the logistics options.
Access Materials Management and Purchasing:
- Under Logistics, expand Materials Management.
- Under Materials Management, expand Purchasing.
Step 2: Review the available creation methods
Under Purchasing, expand Purchase Order, then expand Create. You will see four options for creating a purchase order:
- ME21N – Vendor/Supplying Plant Known
- ME25 – Vendor Unknown
- ME58 – Via Requisition Assignment List
- ME59N – Automatically via Purchase Requisitions
Select the method that matches your scenario. The most common method is ME21N – Vendor/Supplying Plant Known.
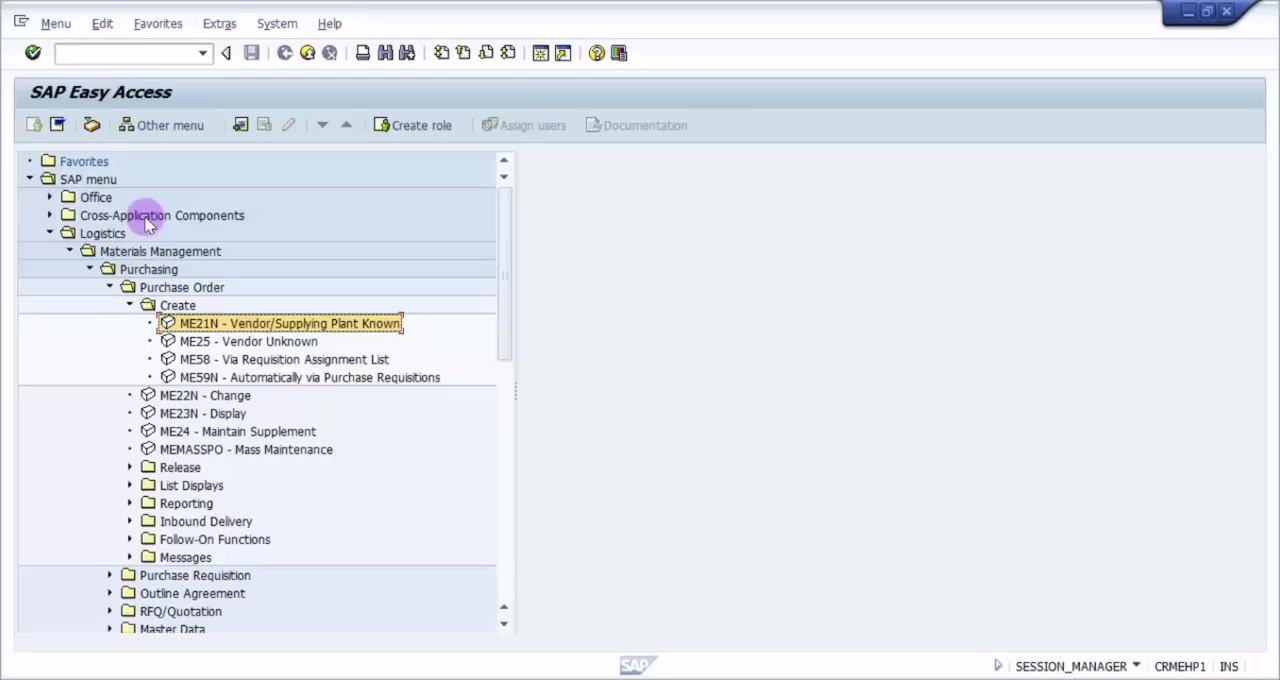
Use each method as follows:
- ME21N: Use when the vendor or supplying plant is known.
- ME25: Use when the vendor is unknown.
- ME58: Use if you have a purchase requisition and want to create a PO via the assignment list.
- ME59N: Use to create purchase orders automatically from existing purchase requisitions.
Most organizations rely on background jobs for automatic creation, but it is still important to know how to create a purchase order manually.
Step 3: Create a purchase order manually
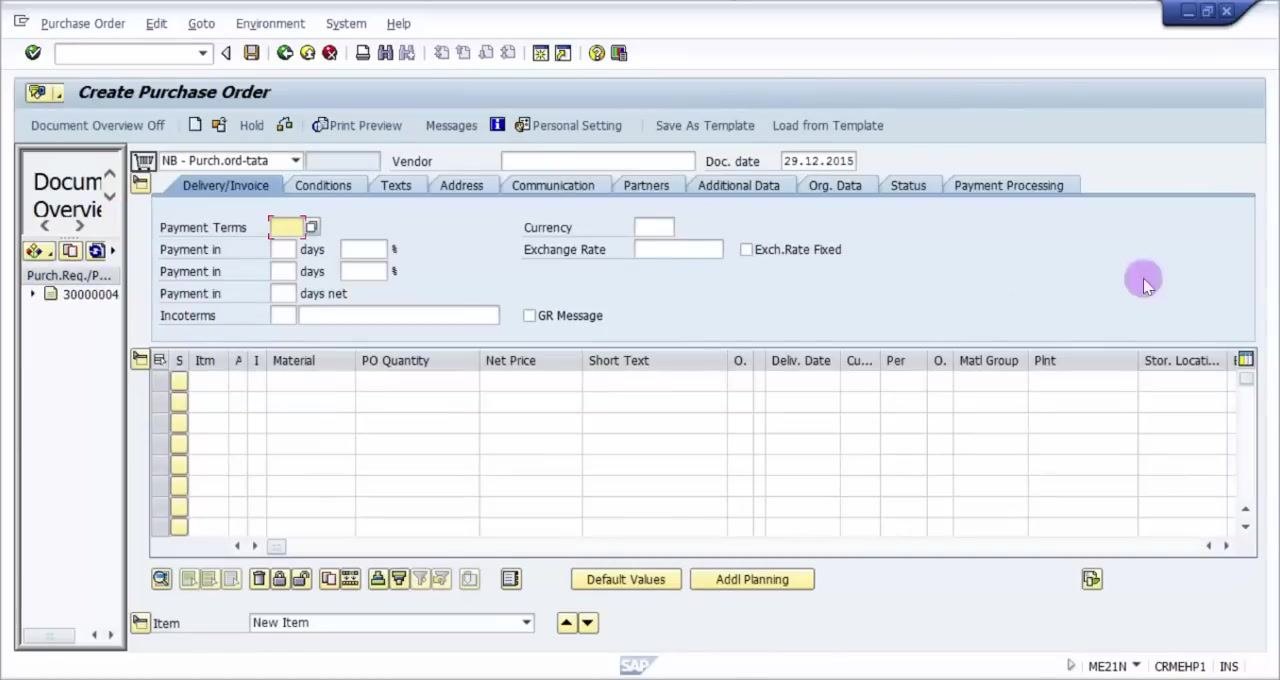
Double-click ME21N – Vendor/Supplying Plant Known to open the purchase order creation screen. The Create Purchase Order screen appears, where you can enter all relevant purchase order details such as vendor, document date, payment terms, currency, and item details.
Step 4: Use the transaction code as an alternative
You can also open the purchase order creation screen directly by entering a transaction code. Type /nME21N in the command field at the top of the SAP window and press Enter. This takes you to the same Create Purchase Order screen.
By following these steps, you can navigate the SAP menu or use the transaction code to reach the purchase order creation screen and begin entering your purchase order details.
Enter mandatory fields for purchase order creation
Step 5: Enter vendor information
In the Vendor field, enter 1000. Leave the other fields blank for now.
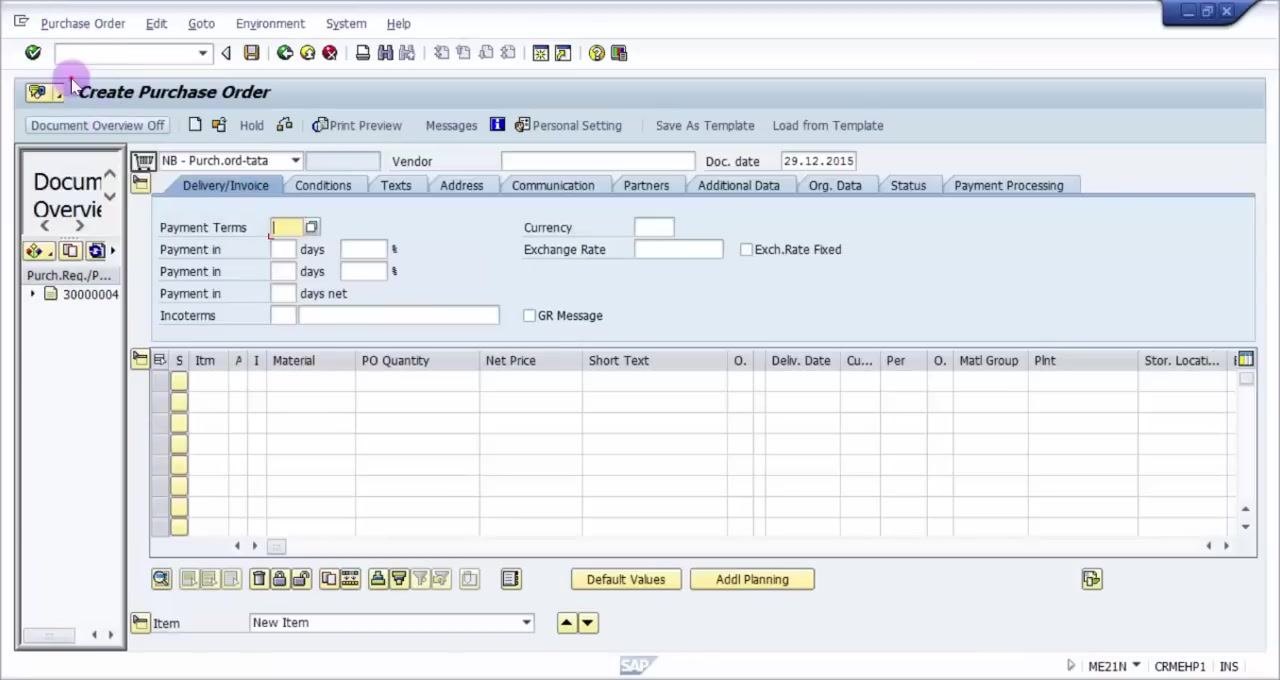
Step 6: Enter material and quantity
In the Material column, enter the material number (for example, T-BW02-01). In the PO Quantity column, enter the quantity (for example, 100). Do not fill in additional details at this stage.
Step 7: Attempt to proceed
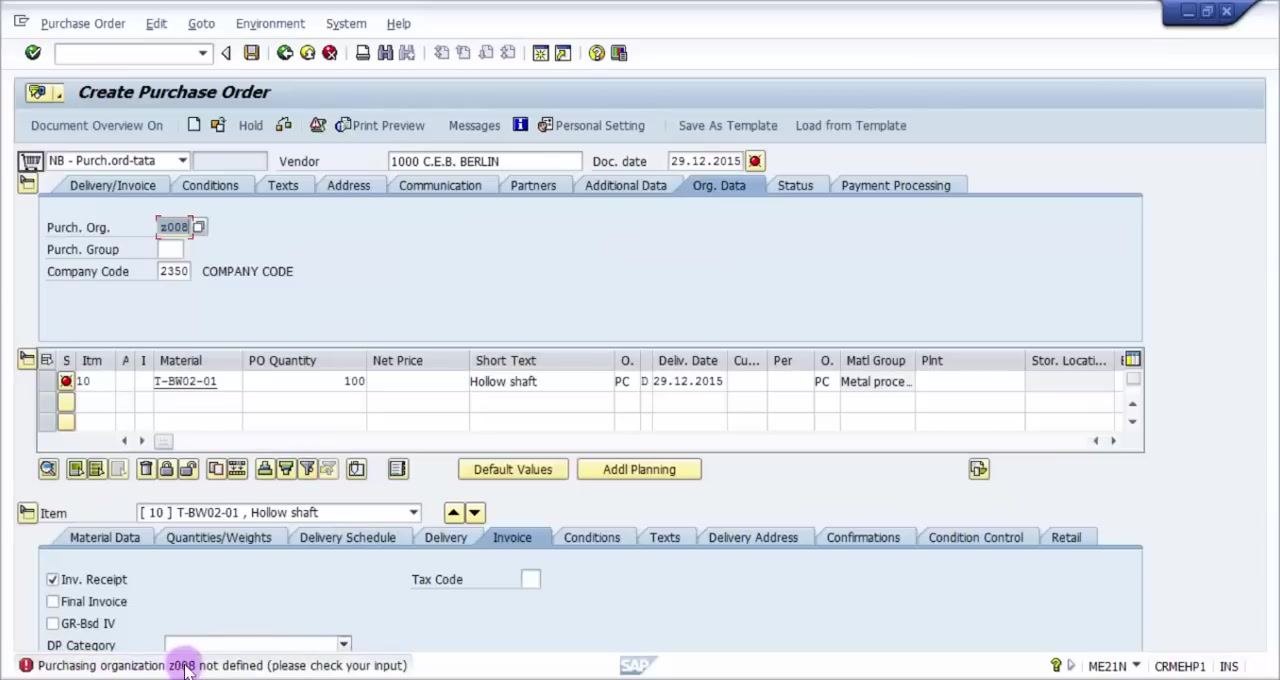
Press Enter to continue. The system checks for required fields and displays an error if any are missing or incorrect.
Step 8: Correct organizational data
If you see the error "Purchasing organization z008 not defined (please check your input)," the default purchasing organization is not valid. The Purch. Org. field will show the invalid value (for example, z008).
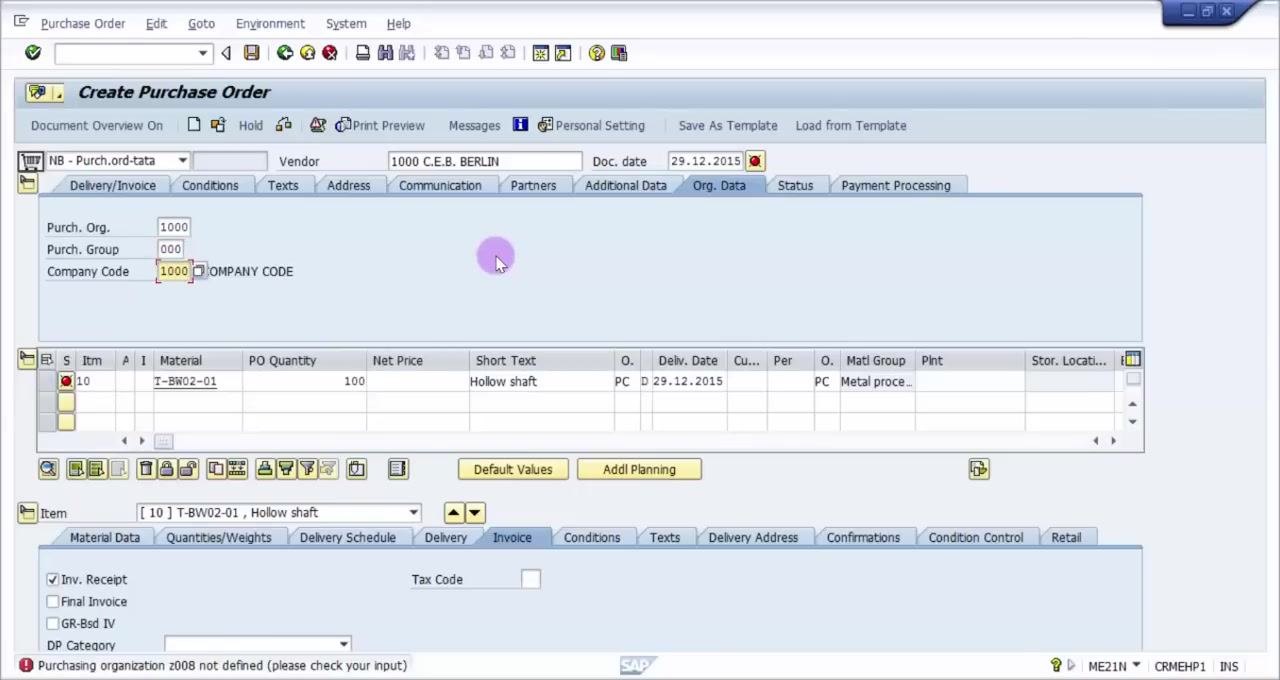
Remove the invalid values in the Purch. Org., Purch. Group, and Company Code fields, then enter the correct values:
- Purch. Org.:
1000 - Purch. Group:
000 - Company Code:
1000
Press Enter to confirm.
Step 9: Enter plant and storage location
When prompted, enter the Plant (for example, Hamburg) and Storage Location (for example, Raw Mat - VLI). The system may prompt for these fields if they are not already filled.
Step 10: Review scheduling agreement notification
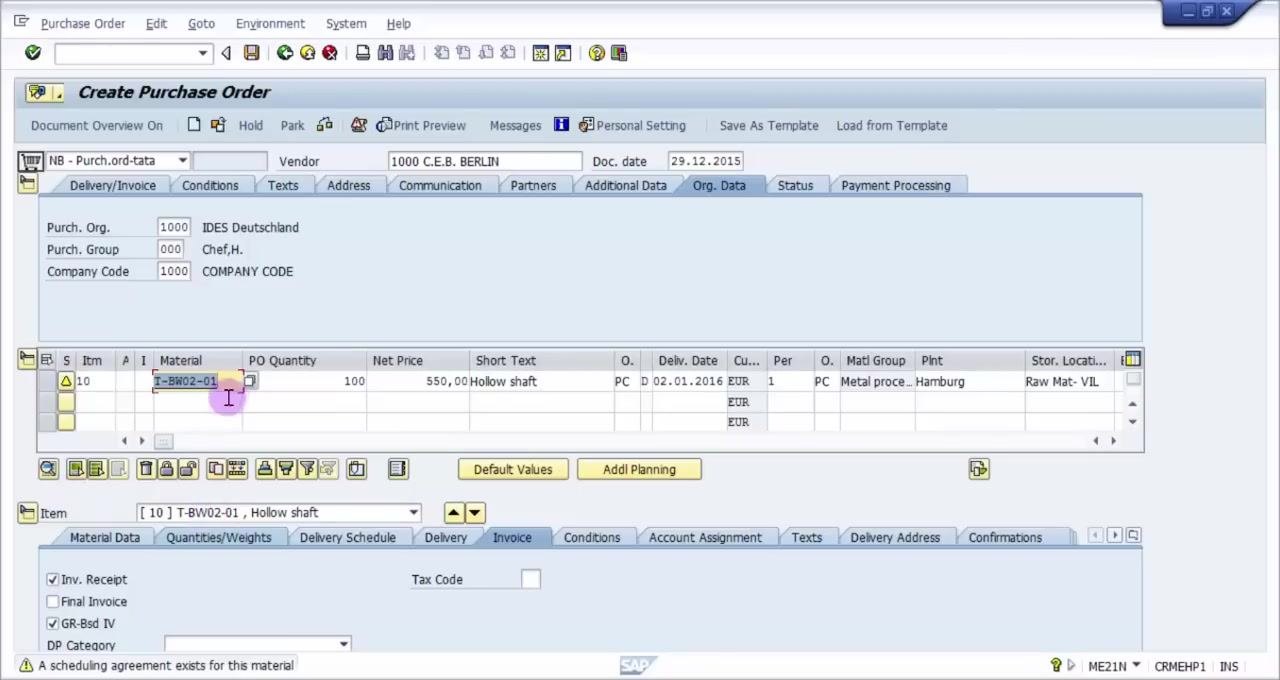
If a message appears stating "A scheduling agreement exists for this material," it means an agreement already exists for the selected material and plant. This is informational and does not prevent you from proceeding.
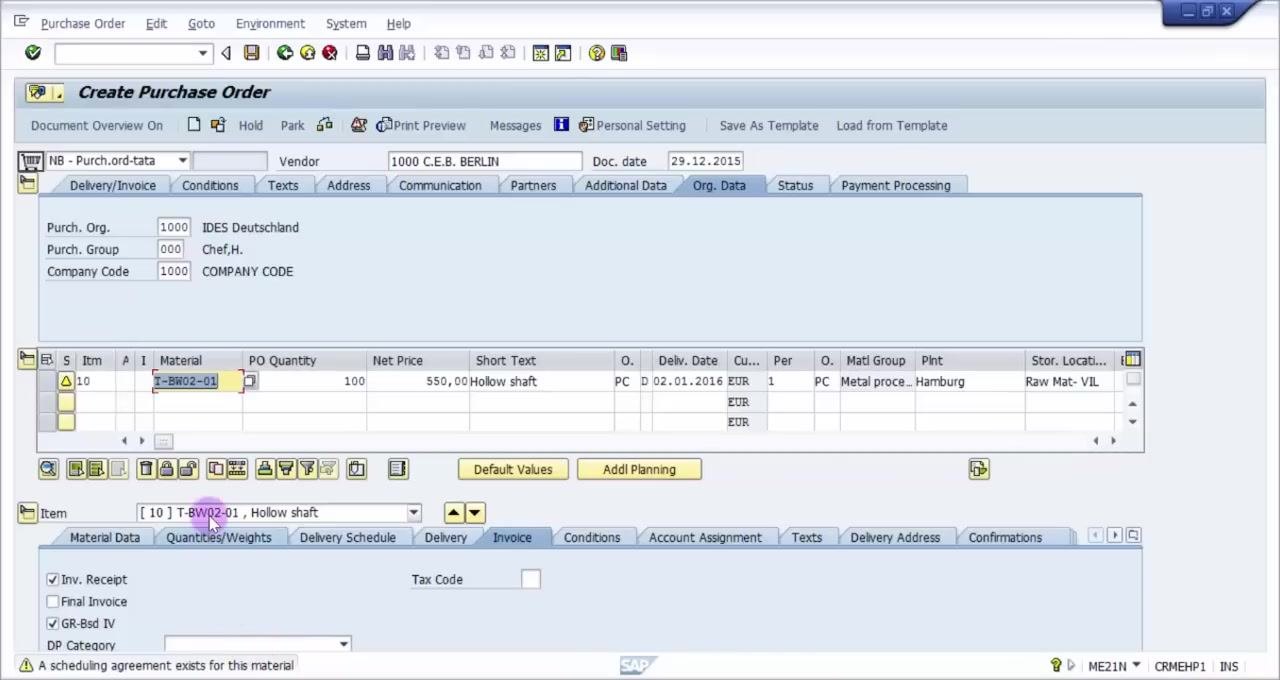
If you want to proceed with a different material, update the Material field accordingly.
By following these steps, you ensure all mandatory fields are completed and can address common system prompts or errors during purchase order creation in SAP.
Perform a final check and save the purchase order
Step 11: Verify pricing and item details
Review the purchase order screen to ensure all details are correct:
- Material:
T-BW03-01 - PO Quantity:
100 - Net Price:
2.00 EUR - Short Text:
Ball bearing - Plant:
Hamburg - Storage Location:
Raw Mat - VLI
Confirm that the net price has been picked up and all required fields are filled.
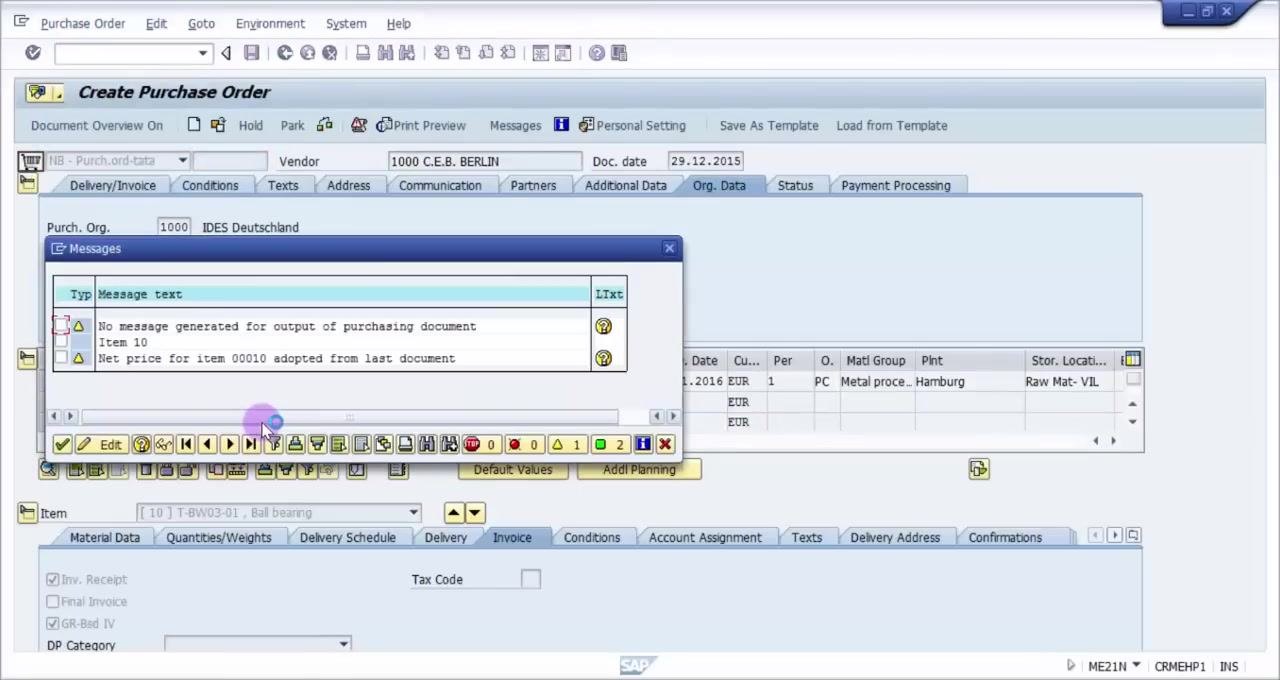
Step 12: Execute the purchase order check
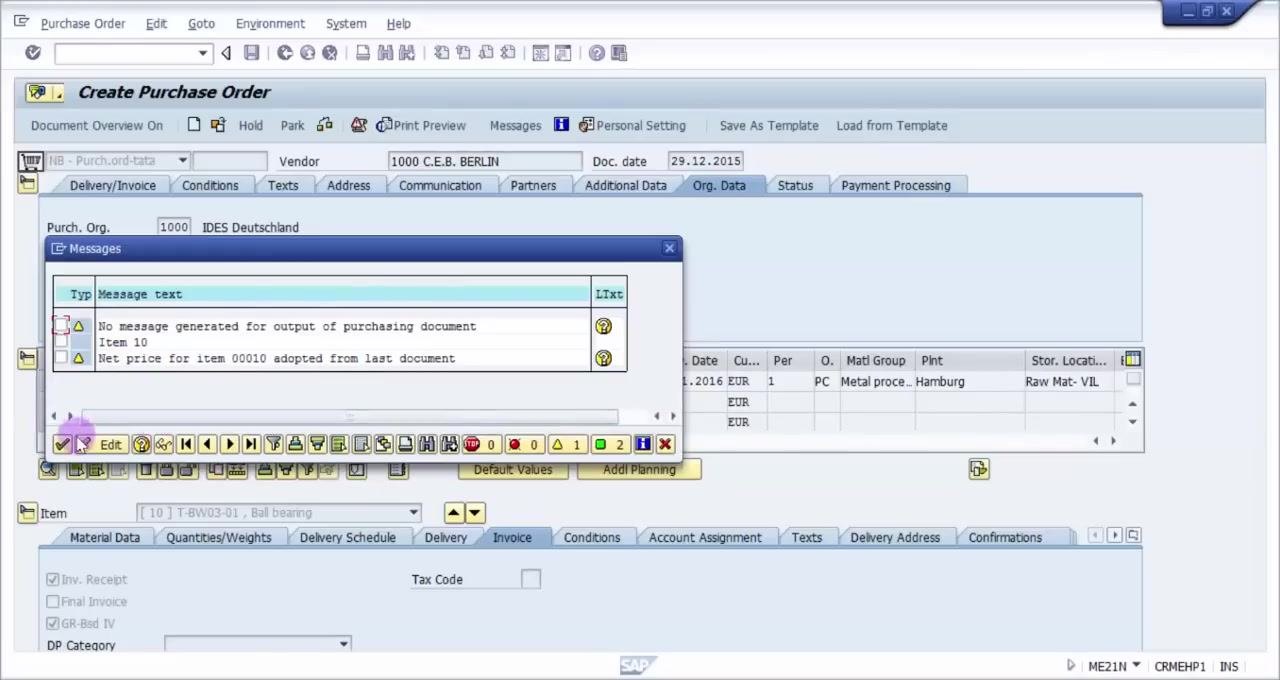
Press Enter or use the purchase order check function to initiate a check on the purchase order. Review the system messages that appear, for example:
- "No message generated for output of purchasing document"
- "Item 10"
- "Net price for item 00010 adopted from last document"
Ensure there are no errors or blocking warnings.
Click OK or close the messages window after reviewing the information, and confirm that all item net prices and details are correct.
Step 13: Save the purchase order
Press Ctrl+S or click the Save button to save the purchase order. If a dialog box appears stating "System messages issued. Do you want to save document or process data?", select Save to proceed.
Step 14: Confirm purchase order creation
After saving, a confirmation window appears stating "NB - Purch.ord-tata created under the number 8100000712." Note the purchase order number (8100000712) for your records.
Summary
By following these steps, you have successfully completed and saved a purchase order in SAP, with confirmation of the document number for future reference. You now know how to create a PO in SAP both manually through the SAP menu and directly through the ME21N transaction code, as well as how to handle common field validation prompts along the way.
Generation details: cost, quality tiers
Docsie billed 2,500 credits ($1.75) to analyze this 5-minute video at standard quality. The rewrite, template fill and Word/PDF exports were included. The same video at each quality tier:
| Quality | Frames sampled | Credits | Approx. cost |
|---|---|---|---|
| Draft | every 16-30 s | 1,250 | $0.88 |
| Standard (this guide) | every 8-15 s | 2,500 | $1.75 |
| Detailed | every 4-7 s | 5,000 | $3.50 |
| Ultra | every 1-3 s | 10,000 | $7.00 |
Credits priced at $0.70 per 1,000; plans include a monthly allowance. Enterprise customers on on-premise or bring-your-own-model deployments run this on their own inference and pay no per-video credits.
Generated by Docsie Video-to-Docs on 2026-10-11 from a 4-minute video. Screenshots are frames from the source video and belong to their creator, BHUPAL REDDY, whose original is embedded above. If you own this video and want the guide removed or credited differently, contact us and we will act within one business day.