
How to Create an Invoice in SAP Ariba
This guide walks you through how to create an invoice in SAP Ariba for Weill Cornell Medicine using the Supplier Portal. You will learn how to locate the correct purchase order, complete the required invoice fields, add optional details such as shipping and attachments, and submit your invoice for processing.
Video: Ariba Supplier Training: How to Create an Invoice by WCM ITS (2022). All credit for the demonstration goes to the creator; watch the original on YouTube. The written guide below was generated from this video by Docsie. Creator? Request a change or removal.
This guide walks you through how to create an invoice in SAP Ariba for Weill Cornell Medicine using the Supplier Portal. You will learn how to locate the correct purchase order, complete the required invoice fields, add optional details such as shipping and attachments, and submit your invoice for processing.
Prerequisites
Before you begin, make sure you have:
- An active SAP Ariba supplier account with valid login credentials
- The purchase order number you intend to invoice
- Any supporting documents you want to attach to the invoice
Log in to your supplier account
Open the SAP Ariba supplier portal
Open your web browser and navigate to supplier.ariba.com.
Sign in to your account
Log in using your supplier credentials.
Find the purchase order you want to invoice
Open the Workbench tab
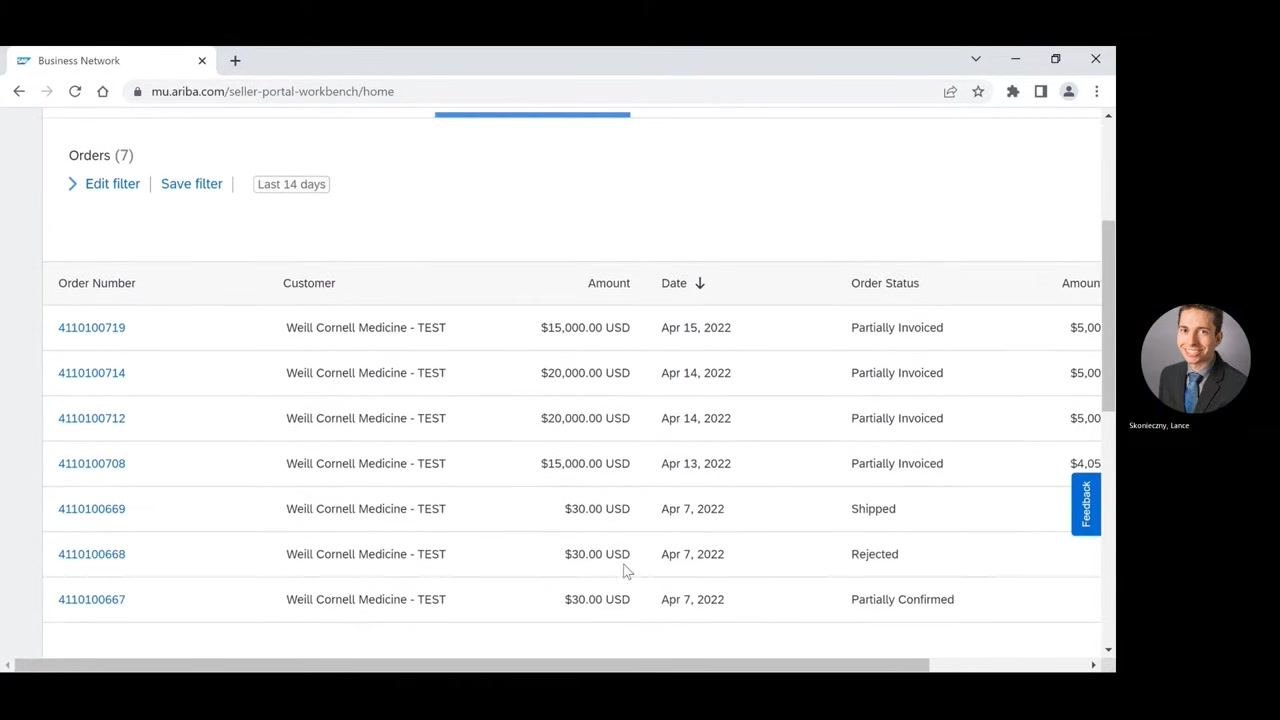
Click the Workbench tab in the top navigation bar, located between "Enablement" and "Orders". The Workbench dashboard displays order statistics and a list of your recent orders.
Locate the purchase order
Click the Orders tile or review the list under "Orders (7)" to find your purchase order. If the order isn't visible, use the Edit filter or Save filter options to adjust the date range or search criteria. Check the order number, customer, amount, date, and status to confirm you have the right order.
Open the purchase order
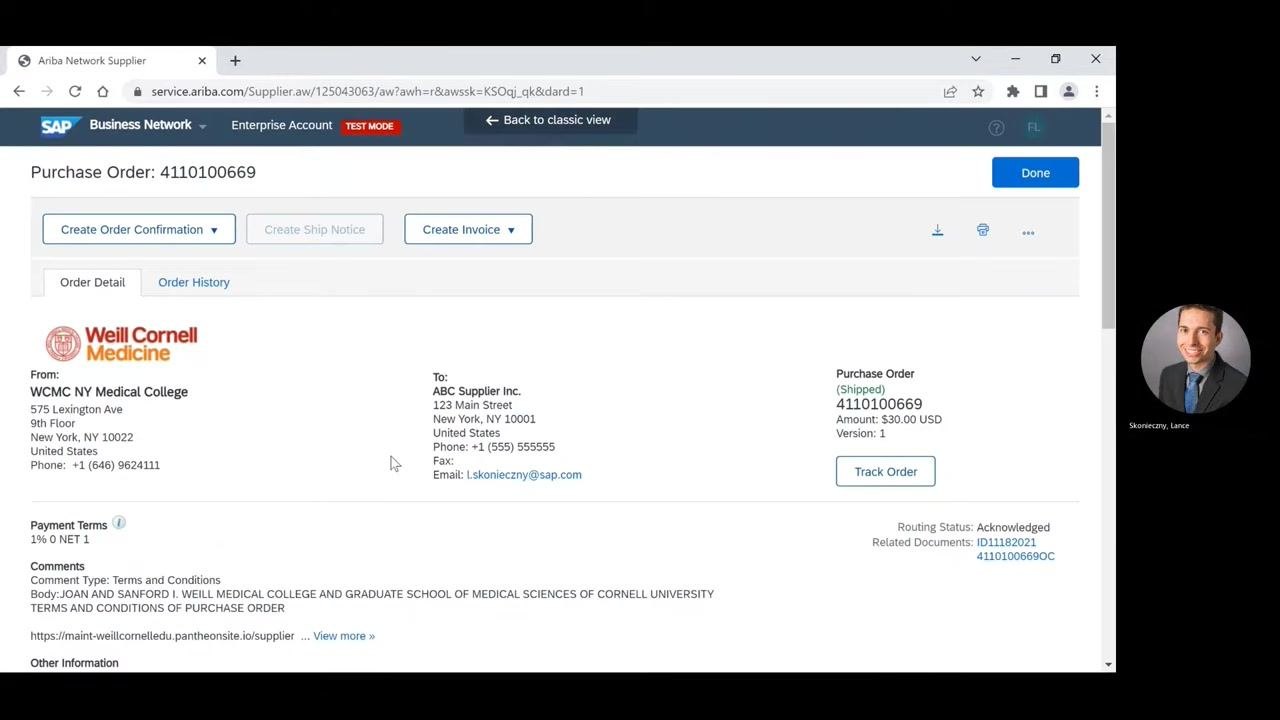
Click the purchase order number of the order you want to invoice. This opens the purchase order details page.
Start the invoice
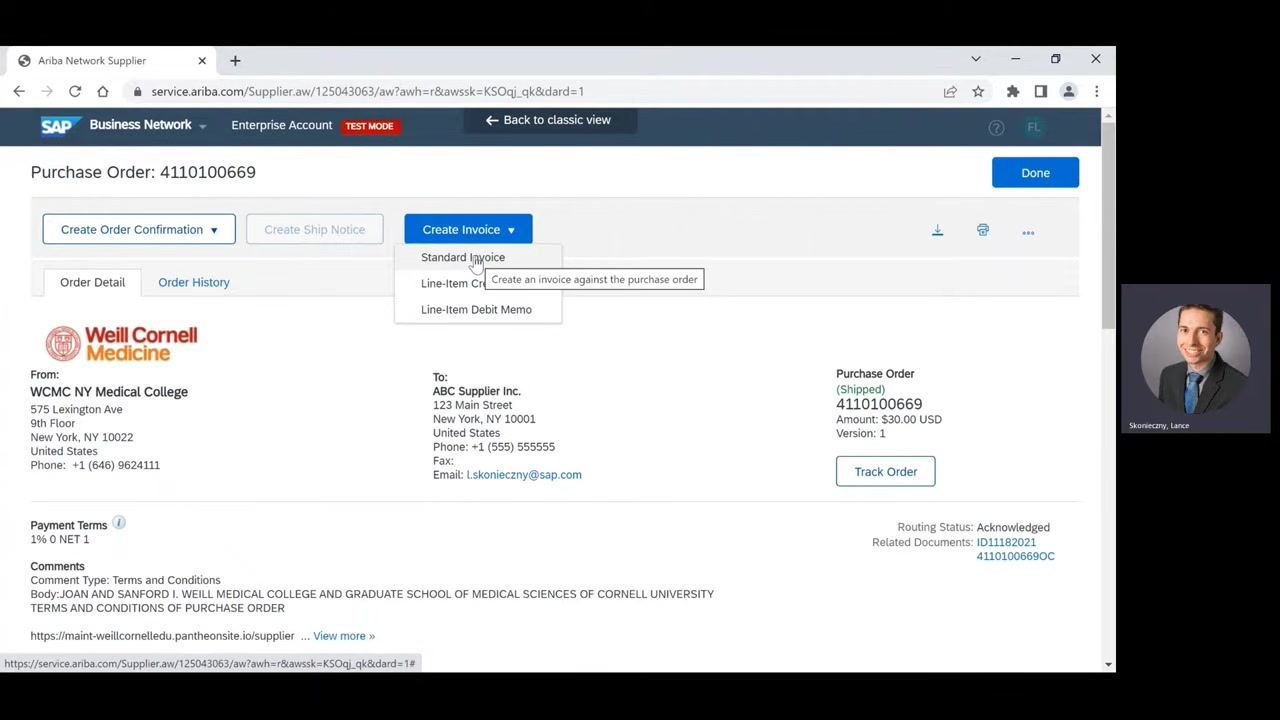
On the purchase order page, click Create Invoice. From the dropdown menu that appears, select Standard Invoice to generate an invoice against the purchase order.
Fill in all required fields
Enter invoice details
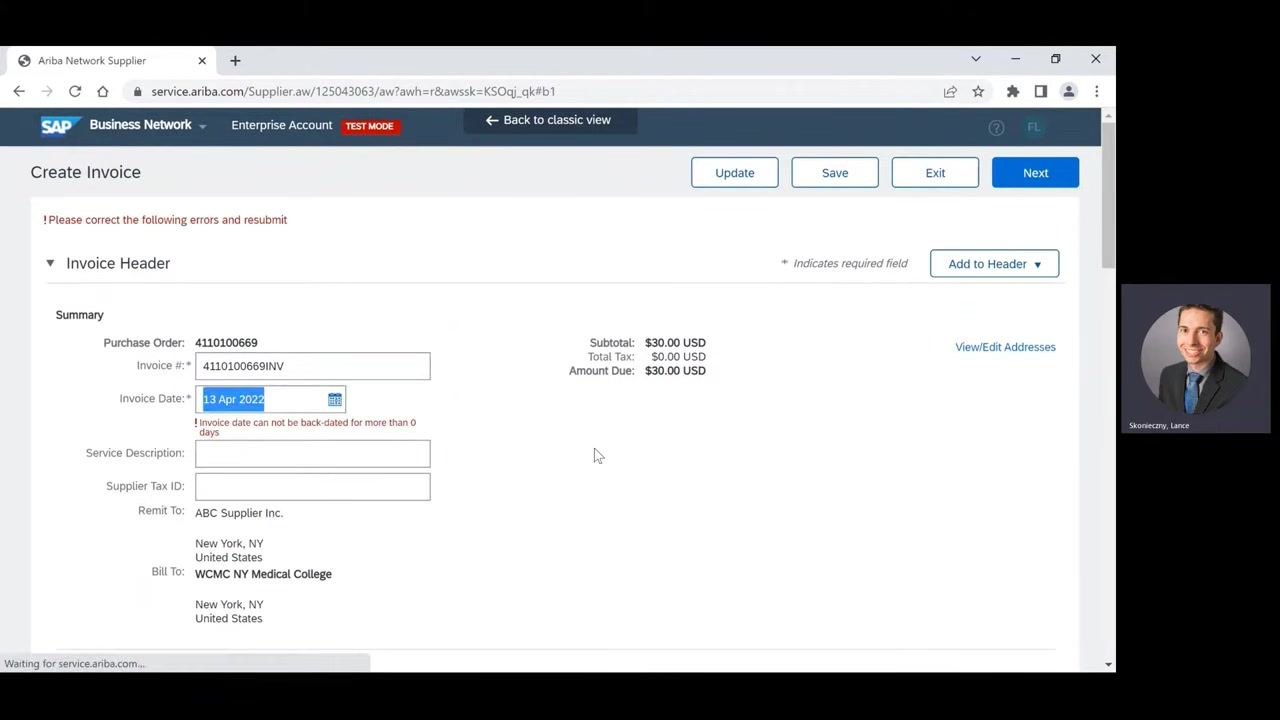
Complete the required fields on the invoice form, marked with an asterisk (*):
- Invoice #: enter your invoice number.
- Invoice Date: enter today's date. You cannot backdate invoices—attempting to use a past date triggers the error "Invoice date can not be back-dated for more than 0 days."
Complete additional required fields
Fill in any other mandatory fields, such as:
- Service Description
- Supplier Tax ID
- Remit To and Bill To addresses (these may already be pre-filled)
Remove tax from the invoice
Scroll to the Tax section. Weill Cornell Medicine invoices should not include tax, so if any tax entry is listed, click Remove next to it.
Add optional header information
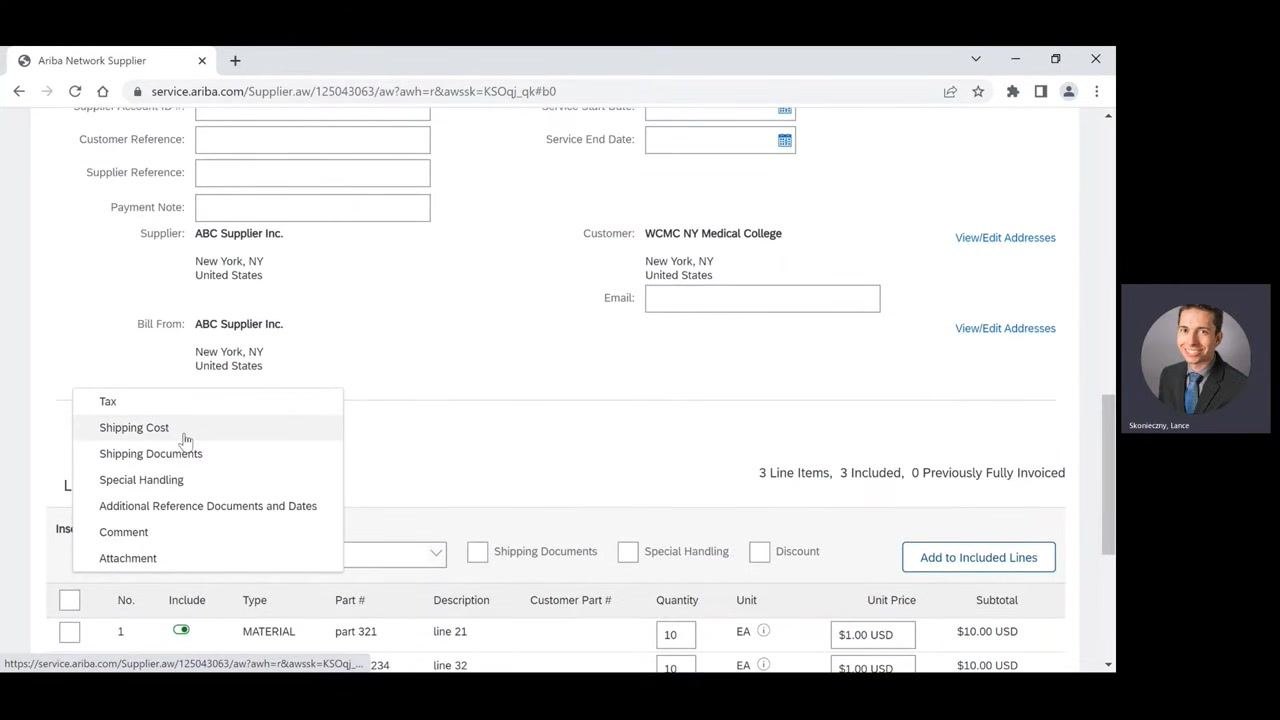
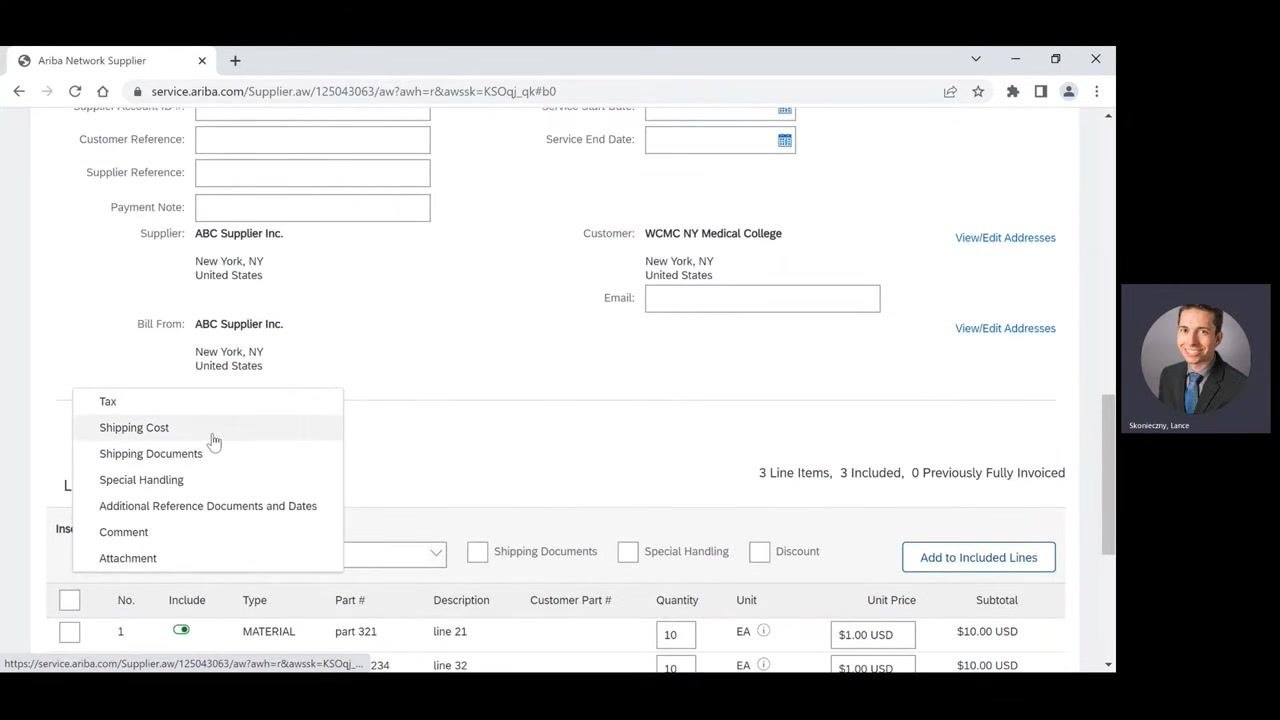
Add shipping cost (if applicable)
Click Add to Header and select Shipping Cost from the dropdown menu.
Enter the Shipping Amount (for example, 10) and set the Shipping Date using the calendar icon.
If you decide not to include shipping, click Remove next to the Shipping Cost section.
Add special handling (if needed)
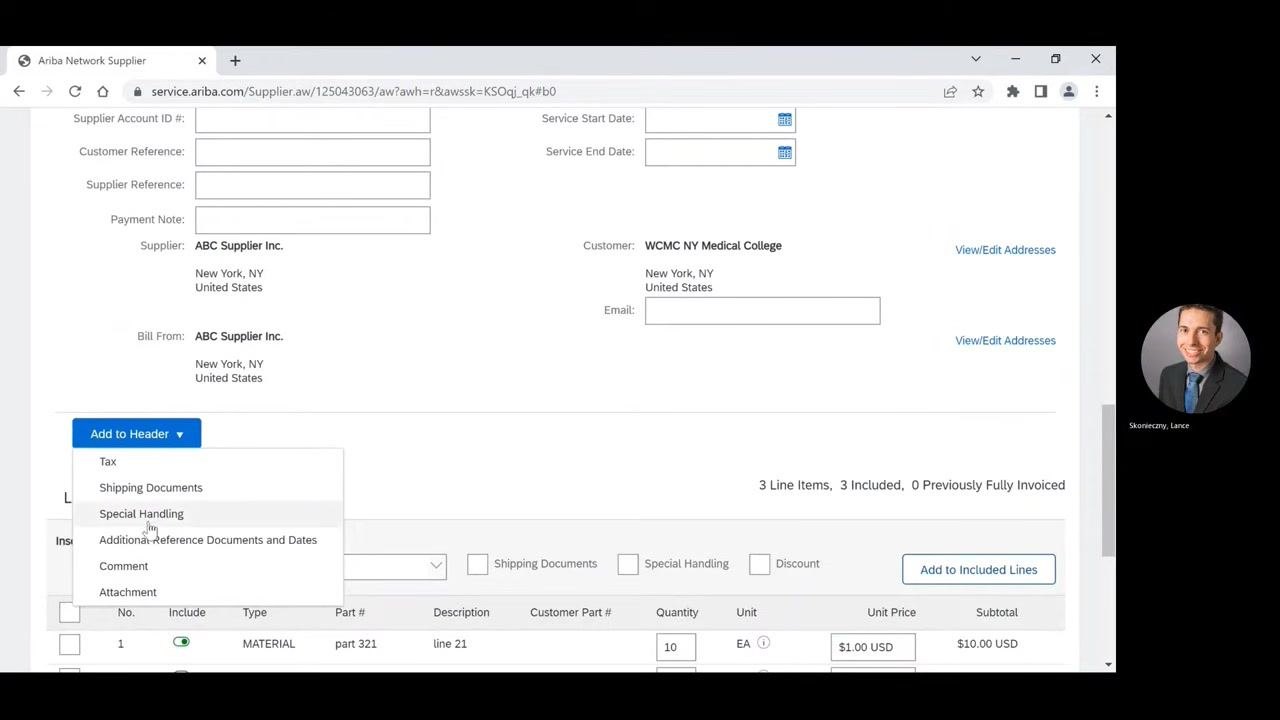
Click Add to Header again and select Special Handling from the dropdown menu.
Enter the Amount (for example, 5) and a Description (for example, "Test" for demonstration purposes).
Add a comment (if needed)
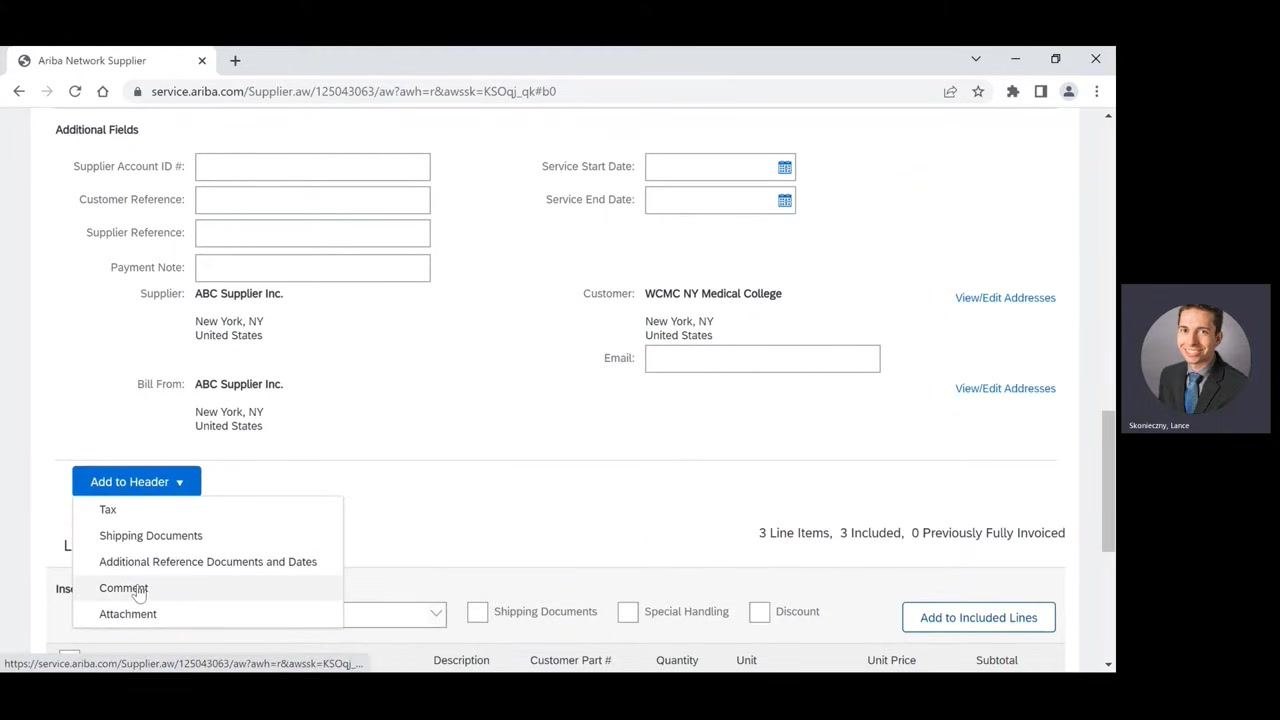
Click Add to Header and select Comment from the dropdown menu.
Enter your comment in the field provided (for example, "Test" for demonstration purposes).
Add an attachment (if needed)
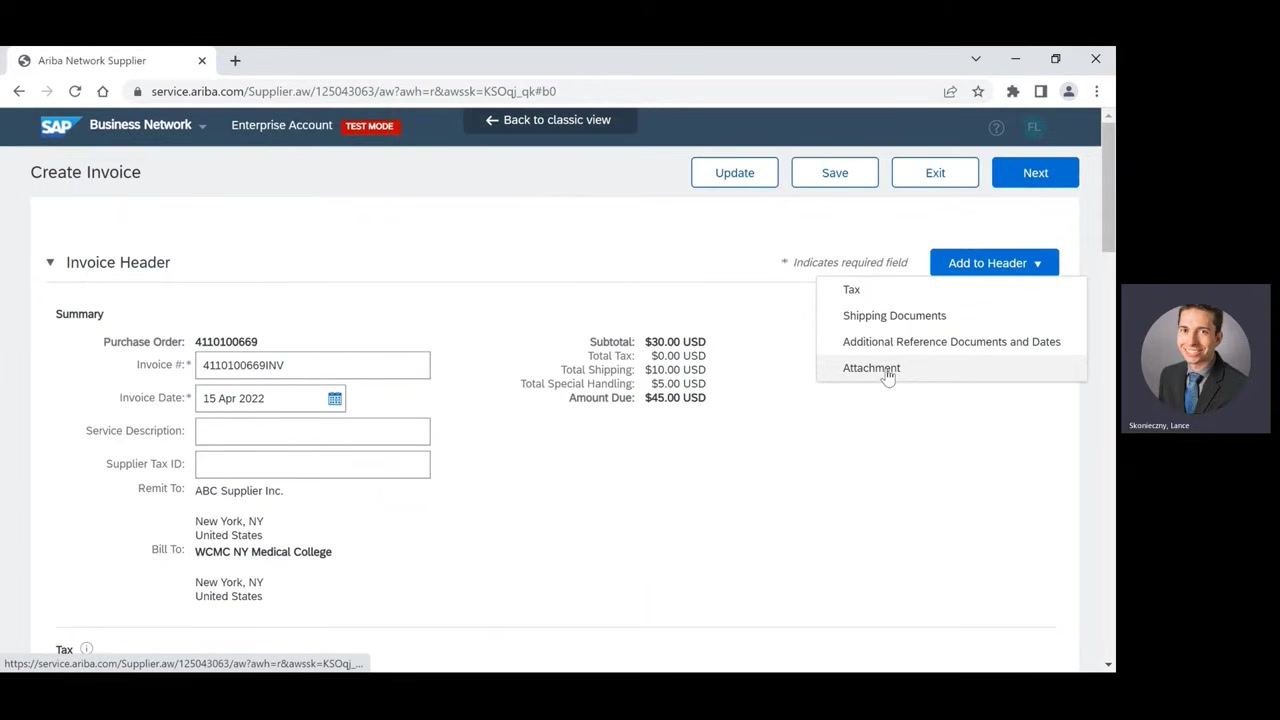
At the top of the invoice form, click Add to Header and select Attachment from the dropdown menu. The attachment section appears at the bottom of the form, where you can upload relevant files.
Attach a file (optional)
In the Attachments section, click Choose File and select the file from your computer. Click Add Attachment to upload it. If you decide not to add an attachment, click Remove next to the attachment section.
Edit line item quantities and unit prices
Adjust line items
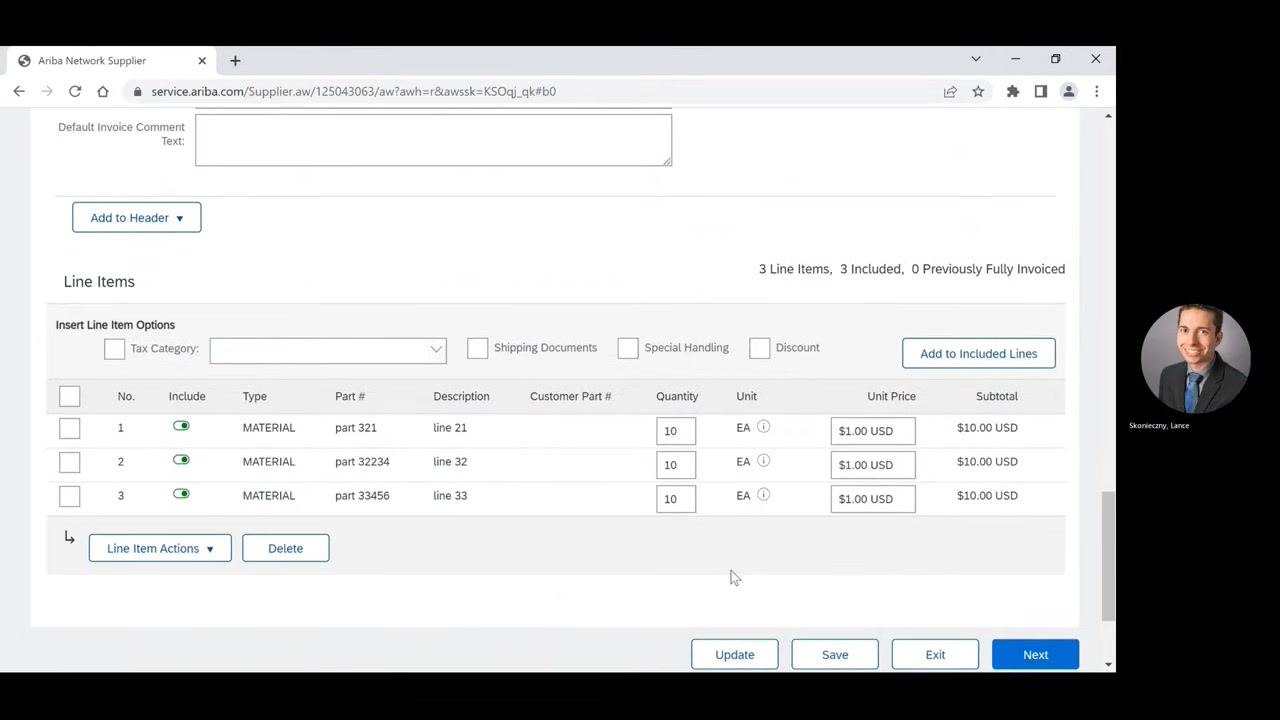
Scroll to the Line Items section. You can edit the Quantity and Unit Price for each item, but you can only decrease these values—you cannot increase them. For example, to reduce the quantity for line 3, change the Quantity field from 10 to 5.
Proceed to review
After adjusting line items as needed, click Next at the bottom right of the screen.
Review and submit the invoice
Review the invoice summary
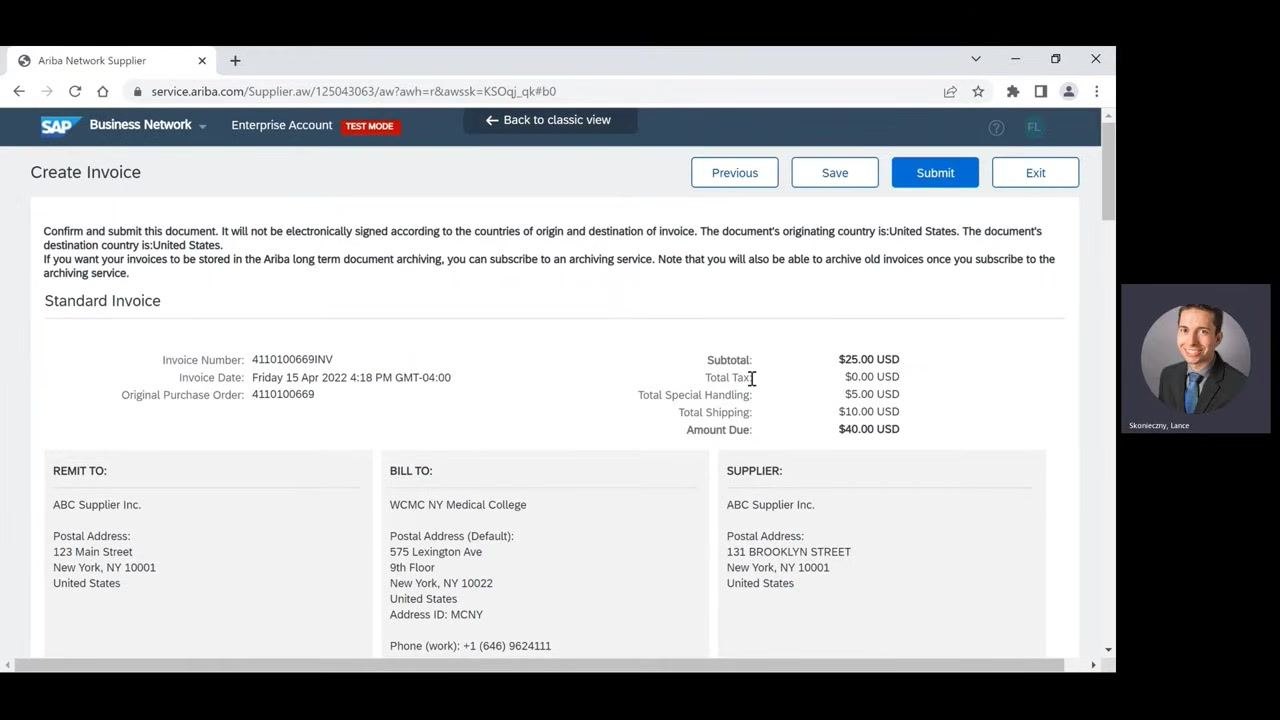
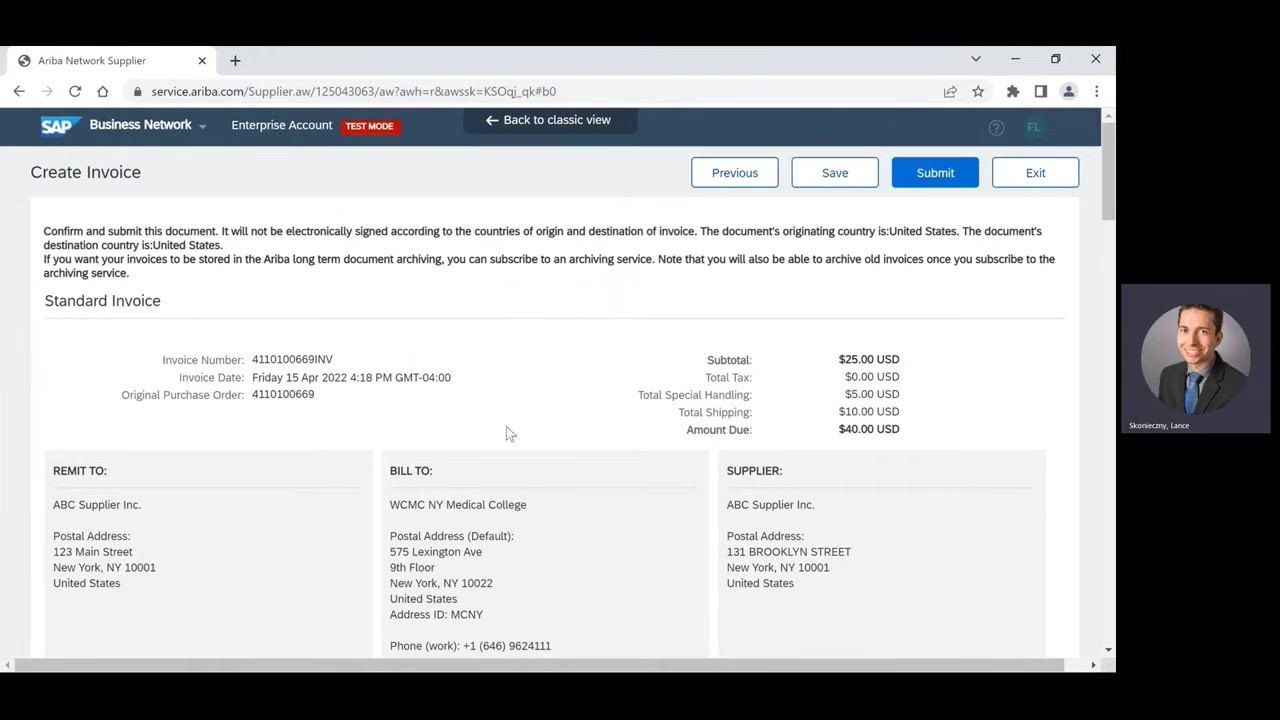
On the Create Invoice review page, verify all invoice details, including:
- Invoice Number: 4110100669INV
- Invoice Date: Friday 15 Apr 2022, 4:18 PM GMT-04:00
- Original Purchase Order: 4110100669
- Subtotal: $25.00 USD
- Total Tax: $0.00 USD
- Total Special Handling: $5.00 USD
- Total Shipping: $10.00 USD
- Amount Due: $40.00 USD
Also confirm that the Remit To, Bill To, and Supplier information is correct.
Submit the invoice
Once you have confirmed the accuracy of all details, click Submit at the top right of the review page.
Print or exit after submission
Print or exit
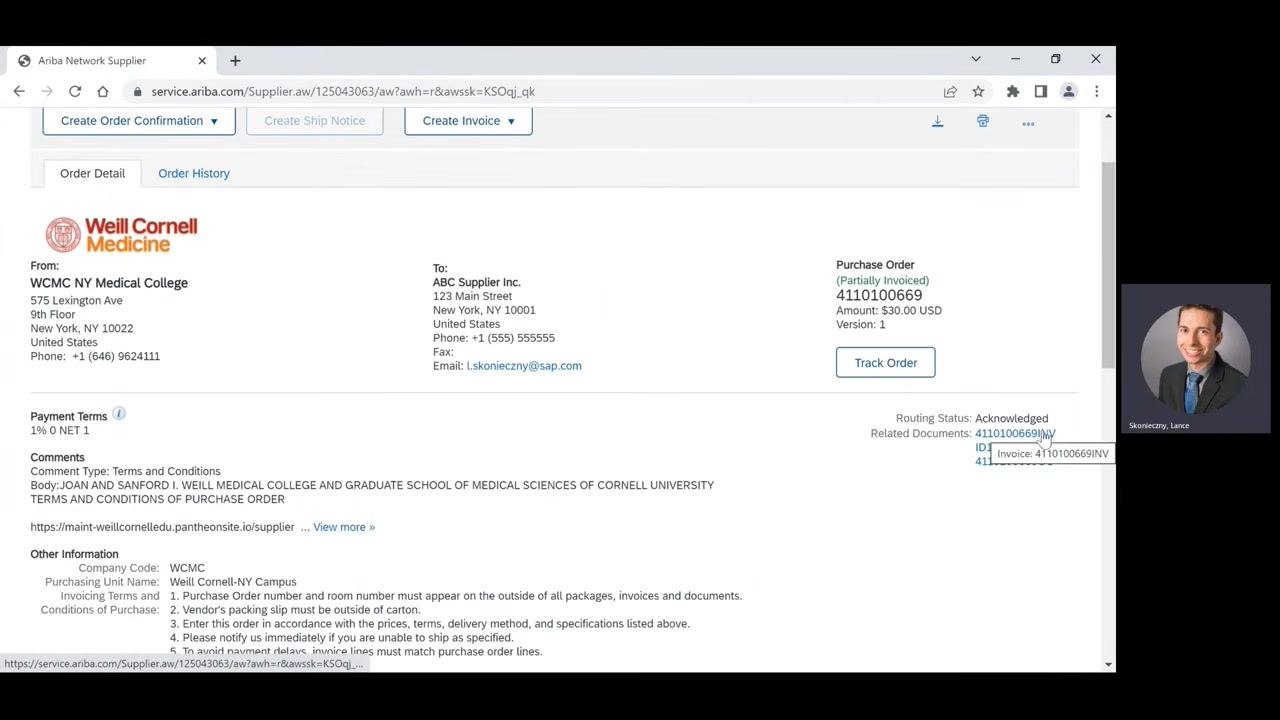
After submitting, you can print a copy of the invoice or click Exit to finish. You will be redirected to the Purchase Order Details page, where the new invoice appears in the Related Documents section.
Check invoice history
View the submitted invoice
Click the invoice number (for example, 4110100669INV) in the Related Documents section to open the invoice page.
Check invoice history (if needed)
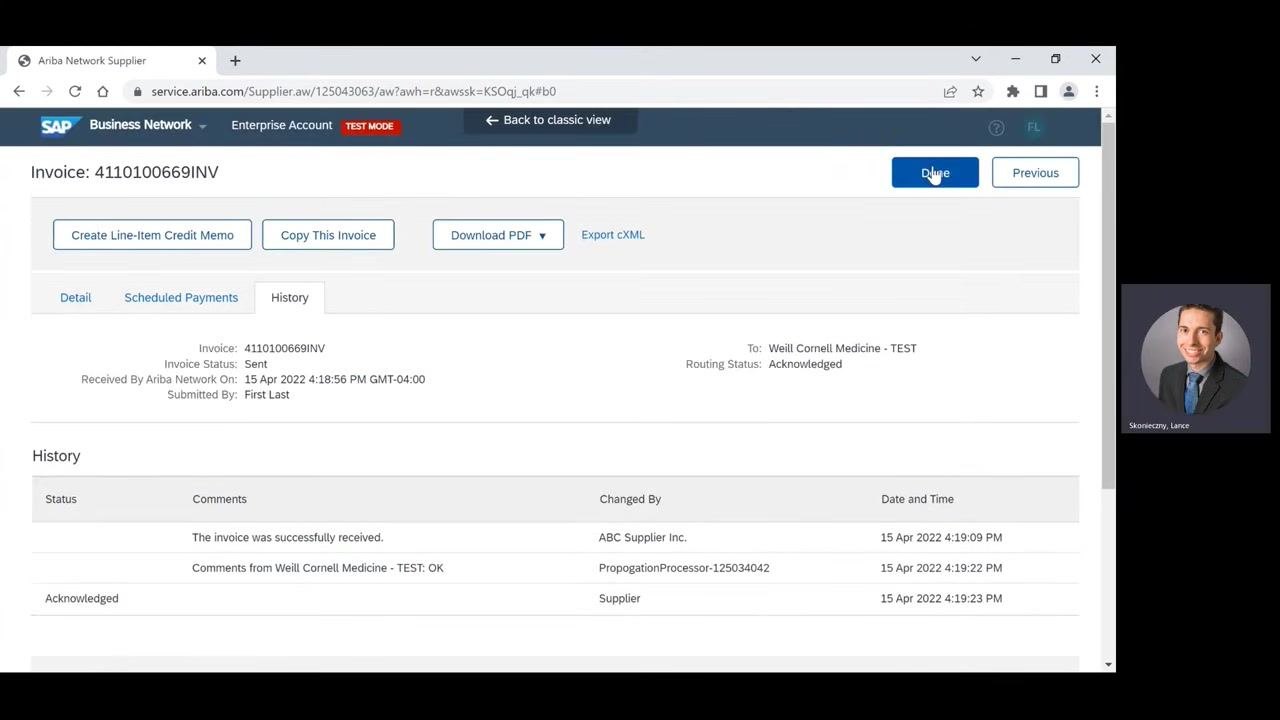
On the invoice page, click the History tab to view the invoice status and any related notes. If the invoice was rejected, review the history notes to understand the reason.
Return to the Workbench
After reviewing the invoice history, click Done at the top right of the invoice page to exit the invoice view and return to your Workbench tab.
The Workbench displays an overview of your orders, including the number of new, changed, rejected, and total orders, as well as credit memos, alongside a list of orders with columns for Order Number, Customer, Amount, Date, and Order Status.
Summary
You have now completed the process of creating and submitting an invoice for Weill Cornell Medicine in SAP Ariba. By following these steps, you located the correct purchase order, filled in all required fields, removed tax, added optional details like shipping and attachments, adjusted line items, reviewed the summary, and submitted the invoice. You can monitor all order and invoice activity going forward from your Workbench dashboard.
Generation details: cost, quality tiers
Docsie billed 3,000 credits ($2.10) to analyze this 6-minute video at standard quality. The rewrite, template fill and Word/PDF exports were included. The same video at each quality tier:
| Quality | Frames sampled | Credits | Approx. cost |
|---|---|---|---|
| Draft | every 16-30 s | 1,500 | $1.05 |
| Standard (this guide) | every 8-15 s | 3,000 | $2.10 |
| Detailed | every 4-7 s | 6,000 | $4.20 |
| Ultra | every 1-3 s | 12,000 | $8.40 |
Credits priced at $0.70 per 1,000; plans include a monthly allowance. Enterprise customers on on-premise or bring-your-own-model deployments run this on their own inference and pay no per-video credits.
Generated by Docsie Video-to-Docs on 2026-10-11 from a 5-minute video. Screenshots are frames from the source video and belong to their creator, WCM ITS, whose original is embedded above. If you own this video and want the guide removed or credited differently, contact us and we will act within one business day.