
How to Export a Report to Excel in Salesforce
Exporting reports to Excel lets you analyze Salesforce data offline, share it with colleagues, or upload it to other systems. This guide walks you through how to export a report to Excel in Salesforce using both the Lightning Experience and Salesforce Classic interfaces.
Video: Export Salesforce Reports to Excel – Quick & Simple Steps by SalesforceFAQs (2023). All credit for the demonstration goes to the creator; watch the original on YouTube. The written guide below was generated from this video by Docsie. Creator? Request a change or removal.
Exporting reports to Excel lets you analyze Salesforce data offline, share it with colleagues, or upload it to other systems. This guide walks you through how to export a report to Excel in Salesforce using both the Lightning Experience and Salesforce Classic interfaces.
Prerequisites
- A valid Salesforce account with access to the Reports app.
- Permission to view and export the report you want to download.
Exporting a report to Excel in Salesforce Lightning
Log in to your Salesforce account
Open your web browser and navigate to your Salesforce Lightning login page. Enter your credentials and sign in.
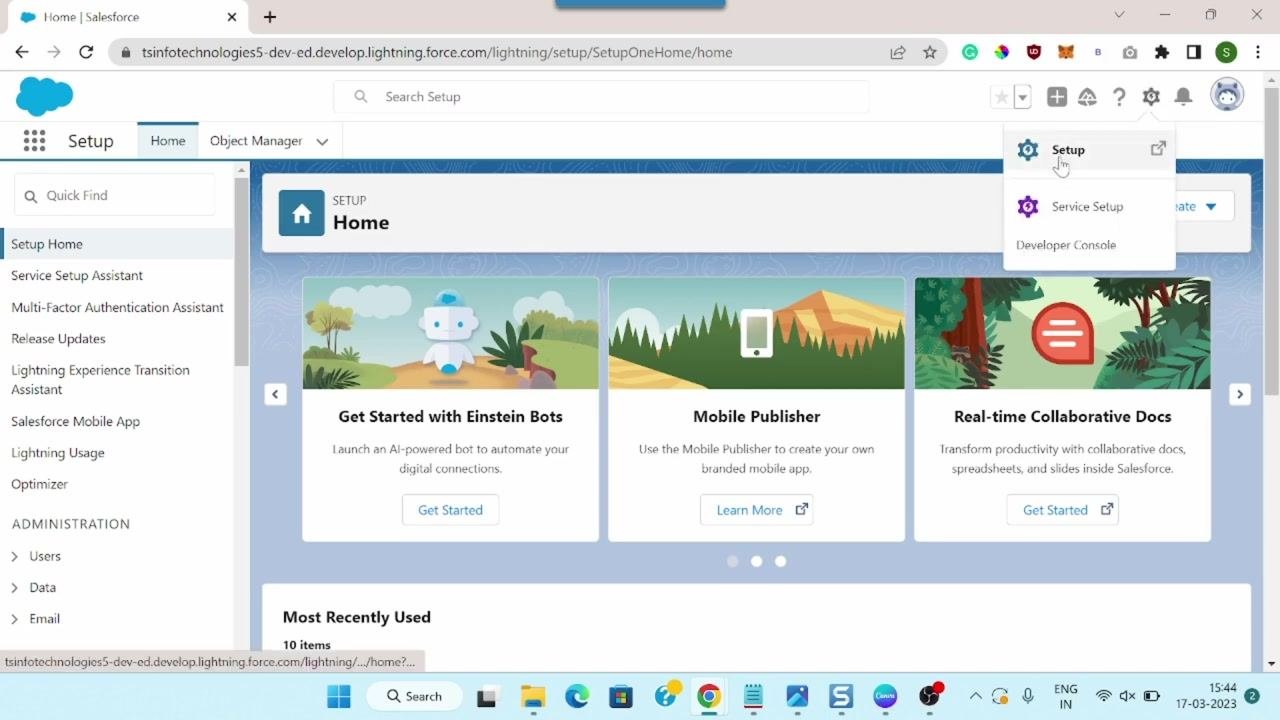
Navigate to the Home Setup page
If you are not already on the Home Setup page, click the gear icon (⚙️) in the upper right corner and select Setup from the dropdown menu. The Home Setup page loads, displaying options such as "Get Started with Einstein Bots," "Mobile Publisher," and "Real-time Collaborative Docs."
Open the App Launcher
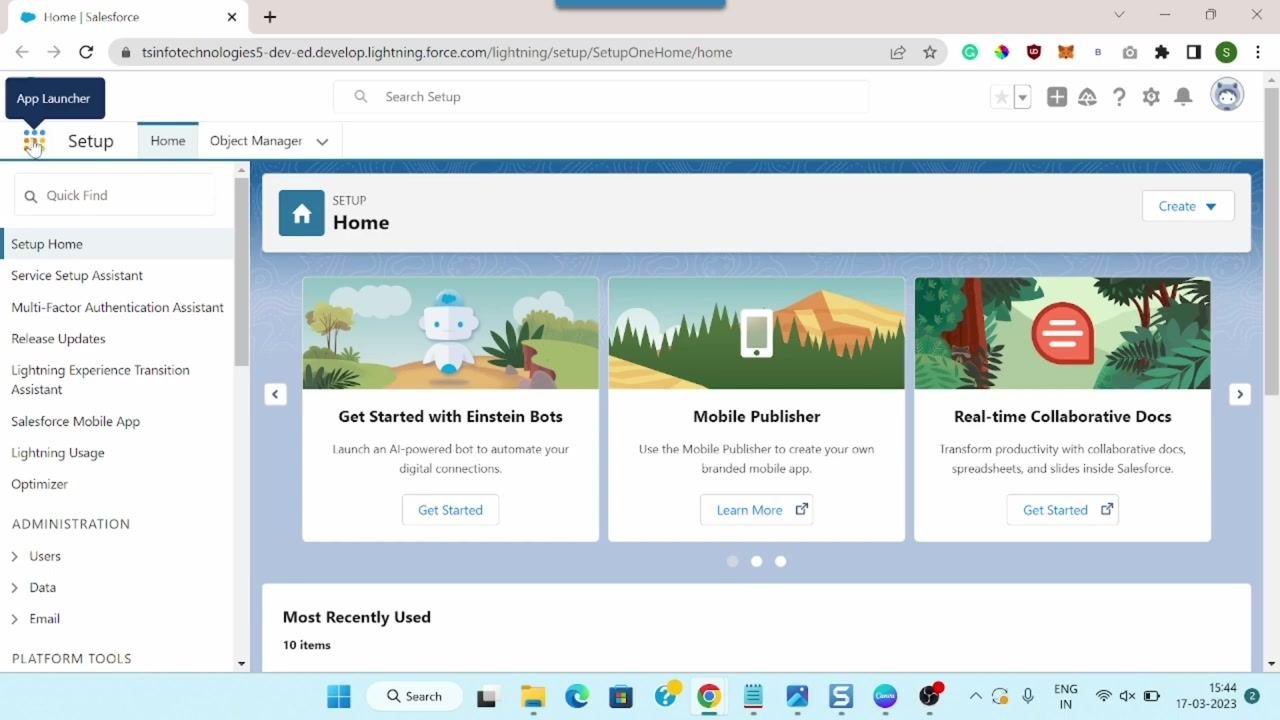
Click the App Launcher icon (the grid of dots) in the upper left corner of the screen. This opens a search bar along with a list of available apps.
Search for and open the Reports app
In the App Launcher search bar, type Reports. Click the Reports option from the search results to open the Reports page.
View available reports
By default, the Recent reports list is displayed. You can also select other categories from the left sidebar, such as:
- Created by Me
- Private Reports
- Public Reports
- All Reports
Click All Reports to view every report available in your organization.
Locate the report you want to export
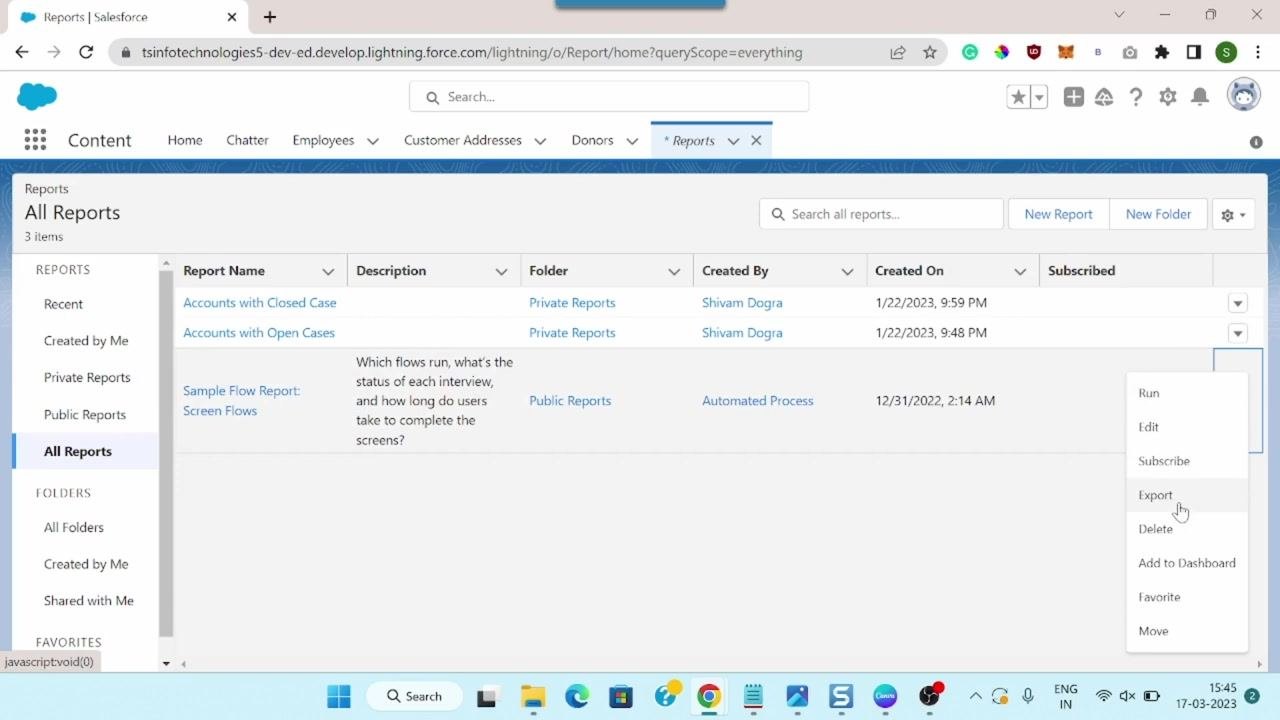
Find the desired report in the list (for example, "Sample Flow Report: Screen Flows"). Hover over the report row to reveal the dropdown icon (three vertical dots) on the right.
Open the report actions menu and select Export
Click the dropdown icon next to your chosen report. In the menu that appears, click Export.
Choose the export format
In the Export dialog, select one of the following options under Export View:
- Formatted Report: Exports the report with headers, groupings, and filter settings in Excel format (.xlsx).
- Details Only: Exports only the raw data rows without formatting, suitable for further calculations or uploading to other systems.
Select the desired Format (for example, Excel Format .xlsx or .xls). Optionally, choose the Encoding if exporting as .xls (for example, ISO-8859-1 for US & Western Europe).
Export the report
Click the Export button to download the report in your chosen format. The file saves to your computer, ready for offline analysis or sharing.
Exporting a report to Excel in Salesforce Classic
Switch to Salesforce Classic Experience
Click your avatar or profile icon in the upper right corner of the Salesforce Lightning interface. In the dropdown menu, click Switch to Salesforce Classic.
Access the All Tabs page
In Salesforce Classic, click the plus (+) icon in the top navigation bar to open the "All Tabs" page. This page displays a list of all available tabs, such as Accounts, Analytics, App Launcher, Home, Ideas, Images, Individuals, Invoices, and Leads.
Open the Reports tab
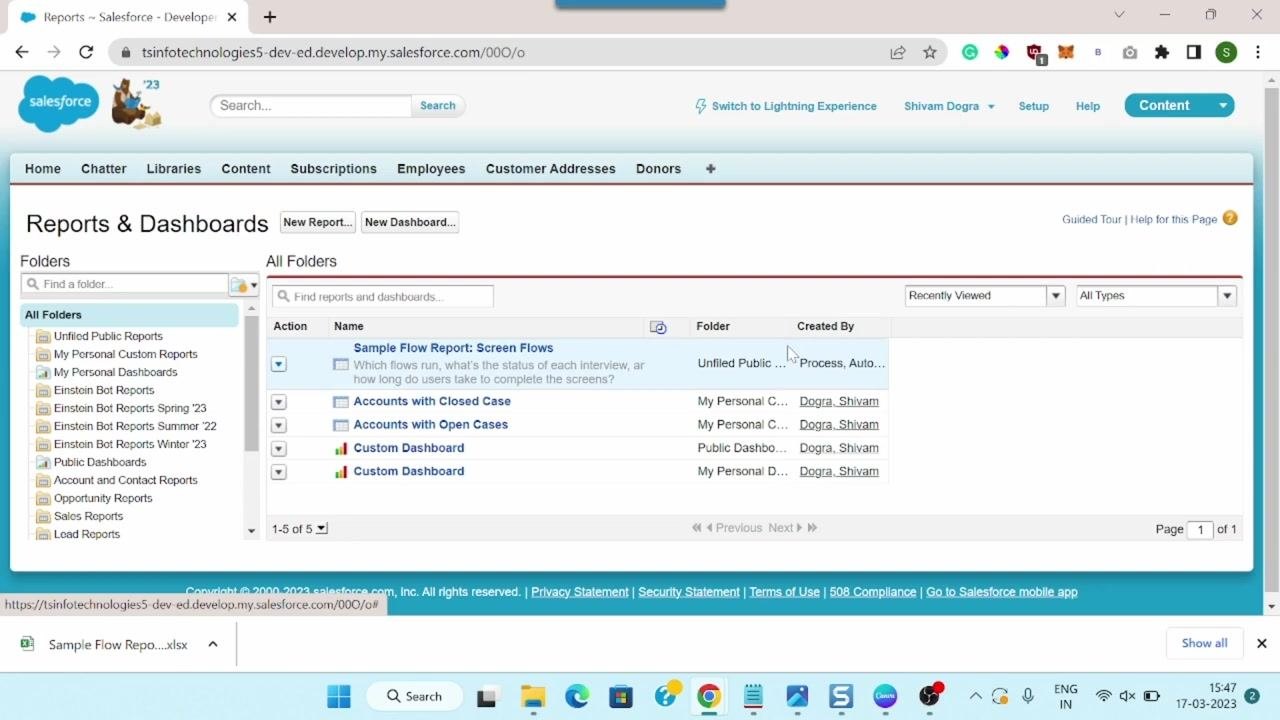
Locate the Reports option in the list of tabs. Click Reports to open the Reports & Dashboards page in Salesforce Classic.
Locate the desired report
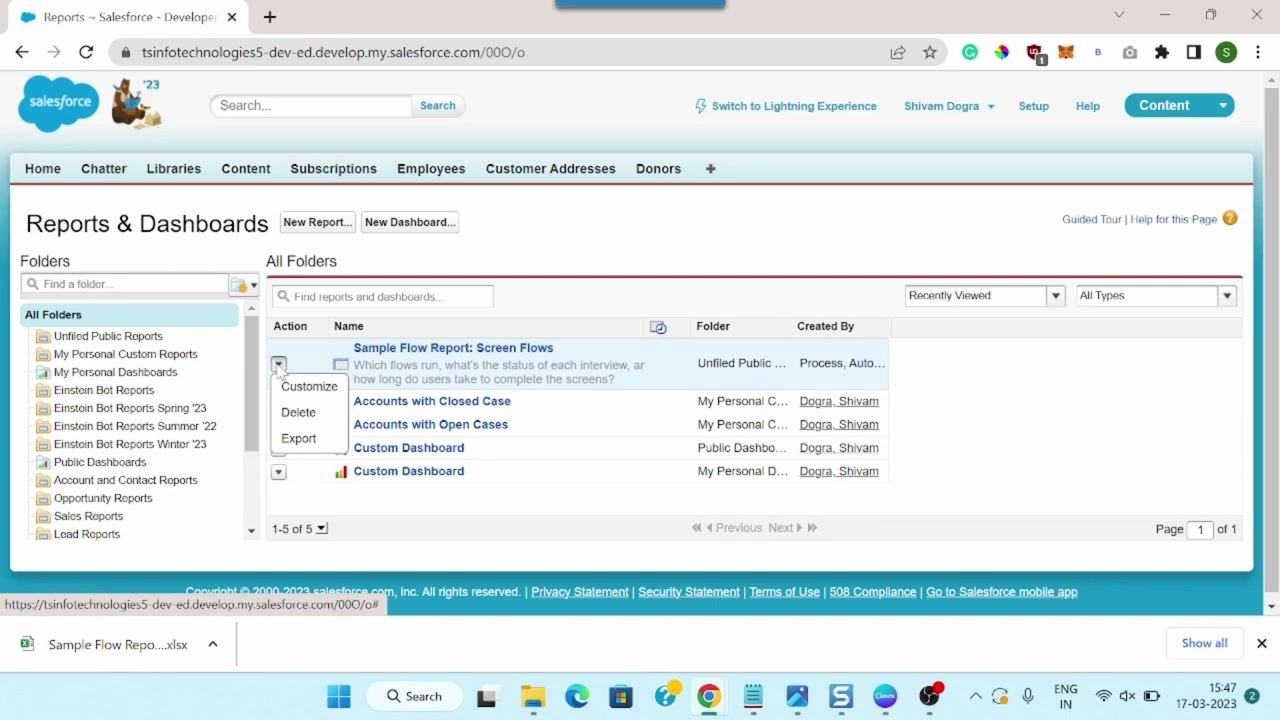
On the Reports & Dashboards page, browse or search for the report you want to export (for example, "Sample Flow Report: Screen Flows"). The page lists available reports with columns for Action, Name, Folder, and Created By.
Open the report actions menu
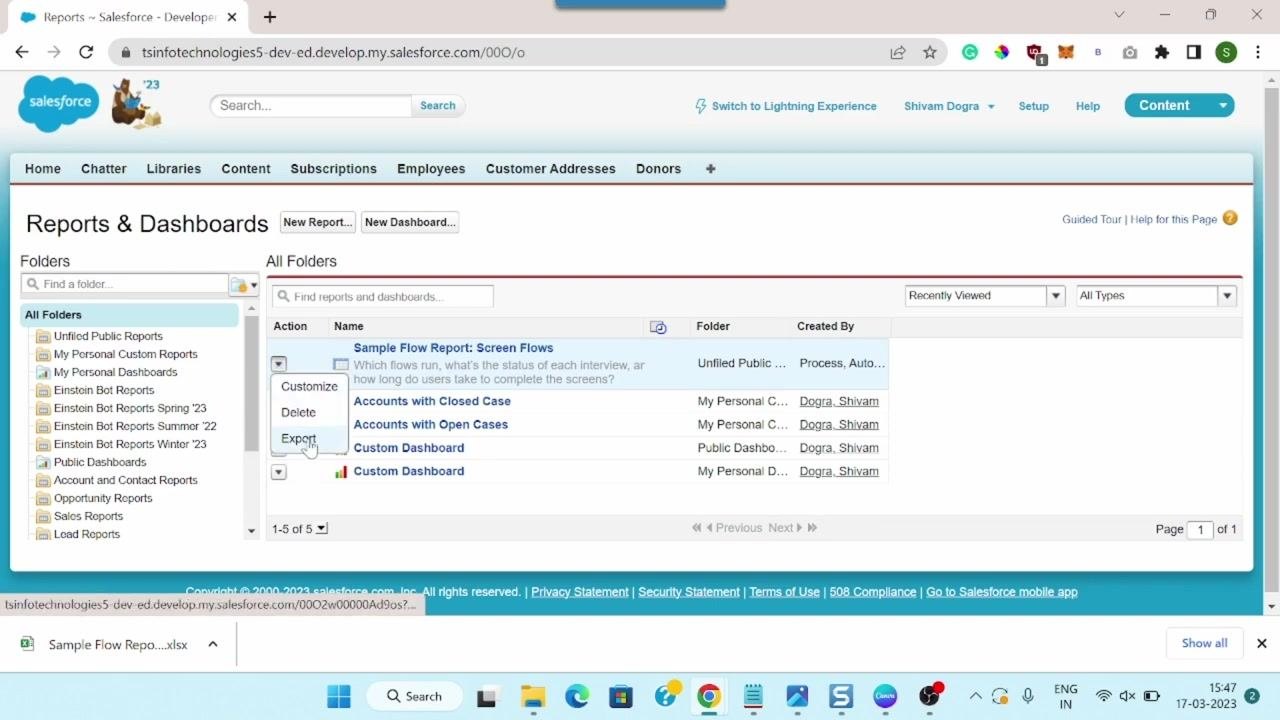
In the Action column next to your desired report, click the dropdown arrow to reveal available actions, then select Export.
Configure export options
In the Export Report dialog, select your preferred Export File Encoding (for example, ISO-8859-1, General US & Western European, ISO-LATIN-1). Choose the Export File Format:
- Excel Format .xls (for Excel files)
- Comma Delimited .csv (for CSV files)
For this example, select Excel Format .xls.
Export the report
Click the Export button to download the report in your chosen format. The file saves automatically to your computer and typically appears in your browser's download bar.
Summary
You have now exported a Salesforce report to Excel in both the Lightning and Classic experiences. This process covered:
- Logging in and navigating to the Home Setup page.
- Accessing the Reports app via the App Launcher.
- Locating and selecting the desired report.
- Choosing export options and downloading the report in Excel format.
- Switching from Lightning to Classic and repeating the export using Classic's Reports tab, with specific encoding and file format options.
What's next
Open the exported file in Excel to review and analyze your data. If you regularly need to export reports from both interfaces, keep this guide handy for reference on the Lightning and Classic export workflows.
Generation details: cost, quality tiers
Docsie billed 3,000 credits ($2.10) to analyze this 6-minute video at standard quality. The rewrite, template fill and Word/PDF exports were included. The same video at each quality tier:
| Quality | Frames sampled | Credits | Approx. cost |
|---|---|---|---|
| Draft | every 16-30 s | 1,500 | $1.05 |
| Standard (this guide) | every 8-15 s | 3,000 | $2.10 |
| Detailed | every 4-7 s | 6,000 | $4.20 |
| Ultra | every 1-3 s | 12,000 | $8.40 |
Credits priced at $0.70 per 1,000; plans include a monthly allowance. Enterprise customers on on-premise or bring-your-own-model deployments run this on their own inference and pay no per-video credits.
Generated by Docsie Video-to-Docs on 2026-10-11 from a 5-minute video. Screenshots are frames from the source video and belong to their creator, SalesforceFAQs, whose original is embedded above. If you own this video and want the guide removed or credited differently, contact us and we will act within one business day.