
How to Void a Check in Sage 100
Sometimes a piece of check stock is damaged during printing, lost, or issued in error. When this happens, you need to record the unusable or incorrect check number in Sage 100 so your accounts payable records stay accurate. This guide walks you through how to void a check in Sage 100, review the related registers, verify the void in Bank Reconciliation, and reverse an incorrectly issued check.
Video: Void Checks in Sage 100 ERP | Step-by-Step Guide by CS3 Technology (2015). All credit for the demonstration goes to the creator; watch the original on YouTube. The written guide below was generated from this video by Docsie. Creator? Request a change or removal.
Sometimes a piece of check stock is damaged during printing, lost, or issued in error. When this happens, you need to record the unusable or incorrect check number in Sage 100 so your accounts payable records stay accurate. This guide walks you through how to void a check in Sage 100, review the related registers, verify the void in Bank Reconciliation, and reverse an incorrectly issued check.
Prerequisites
- Access to the Accounts Payable module in Sage 100 ERP.
- Access to the Bank Reconciliation module in Sage 100 ERP.
- Knowledge of the check number you need to void (for unused check stock) or reverse (for an already-issued check).
When should you void a check?
You need to void a check in Sage 100 in situations such as:
- A piece of check stock becomes damaged or unusable during the check printing process.
- A piece of check stock is lost.
In these cases, your goal is to record the unusable check number in the system as a voided check.
Part 1: Record a voided check
Step 1: Open Manual Check and Payment Entry
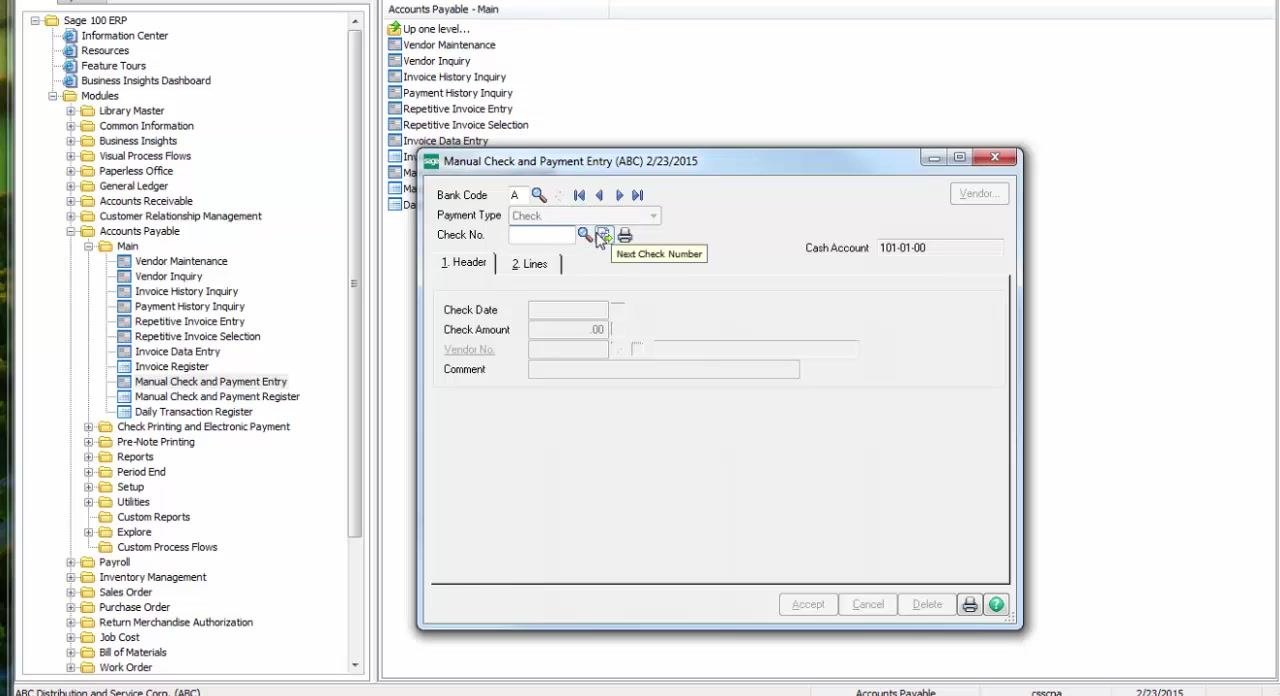
Open Sage 100 ERP and, in the left navigation pane, expand the Modules section. Select Accounts Payable, then expand the Main folder underneath it.
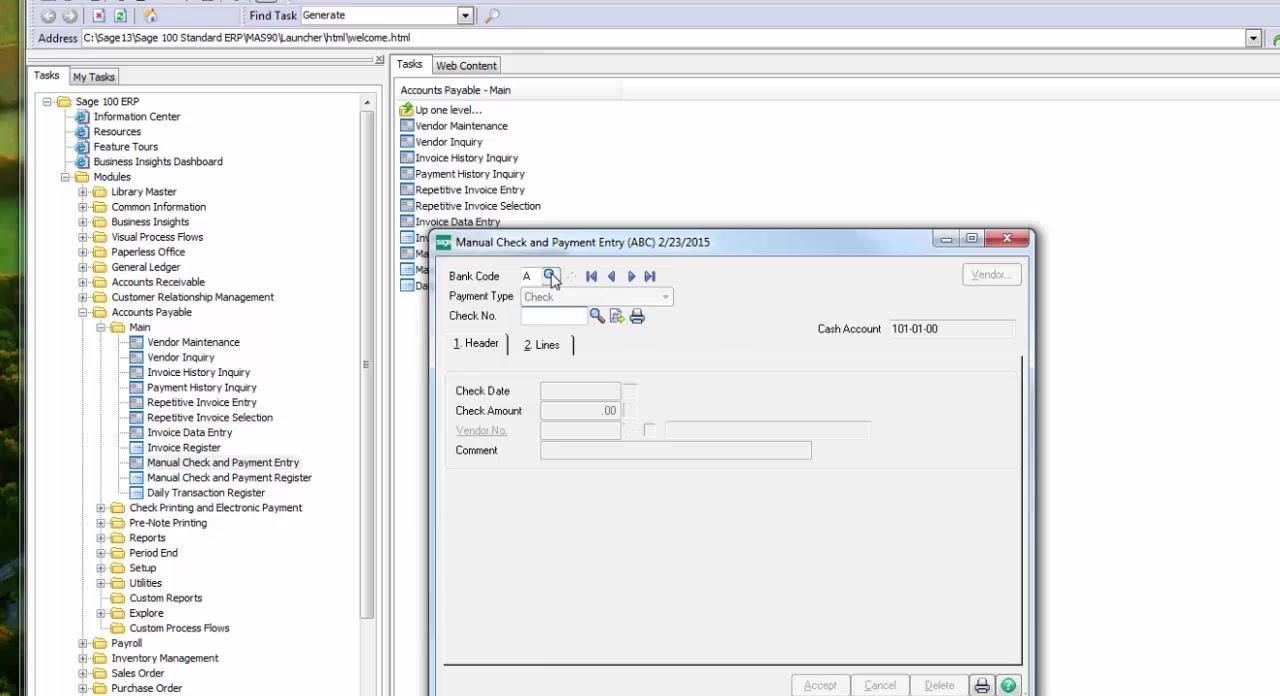
Click Manual Check and Payment Entry from the list of tasks under Accounts Payable - Main. The Manual Check and Payment Entry window opens.
Step 2: Enter the void check details
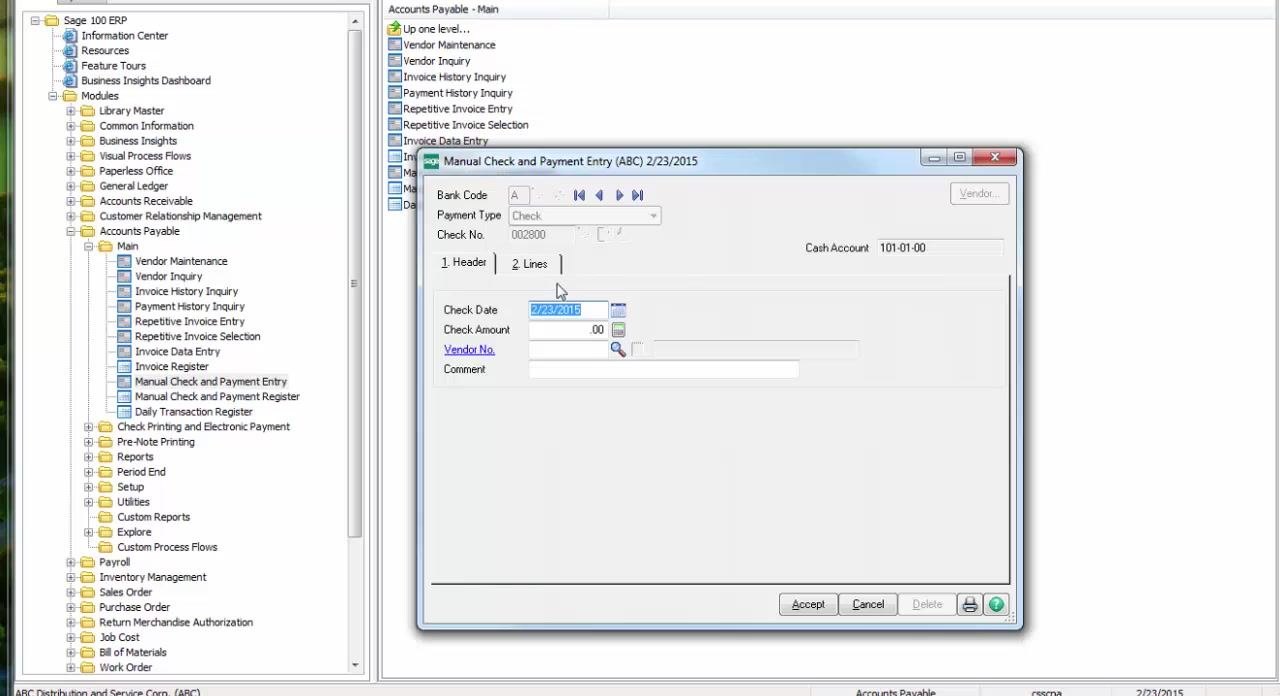
In the Manual Check and Payment Entry window, enter the following information:
- Set the Bank Code to "A".
- Confirm the Payment Type is set to "Check".
- Enter the Check No. as the check stock number you are voiding (for example, "002800").
- Confirm the Check Date is automatically populated (for example, 2/23/2015).
- Leave the Check Amount field as ".00" — do not enter a value.
- Leave the Vendor No. field blank.
- Optionally, add a comment for reference.
Step 3: Accept and confirm the void
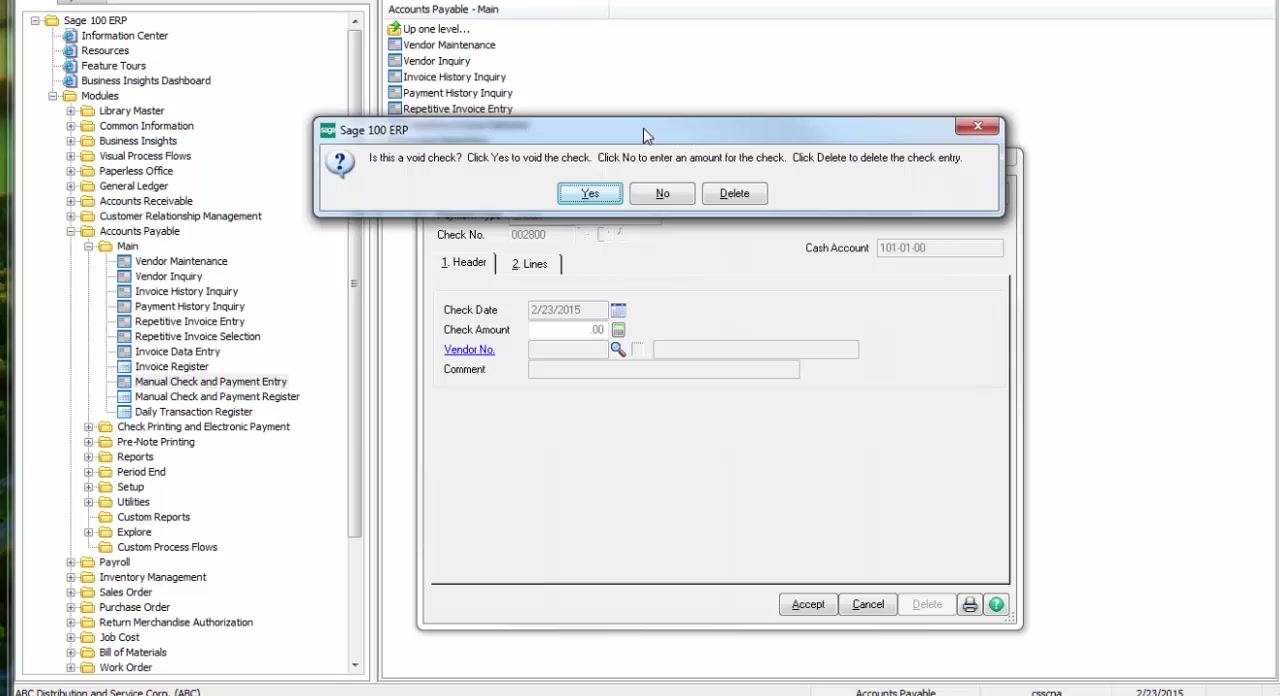
Click Accept at the bottom of the window to proceed. The system prompts you to confirm the void action.
When prompted with the message "Is this a void check? Click Yes to void the check. Click No to enter an amount for the check. Click Delete to delete the check entry," click Yes to confirm that this is a void check.
After you confirm, the Manual Check and Payment Entry window resets and is ready for a new entry. The voided check is now recorded with an amount of .00 and no vendor.
Part 2: Review the Manual Check and Payment Register
Step 4: Preview the register
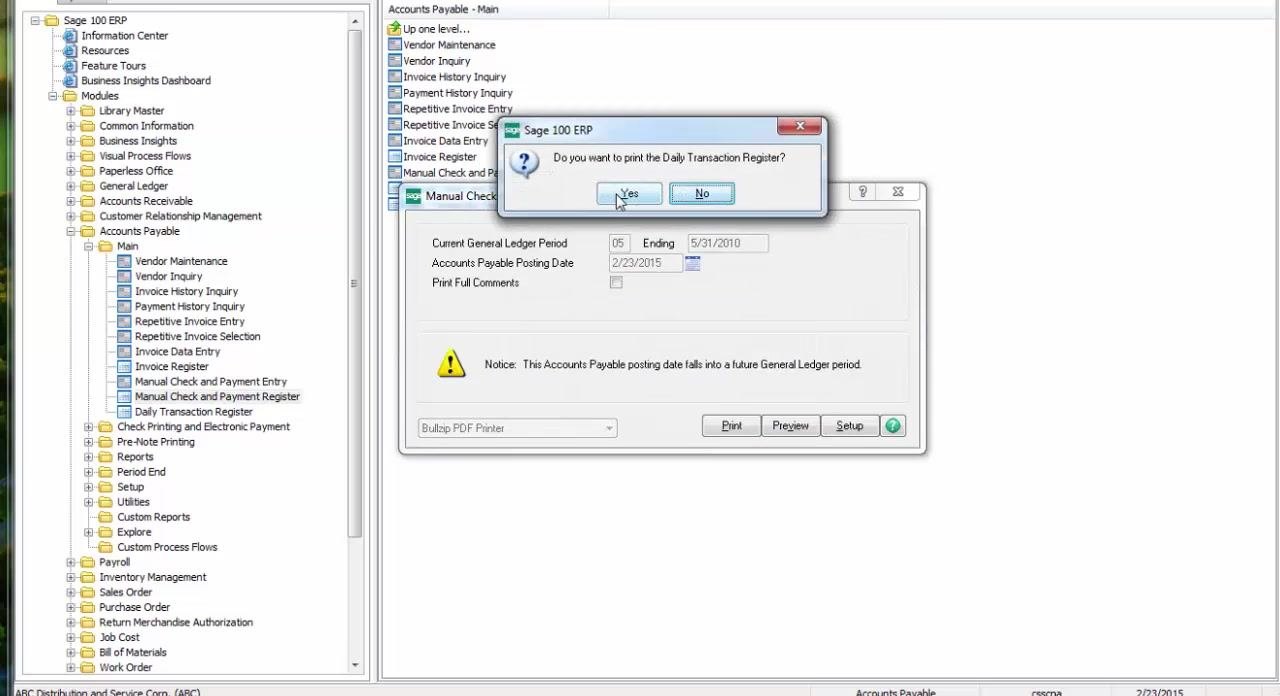
The Manual Check and Payment Register window appears. Verify the Current General Ledger Period (for example, 05, ending 5/31/2010) and confirm the Accounts Payable Posting Date (for example, 2/23/2015). Note any warning if the posting date falls into a future General Ledger period.
Select your printer or PDF printer as needed, then click Preview to review the register before finalizing.
Step 5: Verify the voided check appears correctly
Review the previewed register to confirm the voided check is listed with:
- Check Number: 002800
- Check Date: 2/23/2015
- Vendor Number: blank
- Invoice Amount: Void Check
- All totals (Bank A Total, Report Total): 0.00
Step 6: Print the Daily Transaction Register
When prompted "Do you want to print the Daily Transaction Register?", click Yes.
Step 7: Acknowledge the empty file notification
If a message appears stating "The file is empty," click OK. This indicates there are no dollar values to record in the General Ledger for this voided check.
Part 3: Verify the voided check in Bank Reconciliation
Step 8: Open Check, Deposit and Adjustment Entry
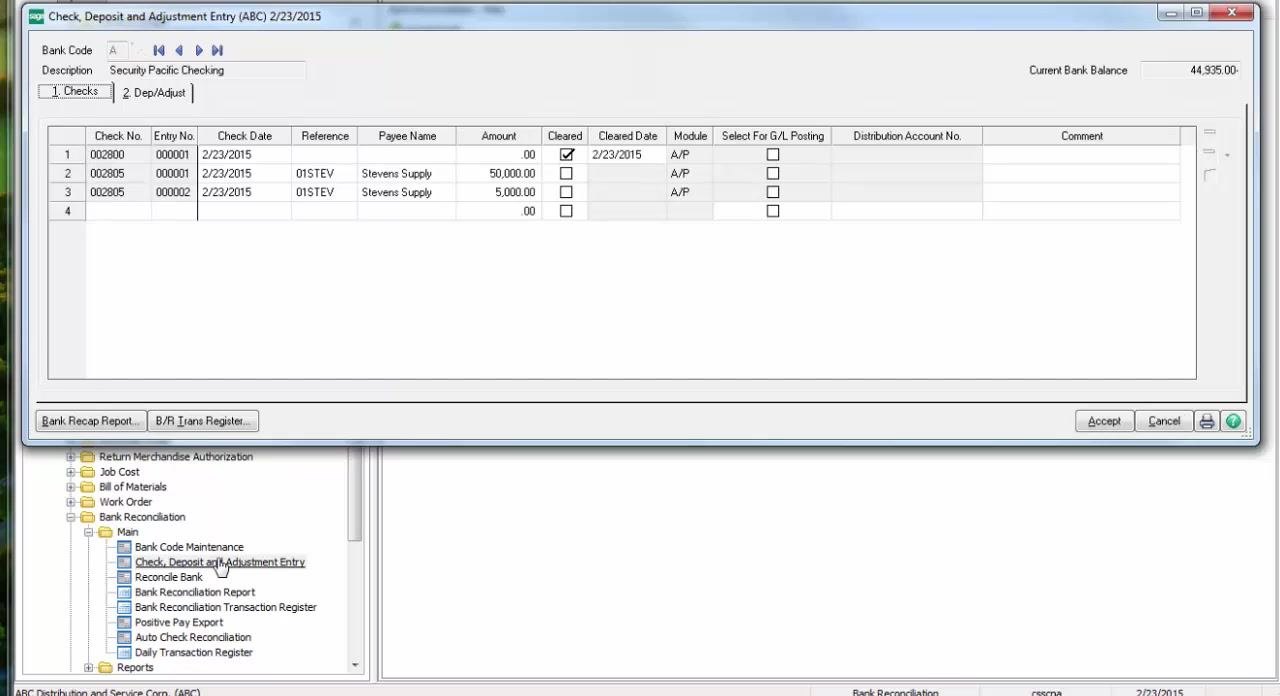
In the left navigation pane, scroll down and expand the Bank Reconciliation section. Select Check, Deposit and Adjustment Entry under Bank Reconciliation - Main.
Step 9: Confirm the voided check status
In the Check, Deposit and Adjustment Entry window, ensure Bank Code is set to "A" and locate the check number you voided (for example, 002800) in the list. Confirm the Amount is .00 and the Cleared box is checked with the correct cleared date (for example, 2/23/2015). Review other checks for accuracy.
Part 4: Reverse an incorrect or duplicate check
Sometimes you need to void a check in Sage 100 that was already issued in error — for example, a duplicate entry created when multiple users process AP checks at the same time. Sage 100 refers to voiding an issued check as a "reversal."
Step 10: Identify the duplicate or incorrect entry
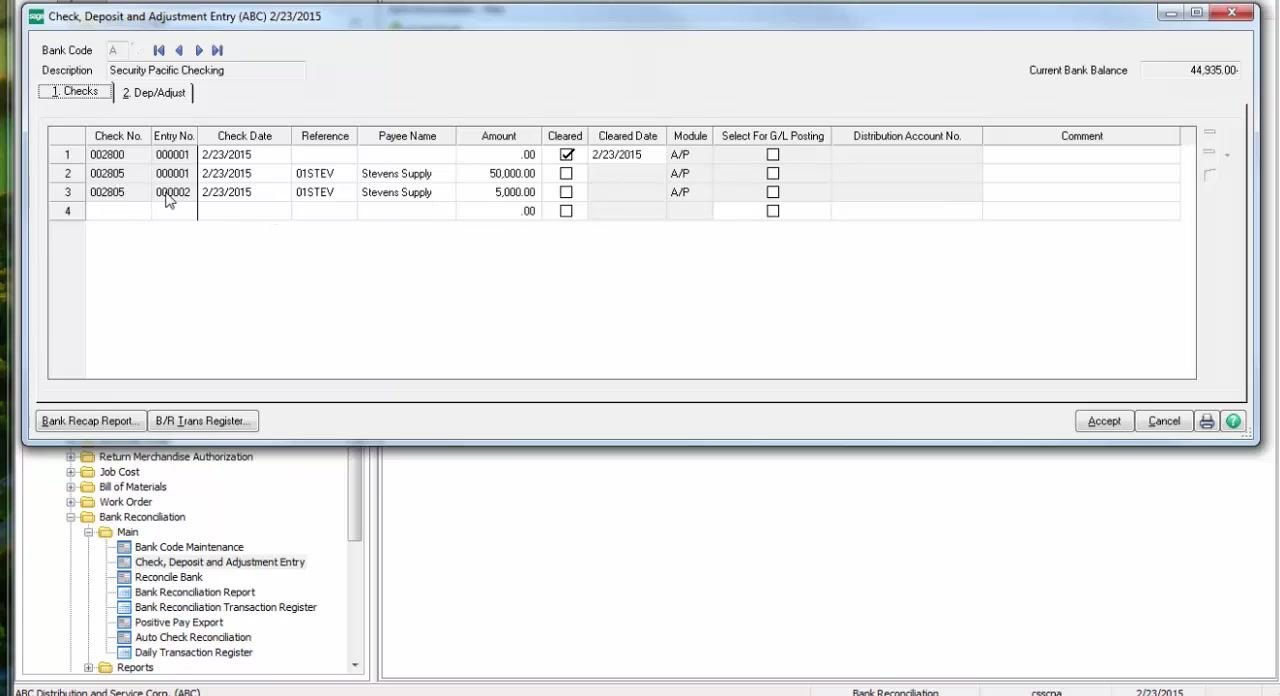
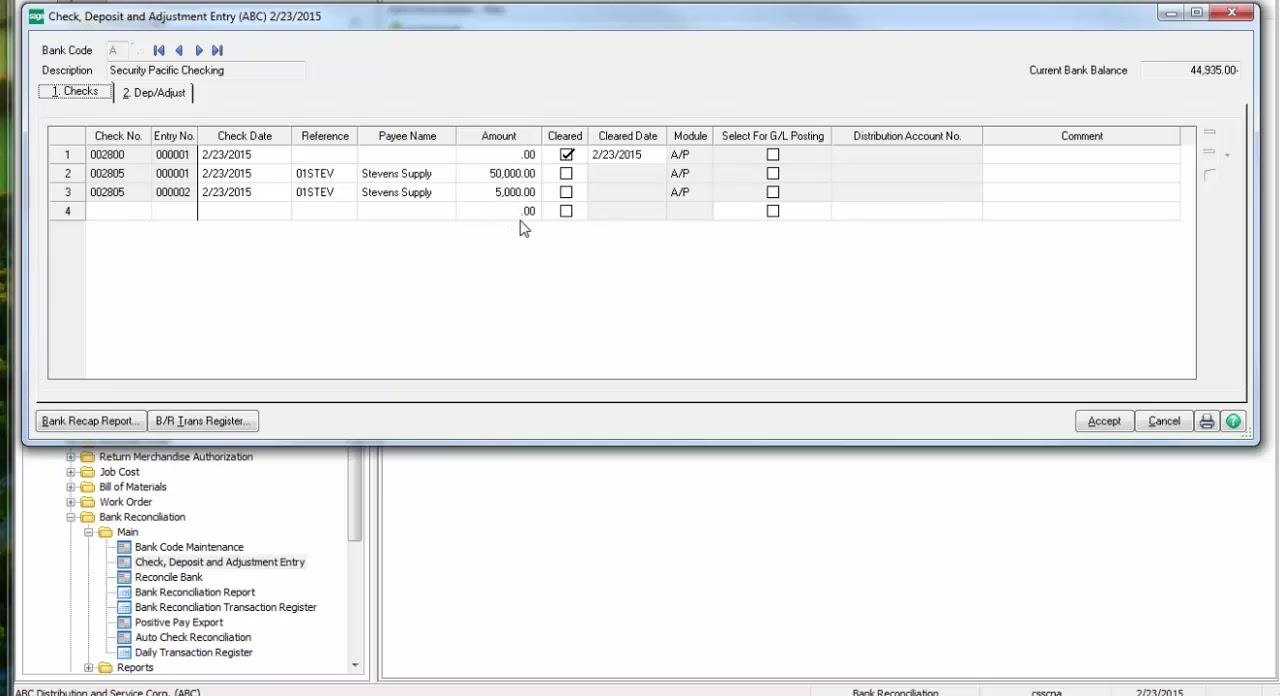
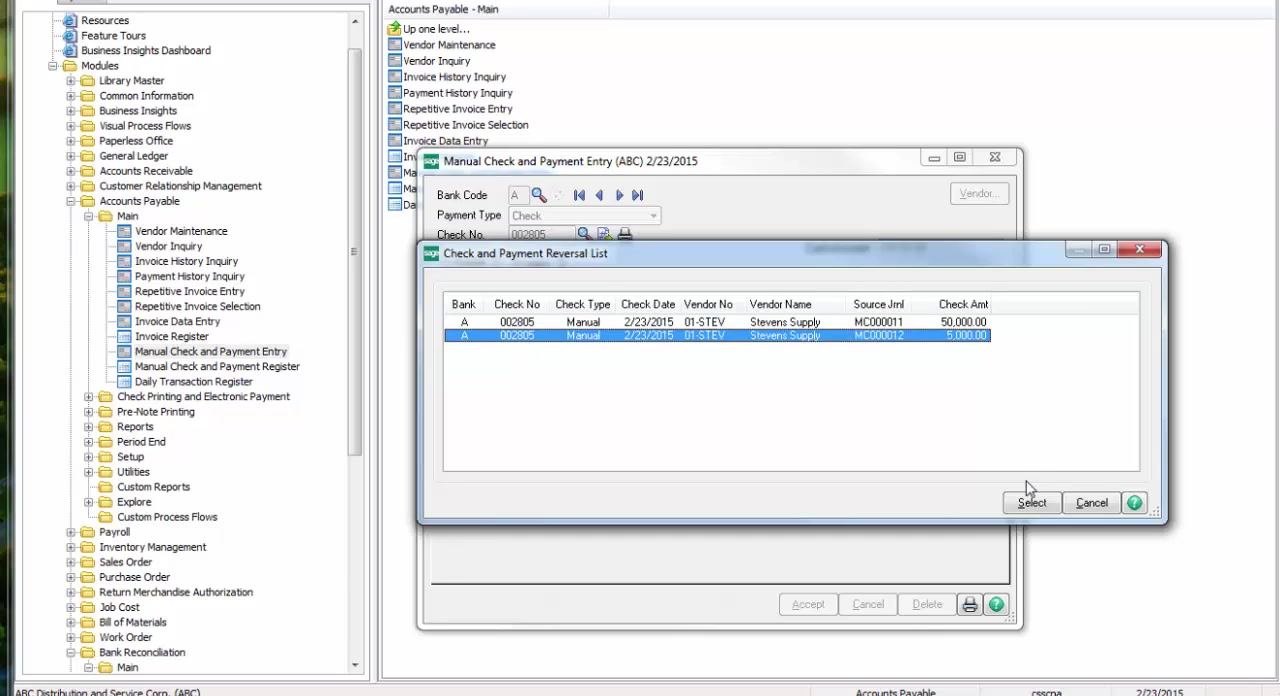
Review the Check, Deposit and Adjustment Entry window for duplicate or incorrect check entries. In this example, check number 002805 appears twice for "Stevens Supply" with different amounts: $50,000.00 and $5,000.00. Confirm the entry you want to void is the incorrect one (in this case, the $5,000.00 check).
Step 11: Return to Manual Check and Payment Entry
Navigate back to the Manual Check and Payment Entry screen. Ensure the Bank Code is set to "A" (Security Pacific Checking), then enter the check number you want to void (for example, "002805") in the Check No. field.
After you enter the check number, a prompt asks if this is a check reversal. Click Yes to proceed with the reversal.
Step 12: Select the correct check for reversal
The Check and Payment Reversal List window displays all checks matching the entered number. Locate and select the check with the Check Amt of $5,000.00 (the incorrect entry). Confirm the details: Bank = A, Check No. = 002805, Check Type = Manual, Check Date = 2/23/2015, Vendor No. = 01STEV, Vendor Name = Stevens Supply, Source Jrnl = MC000012. Click Select to continue.
Step 13: Confirm the invoice recall
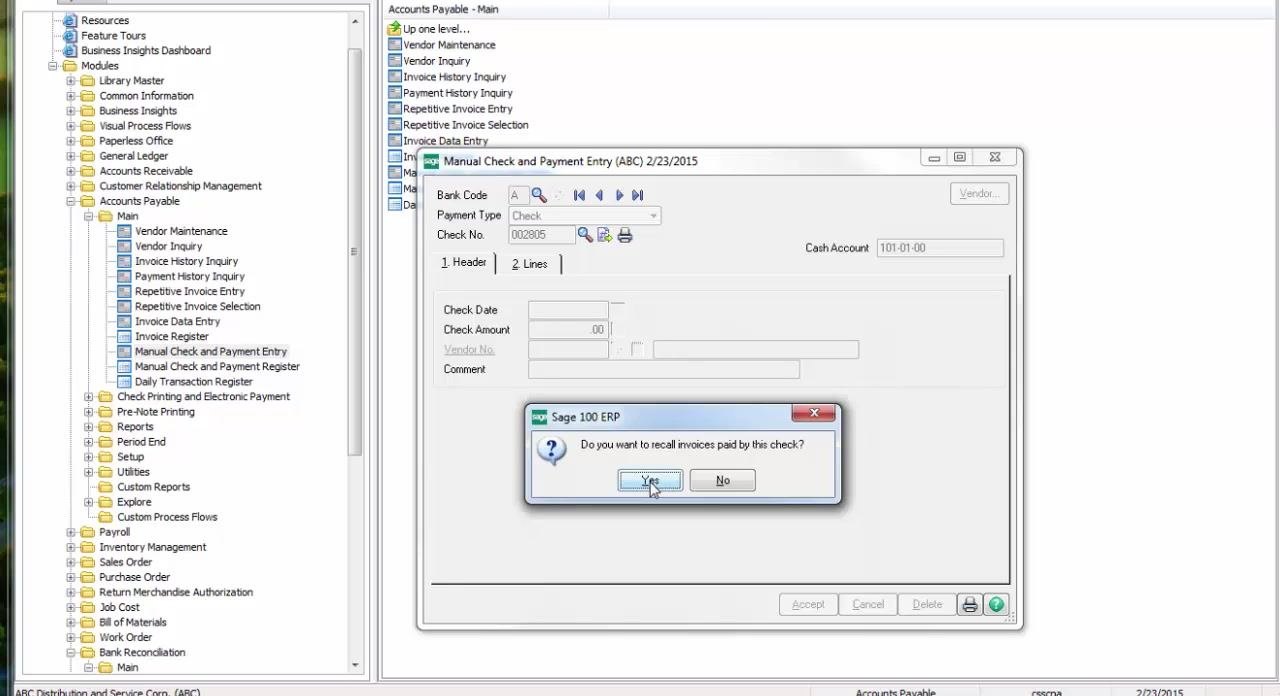
A confirmation dialog appears asking "Do you want to recall invoices paid by this check?" This ensures you want to automatically recall (reverse) the invoices associated with the voided check. Click Yes to proceed — this automatically updates the invoice status, removing the payment without further manual adjustments.
Step 14: Review the payment details and accept
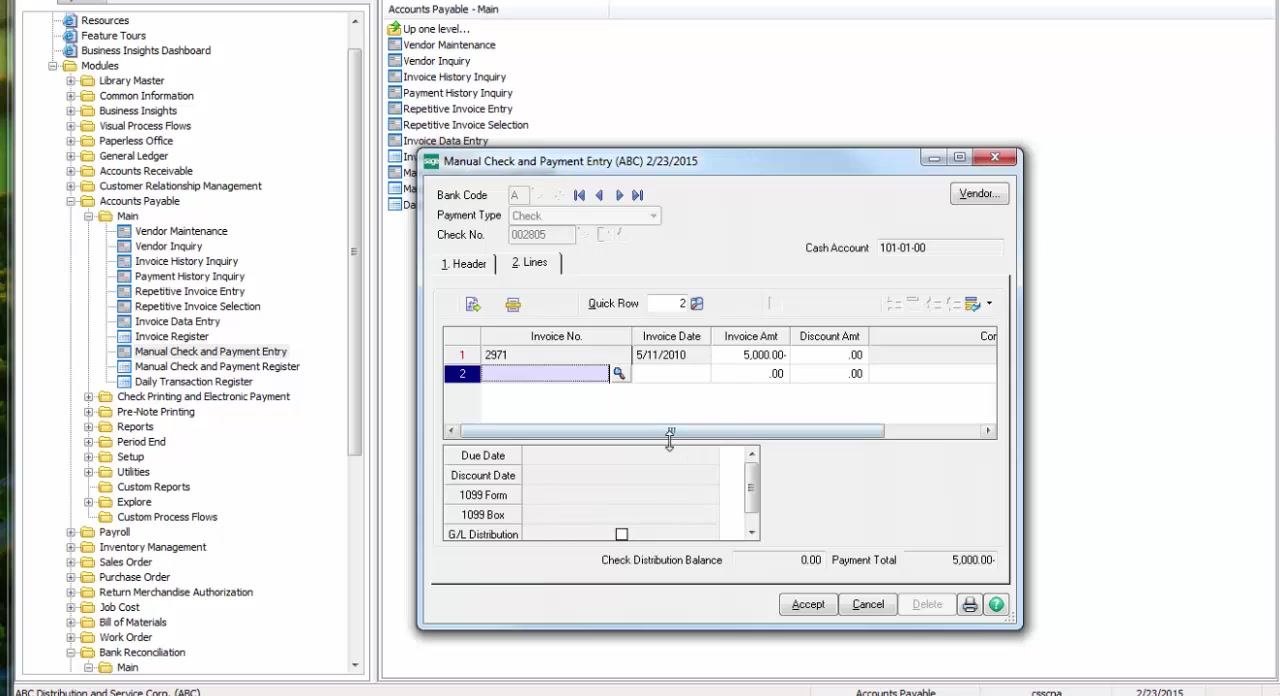
In the Manual Check and Payment Entry window, review the payment details:
- Bank Code: A
- Payment Type: Check
- Check No.: 002805
- Cash Account: 101-01-00
- Invoice No.: 2971
- Invoice Date: 5/11/2010
- Invoice Amount: $5,000.00
- Discount Amount: $0.00
- Payment Total: $5,000.00
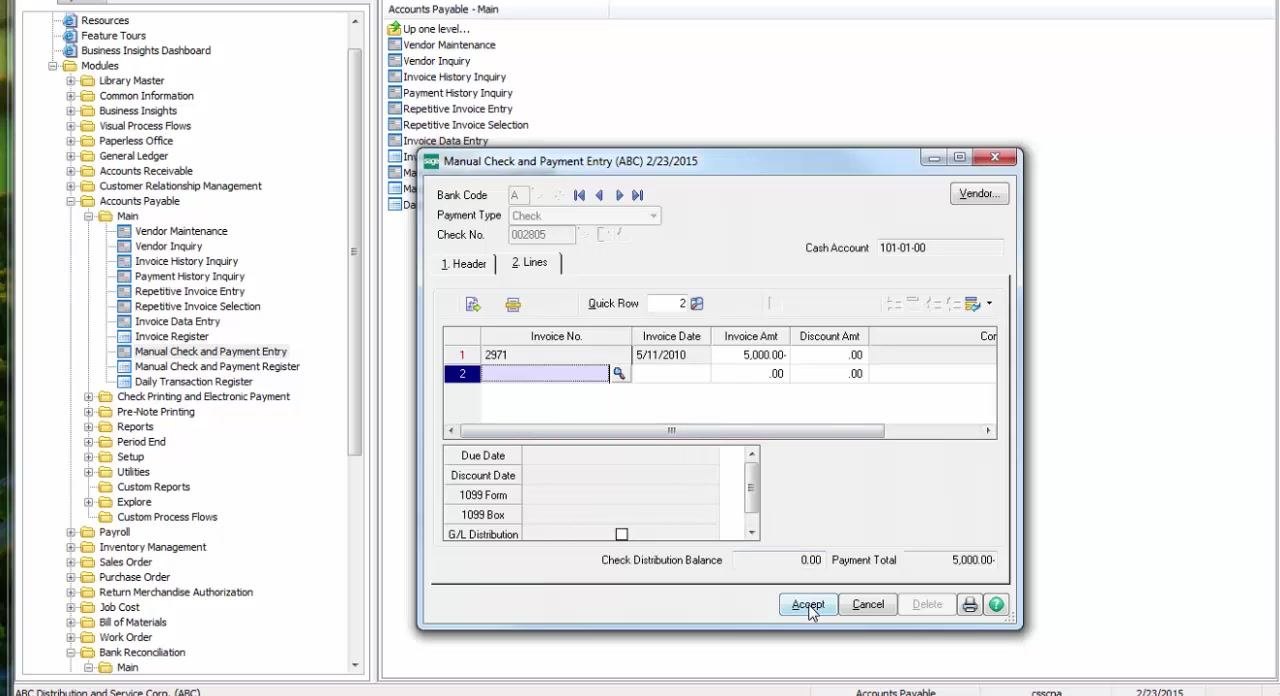
Ensure all information is correct, then click Accept to process the manual check and payment.
Part 5: Review the register and finalize the reversal
Step 15: Preview the Manual Check and Payment Register
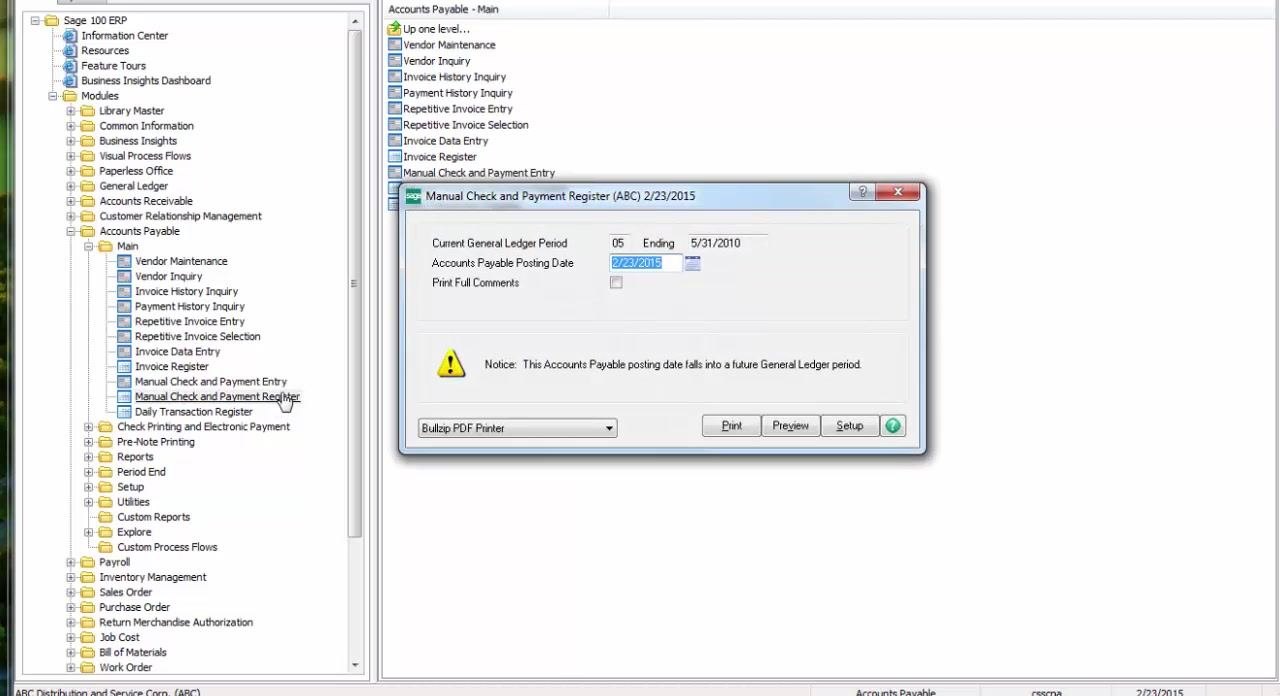
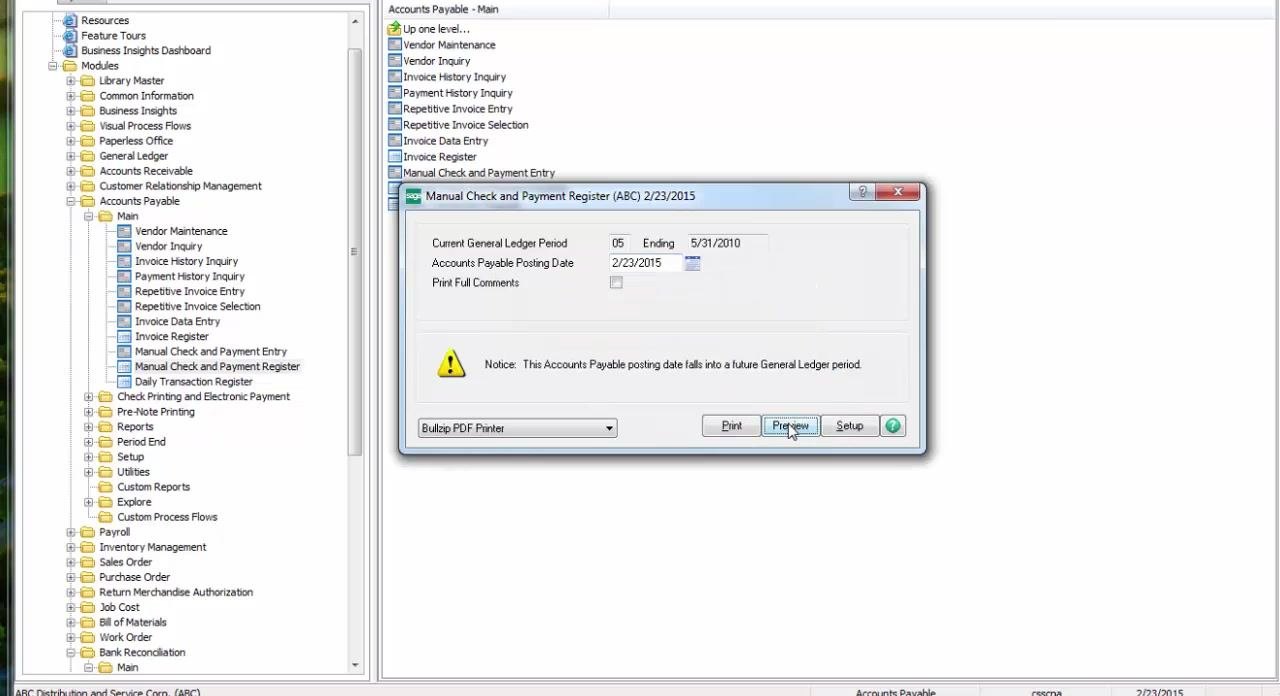
In the Manual Check and Payment Register dialog, verify the Current General Ledger Period (05, ending 5/31/2010) and the Accounts Payable Posting Date (2/23/2015). Note the warning that the posting date falls into a future General Ledger period. Select your printer (for example, Bullzip PDF Printer) and click Preview to review the register before printing or posting.
Step 16: Review the generated register report
Confirm the following details on the report:
- Bank: A Security Pacific Checking
- Check Number: 002805
- Invoice Number: 2971
- Check Date: 2/23/2015
- Vendor Number: 01-STEV (Stevens Supply)
- Invoice Amount: $5,000.00
- Distribution Amount: $5,000.00
- Check Amount: $5,000.00
- Bank A Total and Report Total: $5,000.00
Ensure the check is marked as a reversal and linked to the correct invoice.
Step 17: Review the Recap by Division report
Review the Accounts Payable Manual Check and Payment Register - Recap By Division report for:
- Journal Posting Date: 2/23/2015
- Register Number: MC-000014
- Division Number: 01 TRADE ACCOUNTS PAYABLE
- G/L Account 101-01-00 (Cash in bank - Req. checking): Debit $5,000.00
- G/L Account 200-01-00 (Accounts payable - trade): Credit $5,000.00
- Division 01 Total: Debit $5,000.00, Credit $5,000.00
Step 18: Print and update the Daily Transaction Register
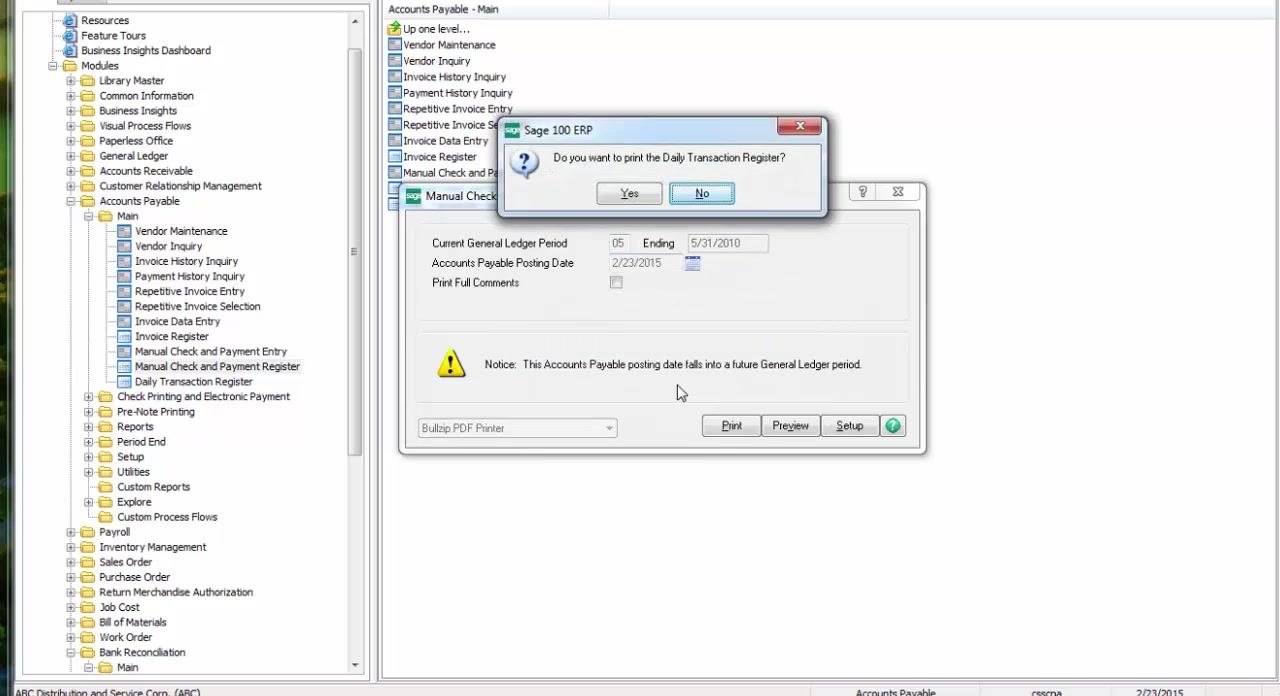
When prompted "Do you want to print the Daily Transaction Register?", click Yes.
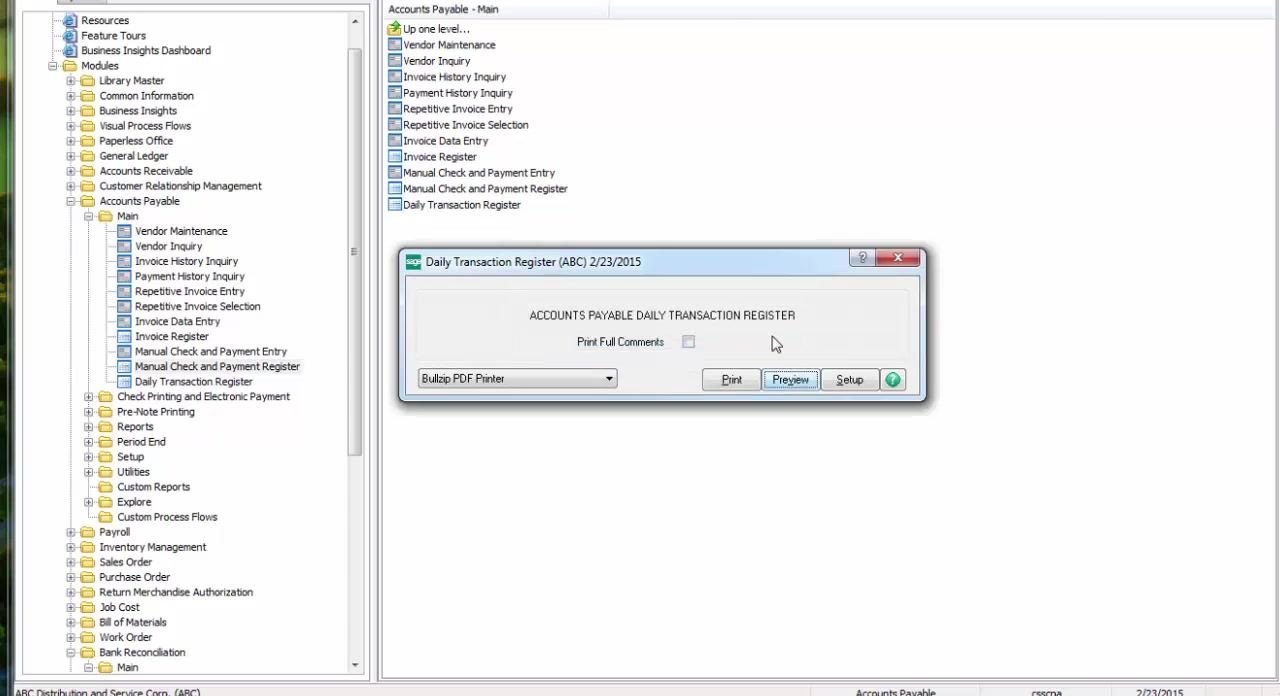
In the Daily Transaction Register dialog, confirm the Accounts Payable Daily Transaction Register window is open, select your printer (for example, Bullzip PDF Printer), and click Preview to review it.
When prompted "Do you want to update the Daily Transaction Register?", click Yes to update the register and finalize the transaction.
Part 6: Verify the final reconciliation
Step 19: Review the Checks tab
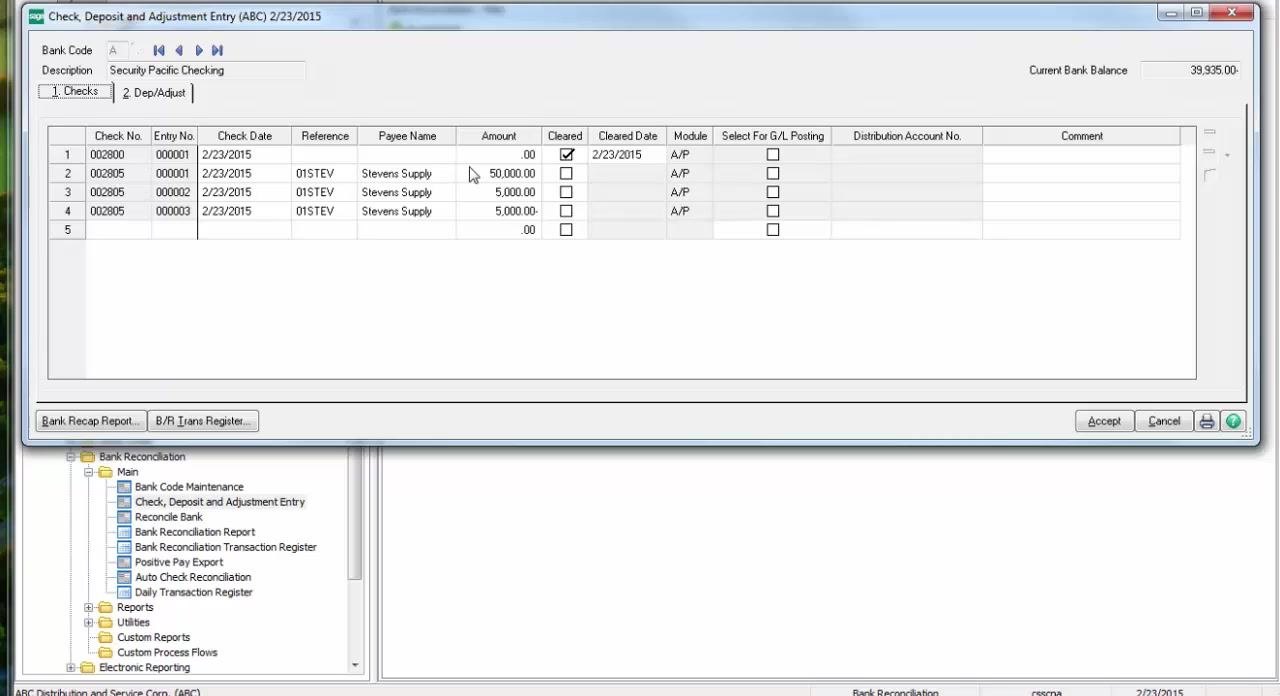
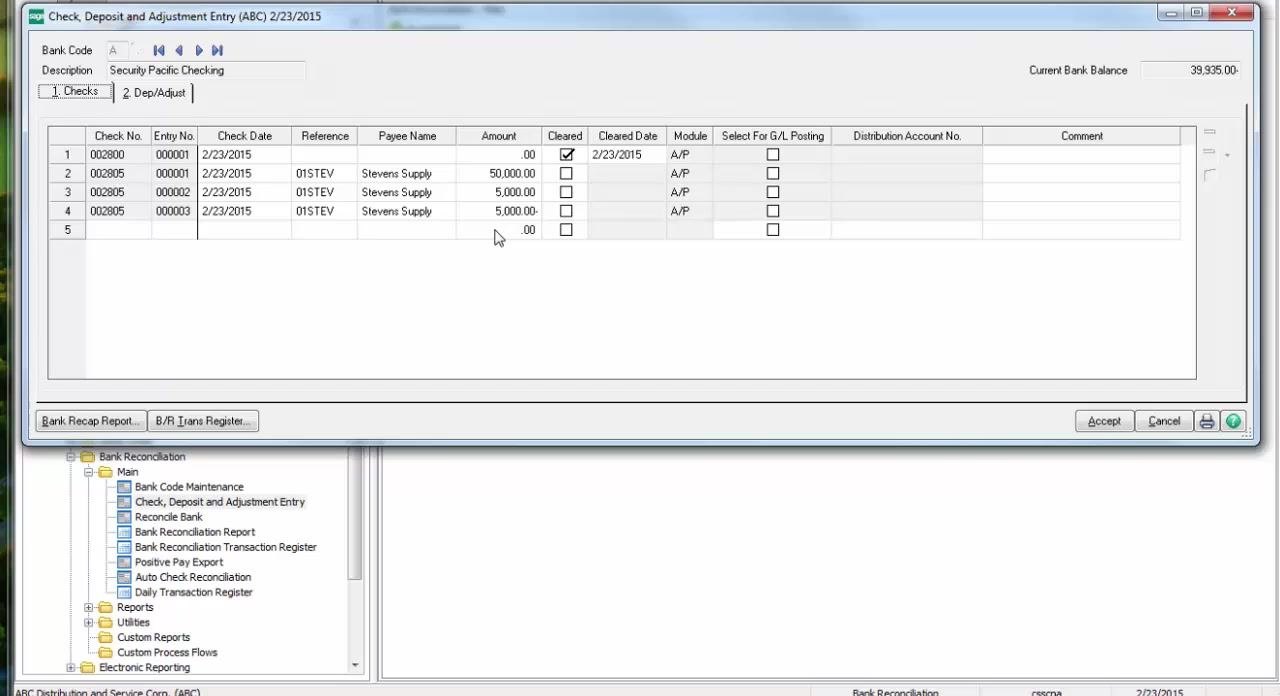
Open the Check, Deposit and Adjustment Entry window and navigate to the Checks tab. Review the list of checks and their statuses, and confirm the current bank balance is updated.
Step 20: Confirm the final check entries
On the Checks tab, confirm the following entries are present:
- Check No. 002800: Entry No. 000001, Check Date 2/23/2015, Reference 01STEV, Payee Name Stevens Supply, Amount $0.00, Cleared checked, Cleared Date 2/23/2015, Module A/P.
- Check No. 002805 (first occurrence): Entry No. 000002, Check Date 2/23/2015, Reference 01STEV, Payee Name Stevens Supply, Amount $5,000.00, Cleared unchecked, Module A/P.
- Check No. 002805 (second occurrence): Entry No. 000003, Check Date 2/23/2015, Reference 01STEV, Payee Name Stevens Supply, Amount $5,000.00, Cleared unchecked, Module A/P.
- A fifth row with no check number and an amount of $0.00.
Verify the Current Bank Balance is $39,935.00. The duplicate $5,000.00 entries for check 002805 represent a positive and negative transaction, resulting in a net effect of zero as part of the reversal process in Sage 100 ERP.
Summary
You now know how to void a check in Sage 100 for both unused check stock and already-issued checks. By using Manual Check and Payment Entry to void or reverse a check, confirming the action through the registers, and verifying the result in Bank Reconciliation, you ensure your accounts payable records stay accurate whether a check was damaged, lost, or issued in error.
Generation details: cost, quality tiers
Docsie billed 4,000 credits ($2.80) to analyze this 8-minute video at standard quality. The rewrite, template fill and Word/PDF exports were included. The same video at each quality tier:
| Quality | Frames sampled | Credits | Approx. cost |
|---|---|---|---|
| Draft | every 16-30 s | 2,000 | $1.40 |
| Standard (this guide) | every 8-15 s | 4,000 | $2.80 |
| Detailed | every 4-7 s | 8,000 | $5.60 |
| Ultra | every 1-3 s | 16,000 | $11.20 |
Credits priced at $0.70 per 1,000; plans include a monthly allowance. Enterprise customers on on-premise or bring-your-own-model deployments run this on their own inference and pay no per-video credits.
Generated by Docsie Video-to-Docs on 2026-10-11 from a 7-minute video. Screenshots are frames from the source video and belong to their creator, CS3 Technology, whose original is embedded above. If you own this video and want the guide removed or credited differently, contact us and we will act within one business day.