
How to Enable AI Agent Studio in Oracle Fusion
This guide walks you through the full process of enabling AI Agent Studio in Oracle Fusion, from assigning the correct security roles to troubleshooting a missing AI Chat icon, configuring administrator access, and creating your own AI agent team from a template. Follow these steps in order to ensure that both administrators and end users have the access they need.
Video: 🚀 Oracle Fusion AI Agent Studio Setup Guide | Common Issues & Must-Know Configurations By Siva Koya by Oracle Cloud ERP Channel (2026). All credit for the demonstration goes to the creator; watch the original on YouTube. The written guide below was generated from this video by Docsie. Creator? Request a change or removal.
This guide walks you through the full process of enabling AI Agent Studio in Oracle Fusion, from assigning the correct security roles to troubleshooting a missing AI Chat icon, configuring administrator access, and creating your own AI agent team from a template. Follow these steps in order to ensure that both administrators and end users have the access they need.
Prerequisites
Before you begin, make sure you have the following in place:
- Access to the Oracle Help Center documentation that explains how to provide access to configure AI Agents in all products.
- A custom job role created in the Security Console.
- Administrator access to Oracle Fusion to manage roles, profile options, and AI Agent Studio.
Troubleshooting a missing AI Chat icon
Step 1: Verify role assignment
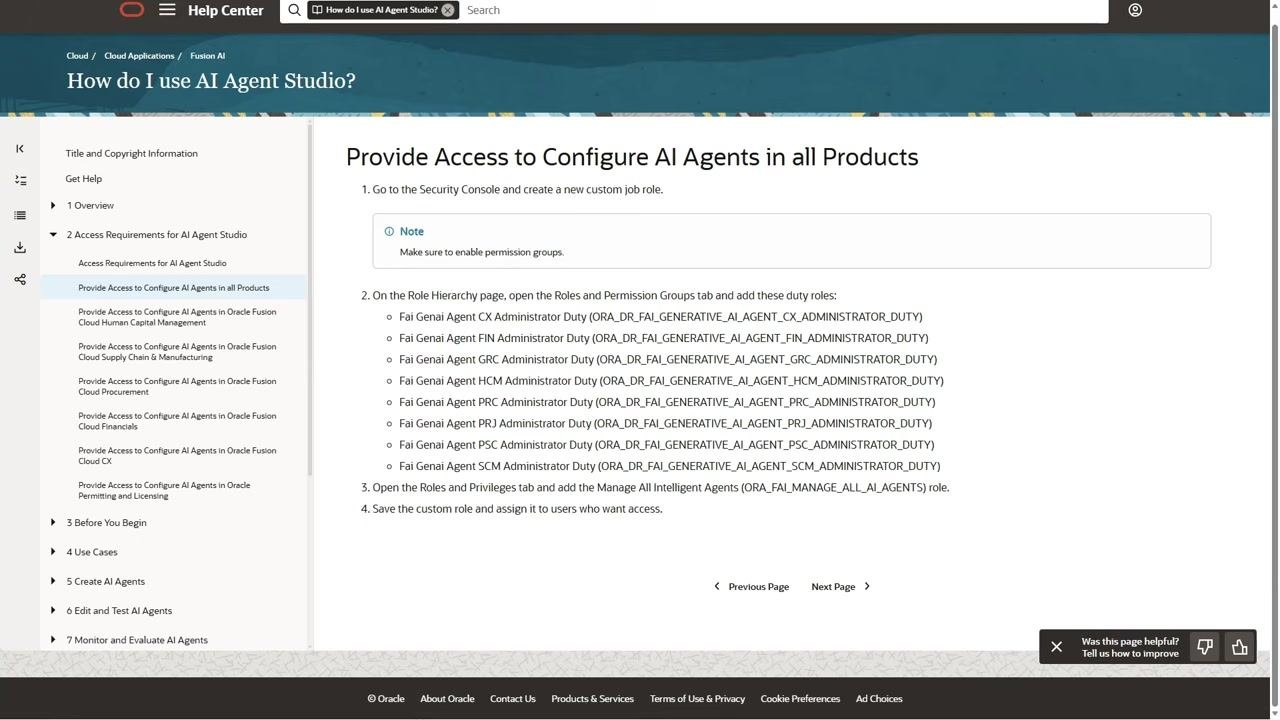
Go to the Oracle Help Center and review the documentation for providing access to configure AI Agents in all products. Make sure you have created a new custom job role in the Security Console.
On the Role Hierarchy page, open the Roles and Permission Groups tab and add the following duty roles as needed:
- Fai Genai Agent CX Administrator Duty (ORA_DR_FAI_GENERATIVE_AI_AGENT_CX_ADMINISTRATOR_DUTY)
- Fai Genai Agent FIN Administrator Duty (ORA_DR_FAI_GENERATIVE_AI_AGENT_FIN_ADMINISTRATOR_DUTY)
- Fai Genai Agent GRC Administrator Duty (ORA_DR_FAI_GENERATIVE_AI_AGENT_GRC_ADMINISTRATOR_DUTY)
- Fai Genai Agent HCM Administrator Duty (ORA_DR_FAI_GENERATIVE_AI_AGENT_HCM_ADMINISTRATOR_DUTY)
- Fai Genai Agent PRC Administrator Duty (ORA_DR_FAI_GENERATIVE_AI_AGENT_PRC_ADMINISTRATOR_DUTY)
- Fai Genai Agent PRJ Administrator Duty (ORA_DR_FAI_GENERATIVE_AI_AGENT_PRJ_ADMINISTRATOR_DUTY)
- Fai Genai Agent PSC Administrator Duty (ORA_DR_FAI_GENERATIVE_AI_AGENT_PSC_ADMINISTRATOR_DUTY)
- Fai Genai Agent SCM Administrator Duty (ORA_DR_FAI_GENERATIVE_AI_AGENT_SCM_ADMINISTRATOR_DUTY)
Open the Roles and Privileges tab and add the Manage All Intelligent Agents role (ORA_FAI_MANAGE_ALL_AI_AGENTS). Save the custom role and assign it to the users who need access.
Step 2: Log in as the user with the assigned role
Log in to Oracle Fusion as the user who was assigned the AI Agent security role. Navigate to the Me tab, where users typically access personal and AI-related features. The AI Chat icon is expected to appear in the Quick Actions or Apps section.
Step 3: Check for a missing AI Chat icon
If the AI Chat icon is missing from the main dashboard or Quick Actions, it may simply be hidden from the springboard. Click the + (plus) icon in the Apps section to customize or add more app shortcuts.
Step 4: Review available apps and identify a configuration issue
In the Apps customization screen, review the list of available apps under the Me section. Confirm whether AI Chat is listed as an available app to add. If it is not present, this points to a configuration issue rather than a role assignment problem.
If security roles are assigned correctly but the AI Chat icon is still missing, the issue is likely related to a missing Redwood-related profile option rather than the AI Agent role itself. The next steps walk you through checking and configuring the necessary Redwood profile option.
Step 5: Open Manage Administrator Profile Options
Click the global task list icon in Oracle Fusion. In the search bar, type Manage Administrator Profile Options and select the relevant search result to open the profile options management screen.
Step 6: Locate the Redwood profile code
In the profile options screen, search for the profile code related to the Redwood web application experience. Review the search results to find the profile value code.
Step 7: Update the profile value
Check the current value of the Redwood profile code at the site level. If it is set to N (No), the Redwood experience is disabled. Change the value to Y (Yes) to enable the Redwood web application experience, then save your changes.
Step 8: Verify AI Chat icon availability
Navigate to the Me tab to check whether the AI Chat icon appears. If it is still not visible, do not raise a Service Request (SR) yet—continue to the next step.
Step 9: Log out and log back in
Log out of Oracle Fusion, then log back in to refresh your session and apply the updated profile settings. After logging in, verify that the AI Chat icon is now visible in the Me tab or Quick Actions section.
Step 10: Verify end user access to AI Chat
Create or identify an end user (for example, "Ben End User") for testing. Open the end user's account details and confirm that the appropriate role is assigned to the user.
Step 11: Inspect the role configuration
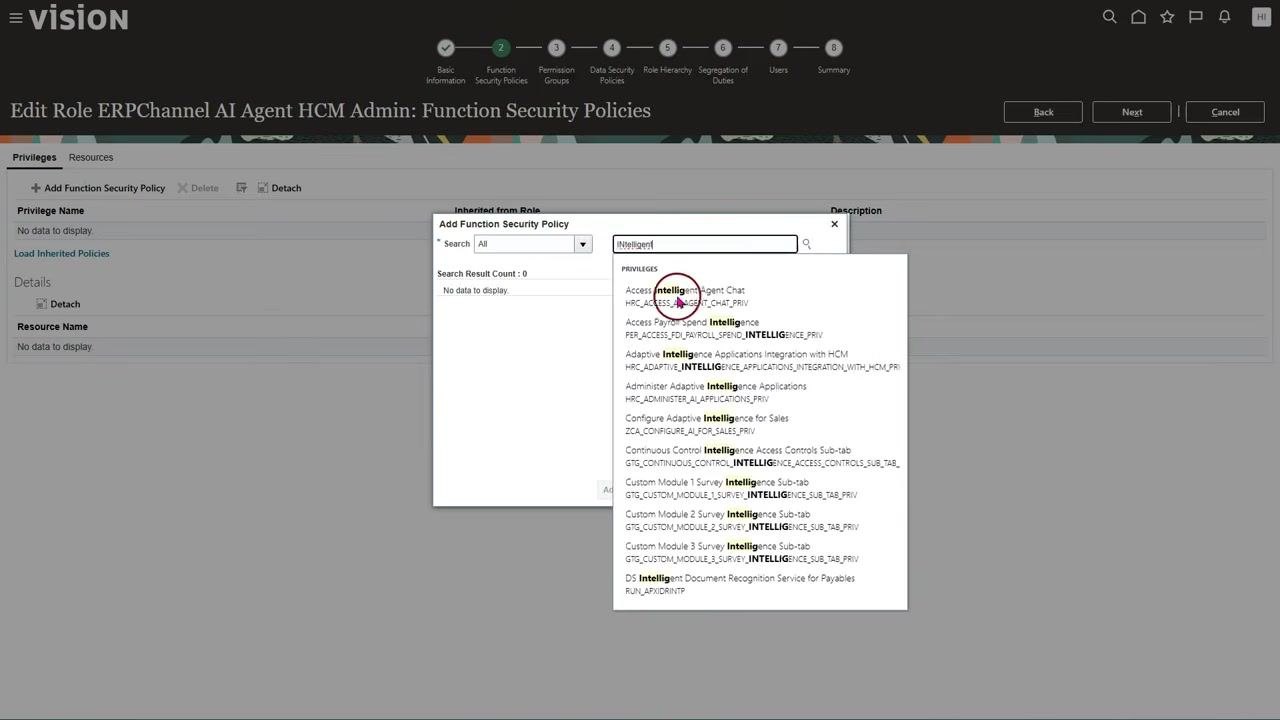
Open the assigned role for the end user and navigate to the Function Security Policies section (sometimes referred to as the "train stop"). Verify that the privilege Access Intelligent Agent Chat is included in the role, since this privilege is required for users to access the AI Chat feature. In Oracle Fusion 26B environments, permission groups do not need to be enabled on this role for AI Chat access.
Step 12: Navigate to AI Agent Teams
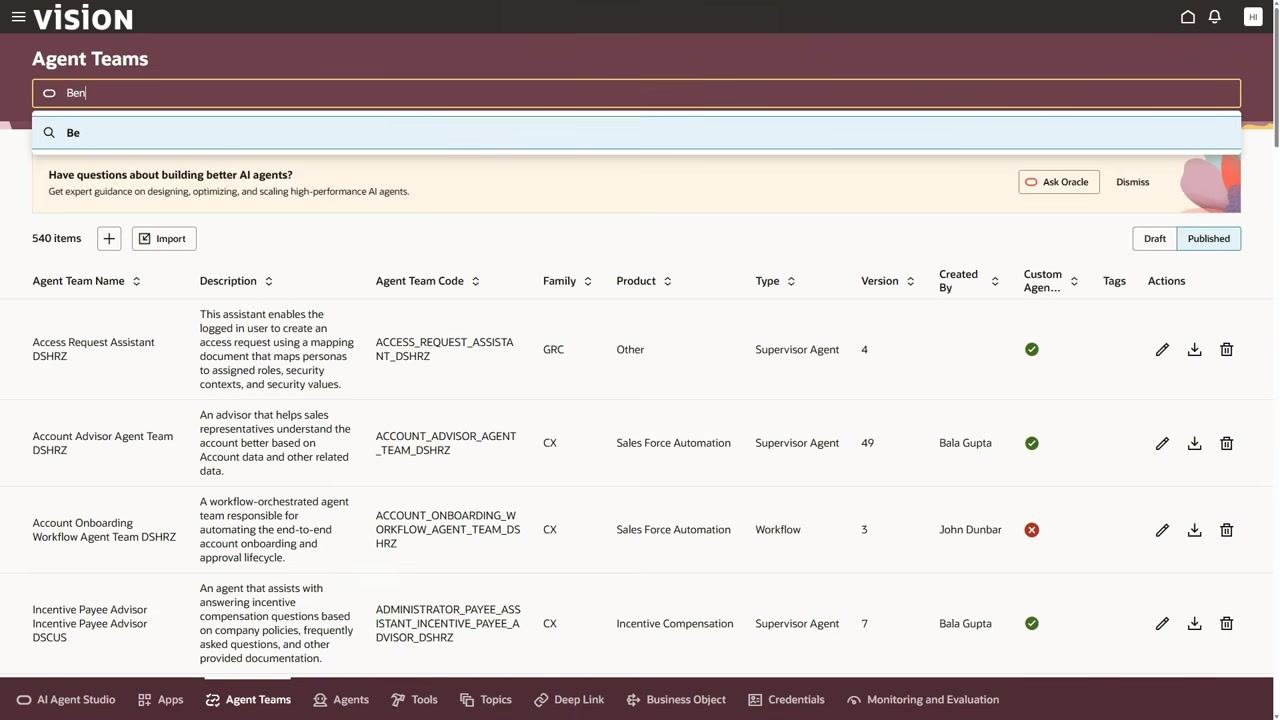
Go to the Agent Teams section from the main navigation bar at the bottom of the screen. In the search bar, type the relevant team name (for example, "Ben") to locate the desired agent team.
Step 13: Edit the agent team
In the search results, locate the agent team you want to configure and click the pencil (edit) icon in the Actions column to open it for editing.
Step 14: Open the Settings tab
After opening the agent team for editing, go to the Settings tab to review or update configuration options as needed.
Summary: Enabling the Redwood web application experience profile option and ensuring the correct privilege is assigned to user roles resolves issues with a missing AI Chat icon. Always log out and back in after making profile changes so that settings take effect. Use the Agent Teams section to further configure or troubleshoot AI agent access for specific users or teams.
Assign the AI Agent Chat role
Step 15: Open the Security tab for an agent team
Open the "Benefits Policy Advisor DSHRZ" agent and confirm that it is published and that you are in the Agent Teams section. Navigate to the Security tab within the agent configuration, locate the section for assigning roles, and click + Add to add a new role.
Step 16: Enter the role name
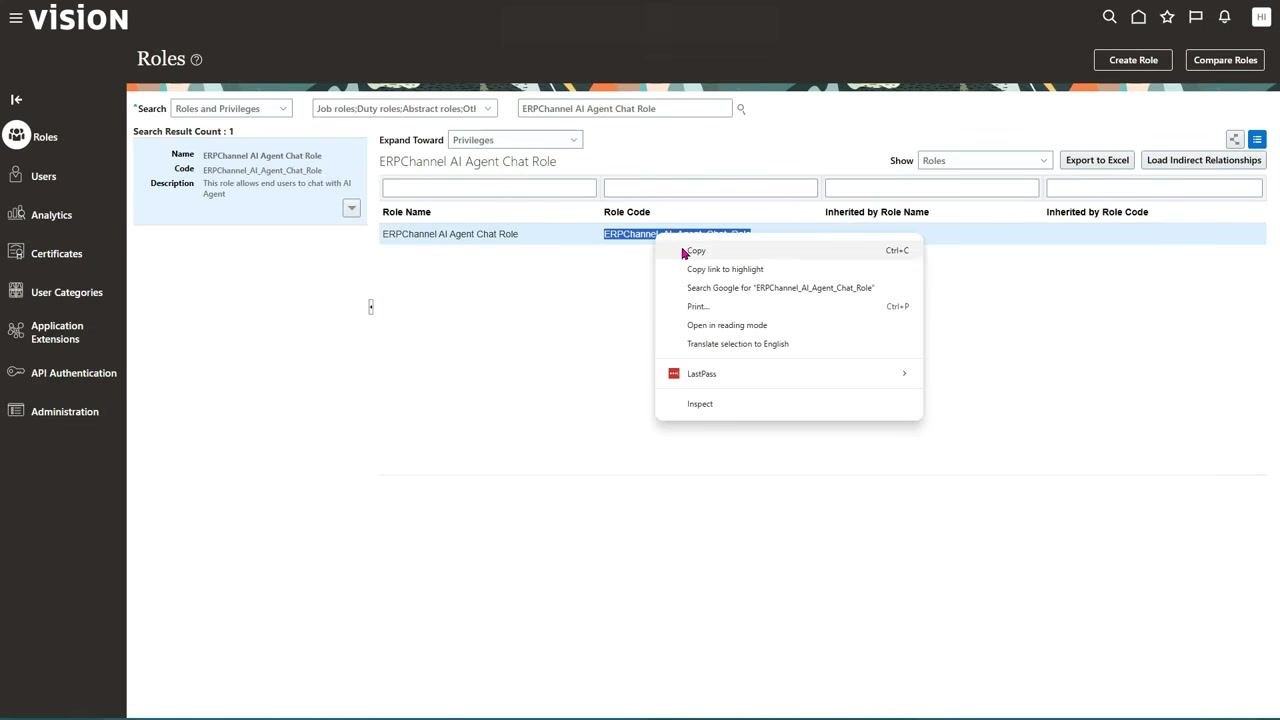
Paste or enter the role name "ERPChannel_AI_Agent_Chat_Role" into the Role field. Leave the Code field empty for now, and optionally add a description if required. The system may not immediately recognize the role if it has not been properly configured or synchronized.
Step 17: Resolve an unrecognized role
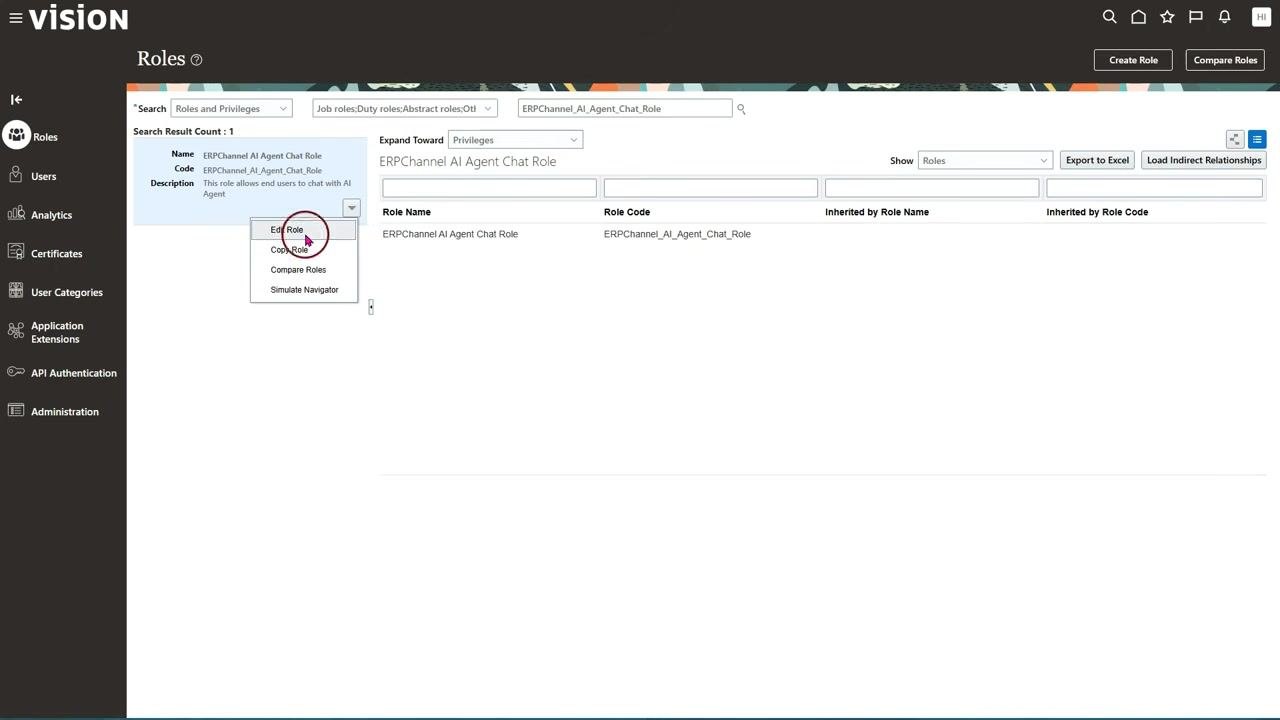
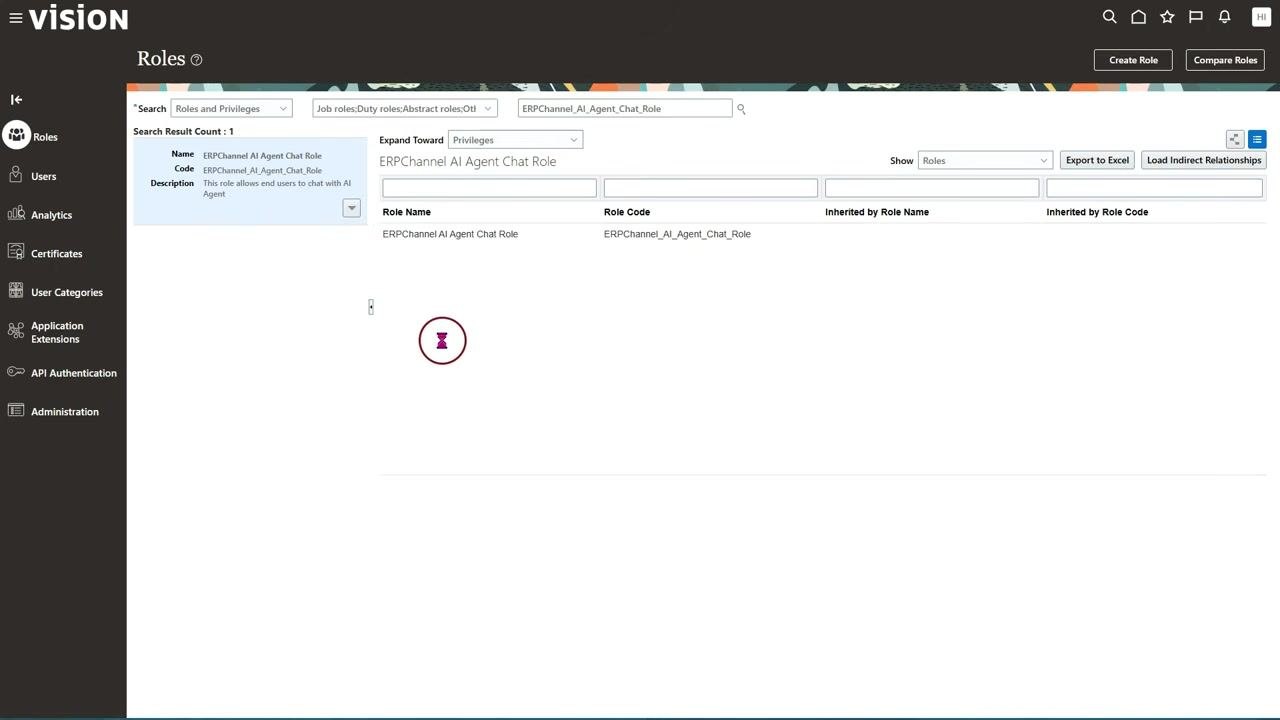
If the role is not recognized, switch to the Roles management section using the left navigation menu. Search for "ERPChannel_AI_Agent_Chat_Role," then click the dropdown arrow next to the role in the search results and select Edit Role.
Step 18: Reassign the role with its code
Return to the agent's Security tab and attempt to assign the role again. Enter "ERPChannel AI Agent Chat Role" in the Role field and "ERPChannel_AI_Agent_Chat_Role" in the Code field. The system should now recognize the role and auto-fill the description: "This role allows end users to chat with AI Agent."
Step 19: Confirm the role assignment
Ensure the correct role and code are entered, then click Apply to save the assignment.
Configure AI Agent administration access
Step 20: Review administrator access requirements
Navigate to the User Accounts section using the left navigation menu and select Users. Search for the administrator account, for example "John.AIAgentHCMAdmin," and confirm the user status is Active with Locked set to No.
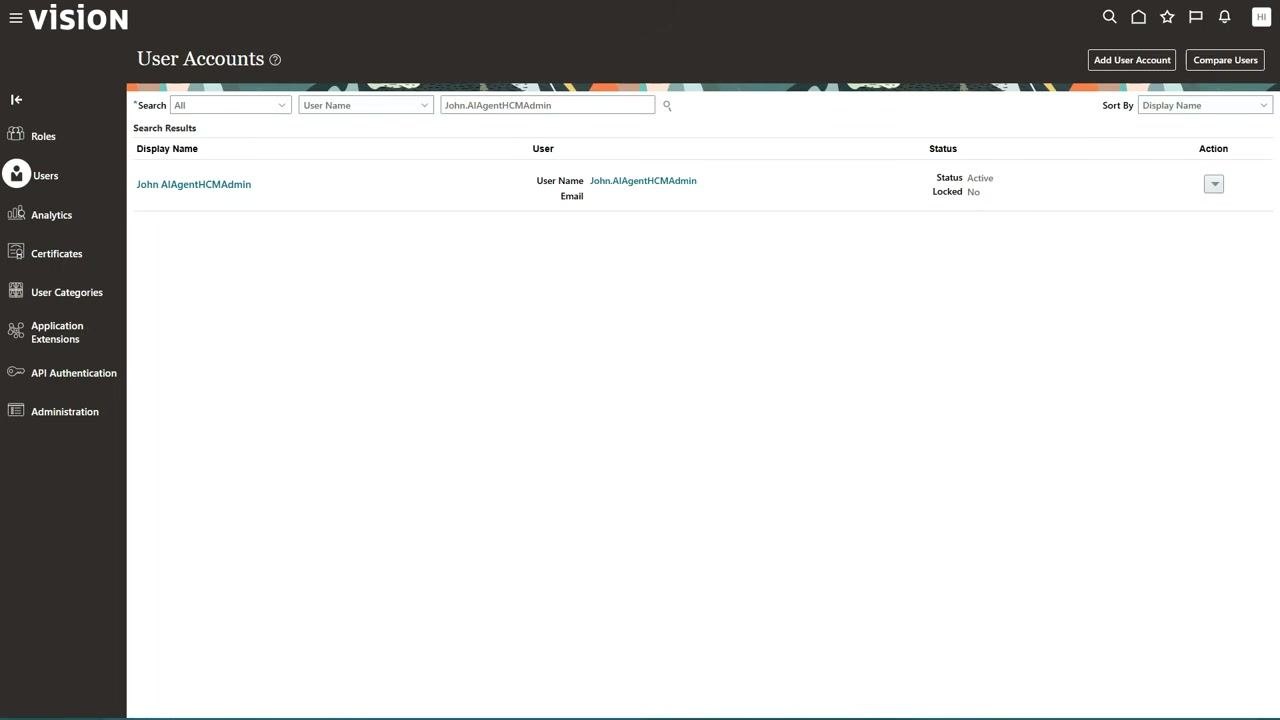
Administrator access requirements depend on the product area. For HCM (Human Capital Management), ensure the administrator has HCM-specific AI agent administration access.
Step 21: Select the user account
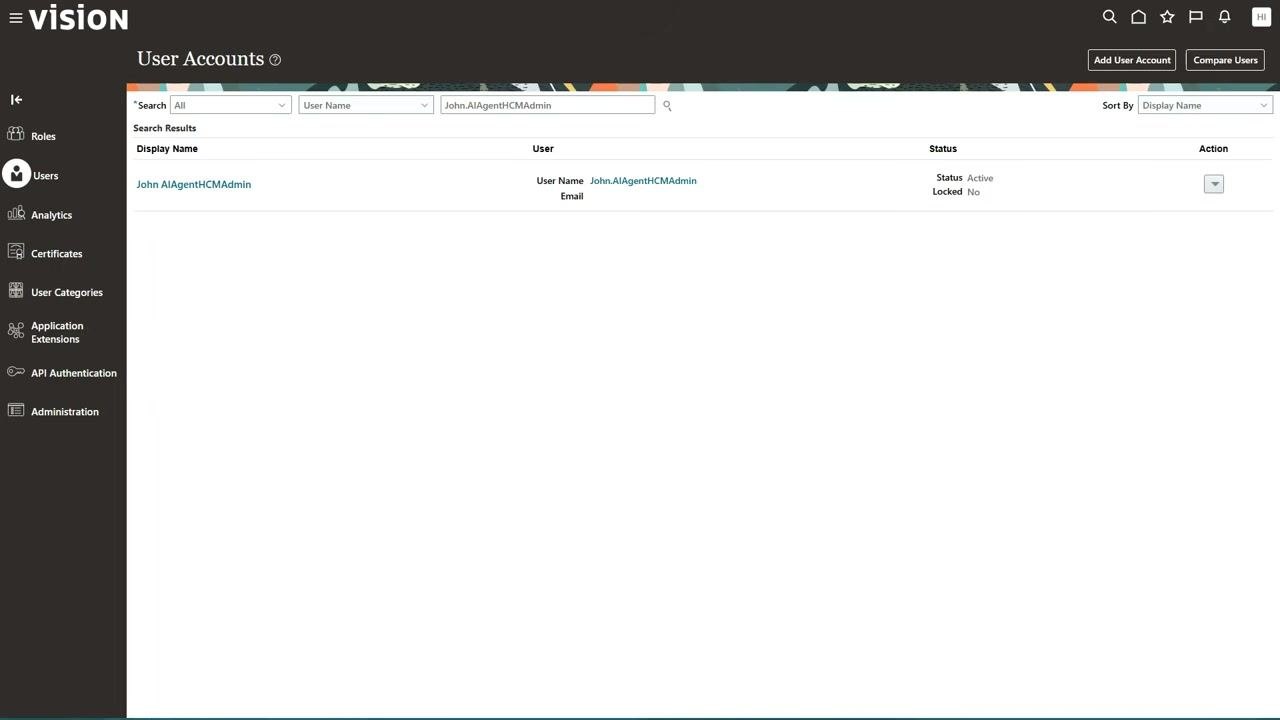
Click the display name "John.AIAgentHCMAdmin" in the search results to open the user account details page.
Step 22: Review the user account details
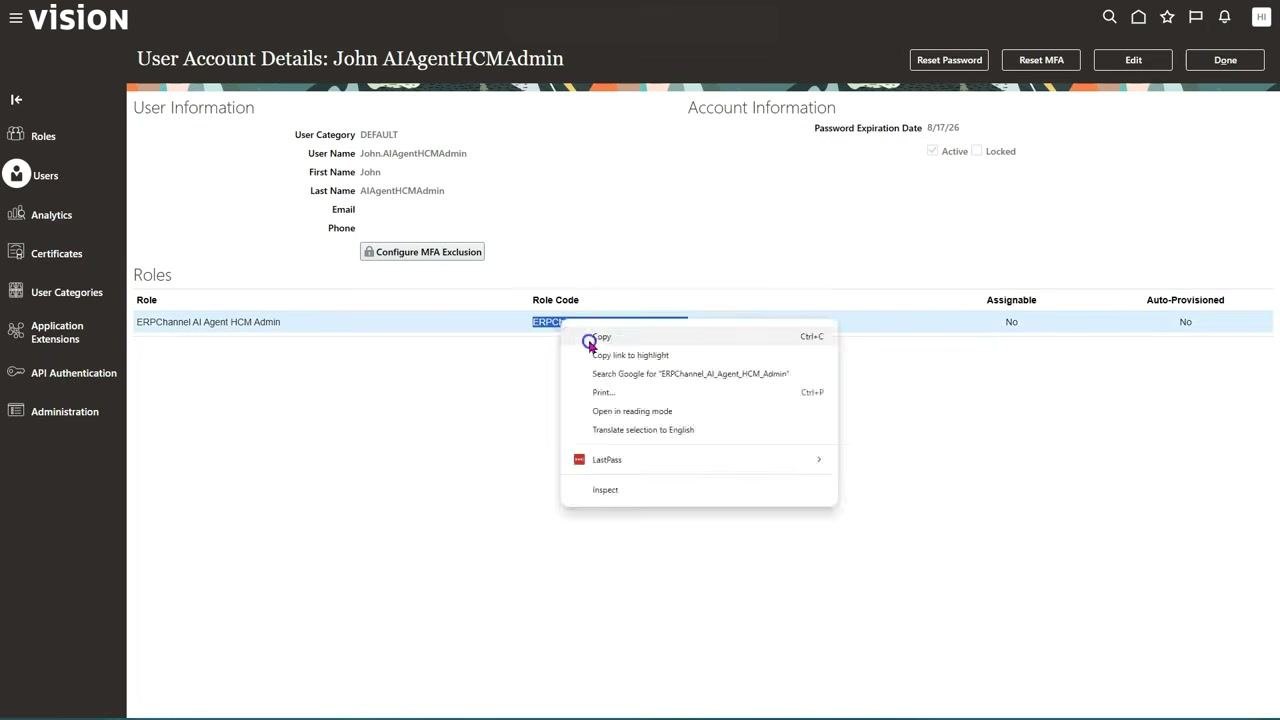
The User Account Details page displays information such as User Category (DEFAULT), User Name, First Name, Last Name, and options to configure MFA exclusion. The Roles section lists assigned roles—here, "ERPChannel AI Agent HCM Admin" is assigned with the role code "ERPChannel_AI_Agent_HCM_Admin." The role is not assignable or auto-provisioned, and the user is active and not locked.
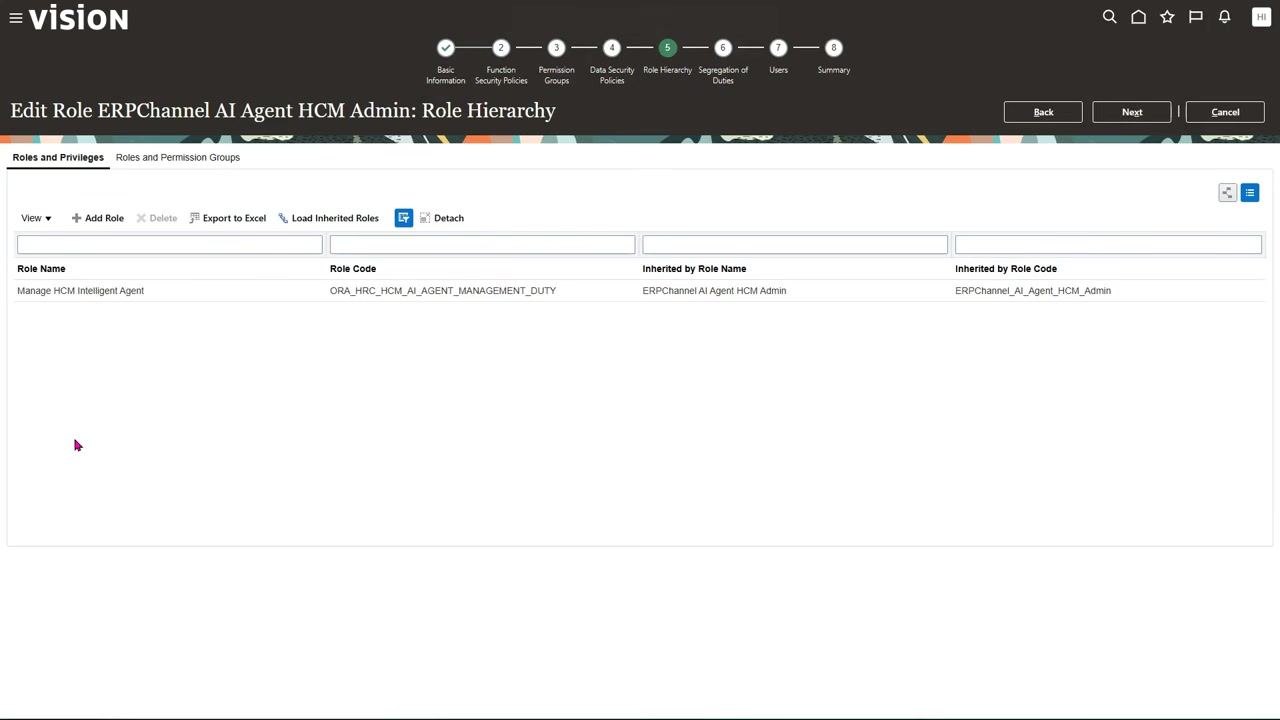
Step 23: Review the role hierarchy
Continue to the Role Hierarchy step (step 5 of 8) to confirm that the role "Manage HCM Intelligent Agent" (code: ORA_HRC_HCM_AI_AGENT_MANAGEMENT_DUTY) is inherited by "ERPChannel AI Agent HCM Admin." This confirms the correct role hierarchy for HCM administration.
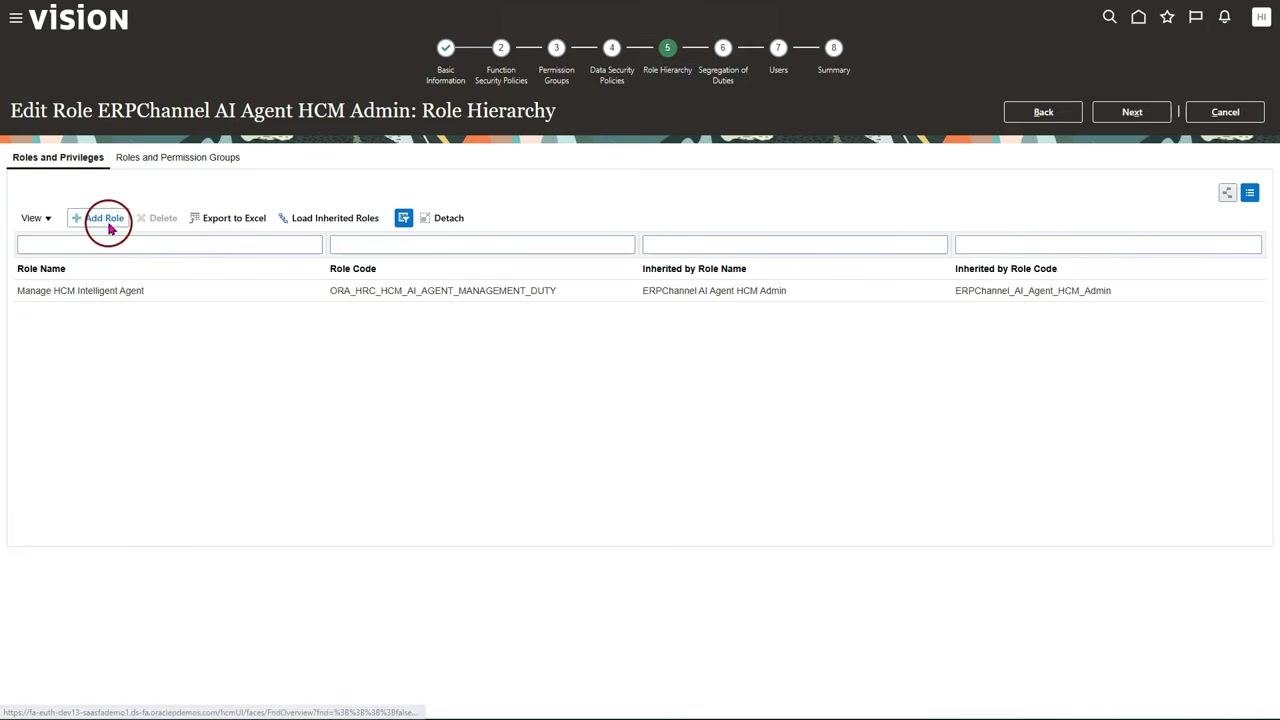
Step 24: Add roles for other product areas
To configure for other product areas, click + Add Role in the Role Hierarchy step to add additional roles as needed.
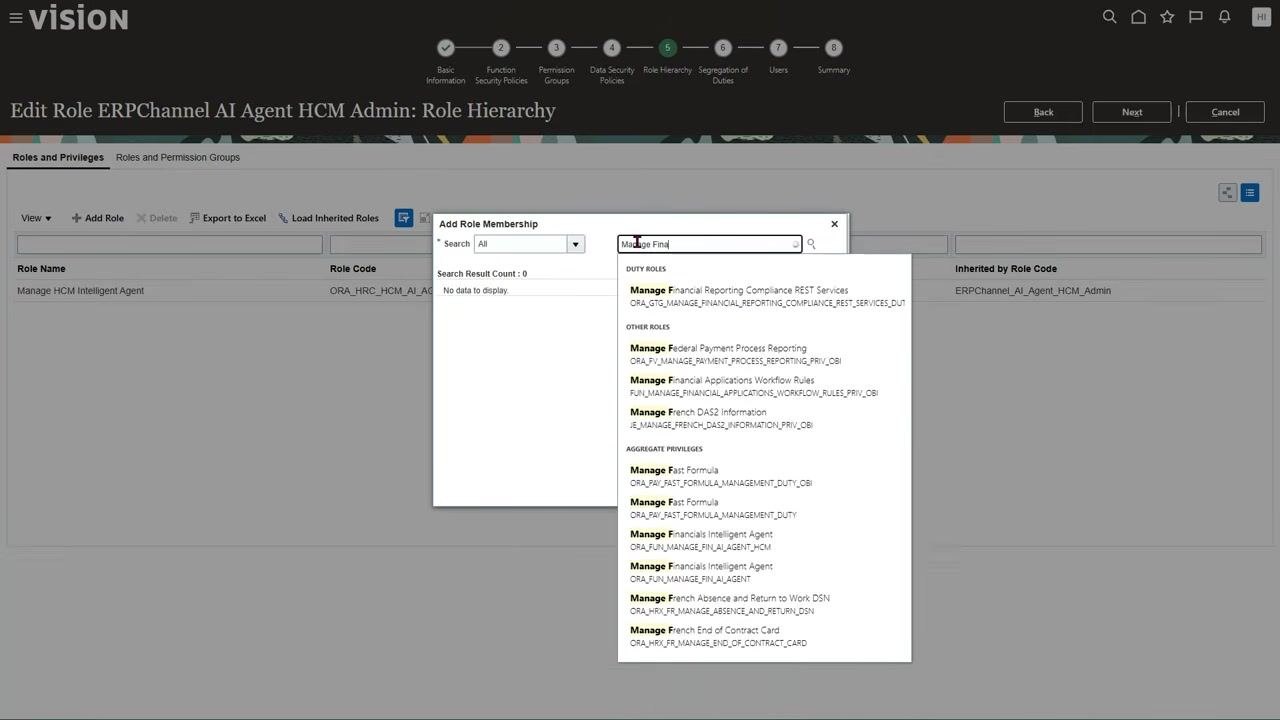
Step 25: Add the Financials role
For Financials, type "Manage Finan" in the Add Role Membership dialog to filter roles. Select "Manage Financials Intelligent Agent" from the list and add it to the role hierarchy.
Step 26: Add the SCM roles
For SCM, type "SCM Intel" in the Add Role Membership dialog to filter roles. Select the appropriate SCM Intelligent Agent Management Duty roles and add them.
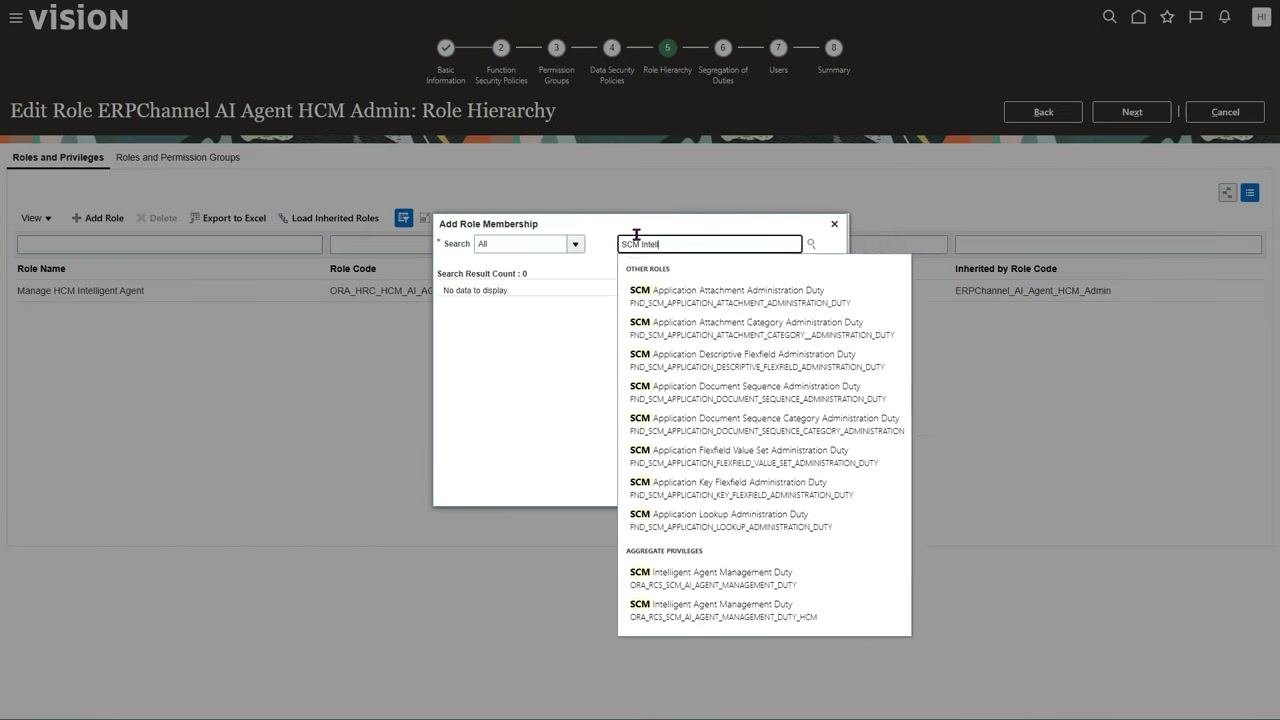
Step 27: Open Roles and Permission Groups
Click the Roles and Permission Groups tab at the top of the role editing interface to continue configuration.
By following these steps, you can assign and configure product-specific AI agent administration roles for HCM, Financials, and SCM, ensuring the correct permissions and role hierarchies are established for each product area.
Step 28: Add the Fai Genai Agent HCM Administrator Duty role
In the "Edit Role ERPChannel AI Agent HCM Admin: Role Hierarchy" screen, make sure you are on the Roles and Permission Groups tab. Click + Add Role to open the Add Role Membership dialog, then type "Fai Genai Agent" in the search box to filter the available duty roles. Review the filtered list, which includes roles such as "Fai Genai Agent CX Administrator Duty" and "Fai Genai Agent FS Administrator Duty," and select the appropriate role to add it to the hierarchy.
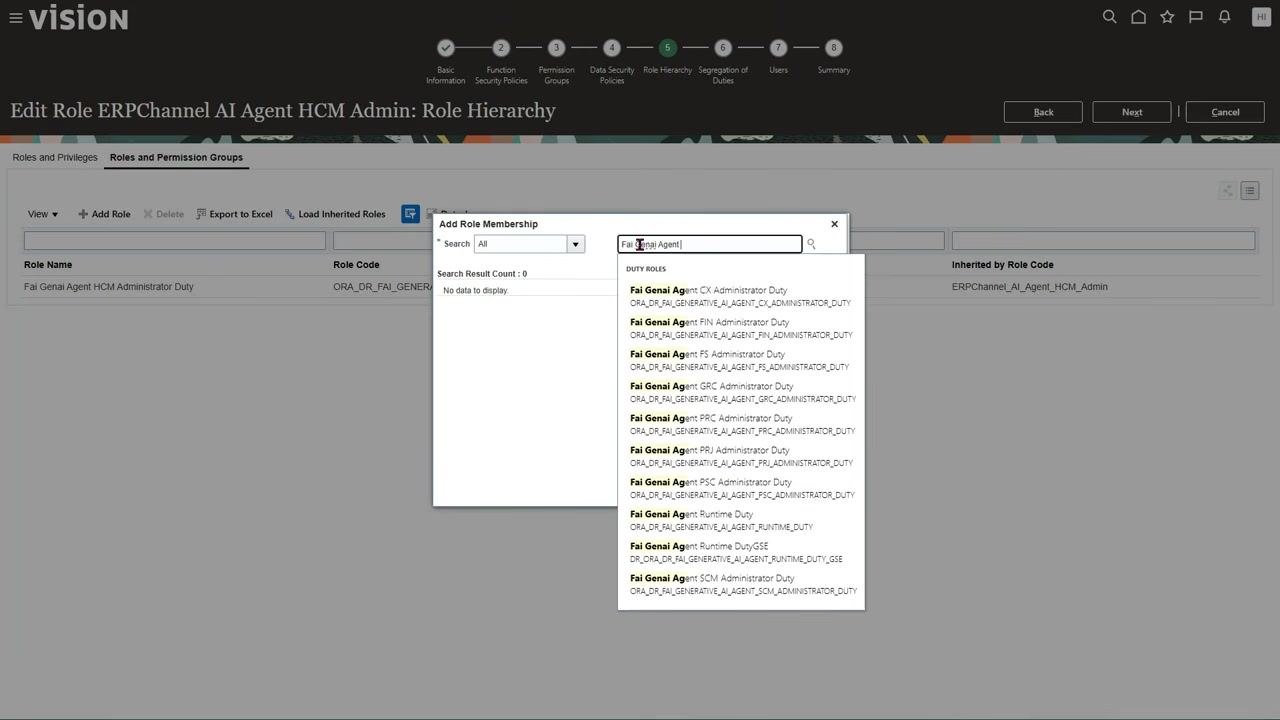
Step 29: Run the required security ESS jobs
After configuring the role, close the role configuration dialog and navigate to the Overview screen for ESS (Enterprise Scheduler Service) jobs. In the search section, set Status to Running and filter by the relevant submission time. Locate the process "Import User and Role Application Security Data" with status Running, and ensure this process completes to apply the new security settings.
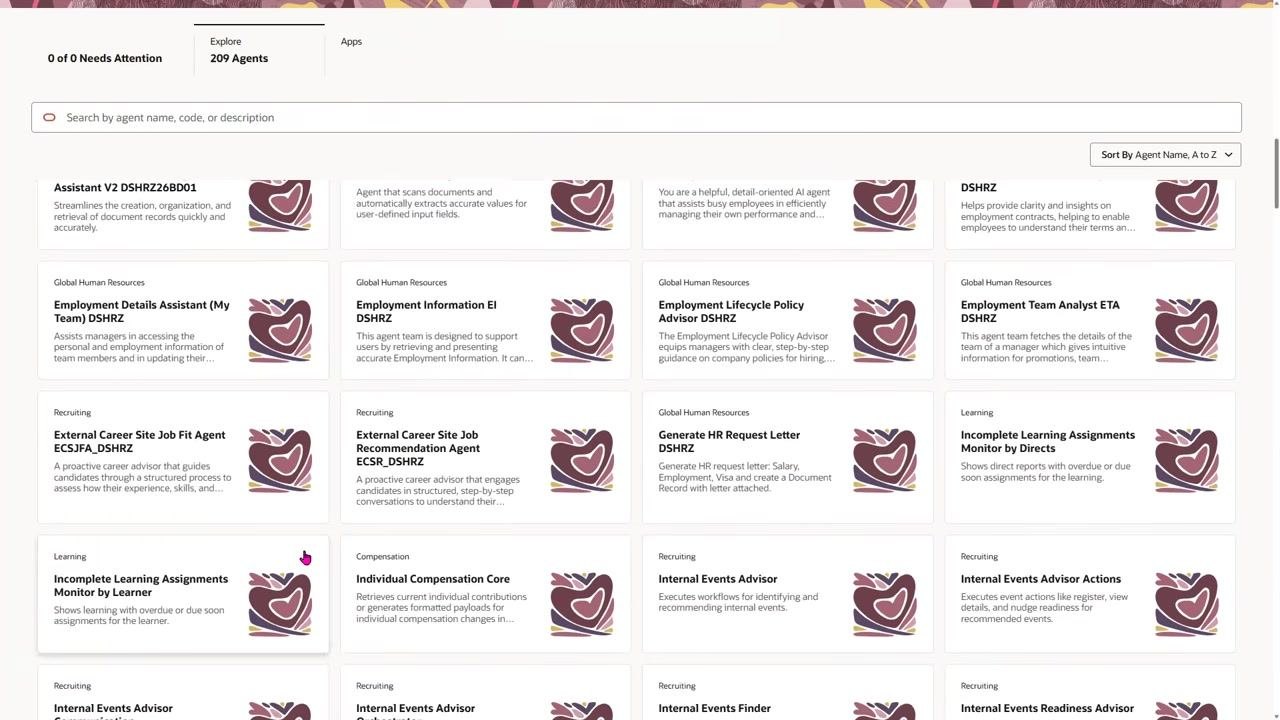
Step 30: Verify administrator access
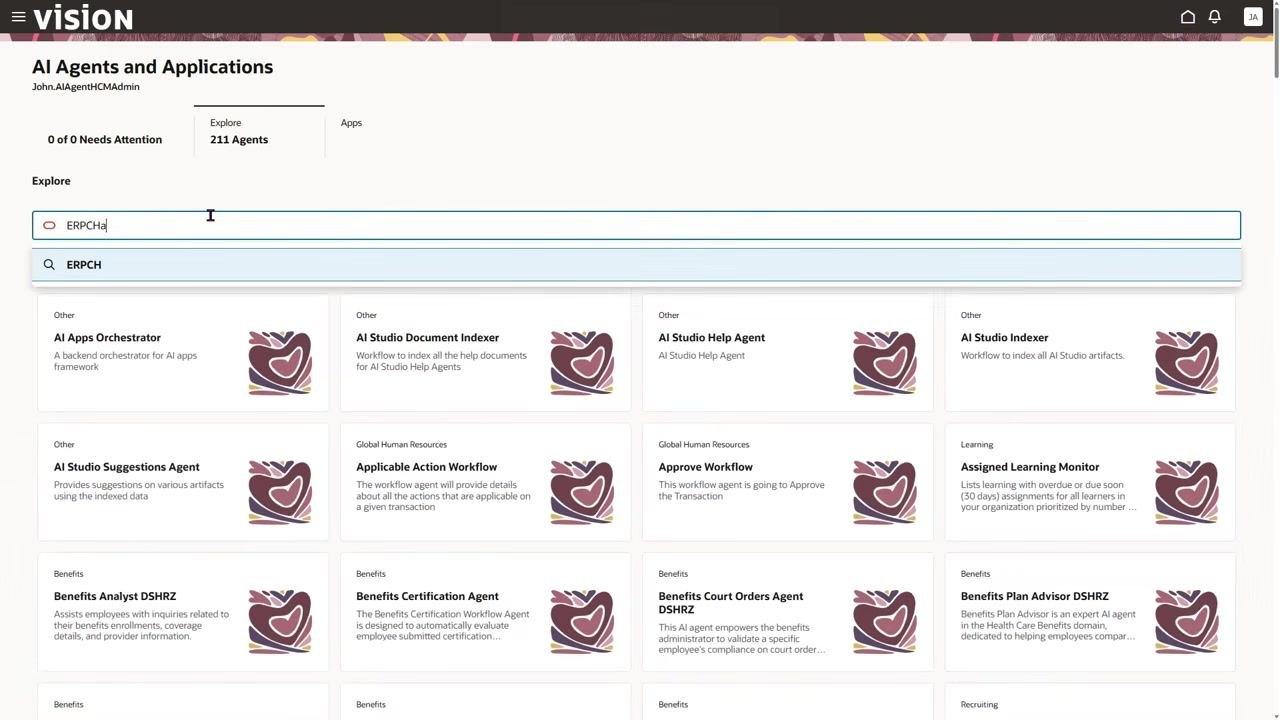
Log in as the HCM administrator user to verify access, and open the AI Agents and Applications dashboard. Confirm that the user (for example, John.AIAgentHCMAdmin) can see the Explore 209 Agents tab. Use the search bar or browse the list to view available AI agents and applications, and confirm that the user now has access to all HCM AI agent teams.
Step 31: Verify template access in AI Agent Studio
Navigate to AI Agent Studio to confirm that the user can see all HCM templates. Only HCM-related templates should be visible, such as "Career Coach Template," "Resignation Assistant," and "Leave and Absence Analyst (My Team)." Each template card provides options to Copy Template or Use Template.
Step 32: Open an agent team's security settings
Select an agent team, such as "Benefits Policy Advisor ERPChannel." The agent team details panel displays fields including Agent Team Name, Family (HCM), Product (Benefits), Type (Supervisor), Maximum Interactions, and Description. Click the Security tab to configure access.
Step 33: Review the security configuration
In the Security tab, verify that the For all employees toggle is off. If no roles are currently assigned, the message "After you add roles, you can see them here" is displayed. Click + Add to assign specific roles if needed. Note that publishing the agent team without assigning roles does not make it available to everyone.
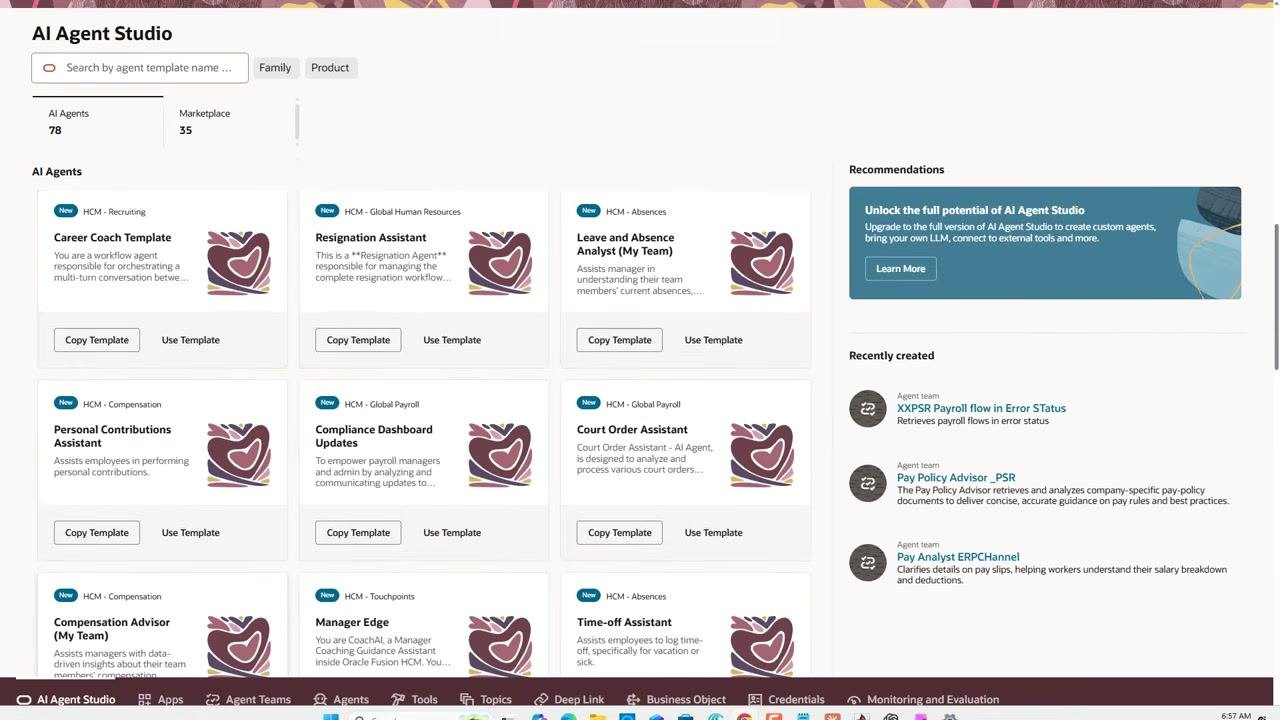
By following these steps, you ensure that the correct duty roles are added, security jobs are run, and access is properly verified and configured for HCM AI agent teams and templates.
Access and use AI Agent templates
Step 34: Search for a specific AI agent
In the AI Agents and Applications section, use the search bar to enter the agent name or code. For example, type "ERPCH" to filter the list of agents. The system displays matching agents, such as "Benefits Policy Advisor ERPChannel" and "Pay Analyst ERPChannel." Review the agent descriptions to ensure you select the correct one.
Step 35: Switch to an end user role
Log in as an end user (for example, Ben.EndUser) who has access only to the AI chat. The AI Agents and Applications screen now displays agents available to this user. The number of agents may differ based on user permissions, for example showing "4 Agents." Review the available agents, such as "AI Apps Orchestrator," "DCS Chat Assistant," "DCS Knowledge Search Assistant," and "Service Request Creation Assistant."
Step 36: View template options in AI Agent Studio
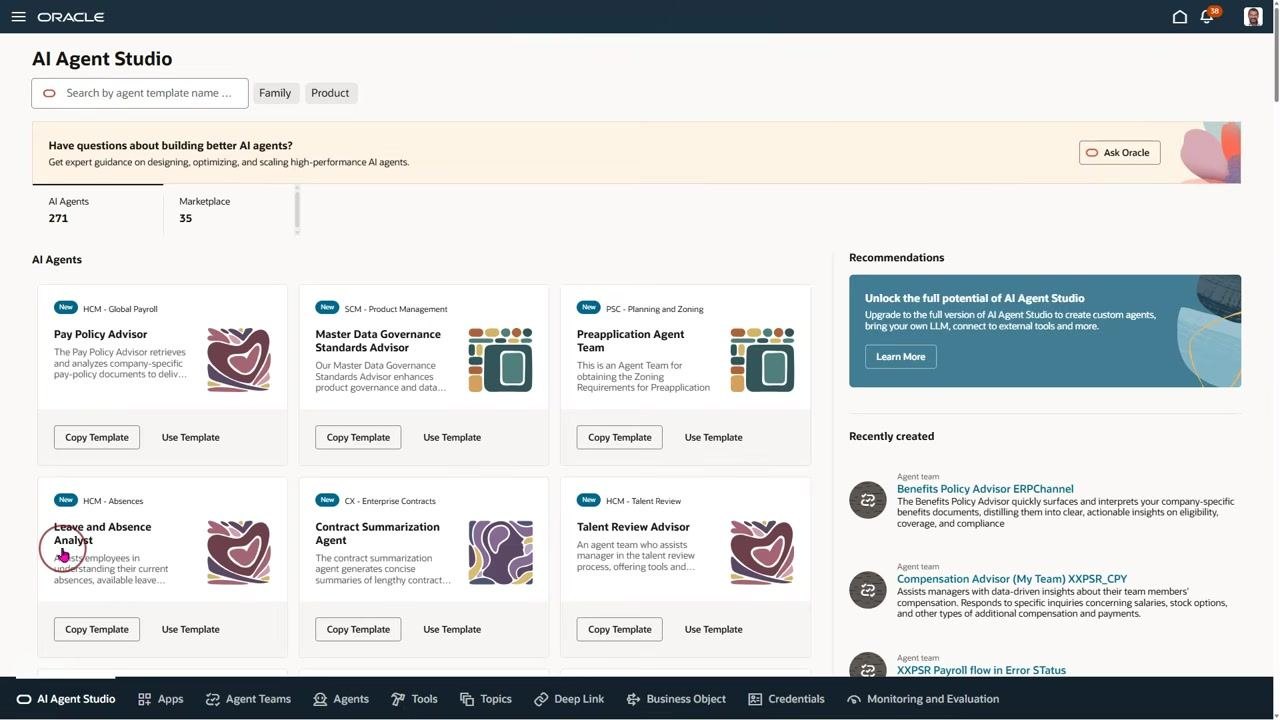
Navigate to AI Agent Studio and browse the list of available agent templates. For each template, you see two options: Copy Template and Use Template. Example templates include "Pay Policy Advisor," "Master Data Governance Standards Advisor," "Preapplication Agent Team," "Leave and Absence Analyst," "Contract Summarization Agent," and "Talent Review Advisor." The right panel displays recommendations and a list of recently created agent teams.
Step 37: Search for the Pay Analyst template
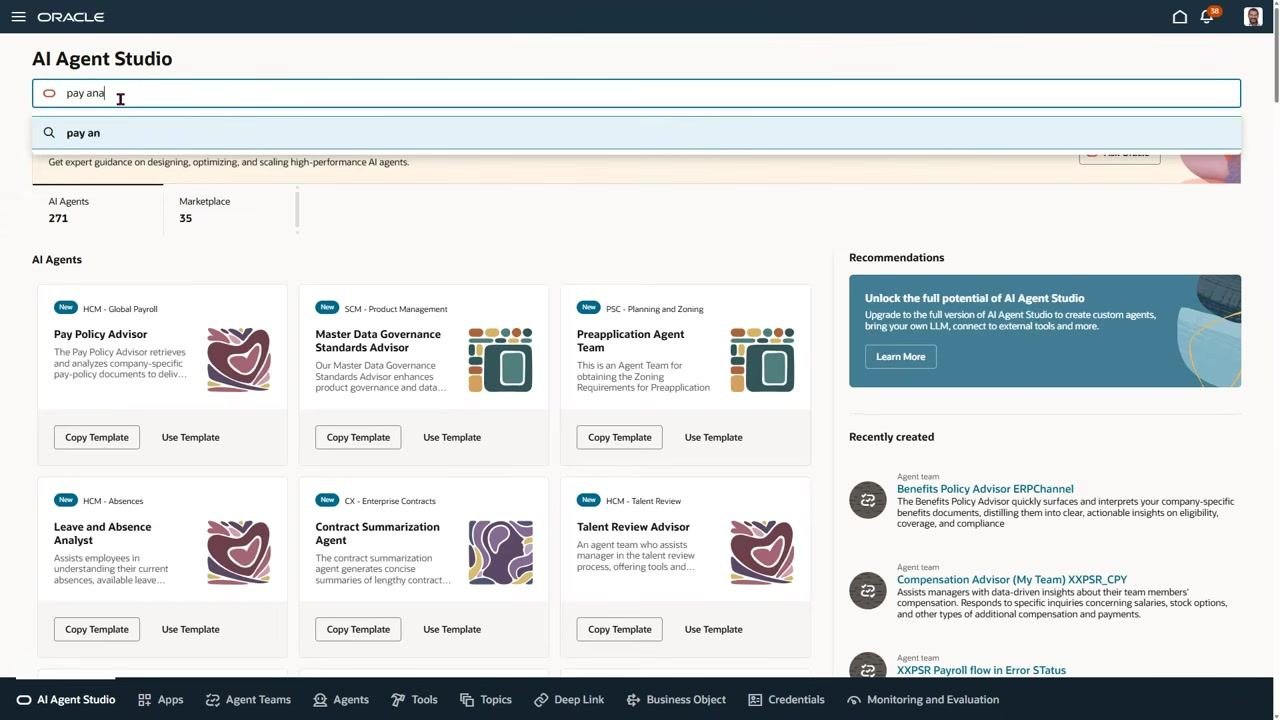
In AI Agent Studio, locate the search bar at the top of the screen and begin typing "pay anal" to filter available agent templates. Observe the dynamic search results as they update. The right panel continues to provide recommendations and a list of recently created agent teams.
Step 38: Copy the Pay Analyst template
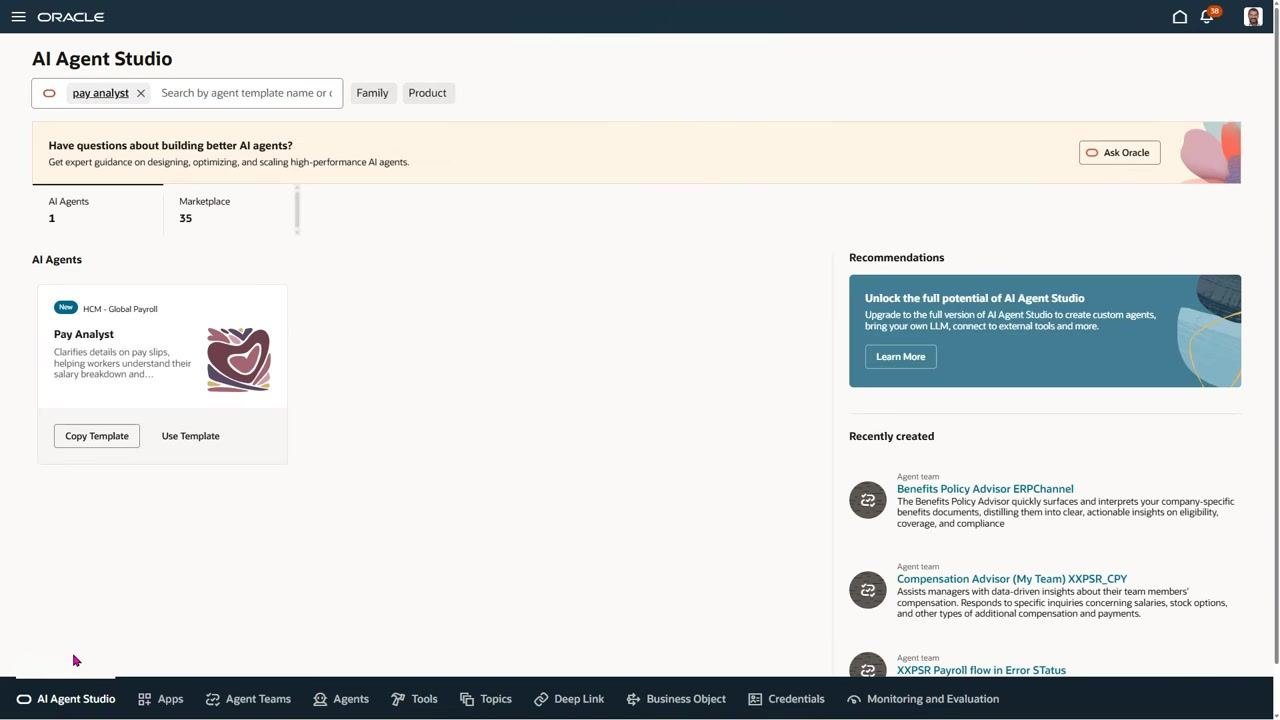
Once the "Pay Analyst" template appears in the search results, click Copy Template. The system creates a new draft agent team based on the selected template. A new screen appears showing the configuration for "Pay Analyst ERPChannel1" in draft mode. The right panel displays the agent's tools (such as LLM Calls, GetUserSession, Public Workers, and Payslips) along with a sample interaction. You can test the agent using the chat area at the bottom of the screen.
Step 39: Use the Use Template option
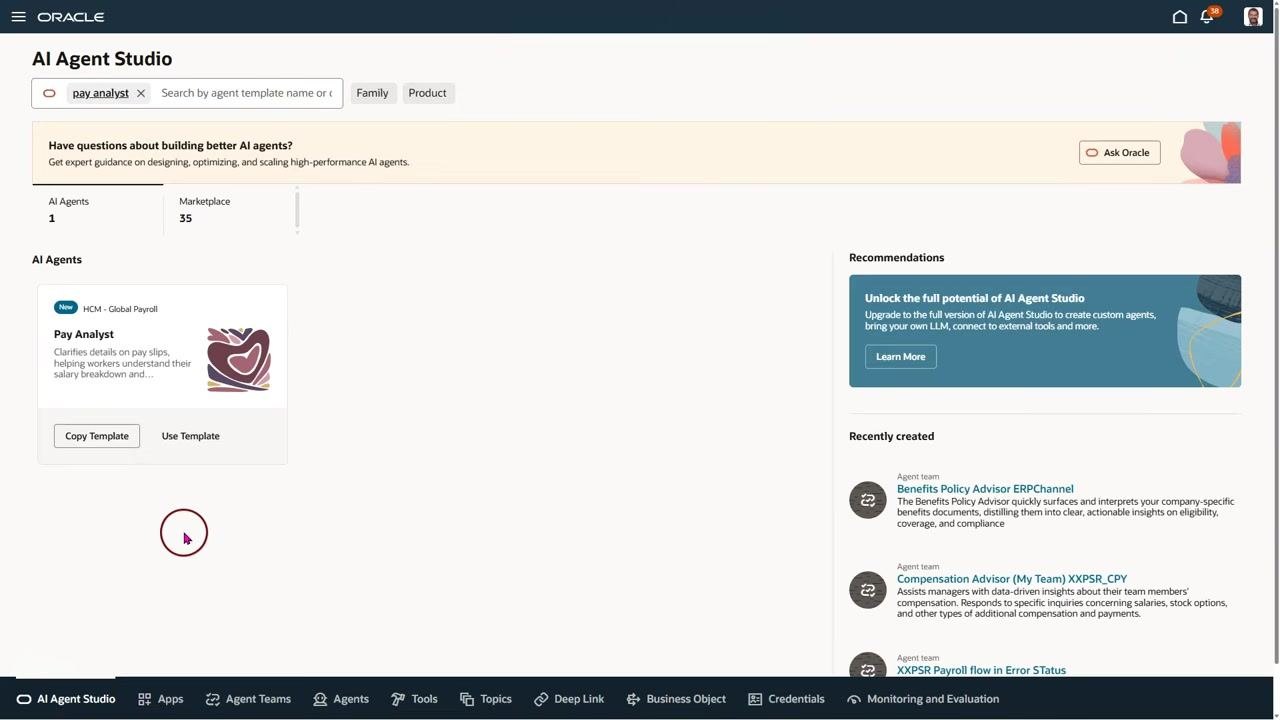
If you prefer a guided setup, click Use Template instead of Copy Template. This launches a step-by-step wizard for configuring the new agent team. The search bar shows "pay_analyst" as the active filter, with only the "Pay Analyst" template displayed, while the right panel continues to show recommendations and recently created agent teams.
Step 40: Start the step-by-step wizard
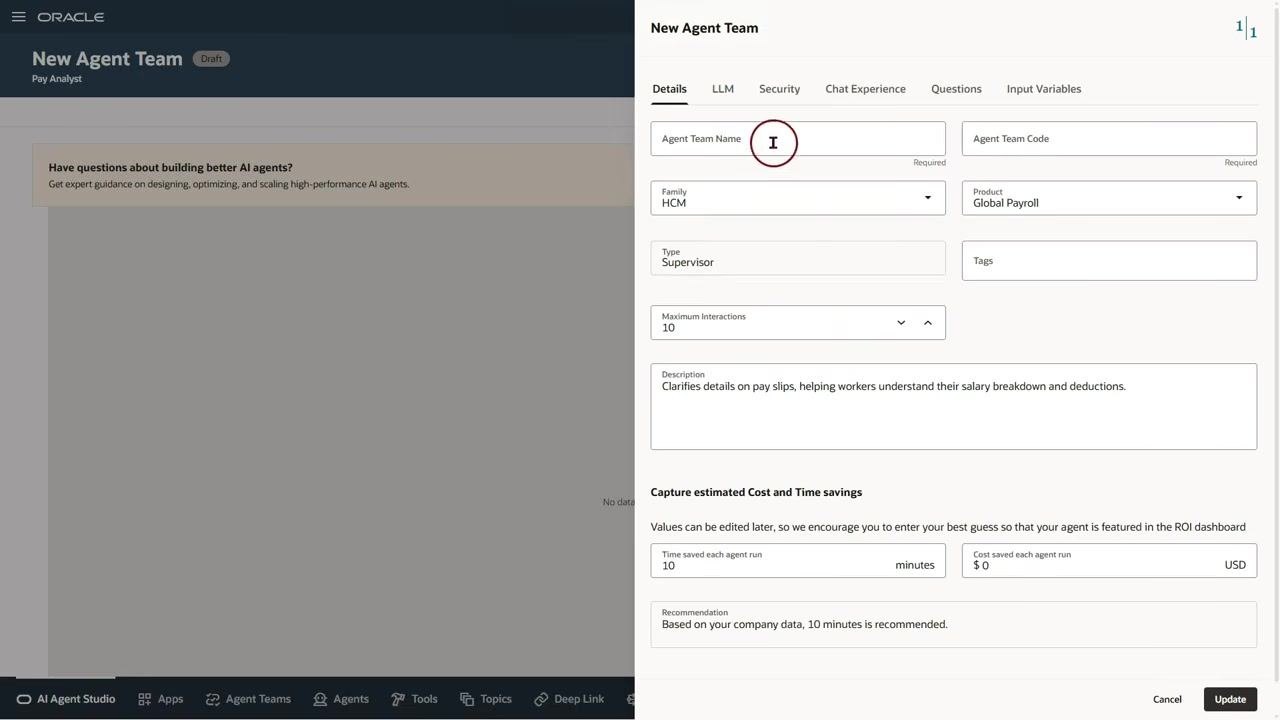
After clicking Use Template, the wizard opens to the New Agent Team configuration screen. The wizard includes multiple tabs: Details, LLM, Security, Chat Experience, Questions, and Input Variables. On the Details tab, fill in the following fields:
- Agent Team Name (required)
- Agent Team Code (required)
- Family: HCM (pre-filled)
- Product: Global Payroll (pre-filled)
- Type: Supervisor (pre-filled)
- Maximum Interactions: 10 (default)
- Description: Clarifies details on pay slips, helping workers understand their salary breakdown and deductions
- Time saved each agent run: 10 minutes (default)
- Cost saved each agent run: $0 USD (default)
A recommendation is shown: "Based on your company data, 10 minutes is recommended." You can edit these values later if needed.
Step 41: Enter the agent team name
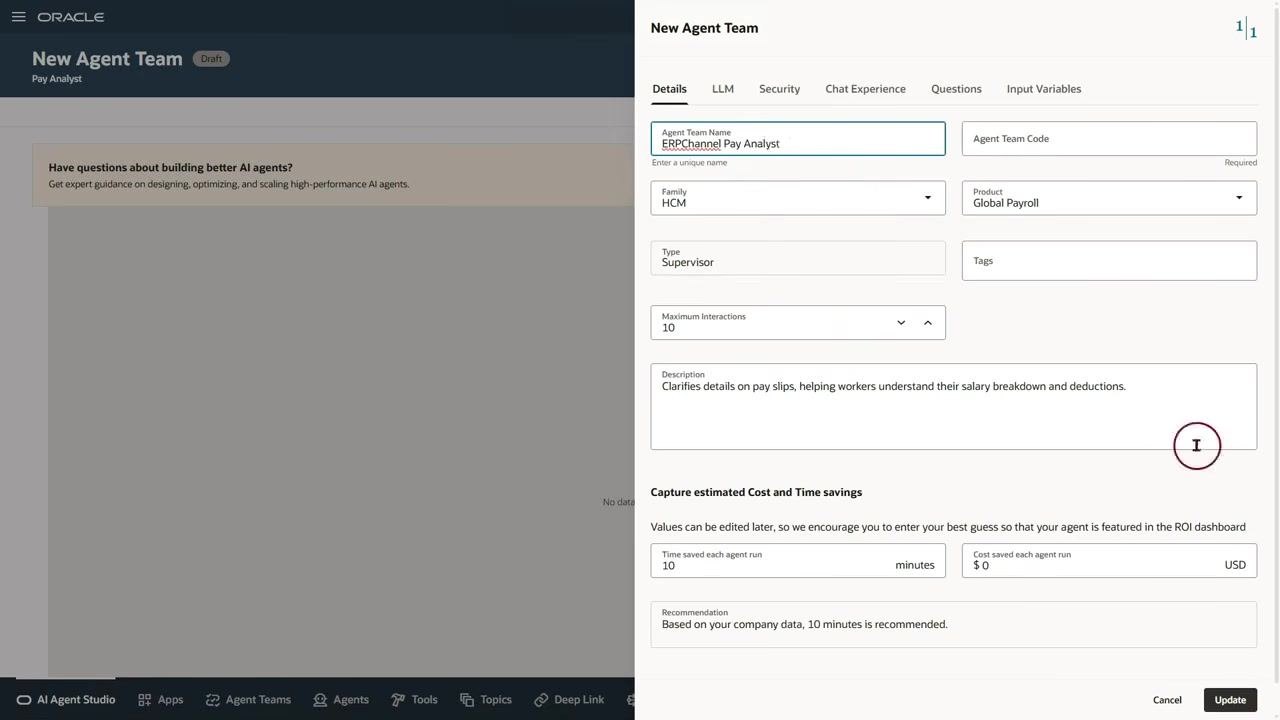
In the Agent Team Name field, enter a unique name for your agent team, such as "ERPChannel Pay Analyst." Make sure the name is descriptive and follows your organization's naming conventions.
Step 42: Save the new agent team
After entering the required details, click Update at the bottom right of the wizard to save your new agent team. The system creates the agent team and returns you to the main configuration screen, where you can interact with or further configure your new AI agent team.
Your new agent team, "ERPChannel Pay Analyst," is now available in draft mode. The left panel shows the agent's details, tools, and topics, while the right panel is ready for further configuration or testing. You can now chat with the agent or continue refining its configuration as needed.
What's next
By following these steps, you can efficiently search for a delivered template, copy or use it, and configure a new AI agent team in Oracle Fusion. Both Copy Template and Use Template lead to the same result, but Use Template provides a guided, step-by-step setup process. Be sure to enter all required details and save your configuration to activate your new agent team.
With AI Agent Studio enabled and your roles, profile options, and agent teams correctly configured, you can continue to create additional agent teams, assign security roles for other product areas, and manage templates for the users in your organization.
Generation details: cost, quality tiers
Docsie billed 7,000 credits ($4.90) to analyze this 14-minute video at standard quality. The rewrite, template fill and Word/PDF exports were included. The same video at each quality tier:
| Quality | Frames sampled | Credits | Approx. cost |
|---|---|---|---|
| Draft | every 16-30 s | 3,500 | $2.45 |
| Standard (this guide) | every 8-15 s | 7,000 | $4.90 |
| Detailed | every 4-7 s | 14,000 | $9.80 |
| Ultra | every 1-3 s | 28,000 | $19.60 |
Credits priced at $0.70 per 1,000; plans include a monthly allowance. Enterprise customers on on-premise or bring-your-own-model deployments run this on their own inference and pay no per-video credits.
Generated by Docsie Video-to-Docs on 2026-10-11 from a 13-minute video. Screenshots are frames from the source video and belong to their creator, Oracle Cloud ERP Channel, whose original is embedded above. If you own this video and want the guide removed or credited differently, contact us and we will act within one business day.