
How to Write Macros in CATIA
This guide shows you how to write macros in CATIA using VBA (Visual Basic for Applications). You will learn how to set up a dedicated macro folder, create a new VBA macro library, write a simple test macro by hand, and record a macro automatically based on actions performed in the CATIA workspace. By the end, you will know how to manage multiple macros from the Macros dialog.
Video: CATIA V5 - VBA MACROS - RECORDING MACROS - CREATE A POINT by HOW2CATIA (2020). All credit for the demonstration goes to the creator; watch the original on YouTube. The written guide below was generated from this video by Docsie. Creator? Request a change or removal.
This guide shows you how to write macros in CATIA using VBA (Visual Basic for Applications). You will learn how to set up a dedicated macro folder, create a new VBA macro library, write a simple test macro by hand, and record a macro automatically based on actions performed in the CATIA workspace. By the end, you will know how to manage multiple macros from the Macros dialog.
Prerequisites
- CATIA V5 installed on your system.
- Access to Windows Explorer to create a folder structure for storing macros.
- Basic familiarity with the CATIA V5 interface and the Tools menu.
Create a folder to store your macros
Before writing macros in CATIA, set up a dedicated folder to keep your VBA projects organized.
- Open Windows Explorer and navigate to the root directory (for example, *C:*).
- Right-click in the white space of the directory window to open the context menu.
- Select New > Folder.
- Name the new folder MACROS.
Verify the folder is empty
Confirm that the new folder is ready to receive your macro project.
- Double-click the MACROS folder to open it.
- Confirm that the folder is empty. The message "This folder is empty" should be displayed.
Open CATIA V5 and access macro libraries
With your folder ready, open CATIA V5 to begin creating your first macro library.
- Launch CATIA V5 and open a new or existing part document.
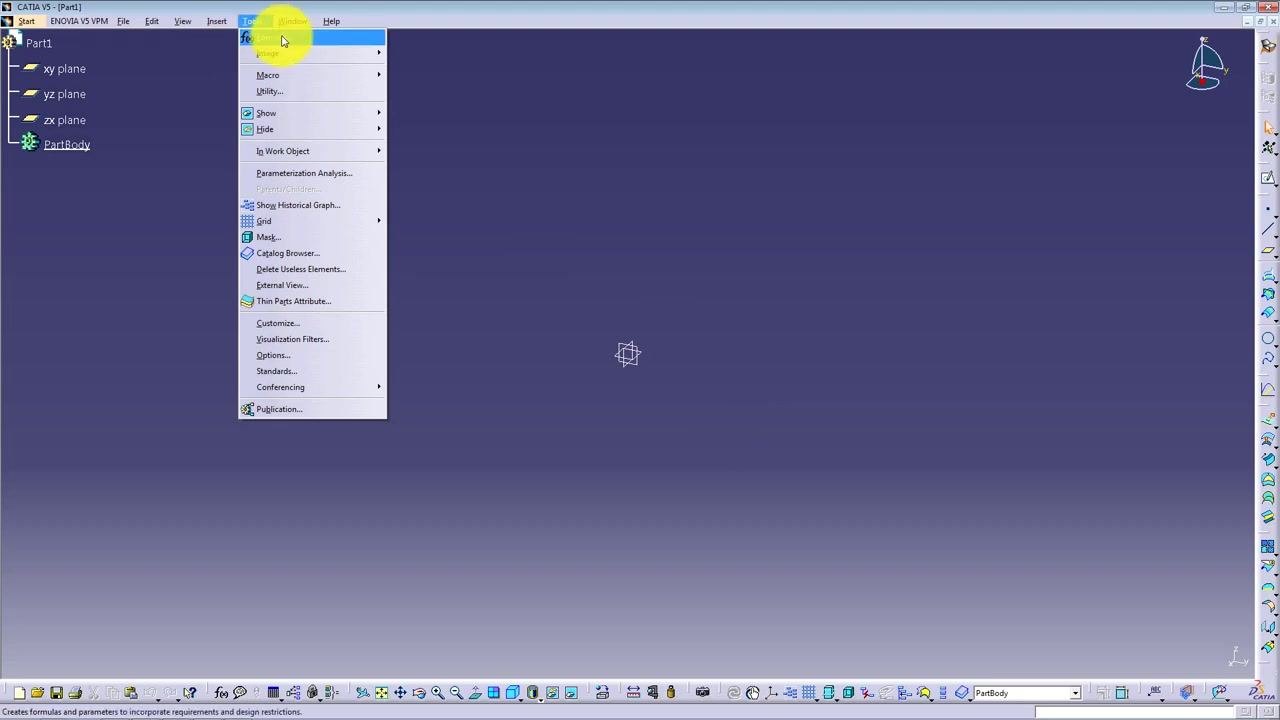
- Go to the top menu and click Tools.
- In the dropdown menu, hover over Macro and select the option to manage macro libraries.
Create a new VBA macro library
Now create the VBA project that will hold your macros.
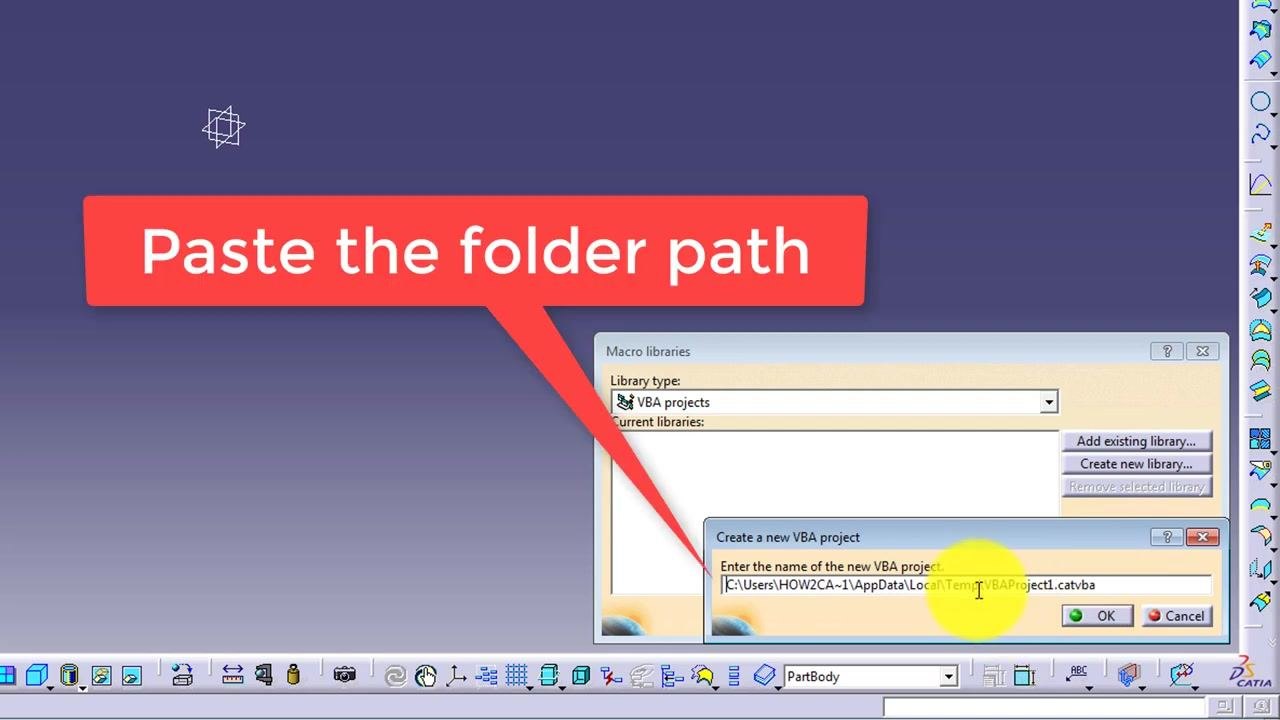
- In the Macro libraries dialog, ensure Library type is set to VBA projects.
- Click Create new library... on the right.
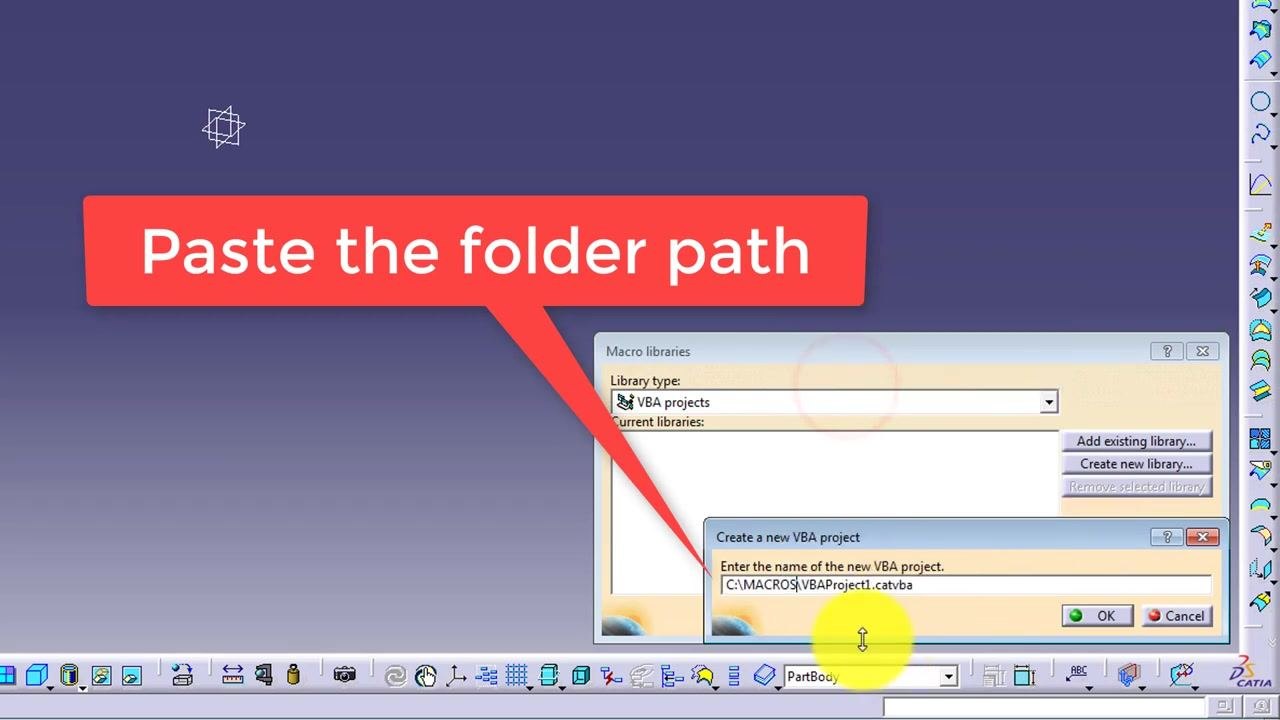
- In the dialog that appears, paste the full path to the MACROS folder you created (for example,
C:\MACROS\VBAProject1.catvba). - Click OK to create the new VBA project in the specified folder.
Create a simple test macro
Write your first macro by hand to confirm the VBA editor is working correctly.
- The Microsoft Visual Basic for Applications (VBA) editor opens automatically with the new project.
- Under VBAProject1 (C:\MACROS\VBAProject1.catvba), expand Modules and select Module1.
- In the code window, type the following code:
Sub CATMain()
    MsgBox "Hello"
End Sub
- This macro displays a message box with the text "Hello" when run.
Start recording a new macro
Beyond writing code manually, you can also record a macro in CATIA based on your actions in the workspace.
- In CATIA V5, open the Record macro dialog.
- Confirm the following settings:
- Current macro library or document:
C:\MACROS\VBAProject1.catvba - Language used: MS VBA
- Macro name:
Module2 - Click Start to begin recording a new macro.
Perform the actions to record
With recording active, perform the actions you want captured in the macro.
- In the CATIA workspace, perform the desired actions to be recorded.
- In this example, a new point is created in the tree under
Geometrical Set.1asPoint.1. - The cursor indicates the selection or creation action.
- The tree structure on the left now shows:
- Part1
- xy plane, yz plane, zx plane
- PartBody
- Geometrical Set.1
- Point.1 (highlighted, indicating selection)
Review the automatically generated macro code
After recording, inspect the code CATIA generated for your actions.
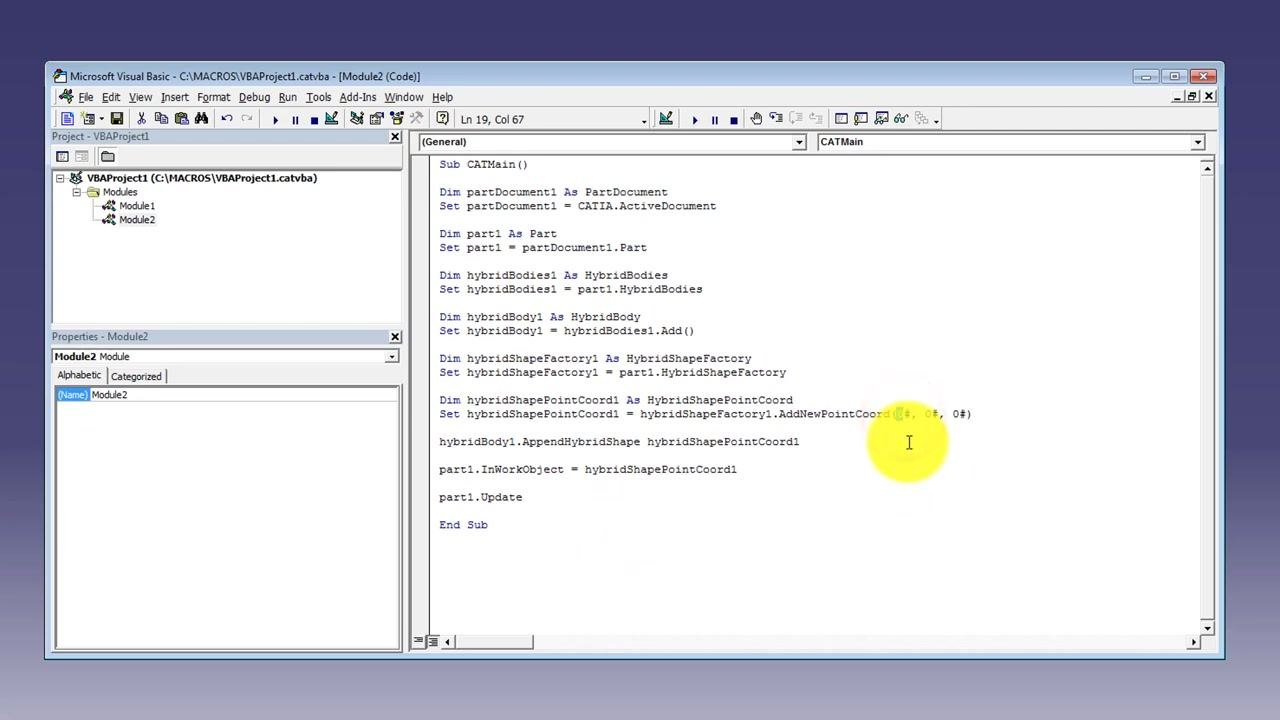
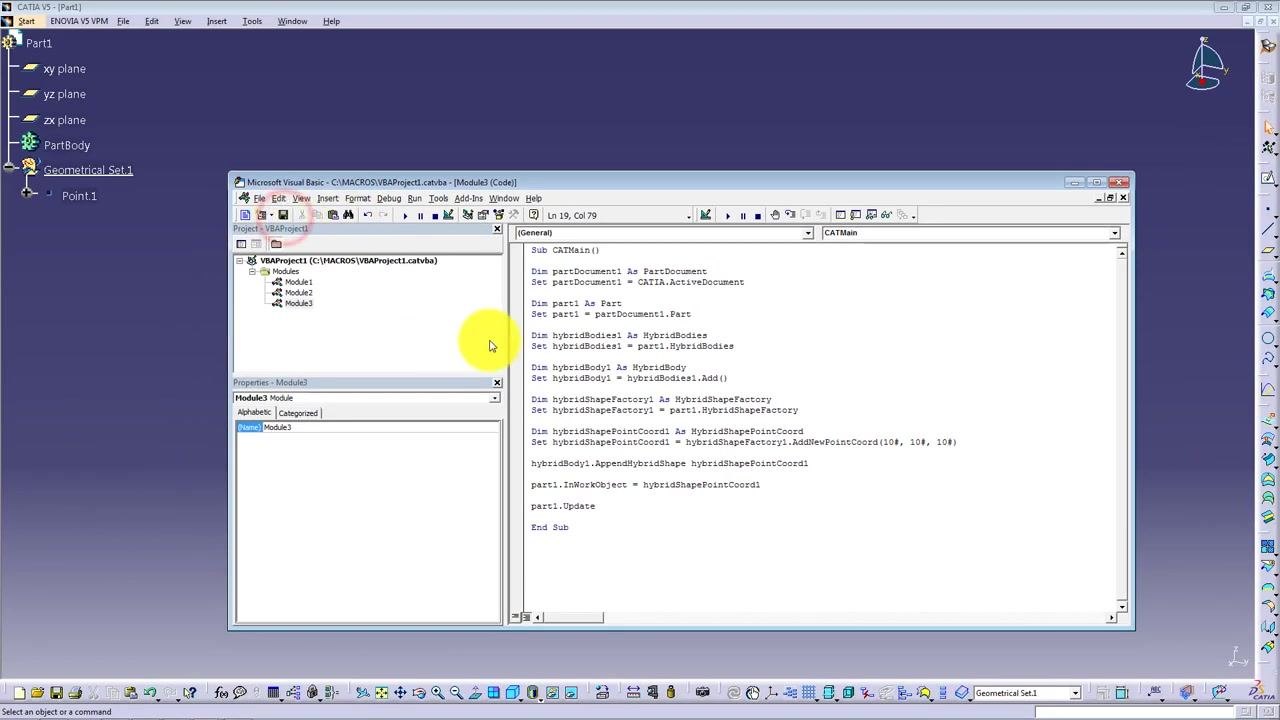
- The VBA editor opens and displays the new module (
Module2) under the same project. - The code window contains the automatically generated VBA code for the recorded actions:
Sub CATMain()
    Dim partDocument1 As PartDocument
    Set partDocument1 = CATIA.ActiveDocument

    Dim part1 As Part
    Set part1 = partDocument1.Part

    Dim hybridBodies1 As HybridBodies
    Set hybridBodies1 = part1.HybridBodies

    Dim hybridBody1 As HybridBody
    Set hybridBody1 = hybridBodies1.Add()

    Dim hybridShapeFactory1 As HybridShapeFactory
    Set hybridShapeFactory1 = part1.HybridShapeFactory

    Dim hybridShapePointCoord1 As HybridShapePointCoord
    Set hybridShapePointCoord1 = hybridShapeFactory1.AddNewPointCoord(0#, 0#, 0#)

    hybridBody1.AppendHybridShape hybridShapePointCoord1
    part1.InWorkObject = hybridShapePointCoord1
    part1.Update
End Sub
- This code creates a new point at coordinates (0, 0, 0) in the part document.
Insert a new module in the VBA project
You can add additional modules to the same project to organize further macros.
- In the VBA editor, right-click the project tree under
VBAProject1. - Hover over Insert and select Module from the context menu.
- This action adds a new module (
Module3) to the project.
Review all available macros
Finally, open the Macros dialog to see and manage everything you have created.
- In CATIA V5, open the Macros dialog.
- The dialog lists all available macros in the current macro library:
- Module1 (MS VBA)
- Module2 (MS VBA)
- Module3 (MS VBA)
- From this dialog, you can select, run, edit, create, rename, or delete macros.
Summary
You have now learned how to write macros in CATIA V5 using two approaches: manually typing VBA code into a module, and recording a macro by performing actions directly in the CATIA workspace. You also know how to organize macros into multiple modules within a single VBA project and manage them all from the Macros dialog.
What's next
- Experiment with editing the recorded code in
Module2to customize the point creation logic. - Try recording additional actions to generate more advanced macros automatically.
- Use the Macros dialog to rename, organize, or delete macros as your project grows.
Generation details: cost, quality tiers
Docsie billed 1,500 credits ($1.05) to analyze this 3-minute video at standard quality. The rewrite, template fill and Word/PDF exports were included. The same video at each quality tier:
| Quality | Frames sampled | Credits | Approx. cost |
|---|---|---|---|
| Draft | every 16-30 s | 750 | $0.52 |
| Standard (this guide) | every 8-15 s | 1,500 | $1.05 |
| Detailed | every 4-7 s | 3,000 | $2.10 |
| Ultra | every 1-3 s | 6,000 | $4.20 |
Credits priced at $0.70 per 1,000; plans include a monthly allowance. Enterprise customers on on-premise or bring-your-own-model deployments run this on their own inference and pay no per-video credits.
Generated by Docsie Video-to-Docs on 2026-10-11 from a 2-minute video. Screenshots are frames from the source video and belong to their creator, HOW2CATIA, whose original is embedded above. If you own this video and want the guide removed or credited differently, contact us and we will act within one business day.