
How to Create a Material Master in SAP MM01
This guide walks you through how to create a material master in SAP MM01, from opening the initial transaction screen to saving the completed raw material. You will enter basic data, purchasing information, plant and storage details, and accounting data, then confirm that the material has been successfully created.
Video: How to create a material master data in SAP MM by D-TaleD VaulT. All credit for the demonstration goes to the creator; watch the original on YouTube. The written guide below was generated from this video by Docsie. Creator? Request a change or removal.
This guide walks you through how to create a material master in SAP MM01, from opening the initial transaction screen to saving the completed raw material. You will enter basic data, purchasing information, plant and storage details, and accounting data, then confirm that the material has been successfully created.
Prerequisites
Before you begin, make sure you have the following information ready:
- The Industry sector and Material Type you want to assign to the new material
- An external material number, if your organization does not use internal numbering (for example,
M101) - The Plant and Storage Location codes for your organization (for example,
ZZ10) - Relevant material group, weight, and dimension values
- Purchasing group and purchasing value key details
- Accounting information such as currency, valuation class, and price control settings
Steps
Open the SAP Easy Access screen
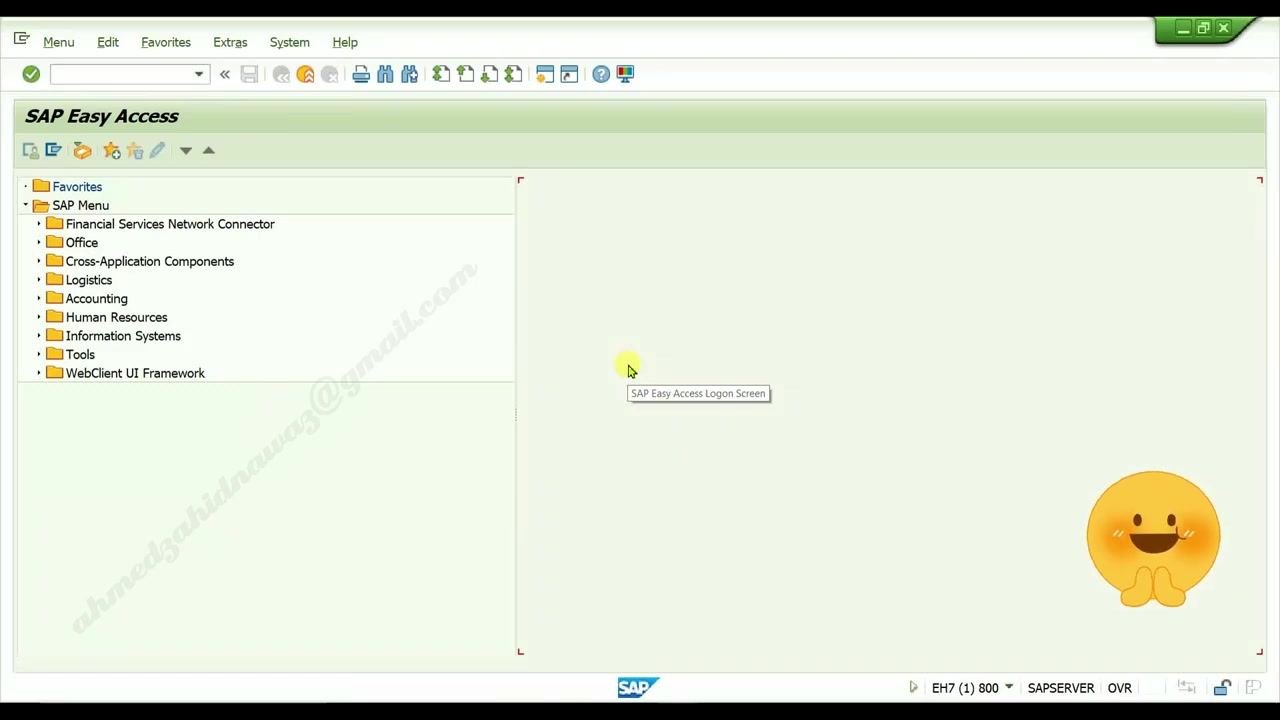
Start from the SAP Easy Access main menu. The left panel displays the SAP Menu with folders such as Financial Services Network Connector, Office, Logistics, Accounting, Human Resources, Information Systems, Tools, and WebClient UI Framework. The top menu bar shows Menu, Edit, Favorites, Extras, System, and Help.
Enter transaction code MM01
In the command field at the top of the screen, type mm01 and press Enter to open the material creation screen.
Fill in the Create Material initial screen
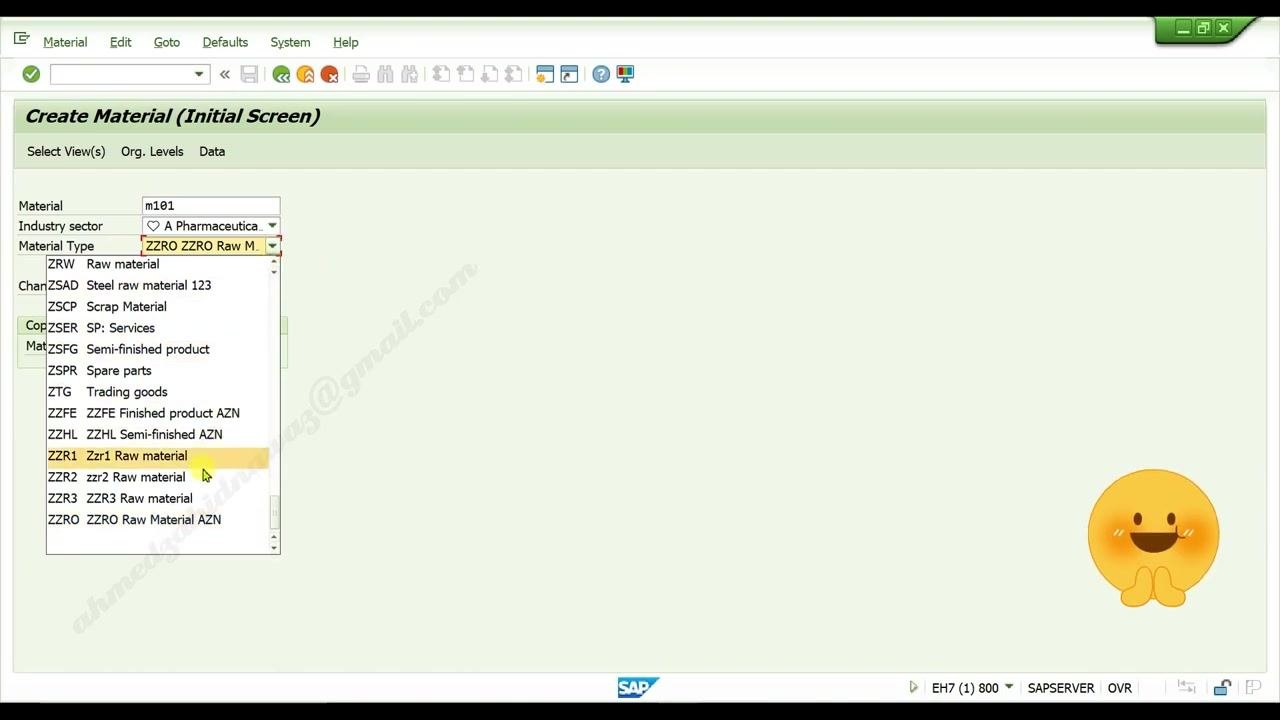
On the Create Material (Initial Screen), you see fields for Material, Industry sector, Material Type, Change Number, and Copy from Material.
- Leave the Material field blank if you want SAP to assign an internal number, or enter an external code (for example,
M101) - Select the appropriate Industry sector (for example, "A Pharmaceutical")
- Select the Material Type from the dropdown (for example, "ZZRO ZZRO Raw M.")
Choose the material type
Click the Material Type dropdown to view the available options and select the one that matches your material (for example, "ZZR1 Raw material").
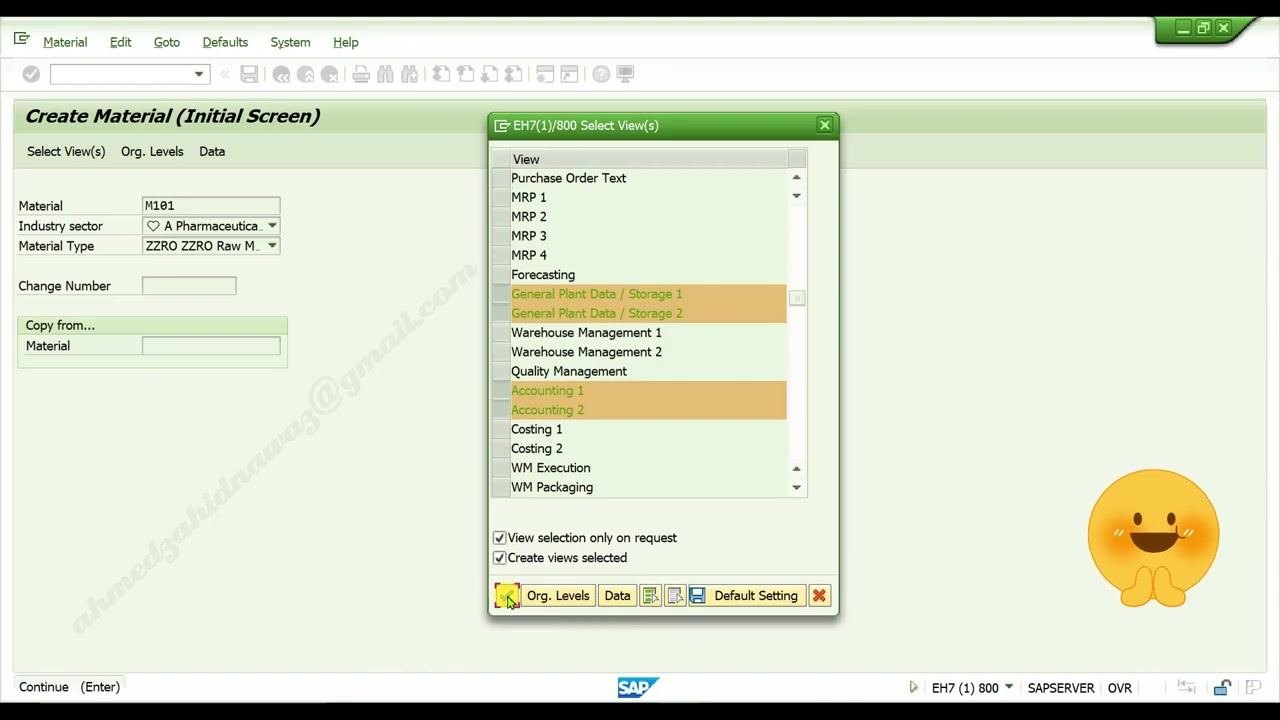
Select views for the material
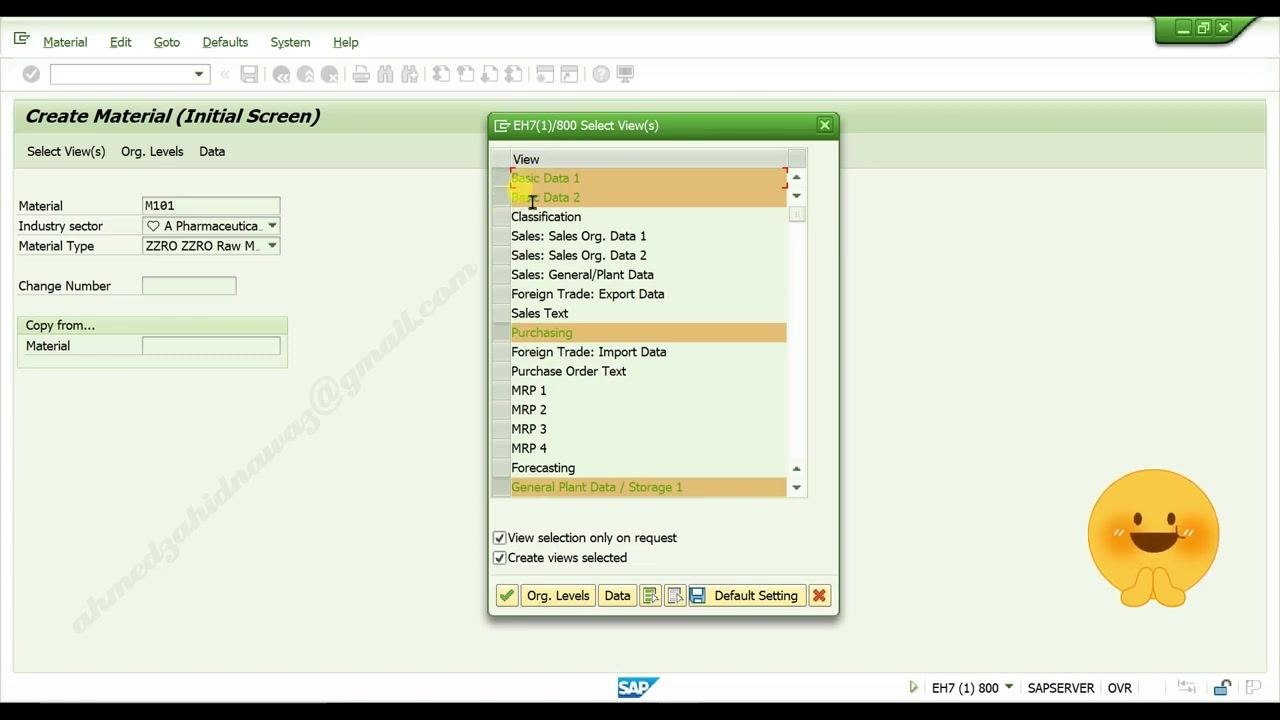
The Select View(s) dialog appears. Check the views you need, including:
- Basic Data 1
- Basic Data 2
- Purchasing
- General Plant Data / Storage 1
- General Plant Data / Storage 2
- Accounting 1
- Accounting 2
Make sure View selection only on request and Create views selected are also checked.
Continue selecting views
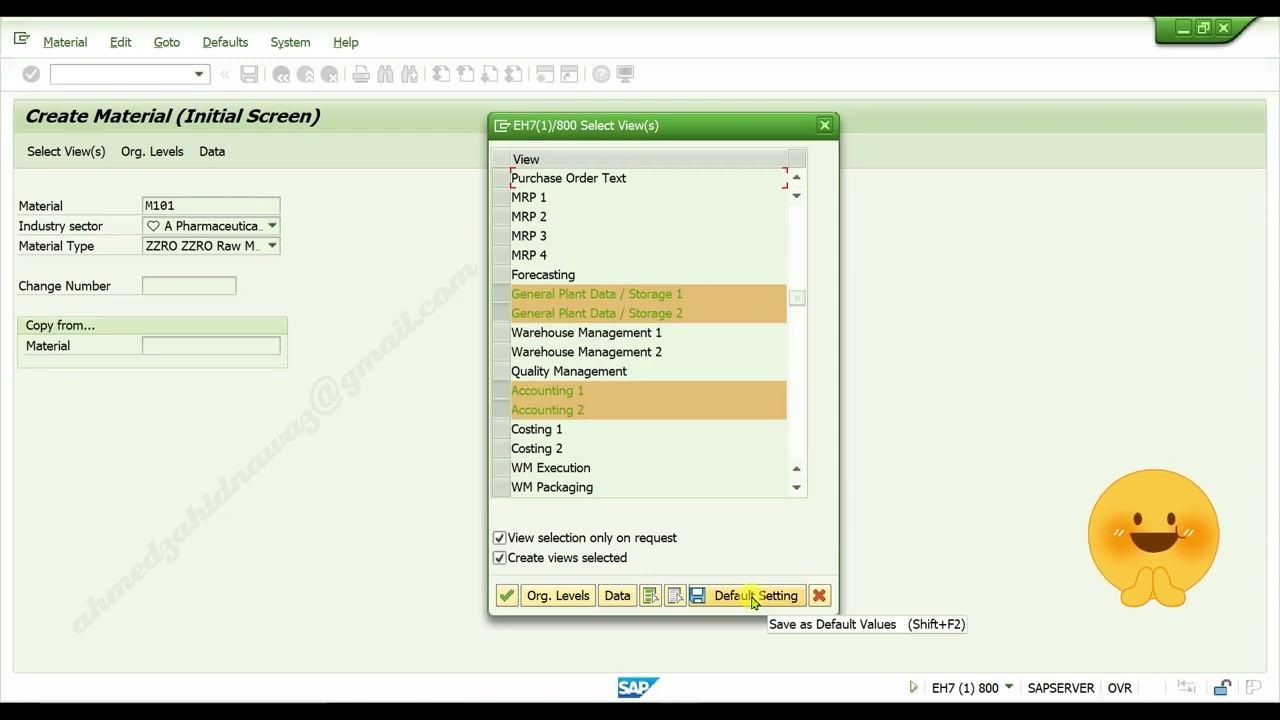
Scroll down in the dialog, if necessary, to select any remaining required views, including Accounting 1 and Accounting 2.
Save your view selection as default
Click Default Setting at the bottom of the Select View(s) dialog to save your selections as default values for future material creations.
Continue to the next screen
Click the green checkmark, or press Enter, to continue.
Enter organizational levels
In the Organizational Levels dialog, enter your Plant (for example, zz10) and your Storage Location. You may see a table showing Plant, Search Terms, Postal Code, City, Name, and Version details. Click Select View(s) to proceed.
Enter material description and basic data
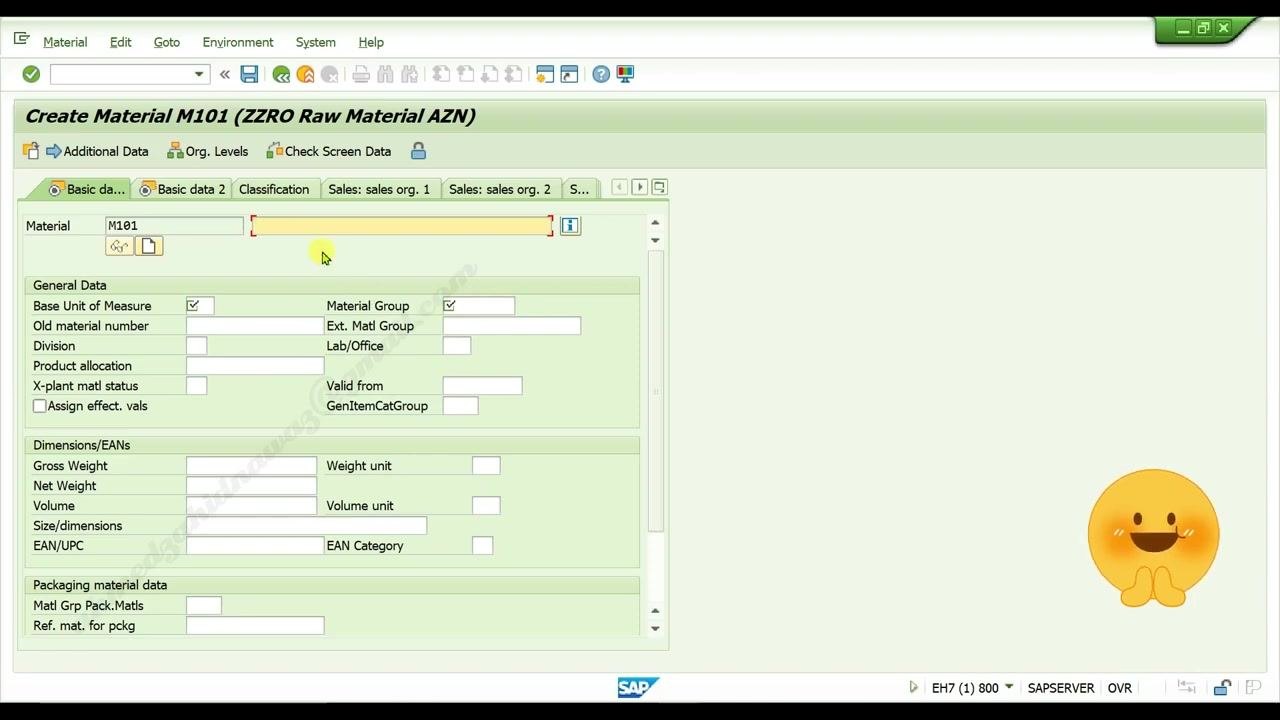
The system opens the material master data entry screen. Enter a description for your material and fill in other required fields such as Base Unit of Measure, Material Group, Division, Product Allocation, and any relevant dimensions or packaging data.
Enter measuring units for your material
On the Basic data 1 tab, locate the Base Unit of Measure field and enter the base unit for your material (for example, CKG for centi-kilogram). Confirm the material description is filled in (for example, Ergo M101).
Enter material group
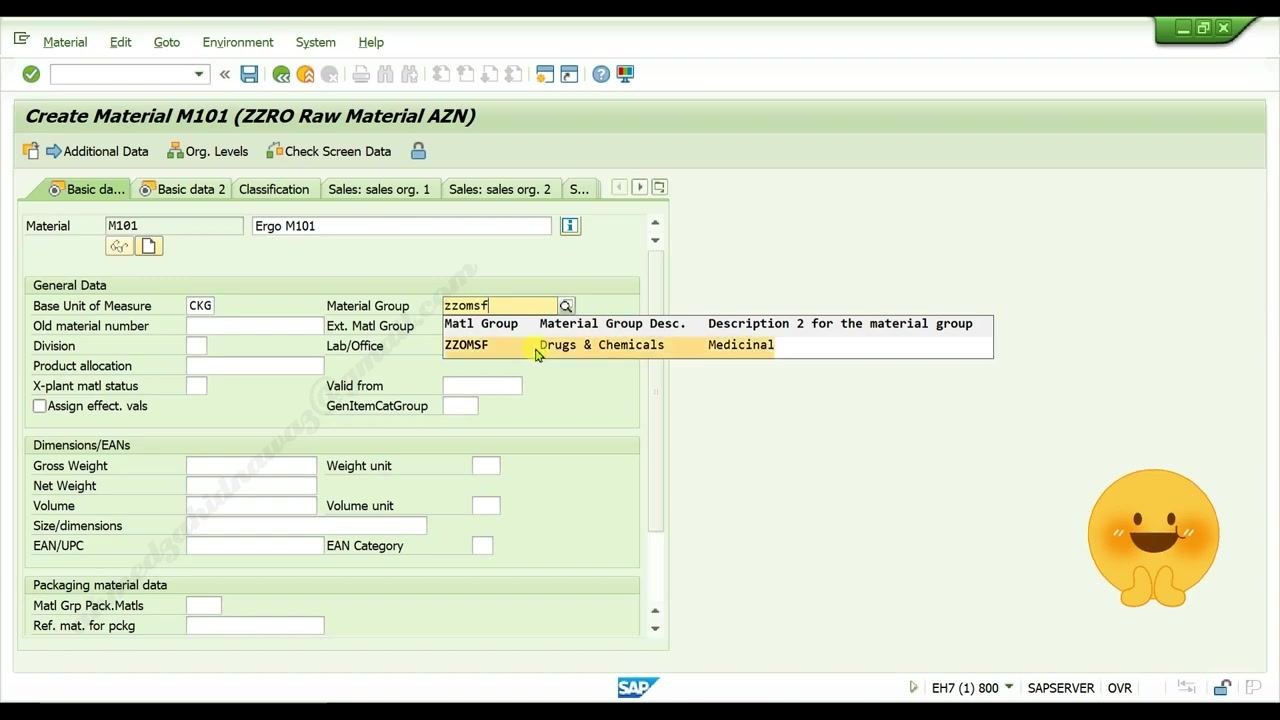
In the Material Group field, enter the appropriate group code (for example, ZZOMSF). Use the search icon to look up available groups if needed. For example, select ZZOMSF for "Drugs & Chemicals" with the description "Medicinal".
Enter gross weight
Under Dimensions/EANs, enter the gross weight of your material in the Gross Weight field (for example, 1020). Make sure the value is appropriate for your material.
Enter net weight and other dimensions
Enter the net weight of your material in the Net Weight field (for example, 1000). Fill in any other relevant dimension fields as required, such as Volume (for example, 1000).
Enter the weight unit
In the Weight unit field, enter the unit for the weights you provided (for example, G for grams). Use the search icon if you need to select from available units.
Confirm entries on the Basic data 1 tab
After entering all required data on the Basic data 1 tab, press Enter to validate the entries.
Confirm any additional prompts
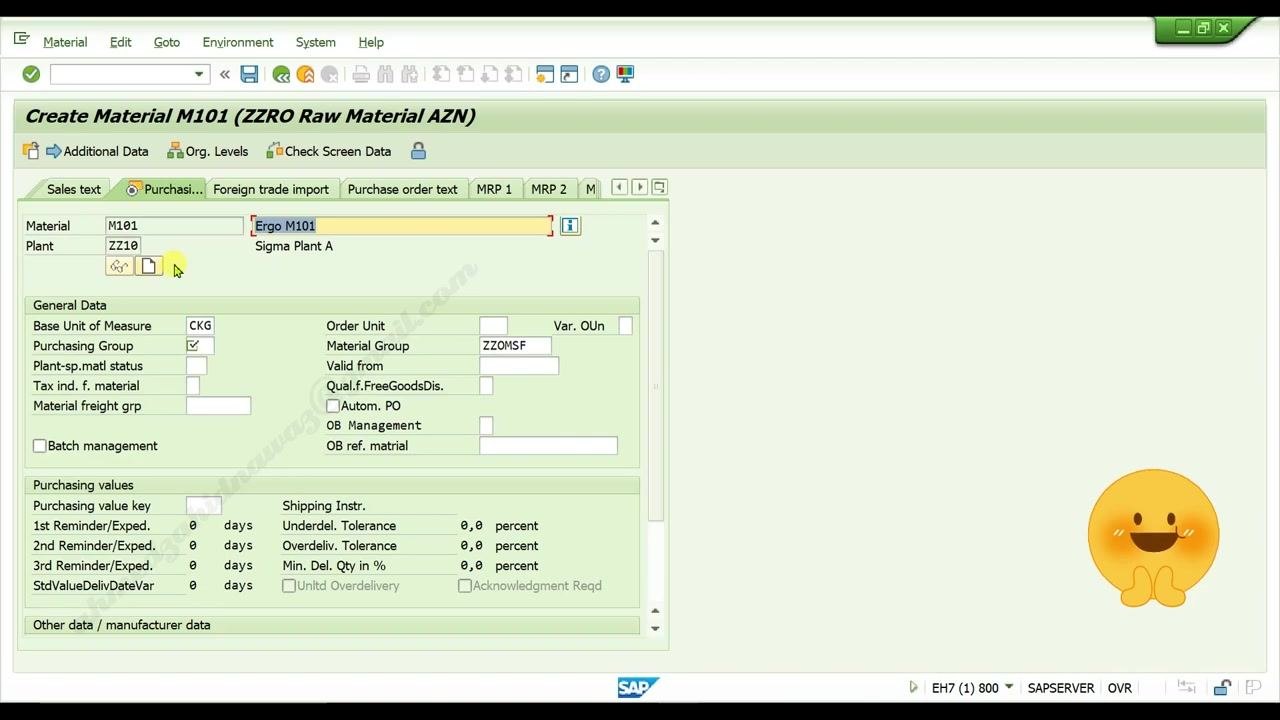
If the system prompts for additional confirmation or moves to the next screen, press Enter again to proceed.
Enter the order unit in the Purchasing view
Navigate to the Purchasing tab. In the Order Unit field, enter the ordering unit for your material — this should be an alternative to the base unit of measurement (for example, if the base unit is CKG, the order unit could be G). Confirm the Plant field is filled (for example, ZZ10 for Sigma Plant A).
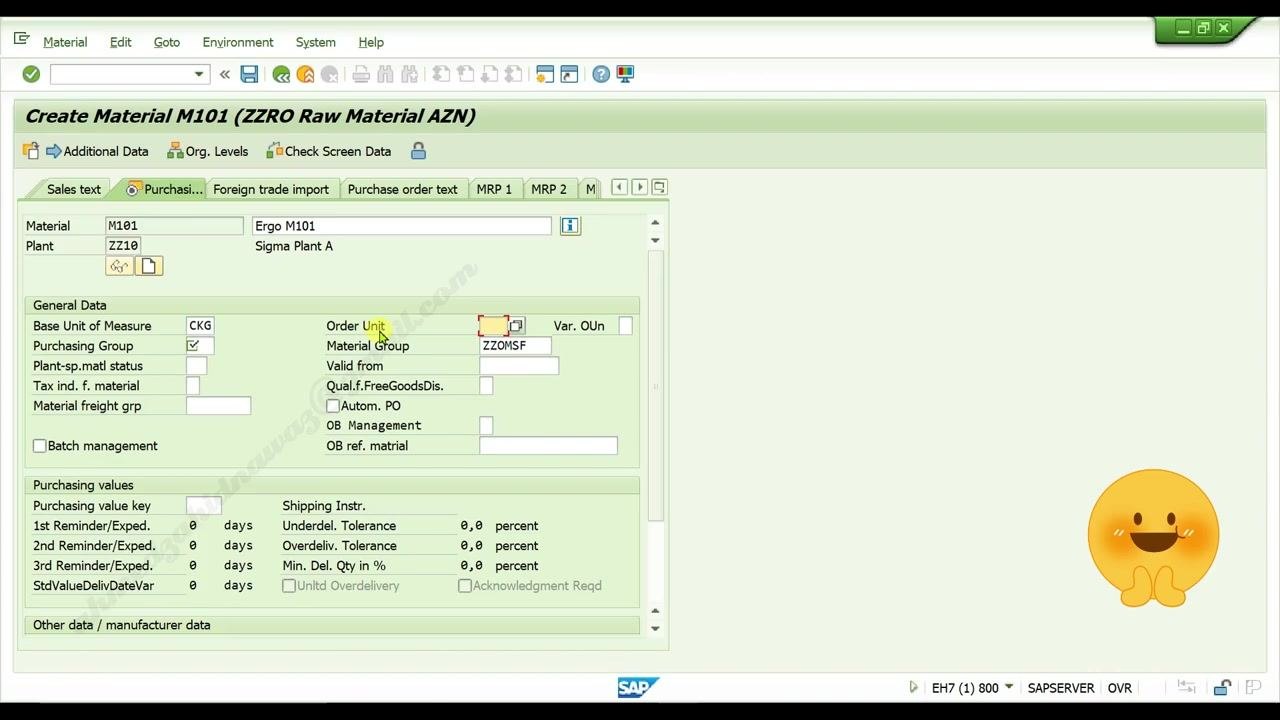
Verify the order unit differs from the base unit
Double-check that the ordering unit you entered is different from the base unit of measurement, as required by your organization's material management policy.
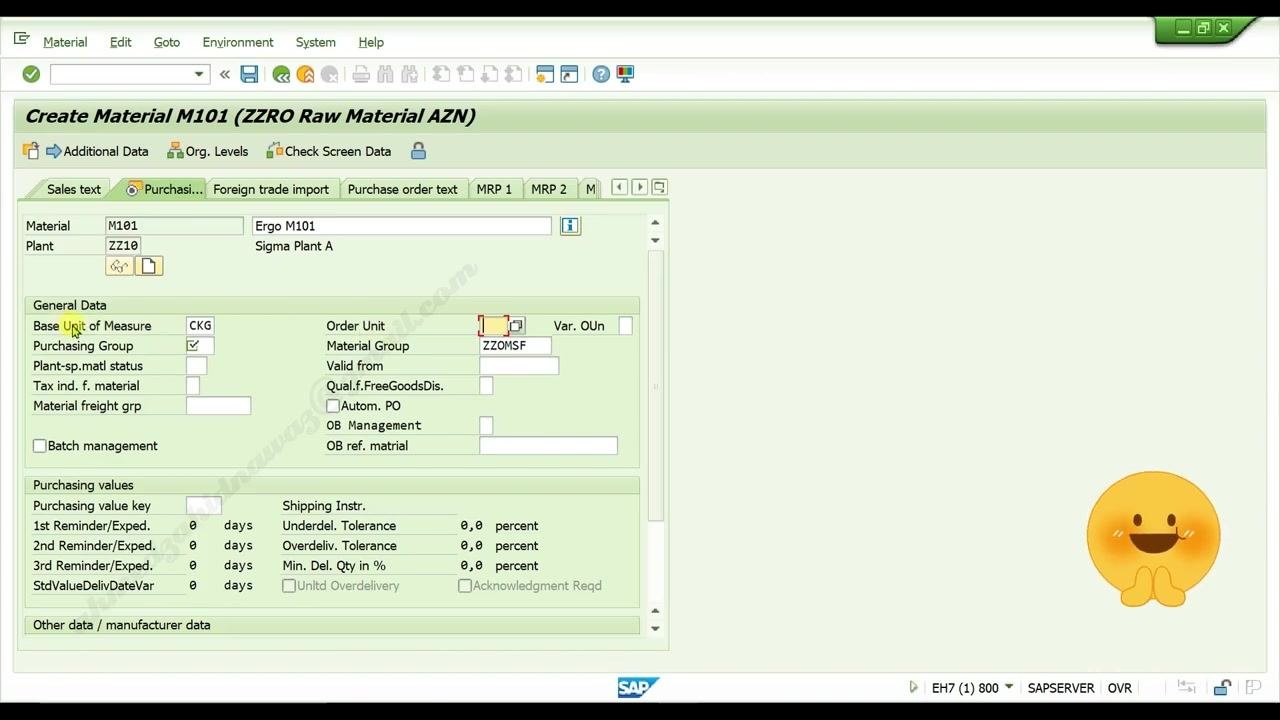
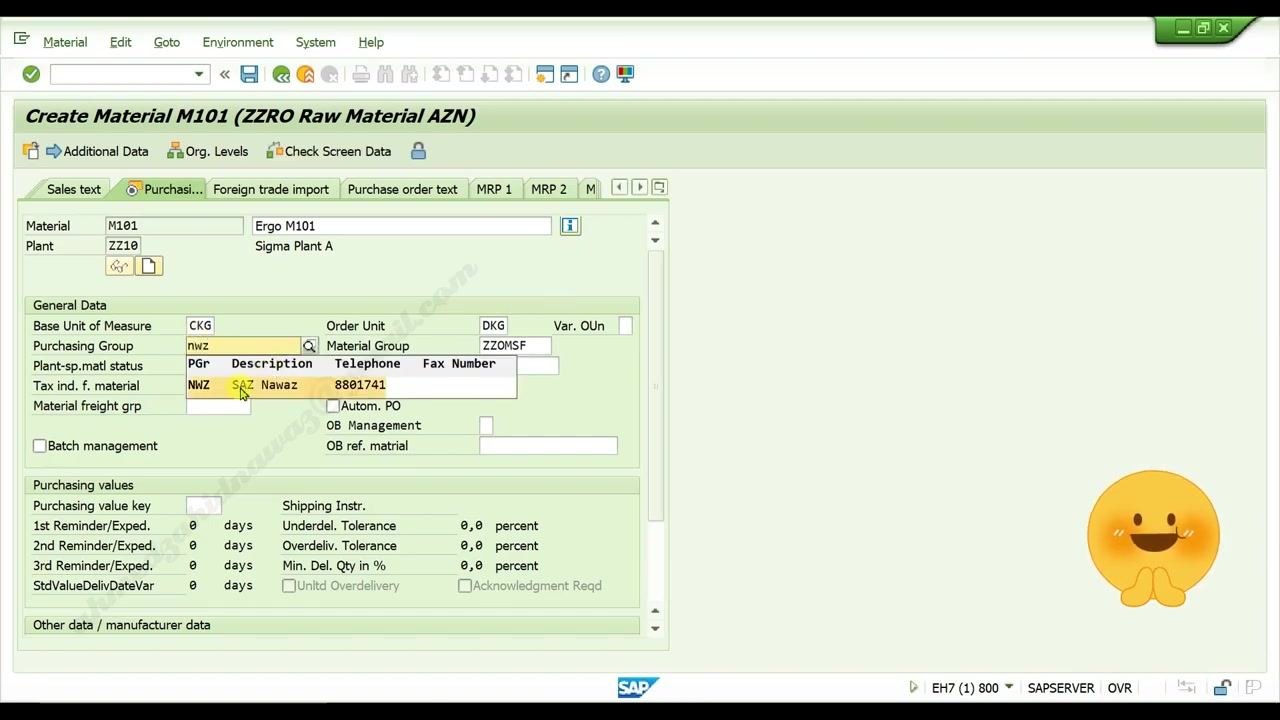
Enter the purchasing group
In the Purchasing Group field, enter the appropriate code. Use the search icon to look up available purchasing groups if needed. For example, select NWZ with the description "SAZ Nawaz" and telephone number 8801741.
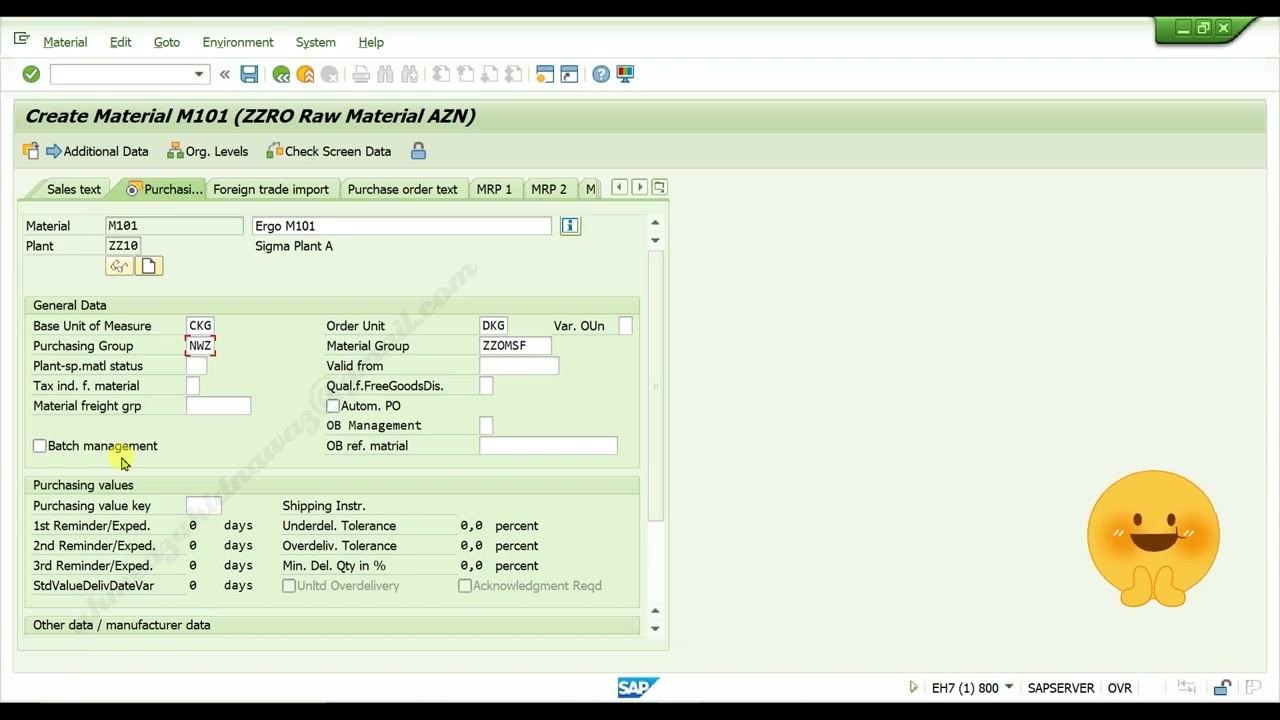
Enable batch management, if required
Check the Batch management checkbox if you want to manage goods in batches, for example for traceability or quality control. This is useful when goods are received in batches and need to be tracked individually.
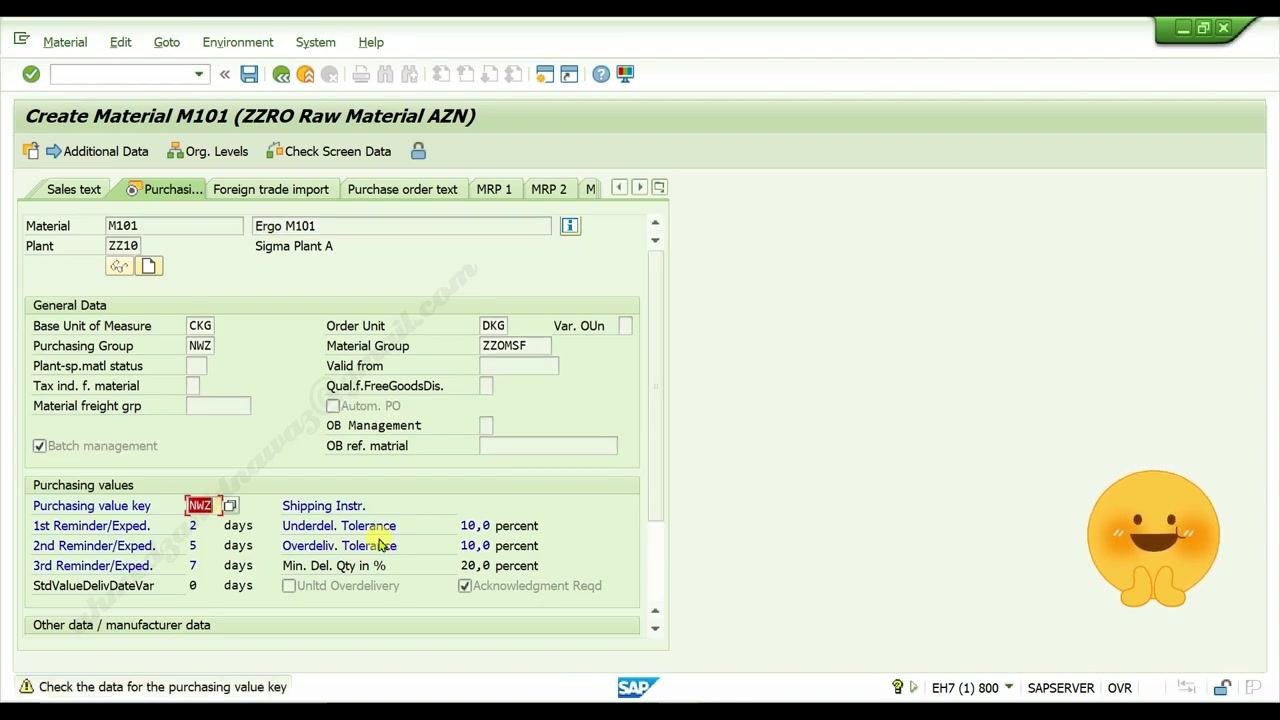
Enter the purchasing value key
In the Purchasing value key field, enter the relevant key (for example, NWZ). This key controls reminders for vendors and tolerance limits for deliveries. Example values include:
- 1st Reminder/Exped.:
2 days - 2nd Reminder/Exped.:
5 days - 3rd Reminder/Exped.:
7 days - Underdelivery Tolerance:
10.0 percent - Overdelivery Tolerance:
10.0 percent - Minimum Delivery Quantity:
20.0 percent
Confirm the unit of measure conversion
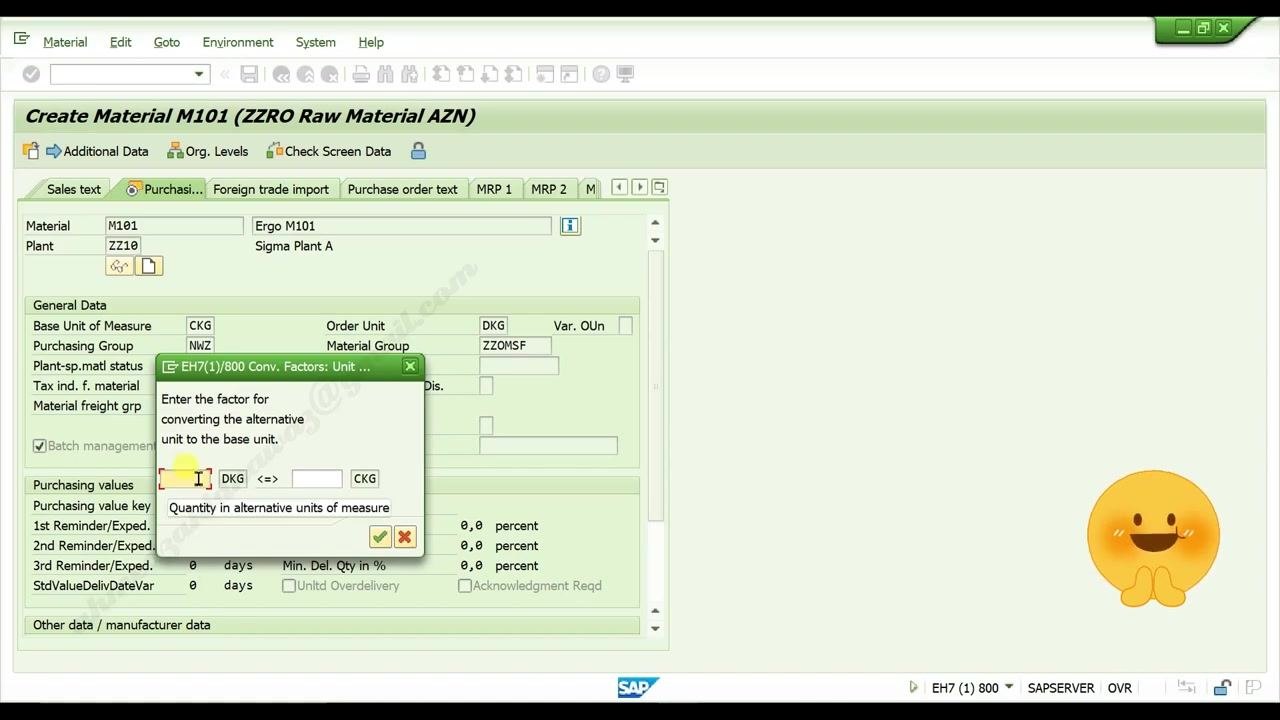
When prompted, enter the conversion factor between the ordering unit and the base unit of measure. For example, enter 1 for both fields to indicate that 1 DKG (deka-gram) equals 1 CKG (centi-kilogram). Press the green checkmark to confirm.
Proceed to the Plant data / Storage 1 view
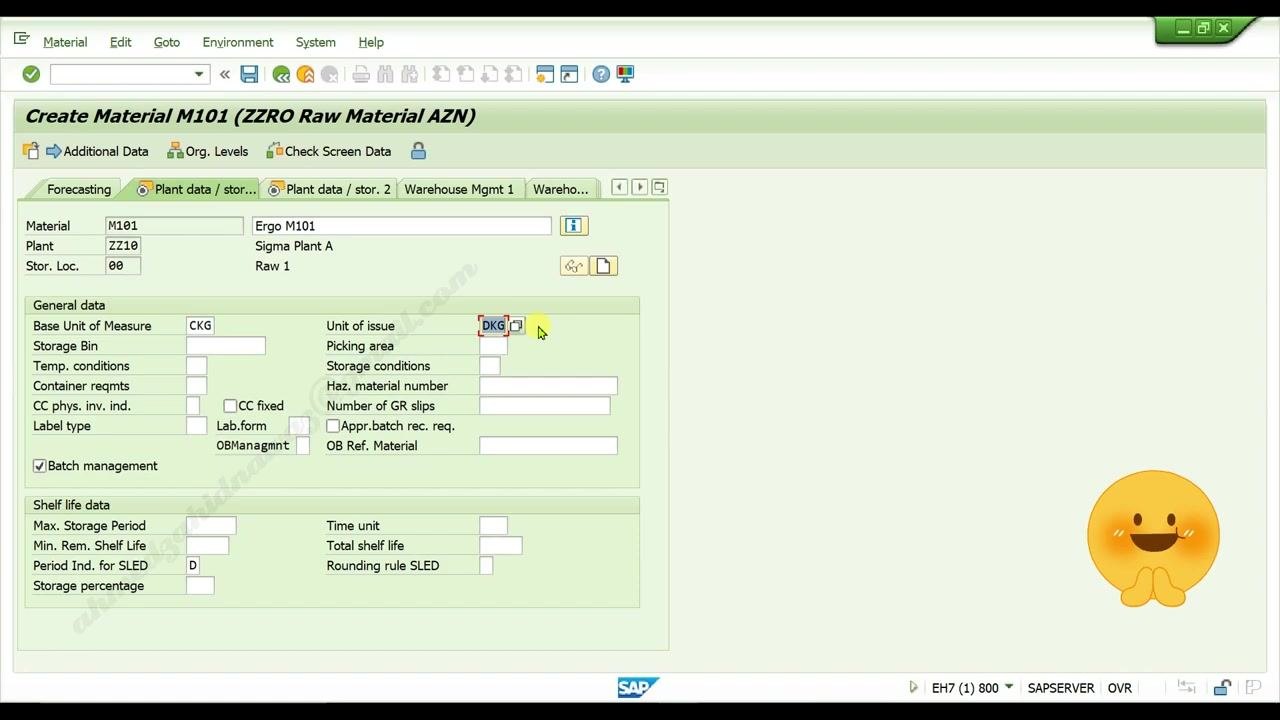
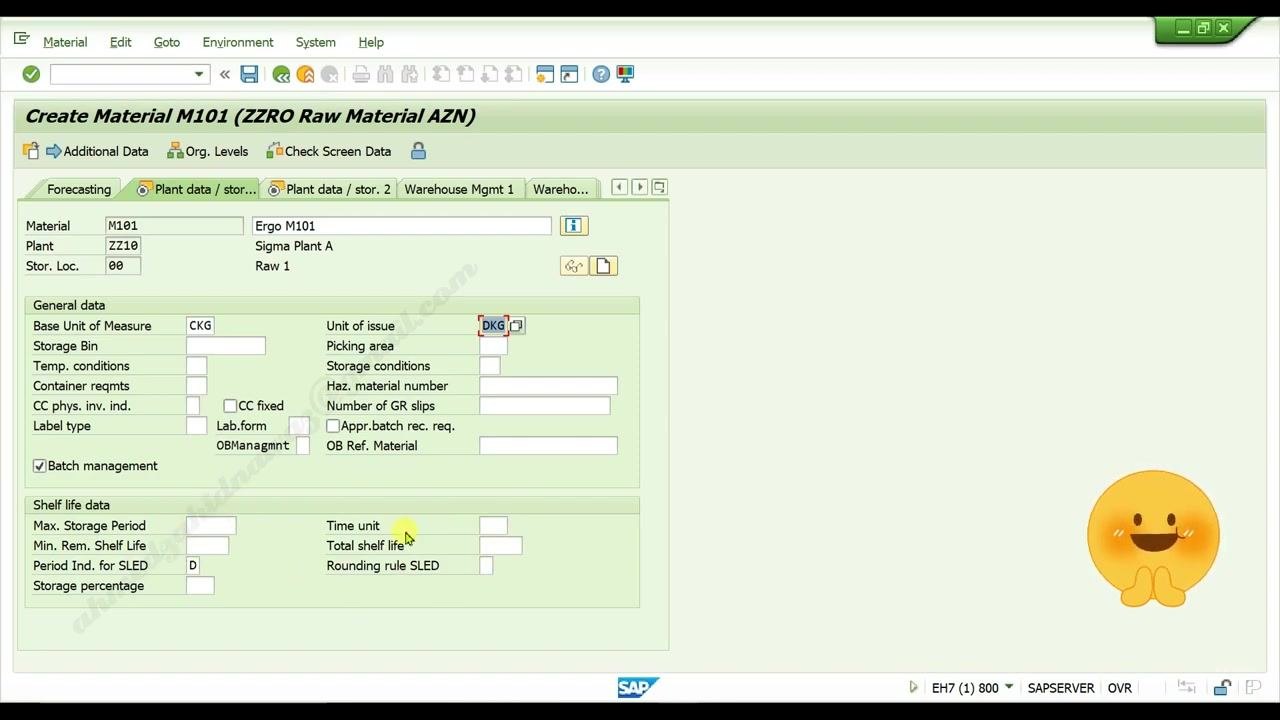
Press Enter to continue. If you receive warning messages, press Enter again to proceed; the system navigates to the Plant data / stor. 1 tab. In the Unit of issue field, specify the unit in which the material will be issued from inventory (for example, CKG). This field determines the unit used for issuing the material in warehouse operations.
Review the general and shelf life data
On the Create Material M101 (ZZRO Raw Material AZN) screen, confirm the following fields are filled:
- Material: M101
- Plant: ZZ10
- Stor. Loc.: 00
- Material Description: Ergo M101
- Plant Description: Sigma Plant A, Raw 1
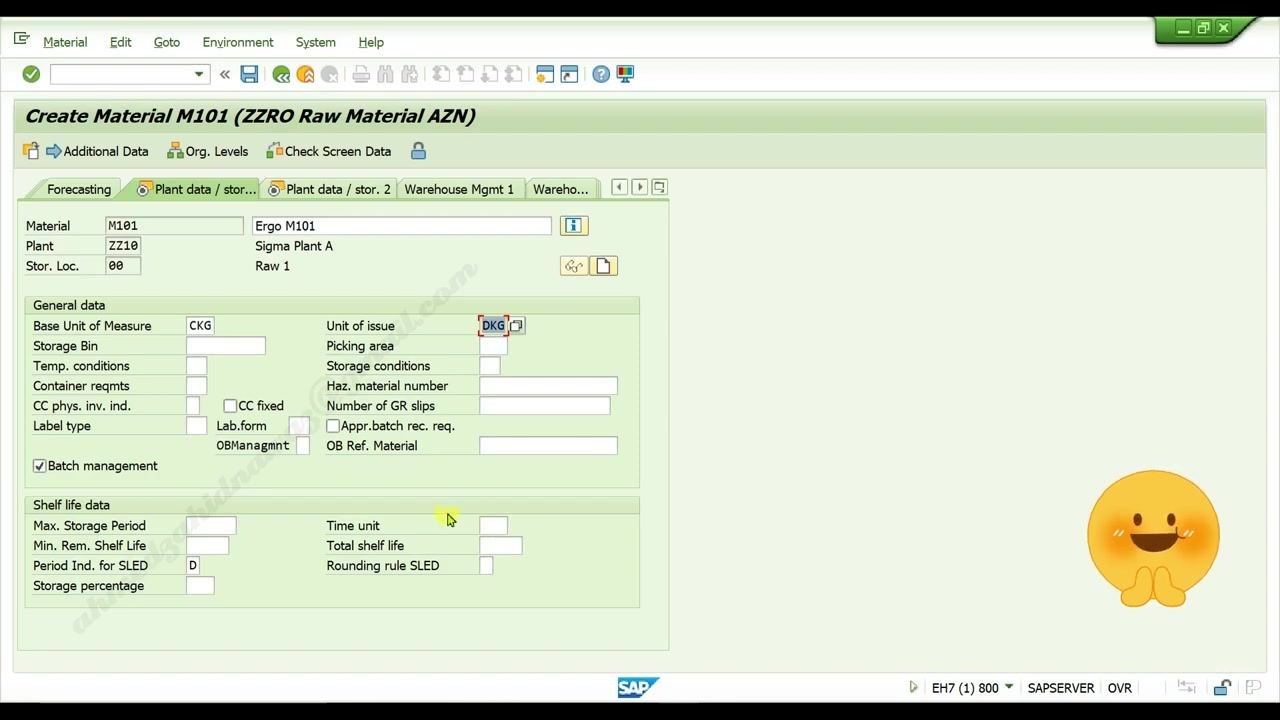
Under General data, confirm Base Unit of Measure is CKG, Unit of issue is DKG, and Batch management is checked. Under Shelf life data, set Period Ind. for SLED to D. Leave other fields blank unless specified.
Leave optional shelf life fields blank
Do not enter values for Max. Storage Period, Min. Rem. Shelf Life, Time unit, Total shelf life, Rounding rule SLED, or Storage percentage.
Proceed to the next screen
Press Enter to continue to the next part of the material creation process.
Enter accounting data for the raw material
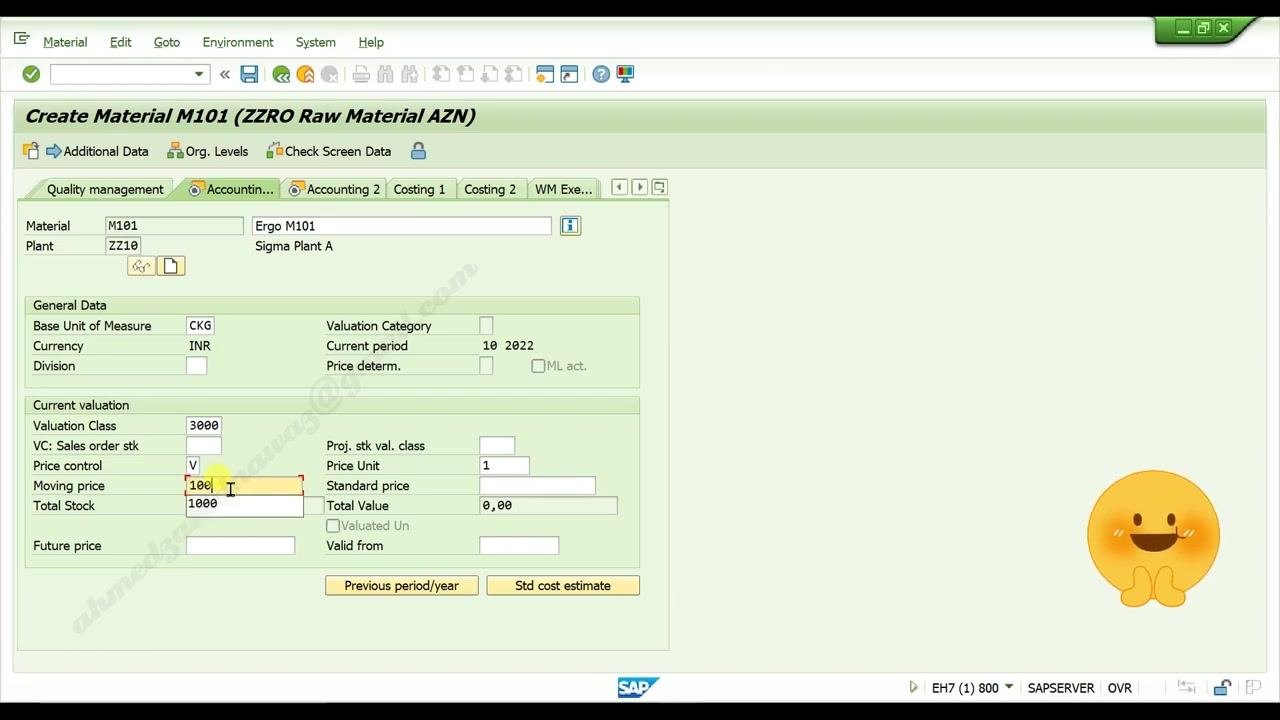
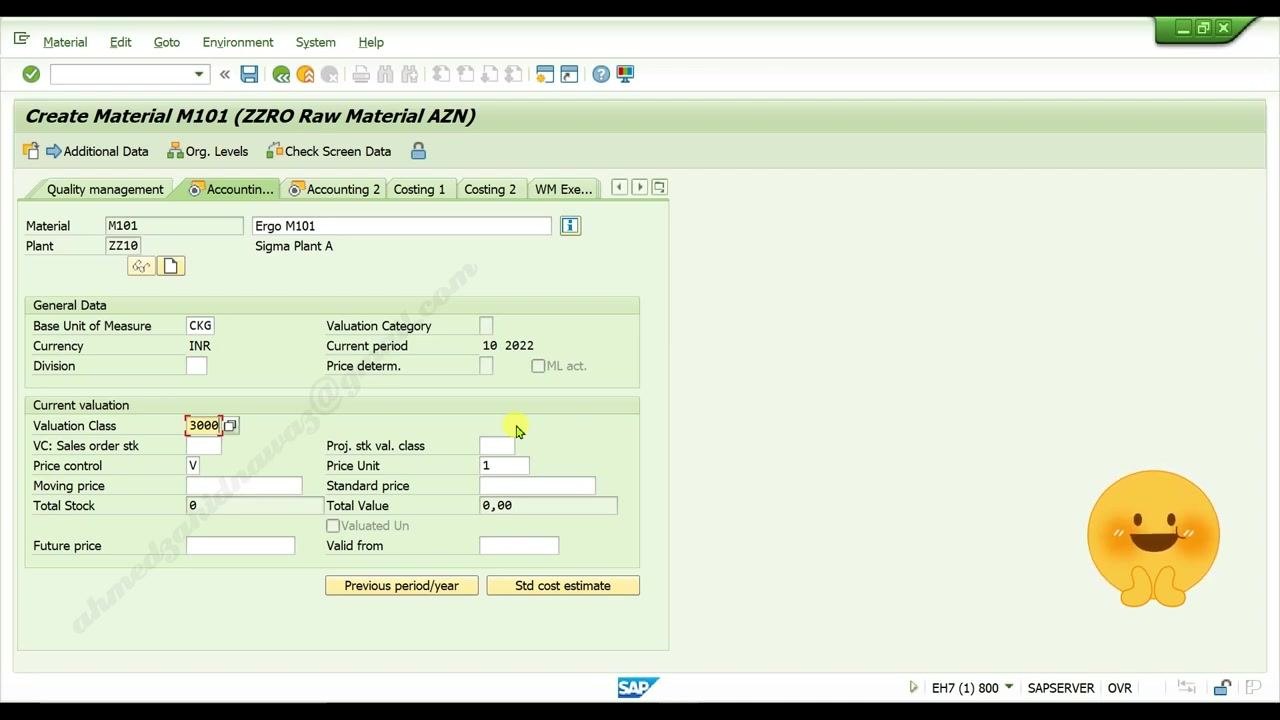
On the Accounting 1 tab, confirm or enter the following values:
- Base Unit of Measure: CKG
- Currency: INR
- Current period: 10 2022
- Valuation Class: 3000
- VC: Sales order stk: 3000
- Price control: V (for moving average price)
- Proj. stk val. class: 1
- Total Stock: 0
- Total Value: 0,00
Set the price control and enter the moving price
Confirm Price control is set to V, then enter the Moving price as 100.
Save the material data
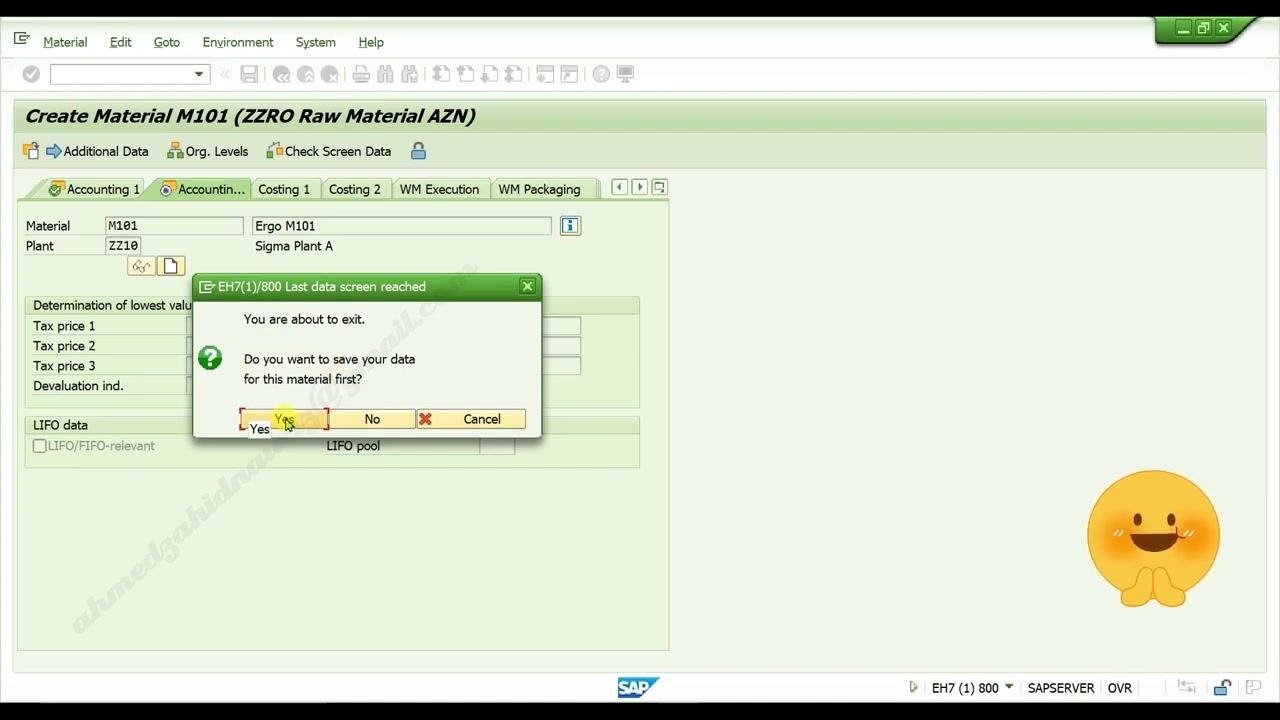
When prompted with "Last data screen reached" and the message "You are about to exit. Do you want to save your data for this material first?", click Yes to save.
Confirm material creation
After saving, verify that the confirmation message "Material M101 created" appears in the Performance Assistant window. The status bar at the bottom of the screen should also display "Material M101 created".
What's next
By completing these steps, you have successfully learned how to create a material master in SAP MM01, including maintaining the remaining shelf life data and entering basic, purchasing, plant, and accounting information. You can now use this material in subsequent transactions, such as purchase orders or inventory management, within your SAP system.
Generation details: cost, quality tiers
Docsie billed 3,500 credits ($2.45) to analyze this 7-minute video at standard quality. The rewrite, template fill and Word/PDF exports were included. The same video at each quality tier:
| Quality | Frames sampled | Credits | Approx. cost |
|---|---|---|---|
| Draft | every 16-30 s | 1,750 | $1.22 |
| Standard (this guide) | every 8-15 s | 3,500 | $2.45 |
| Detailed | every 4-7 s | 7,000 | $4.90 |
| Ultra | every 1-3 s | 14,000 | $9.80 |
Credits priced at $0.70 per 1,000; plans include a monthly allowance. Enterprise customers on on-premise or bring-your-own-model deployments run this on their own inference and pay no per-video credits.
Generated by Docsie Video-to-Docs on 2026-10-01 from a 6-minute video. Screenshots are frames from the source video and belong to their creator, D-TaleD VaulT, whose original is embedded above. If you own this video and want the guide removed or credited differently, contact us and we will act within one business day.