
How to Create a Delivery in SAP VL01N
This guide shows you how to create a delivery in SAP VL01N from an existing sales order, post the goods issue, and carry the process through to invoicing. It also covers how to process sales orders that do not yet have a delivery number, how to review item-level delivery and billing status, and how to preview and print the resulting invoice.
Video: How to create Sales order Delivery & Invoice in SAP (VL01N & VF01) by KH Zeeds. All credit for the demonstration goes to the creator; watch the original on YouTube. The written guide below was generated from this video by Docsie. Creator? Request a change or removal.
This guide shows you how to create a delivery in SAP VL01N from an existing sales order, post the goods issue, and carry the process through to invoicing. It also covers how to process sales orders that do not yet have a delivery number, how to review item-level delivery and billing status, and how to preview and print the resulting invoice.
Prerequisites
- You need an existing sales order already created in SAP. This guide does not cover sales order creation.
- You should have access to the SAP Easy Access screen and the relevant transaction codes (VL01N, VL02N, VA03, VF01, VF02, VF03).
Part 1: Creating the delivery
Access the SAP Easy Access screen
Log in to SAP to reach the SAP Easy Access screen. Confirm you see the main navigation tree, including the Favorites and SAP menu sections.
Review the existing sales order
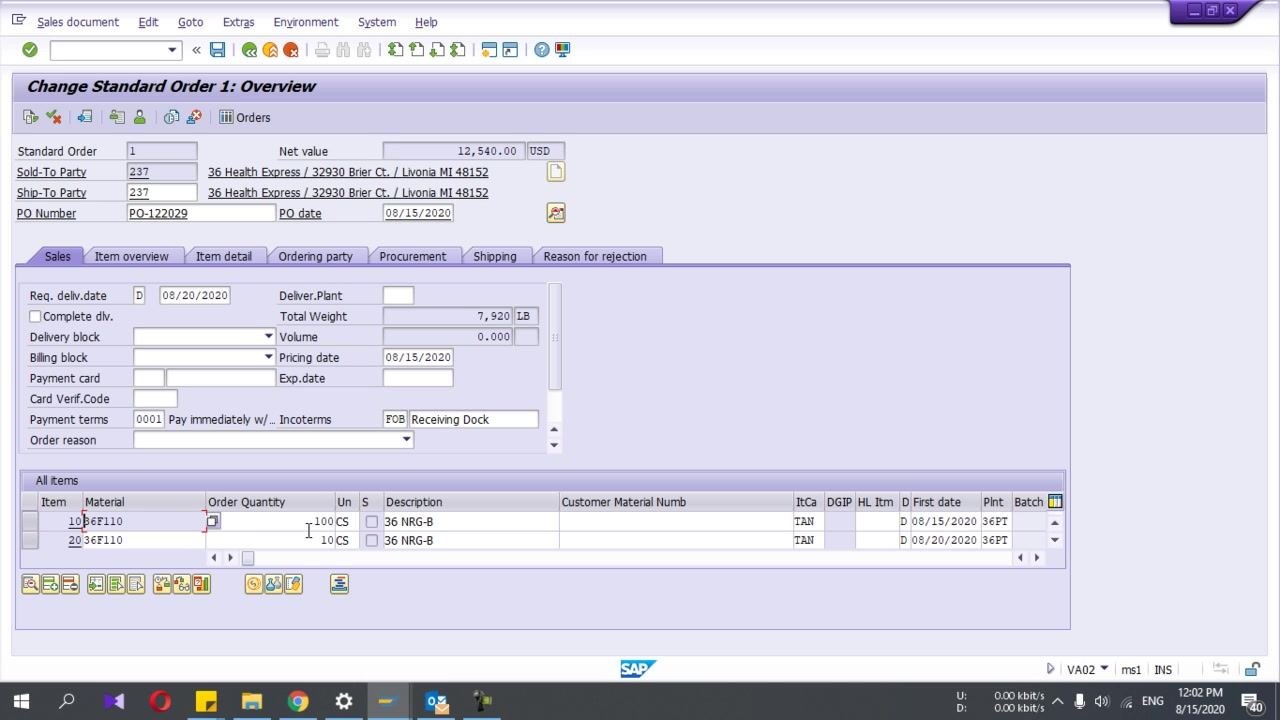
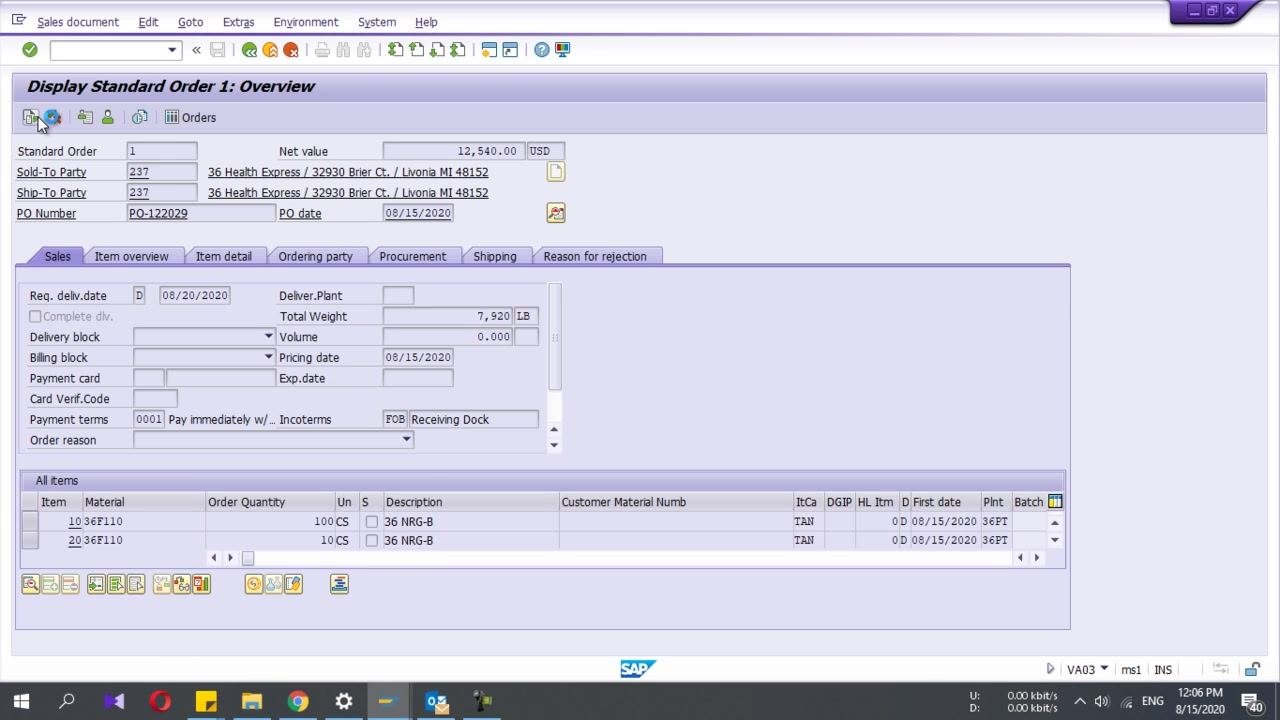
Open your existing sales order before creating the delivery. In this example, the order contains:
- Sales Order Number: 1
- Sold-To Party: 237 (36 Health Express / 32930 Brier Ct. / Livonia MI 48152)
- Ship-To Party: 237 (same as above)
- PO Number: PO-122029
- PO Date: 08/15/2020
- Net Value: 12,540.00 USD
- Item 10: Material 36F110, Order Quantity 100 CS, Description 36 NRG-B
- Item 20: Material 36F110, Order Quantity 10 CS, Description 36 NRG-B
Review all item details, delivery dates, and payment terms before proceeding.
Create a delivery in SAP VL01N using menu navigation
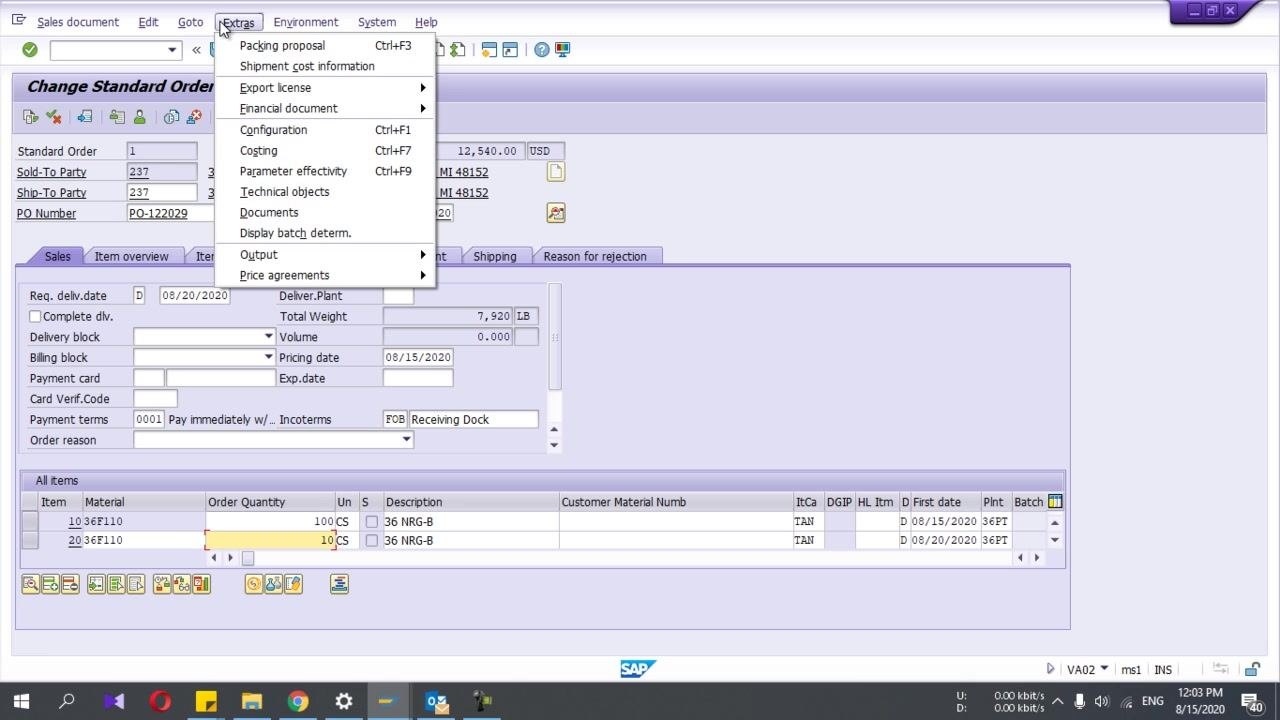
With the sales order open, you can start delivery creation from the top menu. Select the relevant option, for example Sales Document > Deliver. This takes you directly into the delivery transaction (VL01N).
Create a delivery in SAP VL01N using the transaction code
Alternatively, from the SAP Easy Access screen, enter the transaction code VL01N in the command field and press Enter. This opens the delivery creation screen directly.
Enter delivery creation details
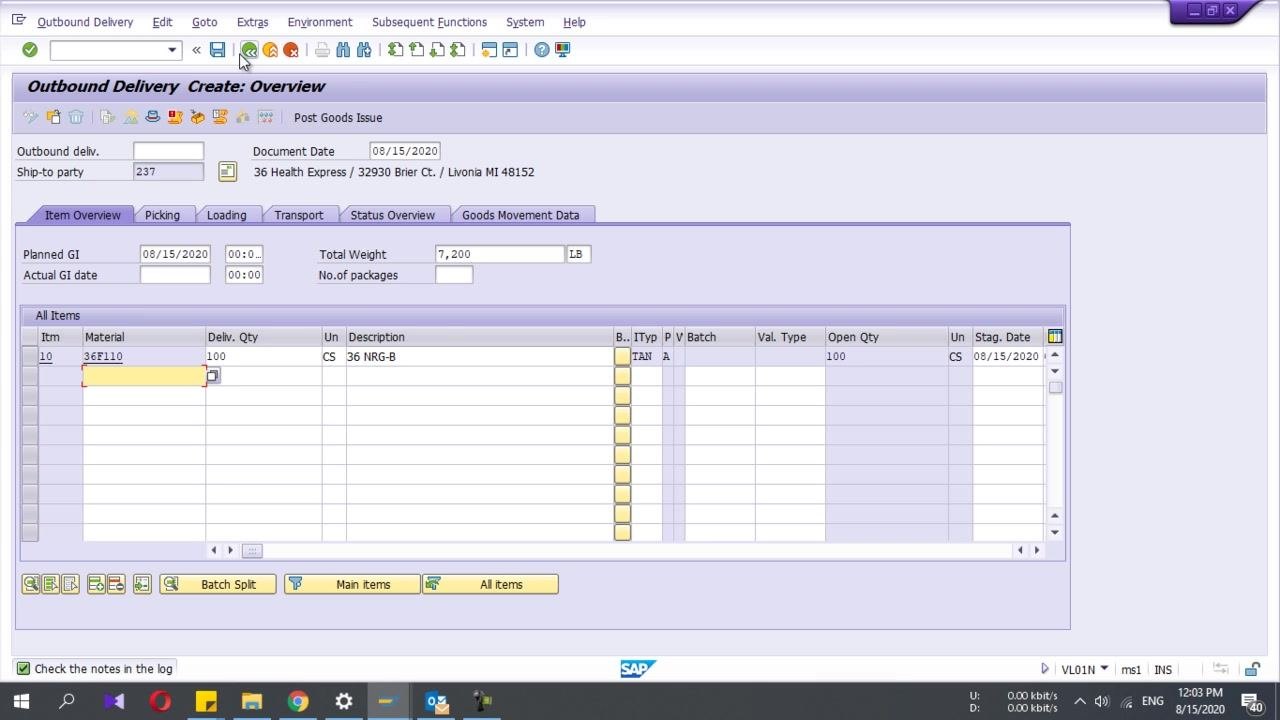
In the Outbound Delivery Create: Overview screen, enter the required details:
- Shipping Point: 237 (36 Health Express / 32930 Brier Ct. / Livonia MI 48152)
- Document Date: 08/15/2020
- Planned GI Date: 08/15/2020
- Total Weight: 7,200 LB
- Material: 36F110
- Delivery Quantity: 100 CS
- Description: 36 NRG-B
Confirm all item and delivery details are correct before continuing.
Save or exit delivery processing
If you attempt to exit delivery processing before saving, a dialog appears asking: "System will exit processing. Do you want to save your data?" You can choose Yes to save, No to exit without saving, or Cancel to return to the delivery screen.
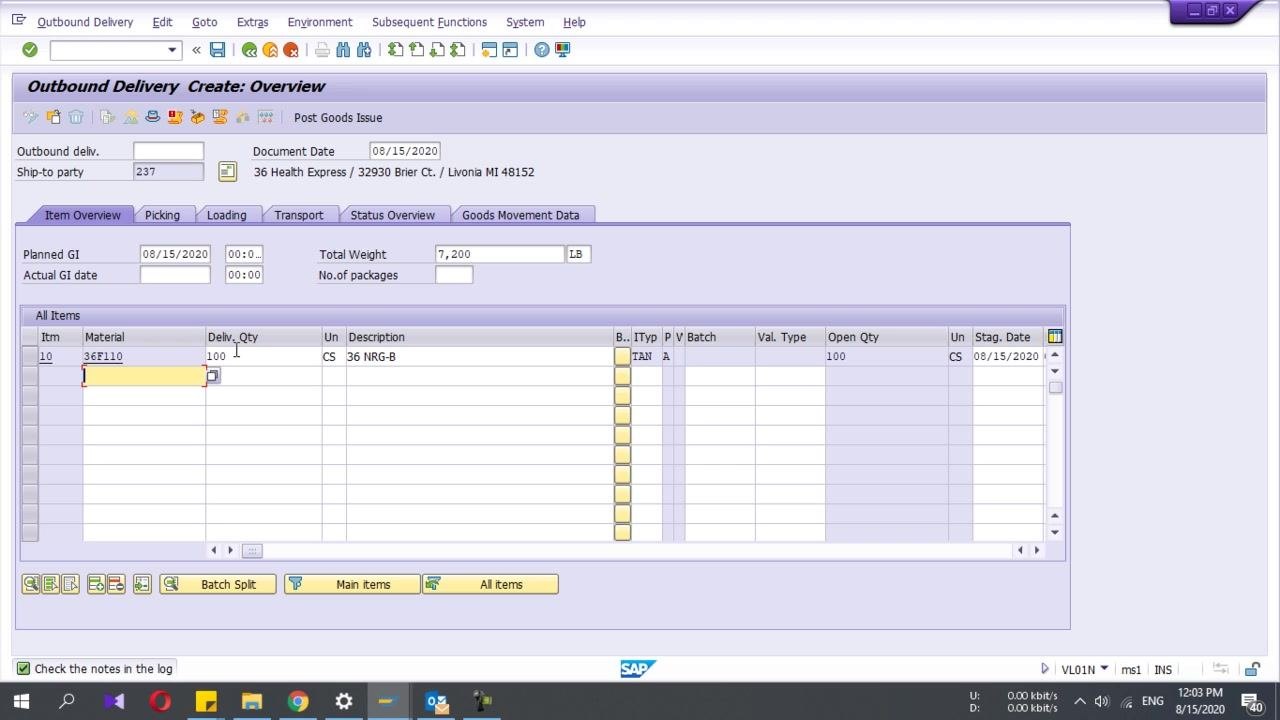
Note: If only one item appears in the delivery screen (for example, only item 10 is shown), verify the sales order and item availability before continuing.
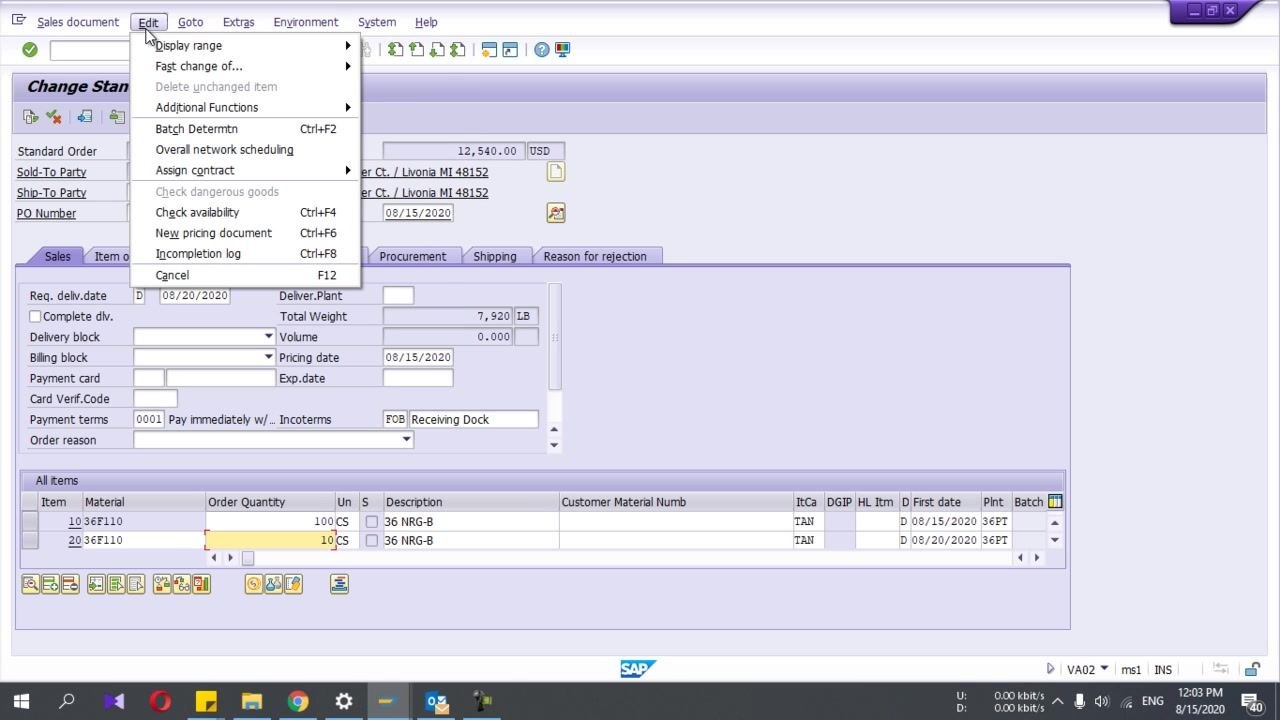
Part 2: Resolving missing items and adjusting quantities
Troubleshoot missing items caused by schedule line dates
If not all sales order items appear during delivery creation, check the schedule line delivery dates for each item in the sales order. Review the "First date" or "Req. deliv. date" for each item — in this example, Item 10 has a delivery date of 08/15/2020, while Item 20 has 08/20/2020. Only items with a delivery date matching the delivery creation date will appear. To include all items, adjust the schedule line dates so they match the intended delivery date.
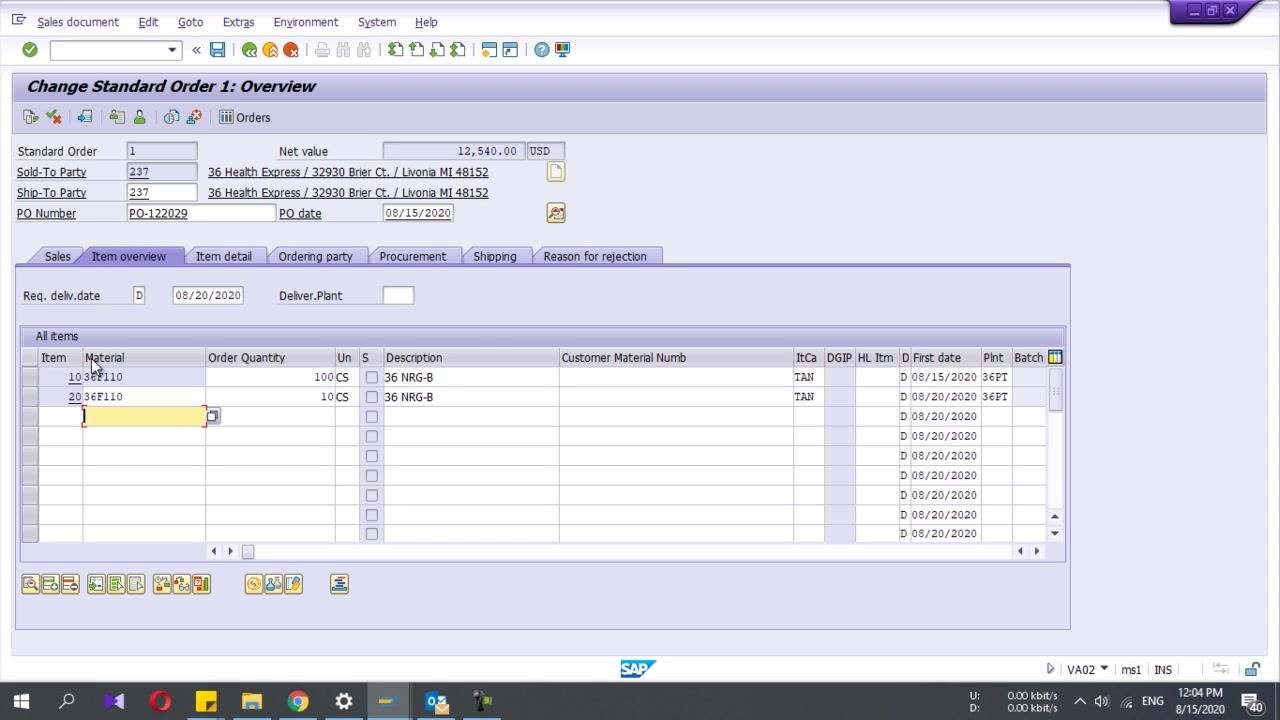
Confirm both items appear in delivery creation
After correcting the schedule line dates, return to the delivery creation screen and verify that both items (Item 10 and Item 20) now appear in the delivery item list.
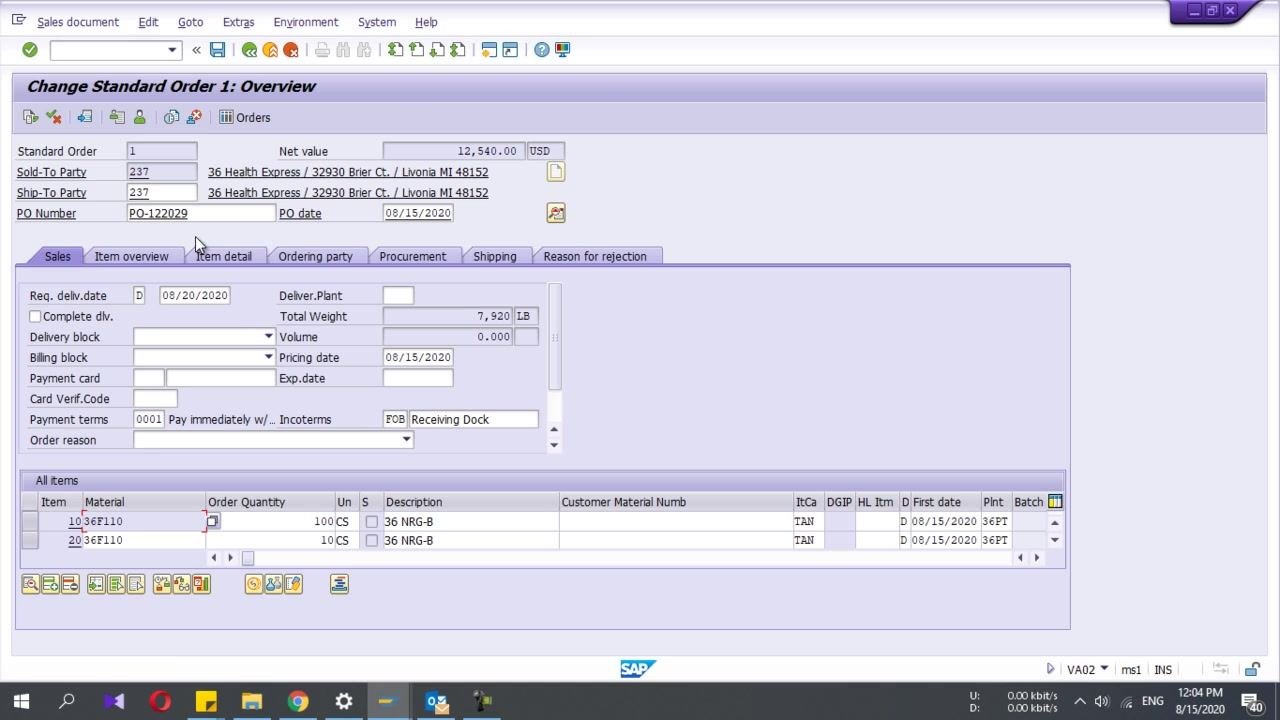
Adjust delivery quantities for partial delivery
In the Outbound Delivery Create: Overview screen, you can change the delivery quantity for each item to allow a partial delivery. In this example, the delivery quantity for Item 20 is changed from 10 CS to 5 CS by updating the "Deliv. Qty" field.
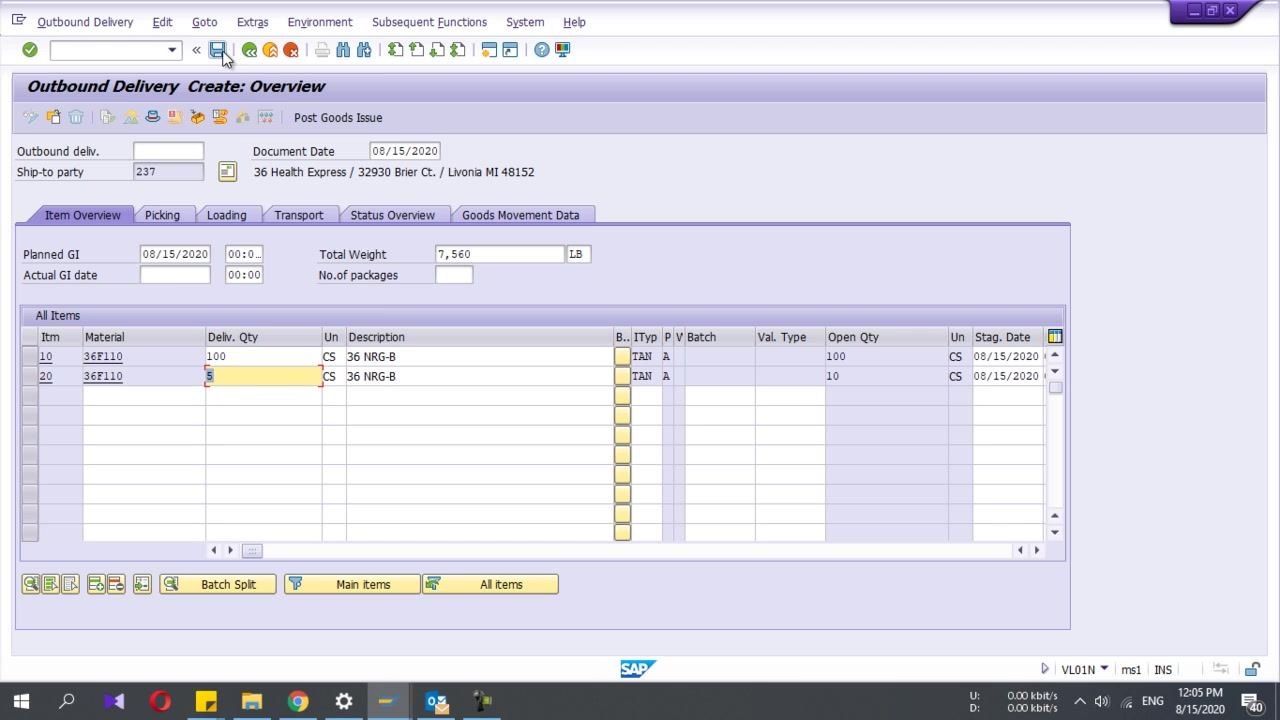
Save the delivery document
After adjusting quantities, click the Save icon (diskette) to save the delivery. Note the generated delivery number for reference in the next steps.
Part 3: Posting the goods issue
Open the delivery for picking
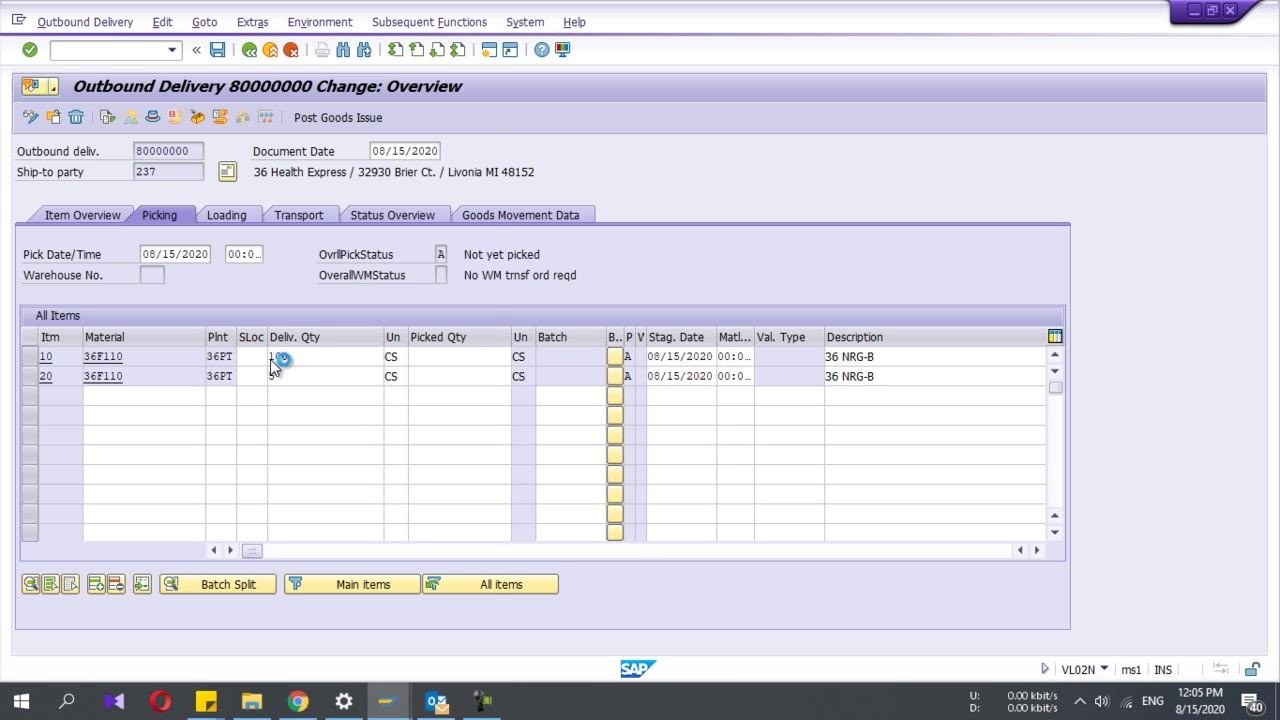
To proceed with goods issue, enter transaction code VL02N in the command field and press Enter. This opens the Change Outbound Delivery screen. Enter your delivery number and continue. Go to the Picking tab, select the appropriate storage location for each item (for example, 36EPT), and confirm the picked quantity matches the delivery quantity.
Enter picked quantities and review delivery tabs
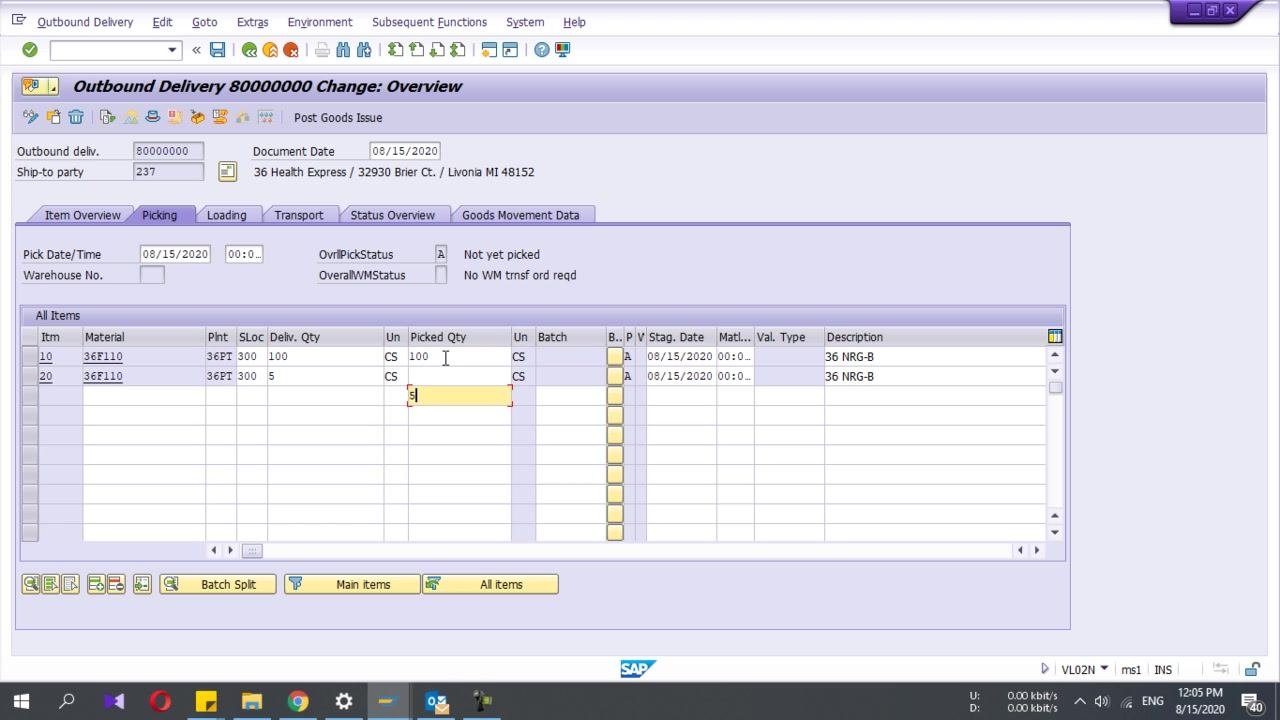
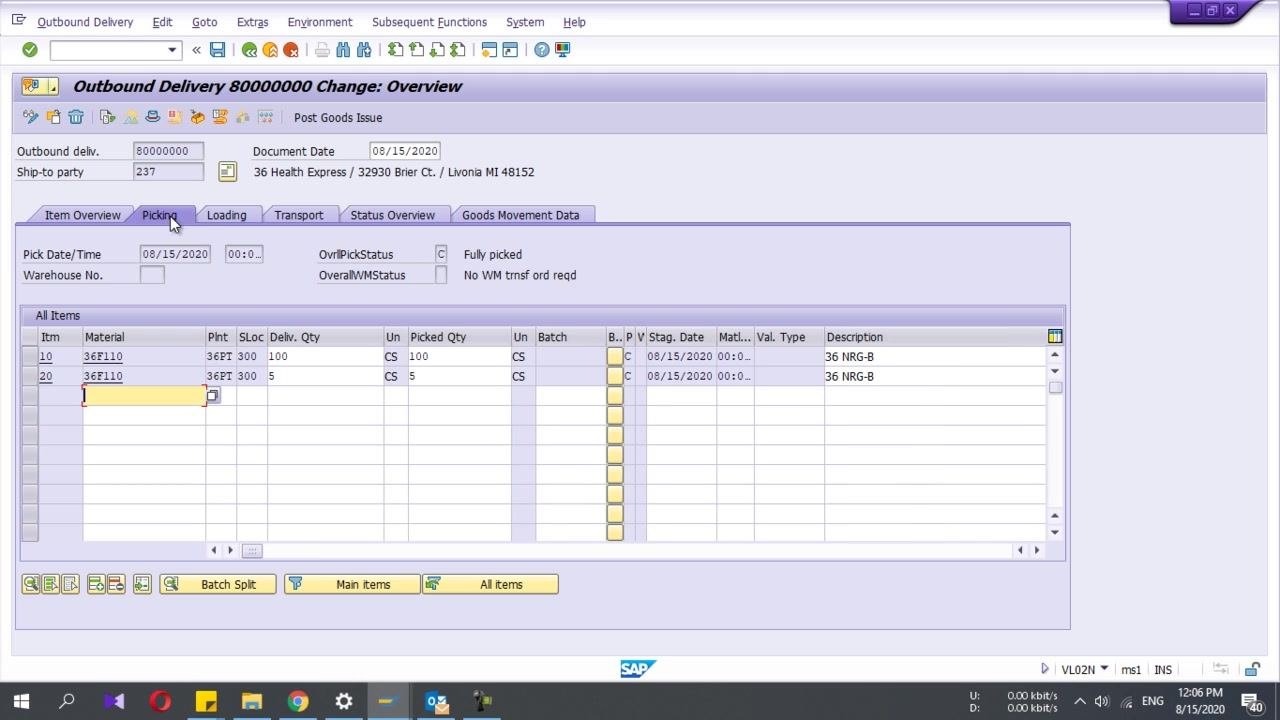
In the Change Outbound Delivery: Overview screen, enter the actual picked quantities for each item under the "Picked Qty" column — in this example, 100 CS for Item 10 and 5 CS for Item 20. Ensure the picked quantities match what is physically picked for shipment.
The delivery screen offers several tabs you can review:
- Picking: Confirms picked quantities and status.
- Loading: Shows loading details and planned loading times.
- Transport: Displays transportation planning and shipment details.
- Status Overview: Provides a summary of the delivery status.
- Goods Movement Data: Shows planned and actual goods movement dates.
Confirm that the "OvrPickStatus" field shows Fully picked after entering the picked quantities.
Review header details (optional)
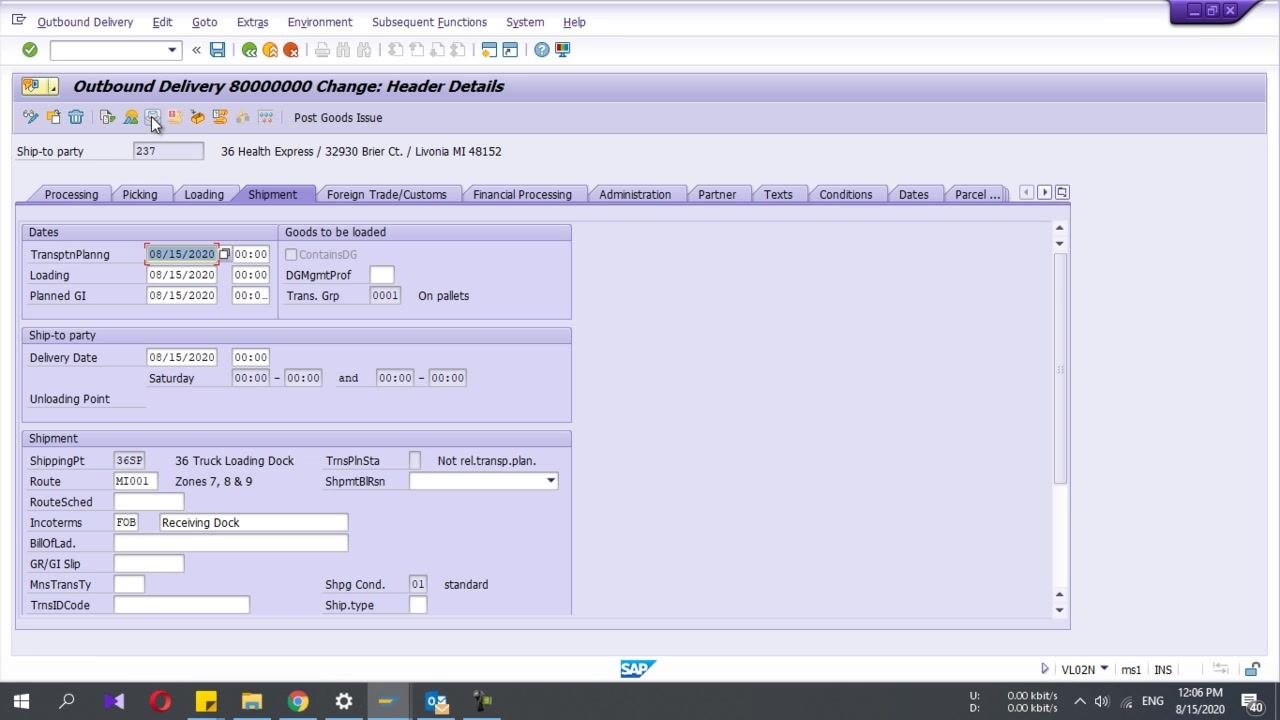
Click the hat icon to view or edit header-level information for the delivery. You can review or update fields such as:
- Transportation Planning Date: 08/15/2020
- Loading Date: 08/15/2020
- Planned GI (Goods Issue) Date: 08/15/2020
- Shipping Point: 36SP (36 Truck Loading Dock)
- Route: MI001 (Zones 7, 8 & 9)
- Incoterms: FOB, Receiving Dock
Make any necessary changes, then return to the main delivery screen.
Post the goods issue
Once all details are confirmed and picked quantities are entered, click the Post Goods Issue button at the top of the screen. This completes the delivery process and records the goods issue in SAP. A confirmation message appears indicating the goods issue has been posted.
Verify delivery status in the sales order
Open the SAP Easy Access screen and enter transaction code VA03 in the command field, then press Enter to display the sales order.
In the Display Standard Order: Overview screen, review the status flow. Confirm that Delivery Created, Picking Created, and Goods Issue Posted statuses are visible, and check that the order quantities, prices, and delivery dates are correct.
Proceed to invoice creation
After posting the goods issue, return to the SAP Easy Access screen and enter transaction code VF01 in the command field to begin invoice creation for the delivery.
Note: Always ensure all data is accurate before posting the goods issue and proceeding to invoicing. This ensures correct inventory and financial records in SAP.
Part 4: Processing sales orders without delivery numbers
Open the Create Billing Document screen
Navigate to the Create Billing Document screen. In the "Docs to be processed" section, enter the sales order document number (for example, 80000000) in the Document field. This screen lets you process sales orders directly for billing, even if there is no delivery number.
Display billing items
Press Enter after entering the document number. The system displays the Invoice (F2) Create: Overview of Billing Items screen. Review the billing items, including:
- Invoice number: 5000000001
- Payer: 237
- Billing Date: 08/15/2020
- Item details such as Description (36 NRG-B), Billed Quantity (100 CS and 5 CS), Net Value, Material, and Cost.
Check header details
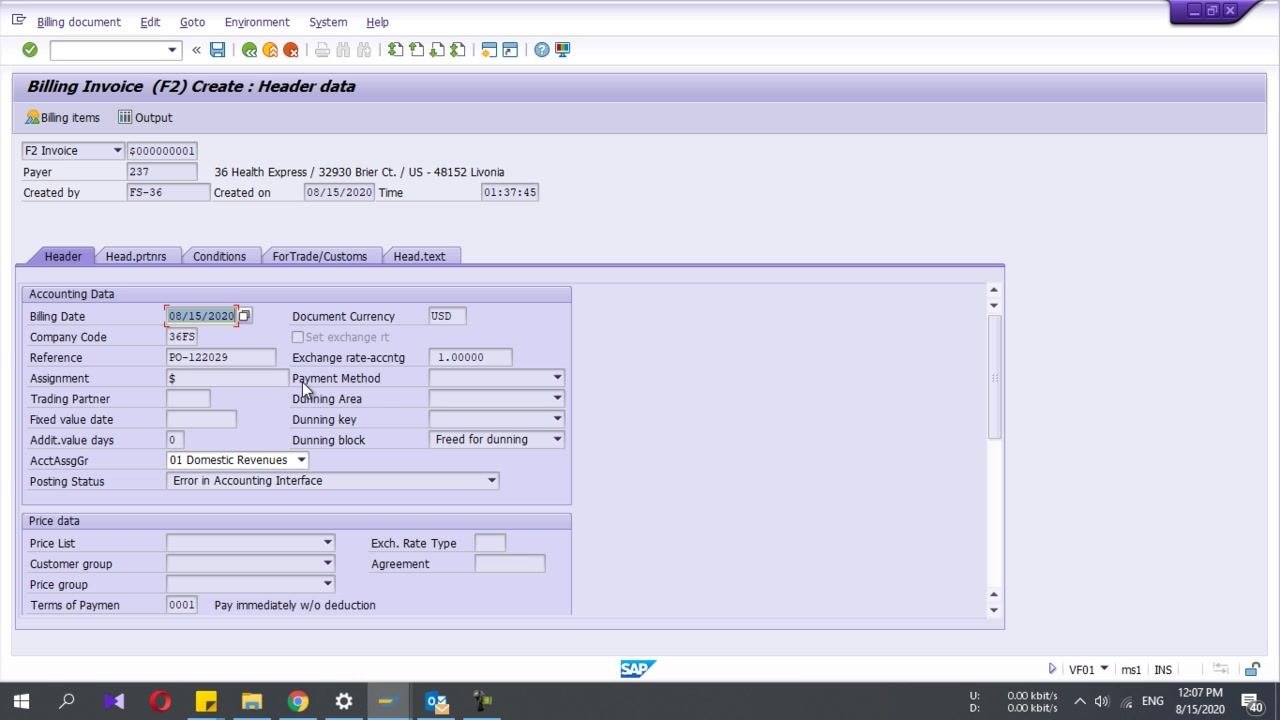
Navigate to the header details by selecting the appropriate tab. Review the Billing Invoice (F2) Create: Header data screen, which includes:
- Billing Date: 08/15/2020
- Company Code: 36FS
- Reference: PO-122029
- Document Currency: USD
- Assignment, Payment Method, Dunning Area, and other accounting data
- Posting Status: Error in Accounting Interface
- Price data, Customer group, Agreement, and Terms of Payment
Review pricing conditions
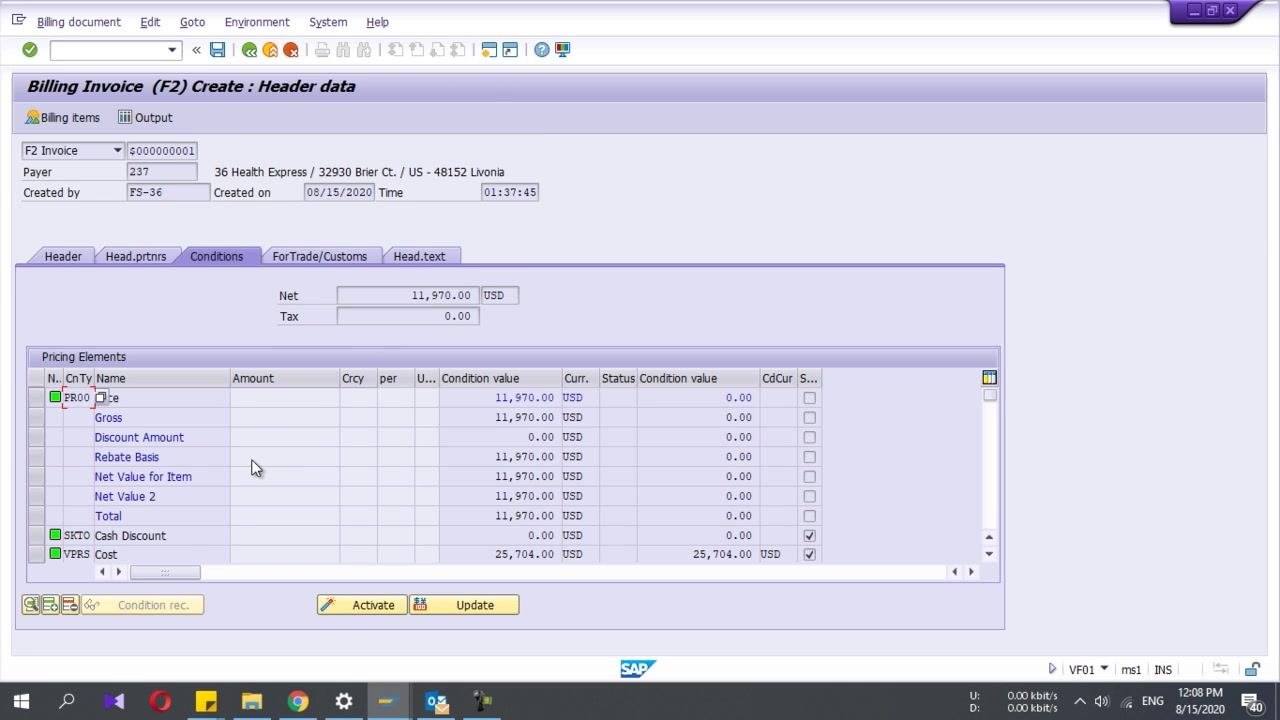
Switch to the Conditions tab to view pricing elements. Confirm the pricing details, such as:
- Net: 11,970.00 USD
- Tax: 0.00
- Pricing elements such as Gross, Discount Amount, Rebate Basis, Net Value for Item, Total, Cash Discount, and Cost
- Gross and Net Value for Item both show 11,970.00 USD; Cost is 25,704.00 USD
Save the invoice
Save the invoice by clicking the save icon or using the appropriate menu option. The system confirms that the document (for example, 90000000) has been saved.
Release the billing document to accounting
Go to transaction VF02 to change the billing document. Enter the billing document number (for example, 90000000) in the Billing document field, then click Release to Accounting (or use the shortcut Shift+F4). The system processes the release and confirms whether the document has already been passed to accounting.
Display the sales order and check status
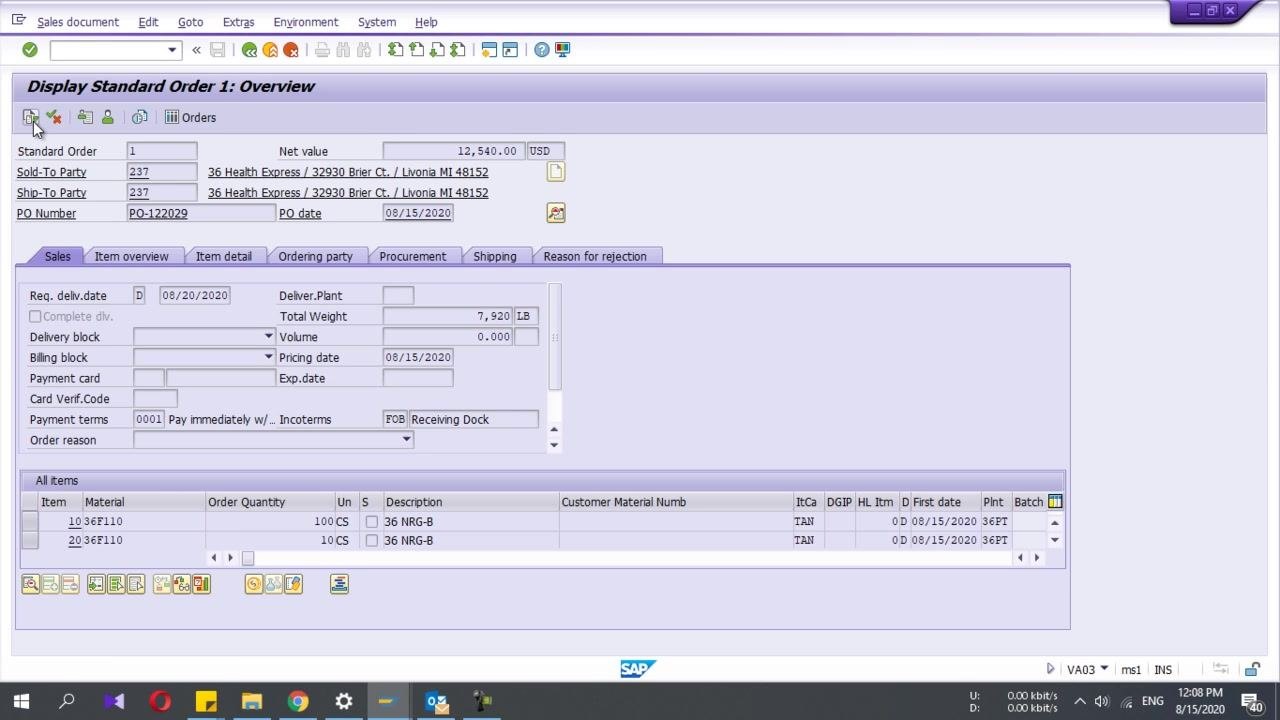
Open the sales order in display mode using transaction VA03. Review the Display Standard Order: Overview screen, which shows:
- Sold-To Party and Ship-To Party: 36 Health Express
- PO Number: PO-122029
- PO Date: 08/15/2020
- Item overview with materials, order quantities, and descriptions
View the document flow
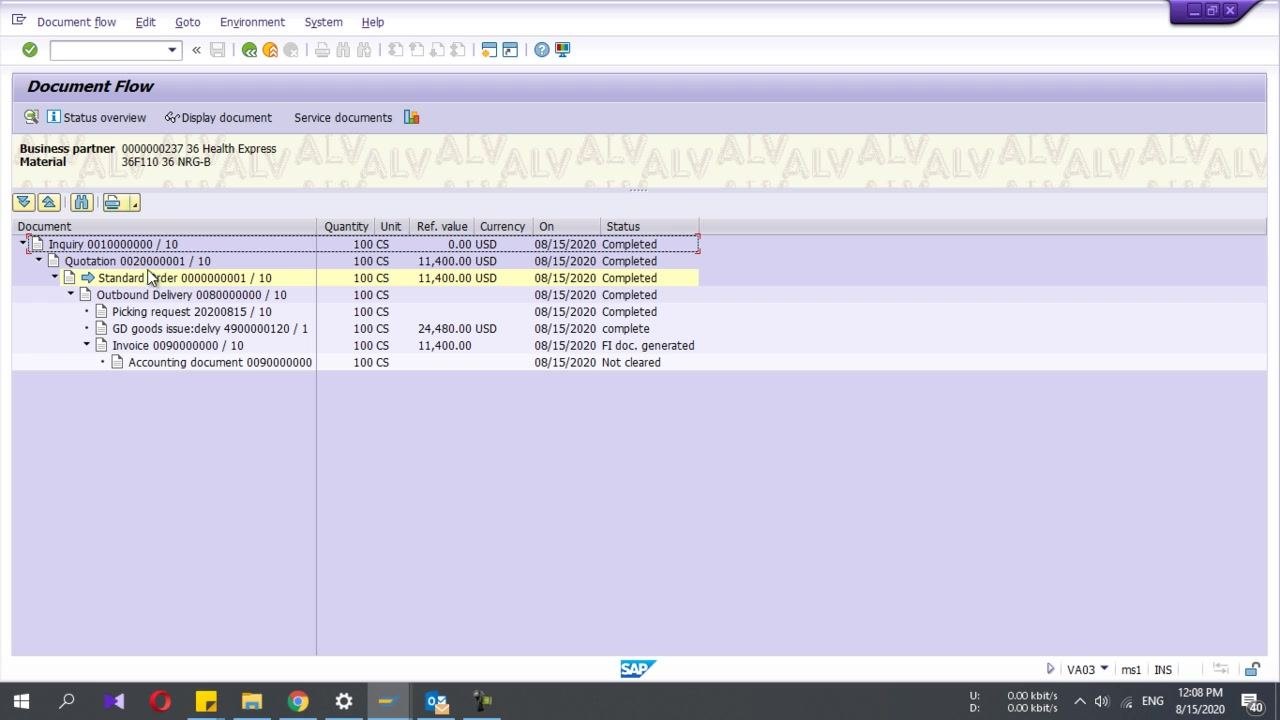
Access the Document Flow to see the complete process chain, including Inquiry, Quotation, Standard Order, Outbound Delivery, Picking Request, Goods Issue, Invoice, and Accounting Document. Statuses such as "Completed," "FI doc. generated," and "Not cleared" are displayed for each document.
Part 5: Reviewing item-level delivery and billing status
Review item details in the sales order overview
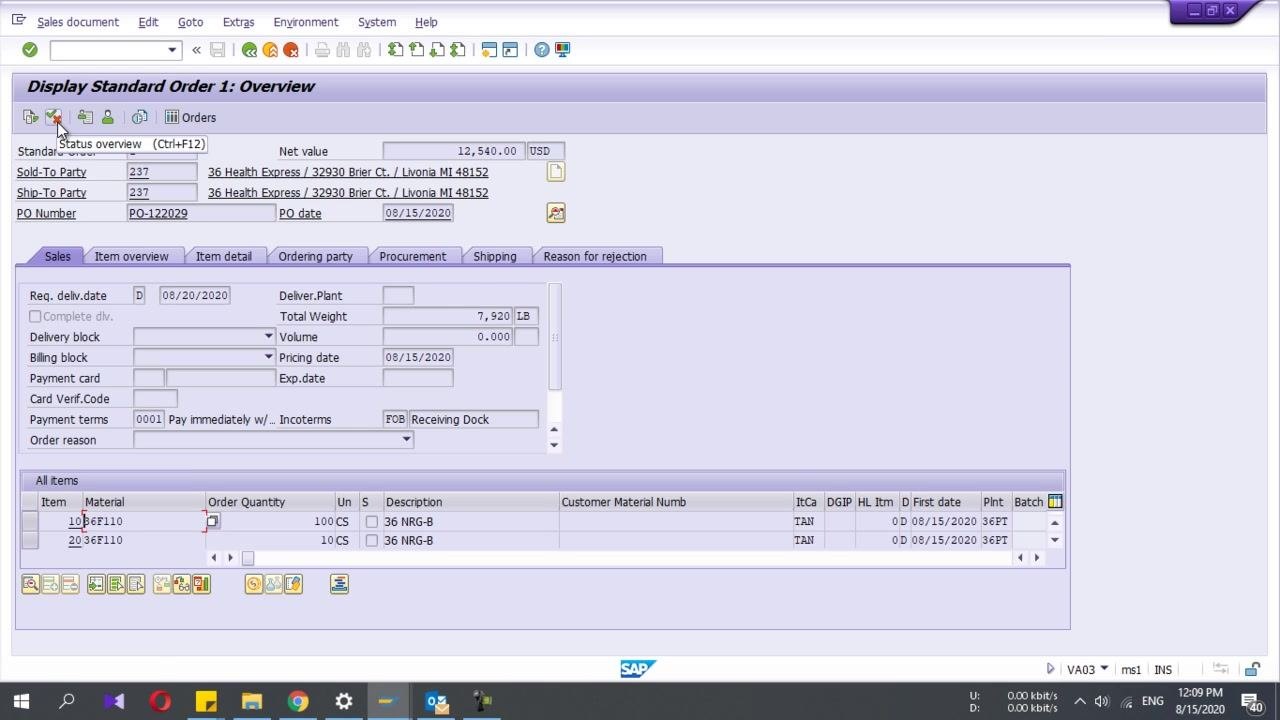
Open the Display Standard Order: Overview screen and locate the "All items" section at the bottom. Review the following details for each item:
- Item 10: Material 36F110, Order Quantity 100 CS, Description 36 NRG-B
- Item 20: Material 36F110, Order Quantity 10 CS, Description 36 NRG-B
Note the Sold-To Party and Ship-To Party (237 36 Health Express), PO Number (PO-122029), PO Date (08/15/2020), and Net Value (12,540.00 USD).
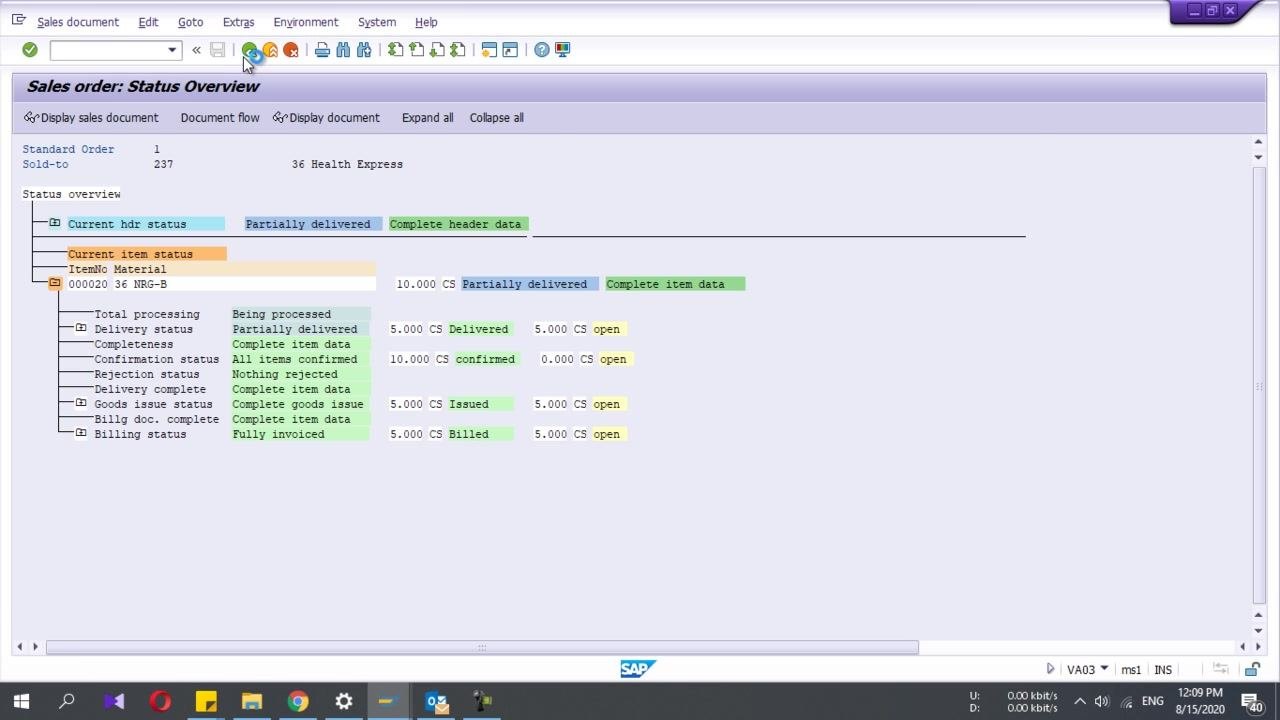
Check the status overview for fully delivered and billed items
Navigate to the Status Overview for the sales order. For Item 10 (36 NRG-B, 100 CS), verify:
- Delivery status: 100.000 CS Delivered
- Goods issue status: 100.000 CS Issued
- Billing status: 100.000 CS Billed
All statuses should show as completed, fully delivered, fully invoiced, and with nothing rejected.
Check the status overview for partially delivered and billed items
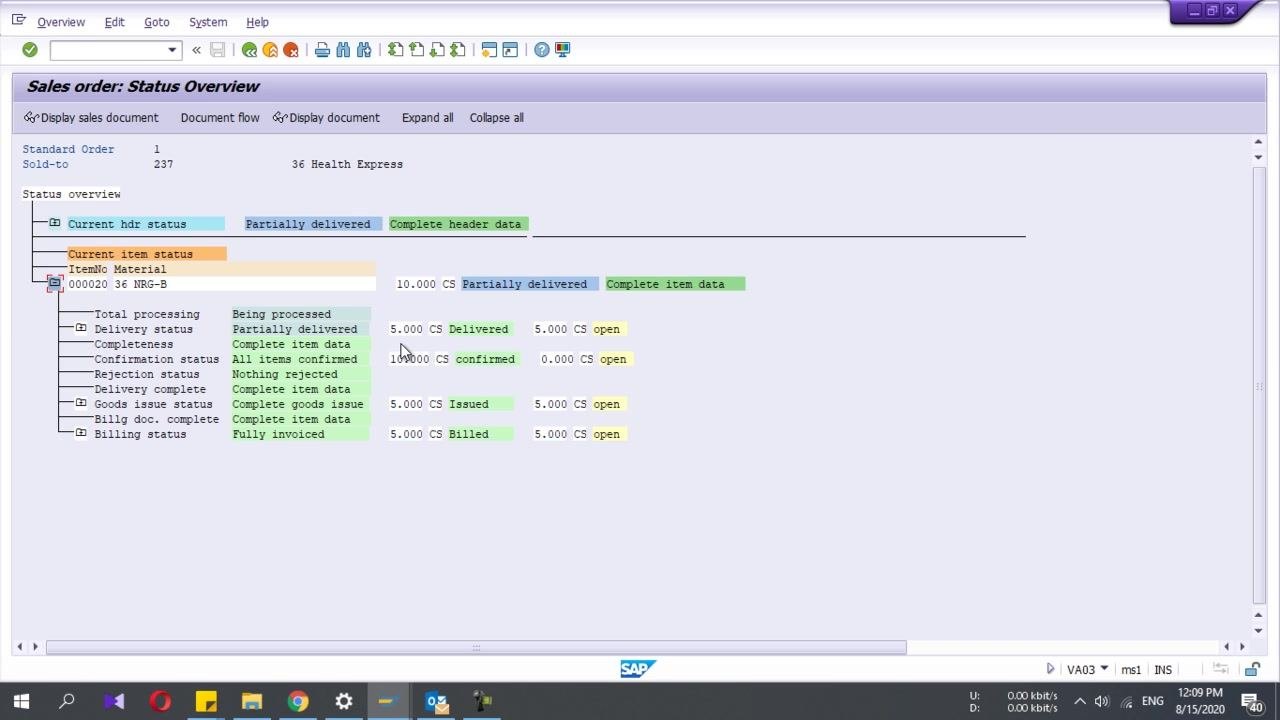
In the same Status Overview screen, select Item 20 (36 NRG-B, 10 CS). Review:
- Delivery status: 5.000 CS Delivered, 5.000 CS open
- Goods issue status: 5.000 CS Issued, 5.000 CS open
- Billing status: 5.000 CS Billed, 5.000 CS open
- Confirmation status: 10.000 CS confirmed
The item is partially delivered and partially billed, with 5 CS still open for delivery and billing.
Verify detailed status for partially delivered items
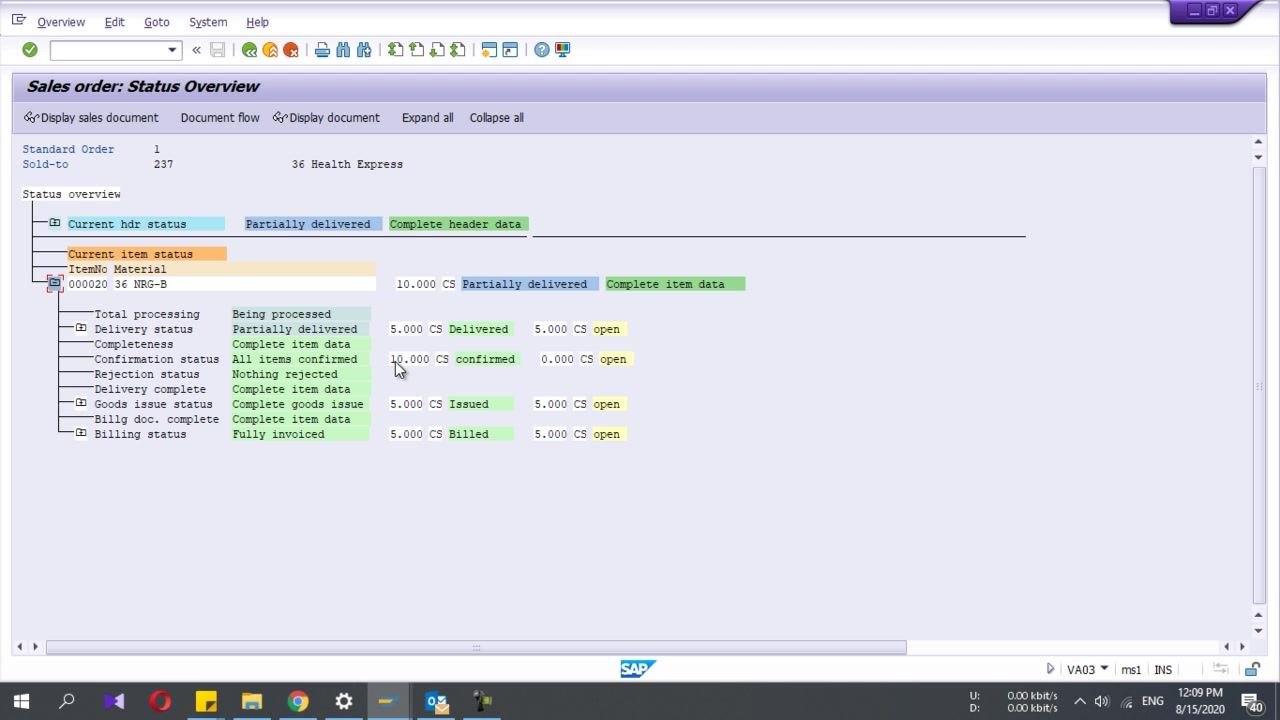
Confirm the detailed breakdown for partially delivered items: "Partially delivered" status, 5 CS delivered with 5 CS open, 5 CS issued with 5 CS open, 5 CS billed with 5 CS open, all items confirmed, nothing rejected, and complete item data. This breakdown helps you track the progress of each item in the sales order.
Access the billing document and review billed quantities
Open the billing document (for example, Invoice 9000000000) in display mode. Review the Overview of Billing Items screen:
- Item 10: 36 NRG-B, Billed Quantity 100 CS, Net Value 11,400.00, Cost 24,480.00
- Item 20: 36 NRG-B, Billed Quantity 5 CS, Net Value 570.00, Cost 1,224.00
The Environment menu is open, showing options such as "List Billing Documents" and "Display document flow."
Show output options for the invoice
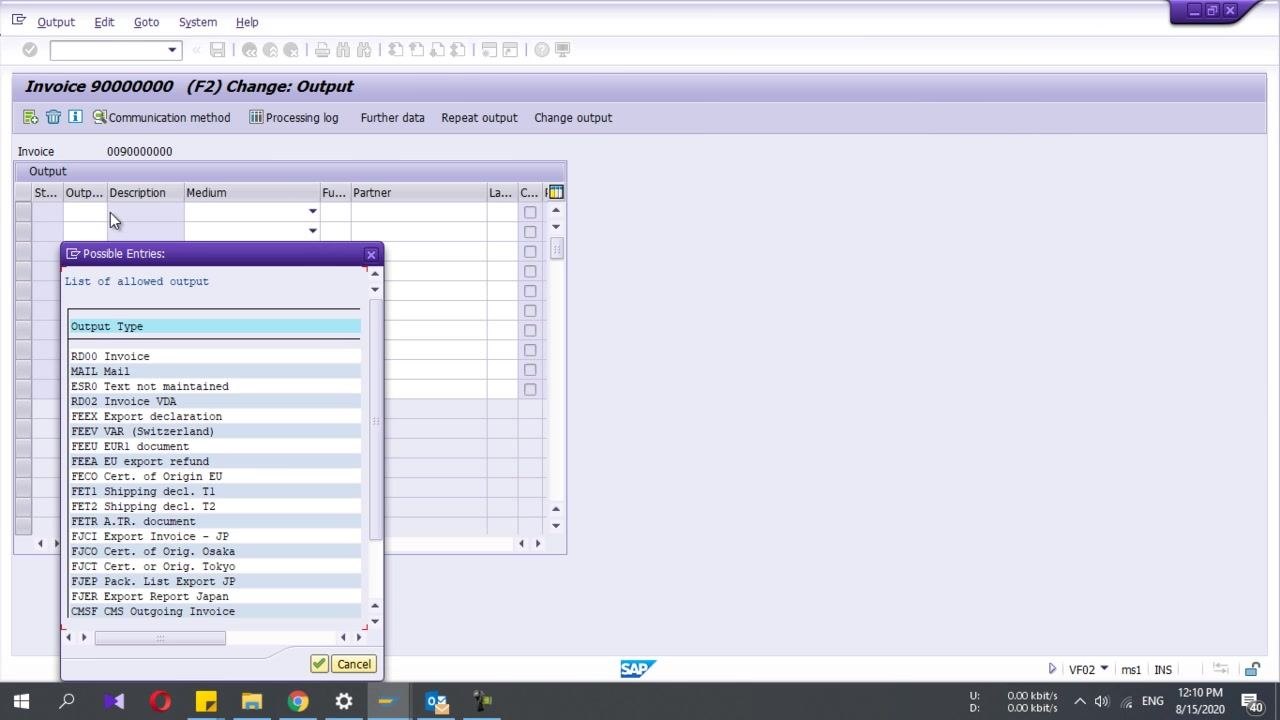
Navigate to the Change Output screen for the invoice. In the "Output" section, click the possible entries button for output type. The "Possible Entries: List of allowed output" window appears, displaying output types such as:
- RD00 Invoice
- MAIL Mail
- ESR0 Text not maintained
- RD02 Invoice VDA
- Additional export and shipping document types
This allows you to select the appropriate output type for the invoice.
Part 6: Printing and previewing the invoice
Configure print parameters for invoice output
On the Change Output screen for Invoice 9000000000, review and set the following fields under "Printing information":
- Logical destination: LOCL (local printer)
- SAP cover page: Do Not Print
- Recipient: FS-36
- Department: Leave as is or enter as required
- Cover Page Text: Access Type for Print Parameter and Proposal
- Authorization: Leave as is or enter as required
- Storage Mode: 1 Print only
- Print immediately: Check this box if you want the invoice to print as soon as it is processed
- Release after output: Check this box if you want the output released after printing
Ensure the "Maintain print parameters" box is checked at the bottom of the screen.
Preview the invoice output
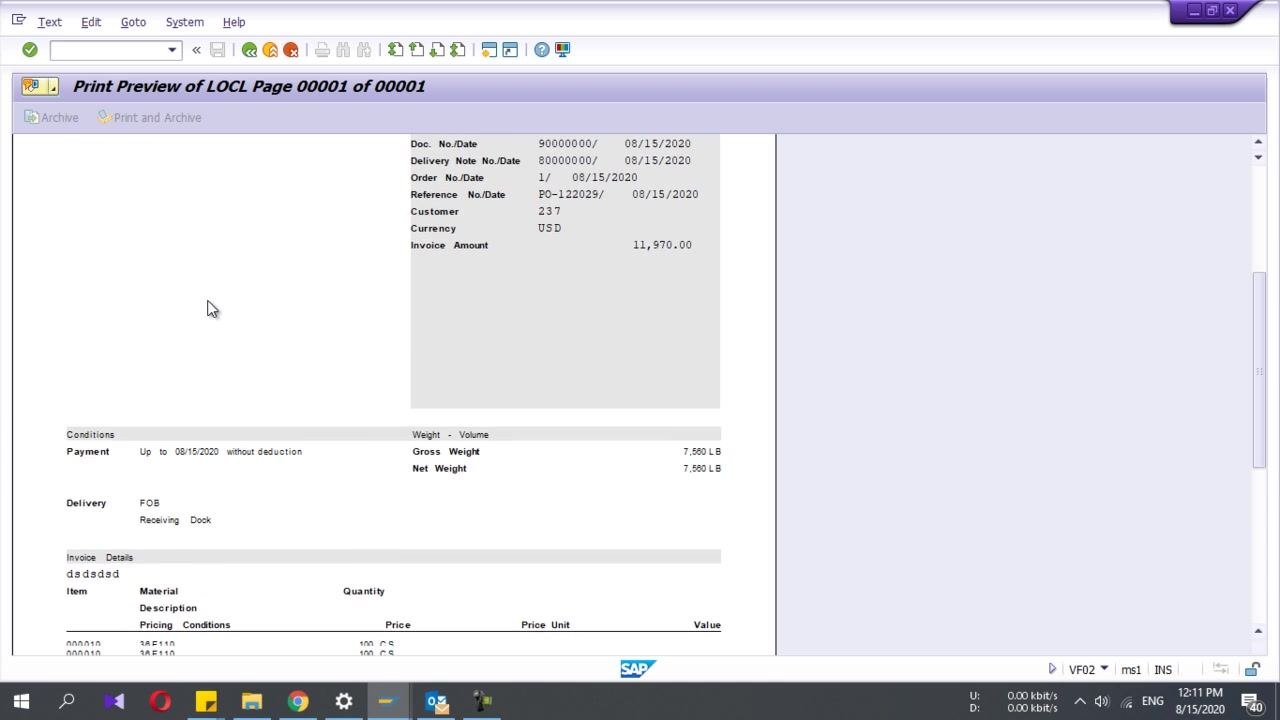
After configuring print parameters, initiate the print preview to see how the invoice will appear when printed. The "Print Preview of LOCL Page 00001 of 00001" screen displays:
- Doc. No./Date: 9000000000 / 08/15/2020
- Delivery Note No./Date: 8000000000 / 08/15/2020
- Order No./Date: 1 / 08/15/2020
- Reference No./Date: PO-122029 / 08/15/2020
- Customer: 237
- Currency: USD
- Invoice Amount: 11,970.00
- Payment conditions, delivery terms, gross and net weight, and itemized invoice details (material, quantity, price, value)
Use this preview to verify all invoice data before finalizing output.
Review an enhanced invoice layout with logo and formatting
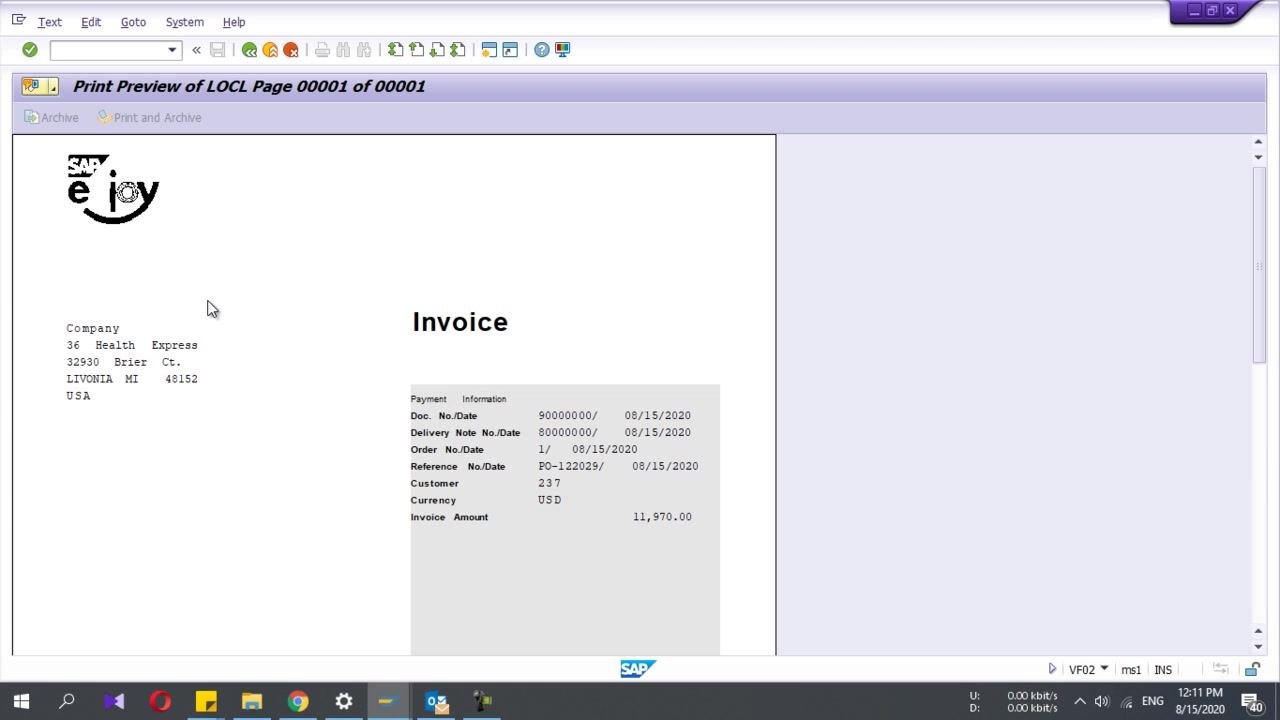
If you use SAP Smart Forms or custom ABAP programming, you can preview an enhanced invoice layout. The print preview displays the SAP logo and company branding (for example, "SAP enjoy"), the company address (36 Health Express, 32930 Brier Ct., LIVONIA MI 48152, USA), a prominent "Invoice" heading, and the same document and payment information as in the standard preview. This layout can include logos, grid lines, and other formatting for a professional appearance.
Verify output processing status
Return to the Change Billing Document screen for Invoice 9000000000. In the "Output output" window, review the output processing status:
- Message type: RD00 (Invoice)
- Name: Invoice
- Created on: 08/15/2020
- Created at: 01:40:40
- Process status: 0
- Transmission Medium: 1
Use the Print Options button to adjust or reprocess output if necessary, and confirm that the output has been generated and processed as expected.
What's next
With the delivery posted and the invoice created, you have completed the full order-to-cash cycle: from reviewing the sales order, creating a delivery in SAP VL01N, posting goods issue, through billing and invoice output. You can use transaction VA03 at any time to check the document flow and status of an order, and transaction VF03 to display any billing document. Always verify picked quantities, storage locations, and pricing data before posting a goods issue or releasing a billing document to accounting, to ensure accurate inventory and financial records in SAP.
Generation details: cost, quality tiers
Docsie billed 4,500 credits ($3.15) to analyze this 9-minute video at standard quality. The rewrite, template fill and Word/PDF exports were included. The same video at each quality tier:
| Quality | Frames sampled | Credits | Approx. cost |
|---|---|---|---|
| Draft | every 16-30 s | 2,250 | $1.57 |
| Standard (this guide) | every 8-15 s | 4,500 | $3.15 |
| Detailed | every 4-7 s | 9,000 | $6.30 |
| Ultra | every 1-3 s | 18,000 | $12.60 |
Credits priced at $0.70 per 1,000; plans include a monthly allowance. Enterprise customers on on-premise or bring-your-own-model deployments run this on their own inference and pay no per-video credits.
Generated by Docsie Video-to-Docs on 2026-10-01 from a 8-minute video. Screenshots are frames from the source video and belong to their creator, KH Zeeds, whose original is embedded above. If you own this video and want the guide removed or credited differently, contact us and we will act within one business day.