
How to Set Up Single Sign-on in Salesforce
This guide walks you through how to set up single sign-on in Salesforce by configuring Salesforce Identity as an identity provider, creating a connected app, and testing SAML-based single sign-on (SSO) with a sample web application. By the end of this guide, you will have a working SAML integration between Salesforce and an external app, complete with custom attributes passed through the SAML assertion.
Video: External Identity: How to Setup Single Sign-on With a Sample Application Using SAML | Salesforce by Salesforce Support (2015). All credit for the demonstration goes to the creator; watch the original on YouTube. The written guide below was generated from this video by Docsie. Creator? Request a change or removal.
This guide walks you through how to set up single sign-on in Salesforce by configuring Salesforce Identity as an identity provider, creating a connected app, and testing SAML-based single sign-on (SSO) with a sample web application. By the end of this guide, you will have a working SAML integration between Salesforce and an external app, complete with custom attributes passed through the SAML assertion.
Prerequisites
Before you begin, make sure you have:
- Access to a Salesforce environment with permission to manage Setup, create connected apps, and manage profiles.
- A Heroku account for deploying a sample SAML-compatible application.
- Access to the Salesforce Identity GitHub repository to deploy the sample app.
- Terminal access with the Heroku CLI installed, so you can run configuration commands.
Review your current connected apps
Open your Salesforce environment and launch the App Launcher. If no connected apps have been assigned yet, you will see a message indicating that you don't have any connected apps assigned. This confirms that no connected apps are currently available to the user, which is expected before you configure one.
The goal of the steps that follow is to configure Salesforce Identity to act as an identity provider for web and mobile applications, enabling single sign-on.
Create a connected app in Salesforce
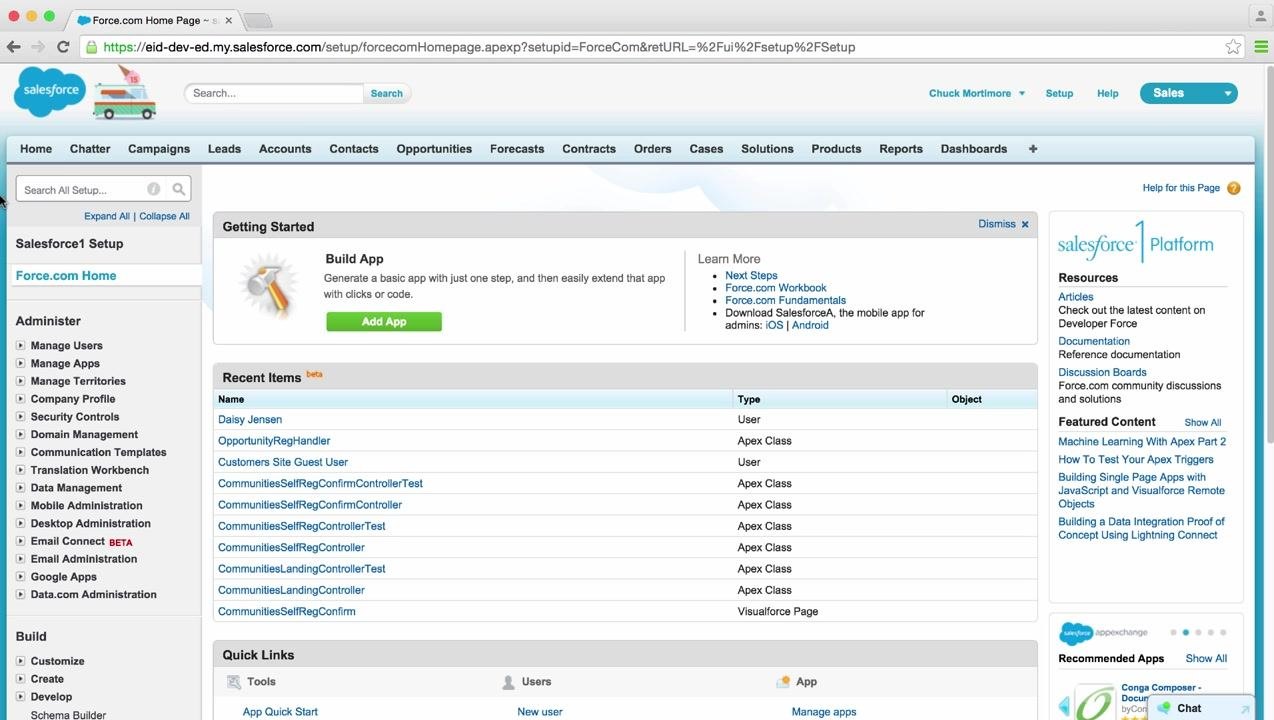
- Go to Salesforce Setup. In the left sidebar, locate the Salesforce1 Setup and Administer sections, which is where you manage and create apps.
-
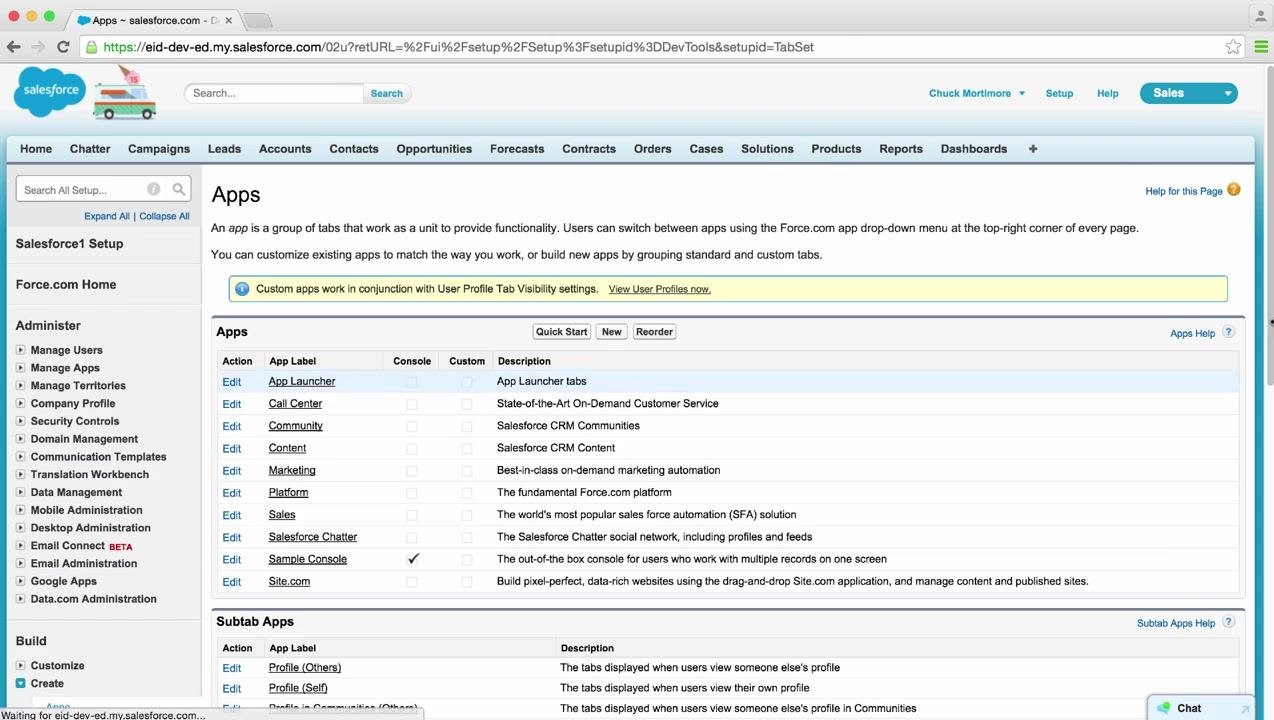
In the Setup menu, under Build, select Create, then Apps. The Apps page lists all existing apps and gives you the option to create new ones. Scroll down to find the Connected Apps section.
-
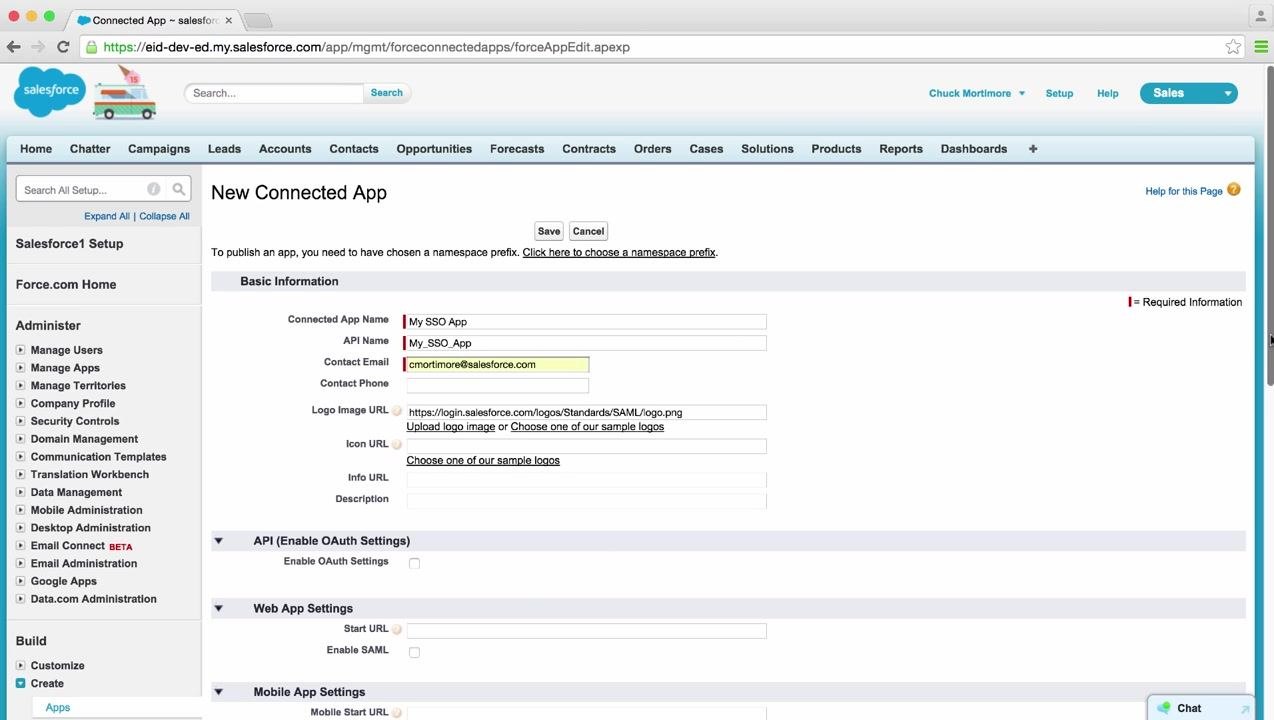
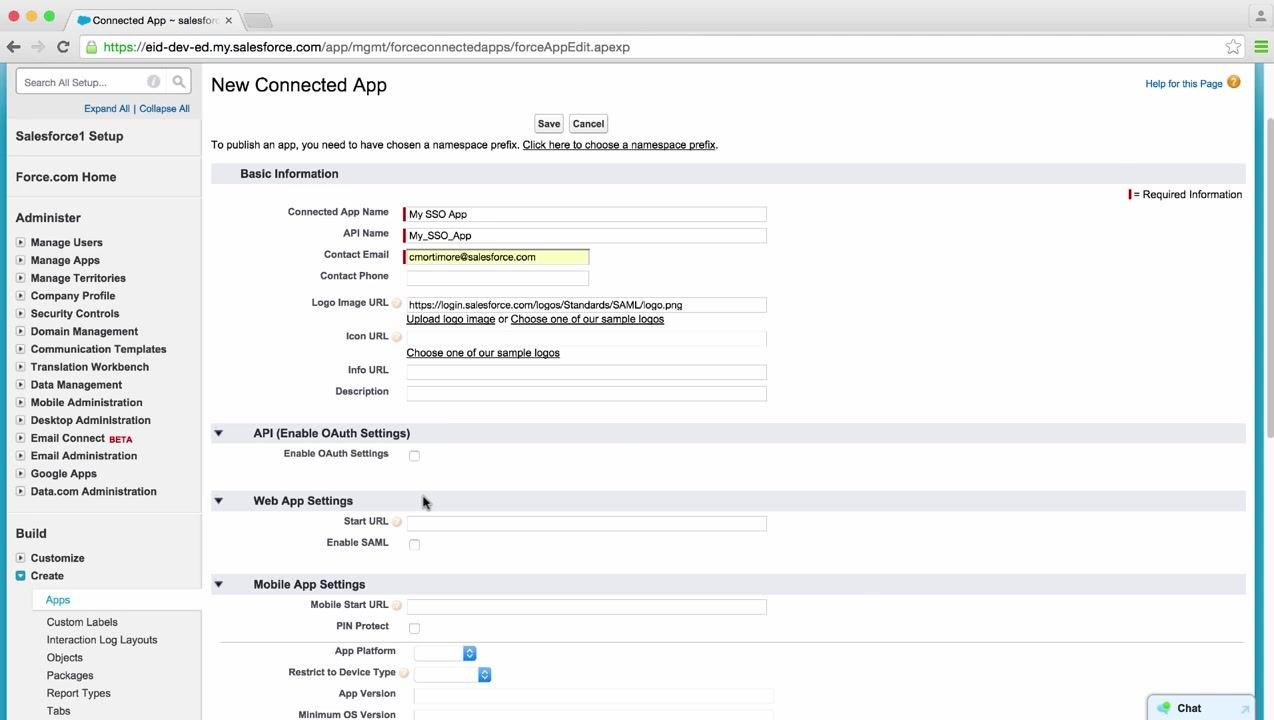
Click the option to create a new connected app, and fill in the following fields under Basic Information:
- Connected App Name: My SSO App
- API Name: My_SSO_App
- Contact Email: cmortimore@salesforce.com
You can optionally select a logo for your app; for this walkthrough, the SAML logo from the sample logos is used.
- Decide which protocol the app will use — options include OAuth, OpenID Connect, or SAML. For this integration, select SAML and make sure the Enable SAML option is checked under Web App Settings.
Deploy a SAML-compatible sample app to Heroku
- To test SAML SSO, use a sample app that already supports SAML. Visit the Salesforce Identity GitHub repository for the heroku-identity-java sample app, which is pre-configured for SAML and can be quickly deployed to Heroku.
- On the GitHub page, scroll down and click Deploy to Heroku. You are redirected to the Heroku deployment page, where Heroku reads the app's configuration.
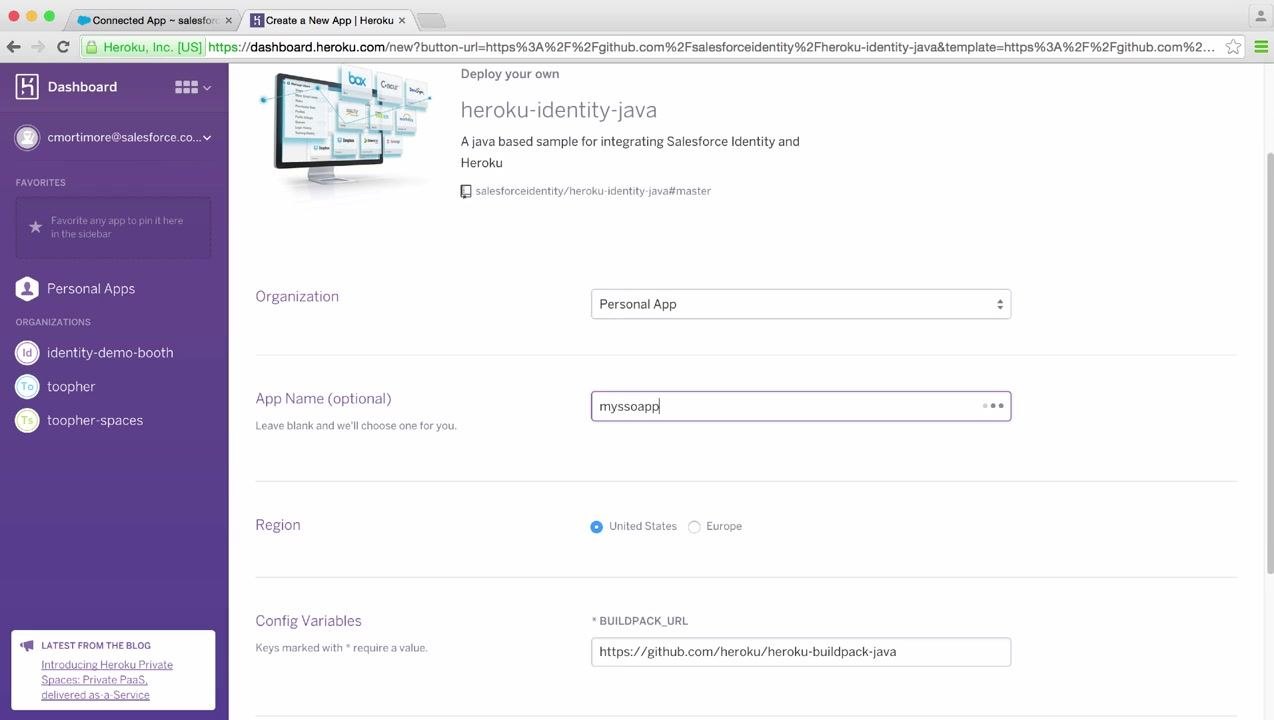
- On the Heroku deployment page, set the App Name (for example, "myssoapp"), choose your region (United States or Europe), and confirm the buildpack URL is set to
https://github.com/heroku/heroku-buildpack-java. Click the button to deploy the app.
Open the deployed sample app
Once deployment finishes, click View on the Heroku deployment page to open your new app. The app displays a simple interface with a large Login button. Click Login to begin the SAML SSO setup.
Collect SAML endpoint values from the sample app
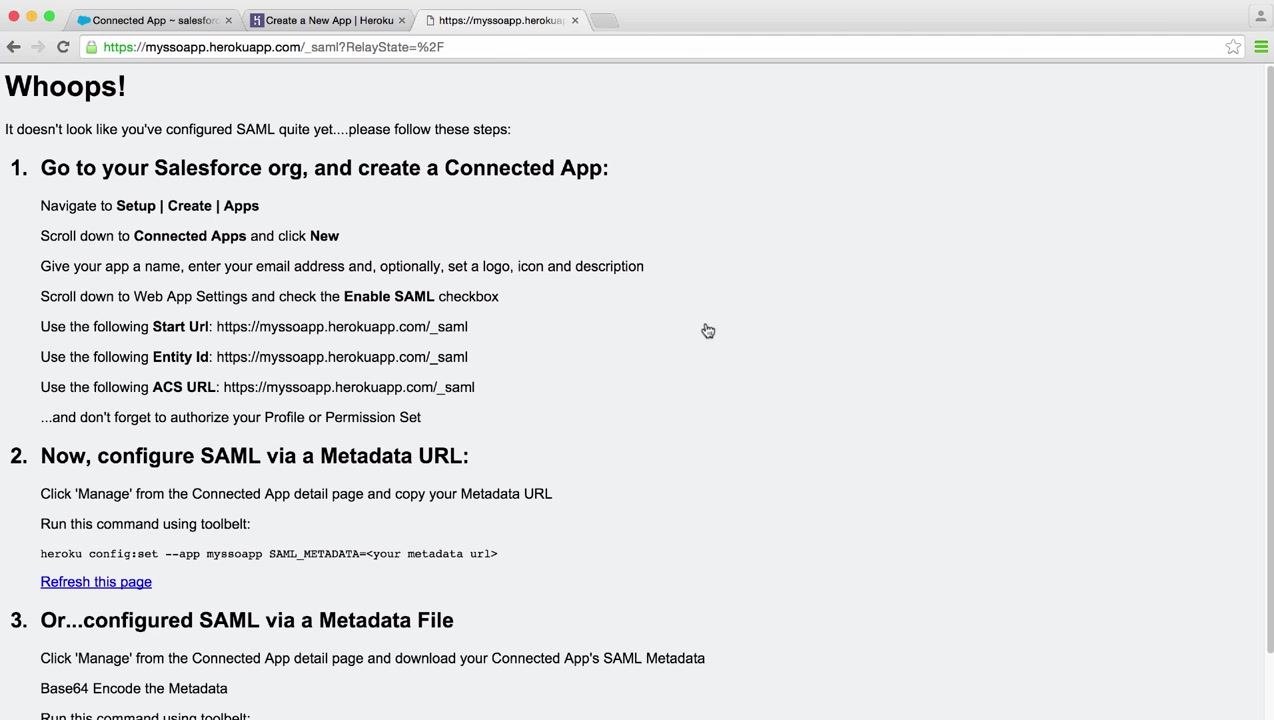
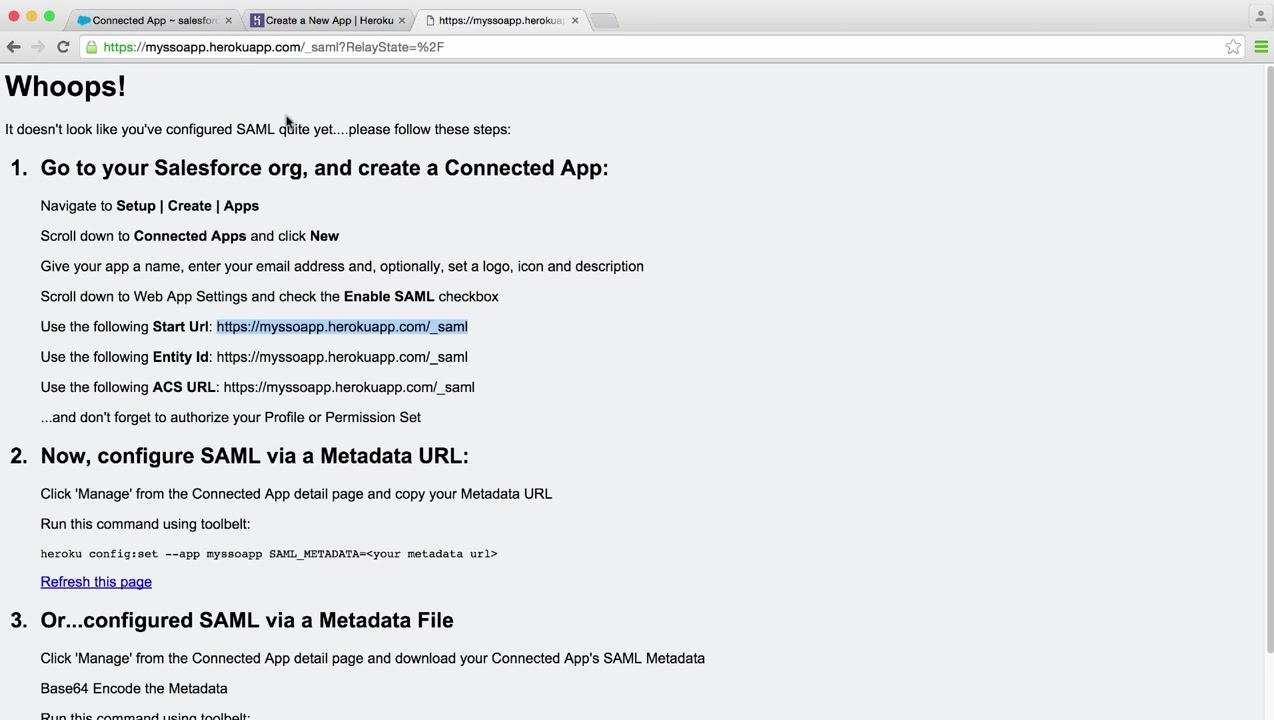
If SAML is not yet configured, the app displays a "Whoops!" page with setup instructions, including the required SAML endpoints:
- Start URL:
https://myssoapp.herokuapp.com/_saml - Entity ID:
https://myssoapp.herokuapp.com/_saml - ACS URL:
https://myssoapp.herokuapp.com/_saml
Note these values — you will need to enter them in Salesforce. The page also outlines steps for configuring SAML using a Metadata URL or file.
Highlight and copy the Start URL, Entity ID, and ACS URL from the instructions. In this example, all three values are identical: https://myssoapp.herokuapp.com/_saml.
Enter SAML settings in the Salesforce connected app
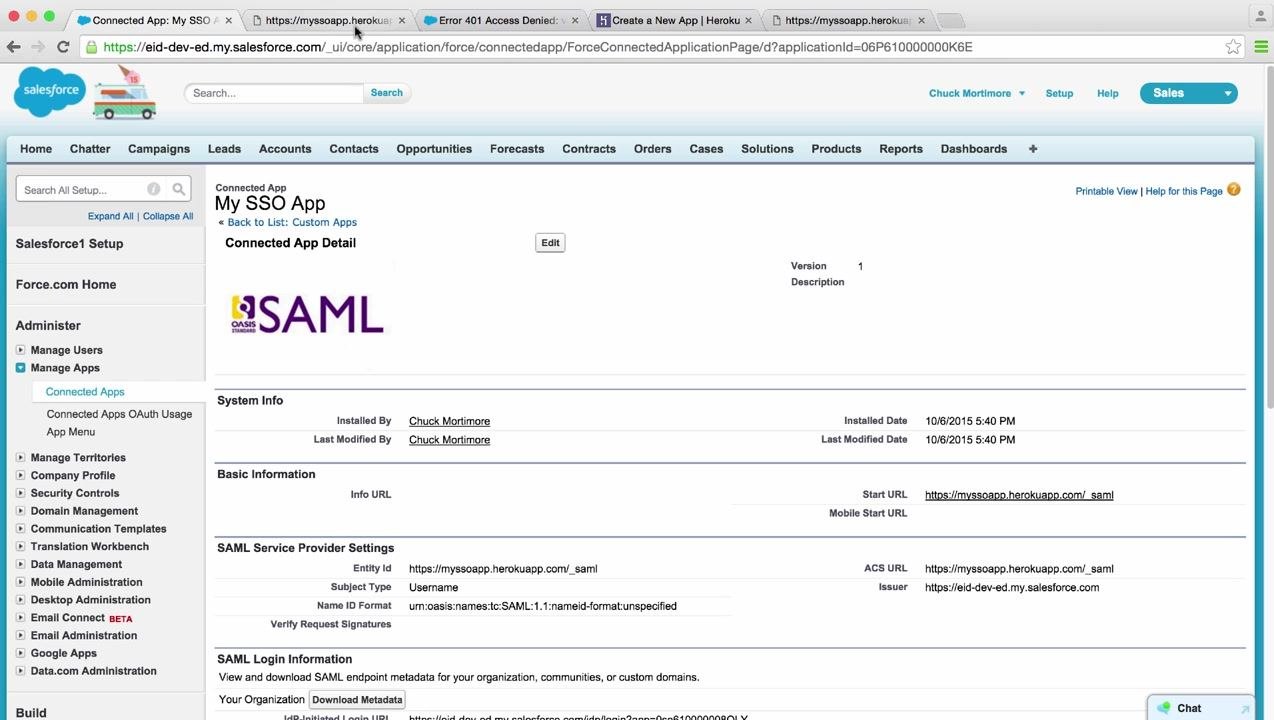
Return to your Salesforce Setup and open the New Connected App configuration screen. In the Web App Settings section, enter:
- Start URL:
https://myssoapp.herokuapp.com/_saml - Entity ID:
https://myssoapp.herokuapp.com/_saml - ACS URL:
https://myssoapp.herokuapp.com/_saml
Optionally, also specify:
- Subject Type: Username
- Name ID Format:
urn:oasis:names:tc:SAML:1.1:nameid-format:unspecified - Issuer:
https://eid-dev-ed.my.salesforce.com
You can also enable Encrypt SAML Response if your integration requires it. Click Save to create the connected app with these SAML settings.
Authorize user profiles for the connected app
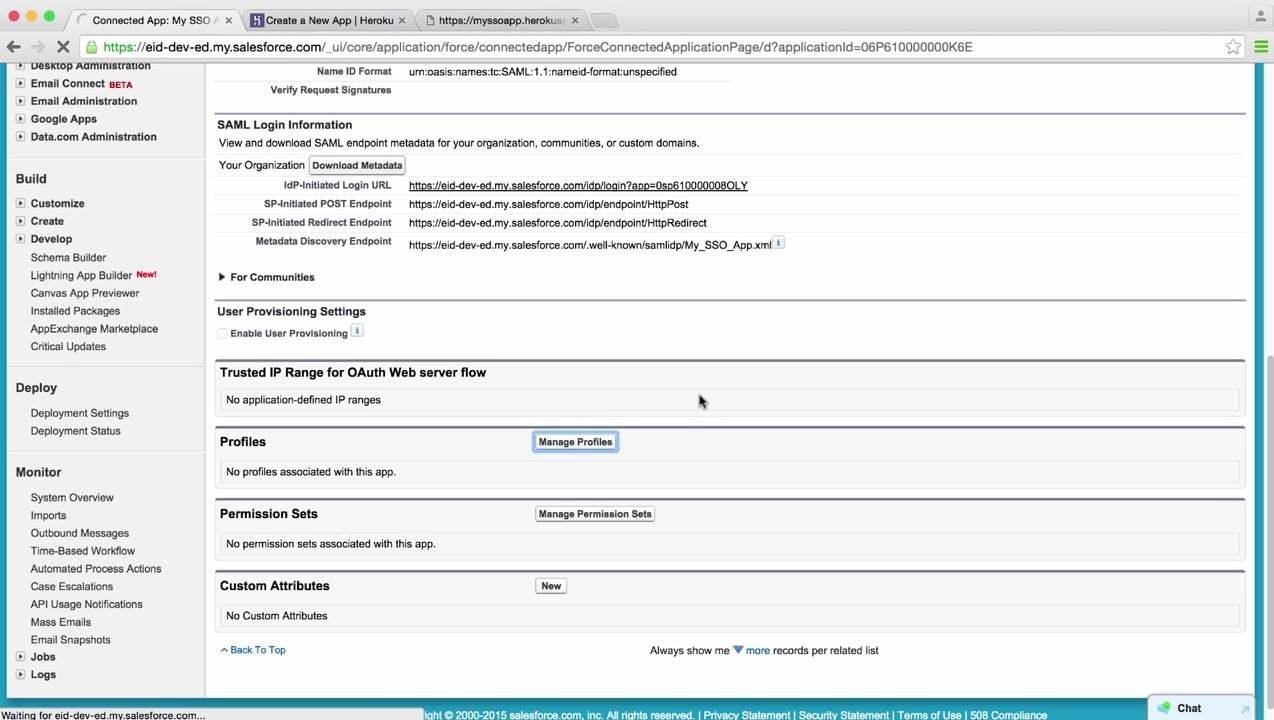
After saving, go to the connected app's detail page. Under Profiles and Permission Sets, click Manage Profiles. Select the profiles that should have access to the app — for example, Customers and System Administrators — then click Save to apply the authorization.
Test IdP-initiated SAML SSO
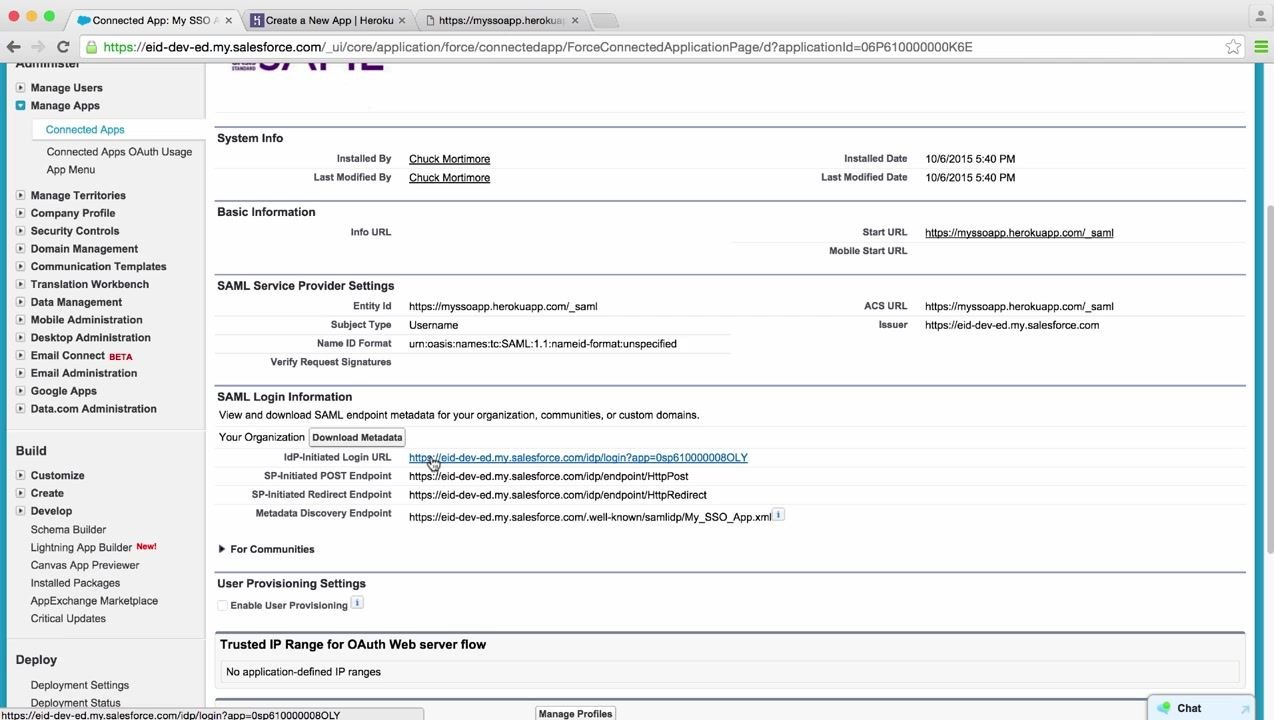
Since the System Administrator profile is authorized, you can test the app directly from Salesforce. On the connected app detail page, locate the IdP-Initiated Login URL and click it to start a login that begins at the identity provider (Salesforce) and sends a SAML assertion to the service provider (your Heroku app).
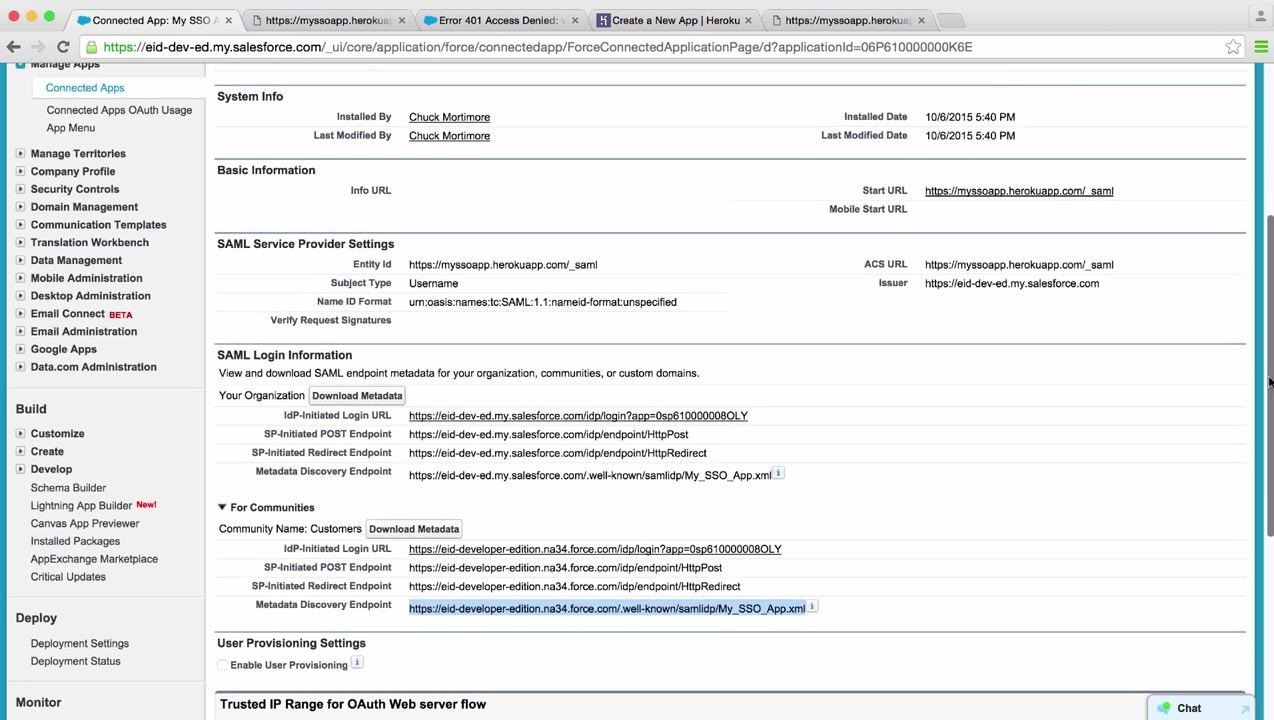
On the same page, verify the SAML settings, including the Entity ID, ACS URL, Subject Type, Name ID Format, and Issuer, and confirm the IdP-Initiated Login URL and other SAML endpoints are correct.
Exchange metadata between Salesforce and Heroku
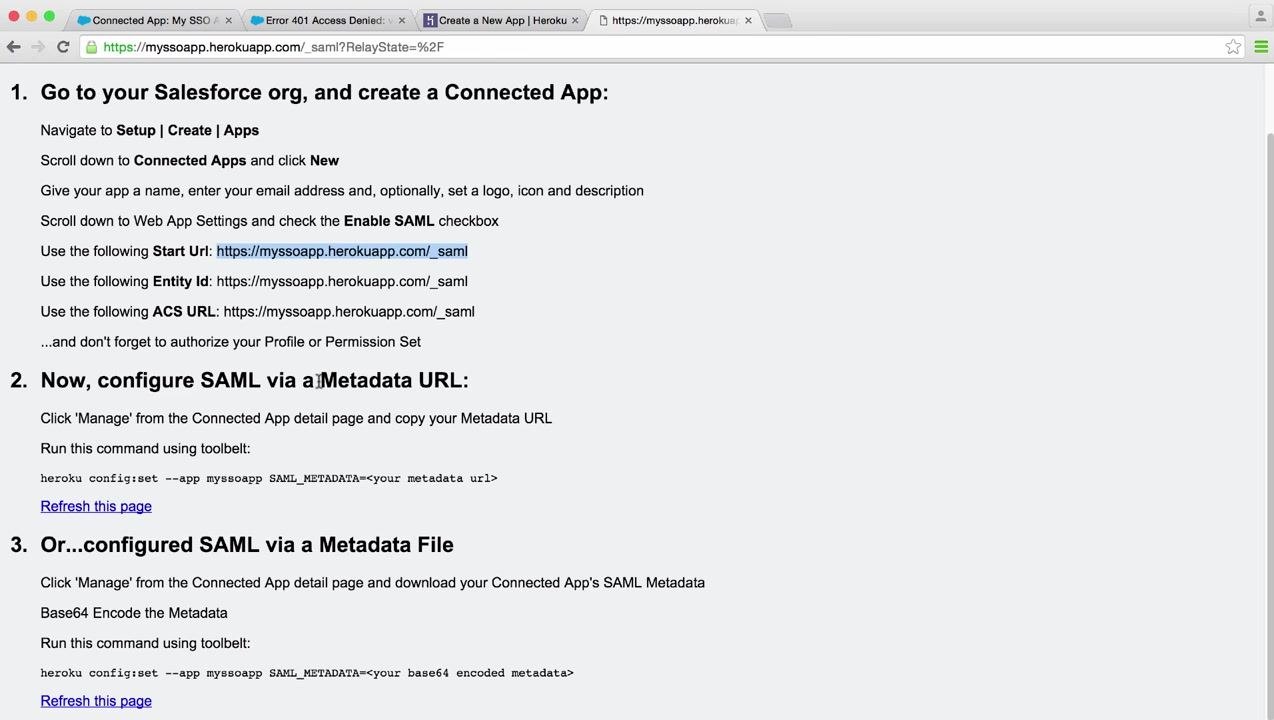
- Return to your Heroku sample app's setup instructions page and locate the section titled "Now, configure SAML via a Metadata URL:". Note the command provided for configuring the SAML metadata in your Heroku app:
heroku config:set --app myssoapp SAML_METADATA=<your metadata url>
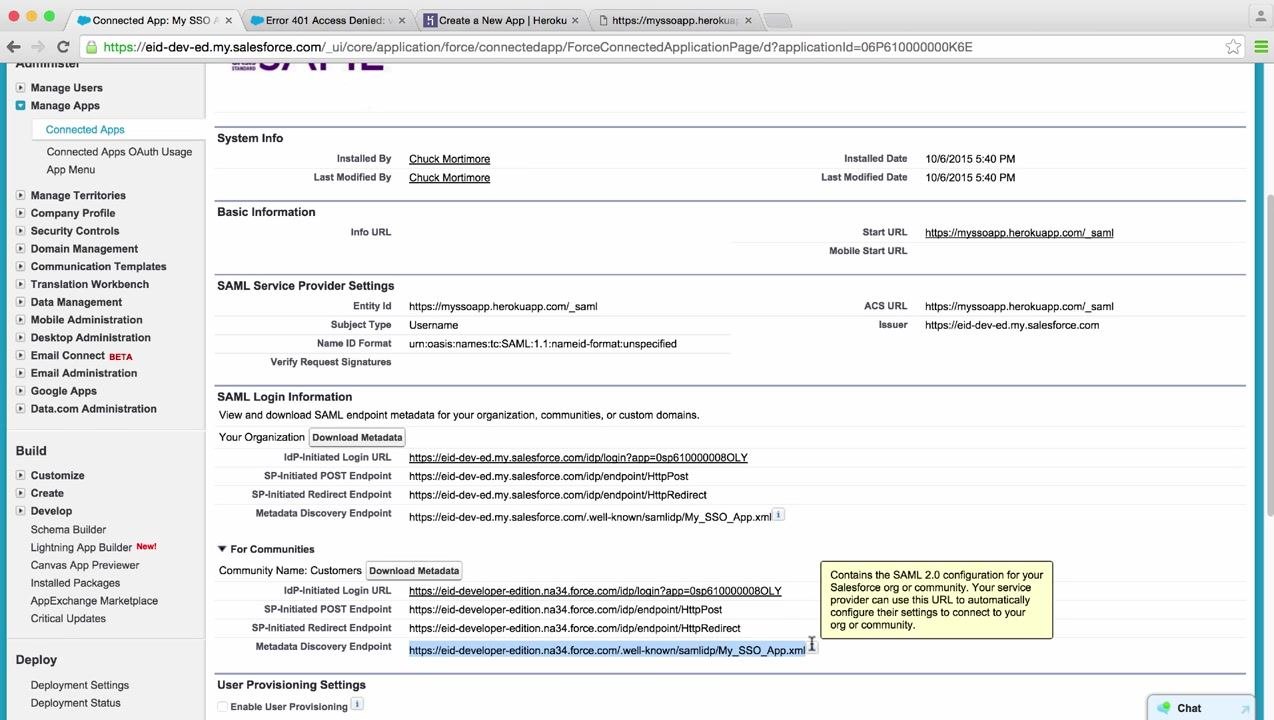
- In Salesforce, go to your connected app's detail page and, under SAML Login Information, find the Metadata Discovery Endpoint. There are separate endpoints for your organization and for each community — for this example, use the community endpoint:
https://eid-developer-edition.na34.force.com/.well-known/samlidp/My_SSO_App.xml
Copy the appropriate metadata URL for your use case.
- Open your terminal and run the following command, replacing
<your metadata url>with the copied Salesforce metadata URL:
heroku config:set --app myssoapp SAML_METADATA=https://eid-developer-edition.na34.force.com/.well-known/samlidp/My_SSO_App.xml
Wait for Heroku to restart your app and apply the new configuration.
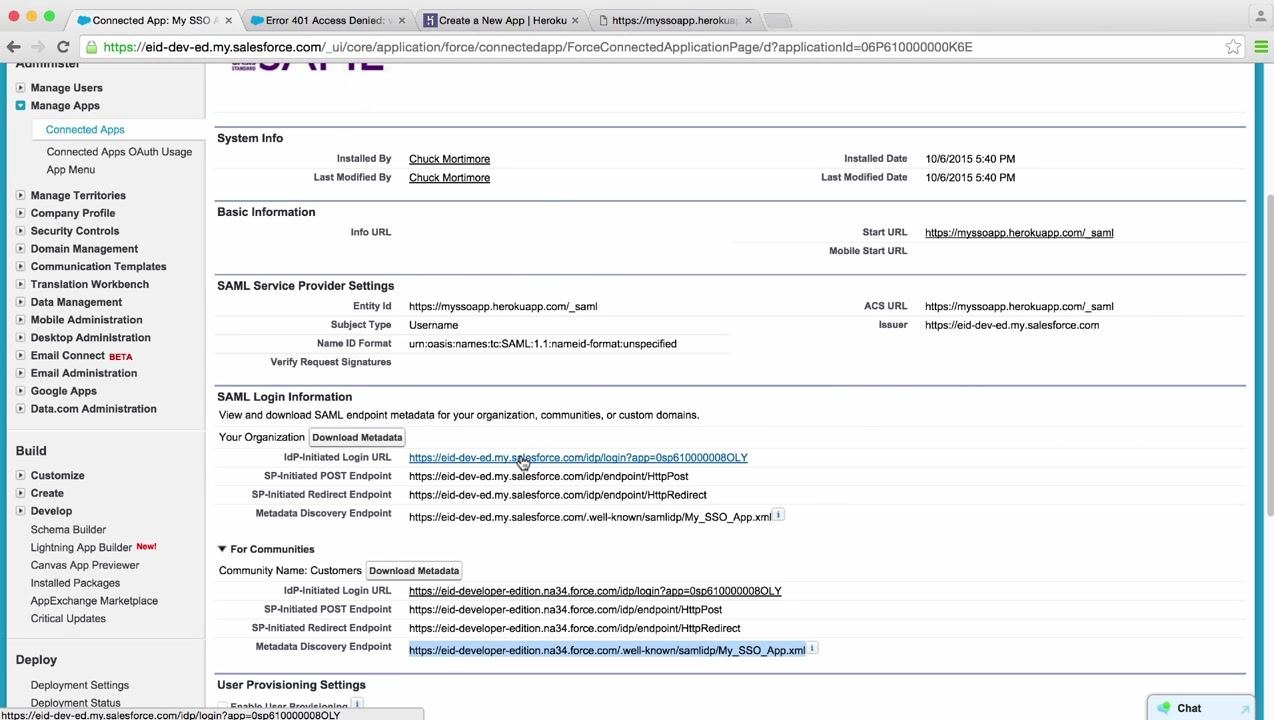
- In Salesforce, return to your connected app detail page, locate the IdP-Initiated Login URL under SAML Login Information, and click it to initiate a login from Salesforce. The Heroku app should now process the SAML single sign-on message and sign in the admin user, passing over standard attributes.
Add a custom SAML attribute
- In Salesforce, scroll down to the Custom Attributes section of your connected app detail page and click New to create a custom attribute.
- On the Create Custom Attribute screen, set the Attribute key to
Profileand, in the Attribute value field, insert the following value to pass the user's profile name:
$Profile.Name
Click Save to add the custom attribute.
- Switch back to your Heroku app and click Login to initiate SAML SSO again. The app should now receive the additional custom
Profileattribute in the SAML assertion.
Verify SP-initiated SSO and standard attributes
Initiate an SSO flow starting from the service provider (the Heroku app) by opening your browser and navigating to your Heroku app's SAML endpoint (for example, https://myssoapp.herokuapp.com/). The app redirects you to Salesforce for authentication, then returns you to the app after a successful login.
Confirm that you are logged in and that your user profile information is displayed, including username, is_portal_user, email, userId, and Profile (for example, "System Administrator"). This confirms that the SAML assertion correctly passes user attributes, including the custom profile attribute.
Test SSO as a community user
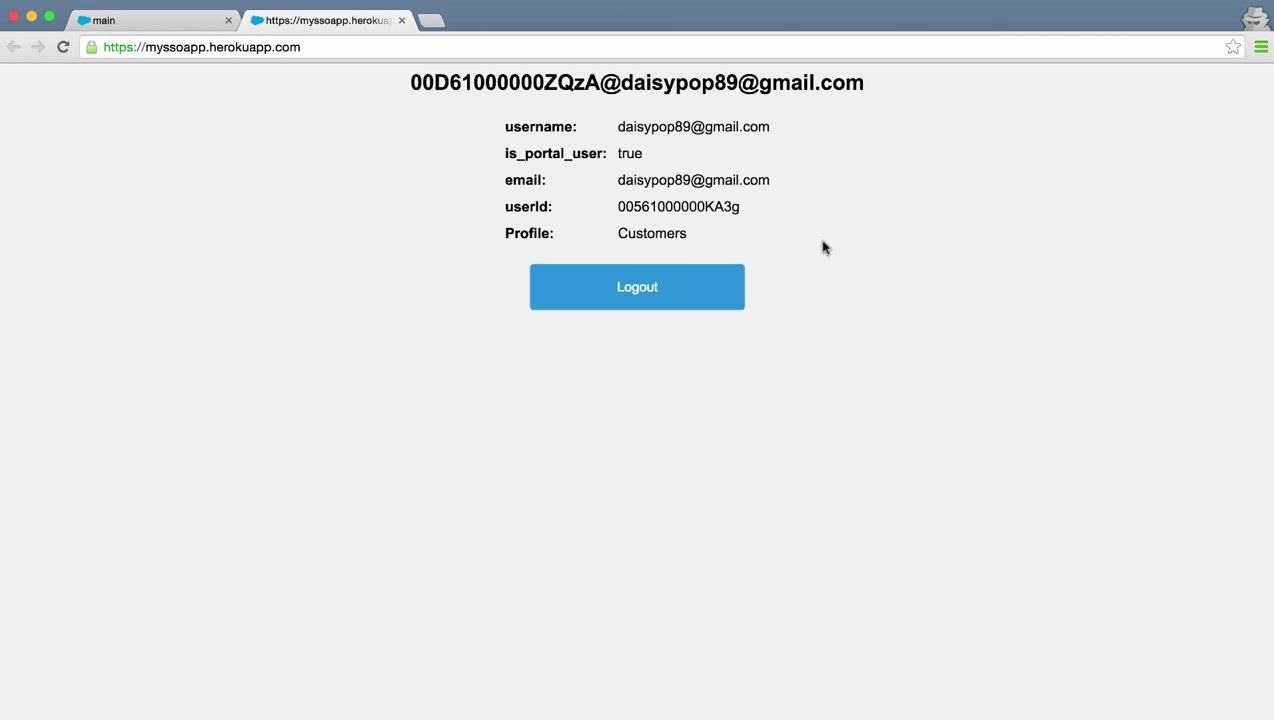
Switch to a Salesforce community user account (for example, Daisy) and reload the community app launcher to make sure the SSO app is visible. Click the SSO app from the launcher to initiate login, and confirm that the user is signed in to the Heroku app with their information displayed, including username (for example, daisypop89@gmail.com), is_portal_user (true), email, userId, and Profile (for example, "Customers"). Verify that the custom profile attribute is passed and displayed correctly for the community user.
Summary and what's next
You have now learned how to set up single sign-on in Salesforce end to end: configuring Salesforce Identity as an identity provider, creating and configuring a SAML connected app, deploying a SAML-compatible sample app to Heroku, exchanging metadata, authorizing profiles, and adding a custom attribute. You have also verified both IdP-initiated and SP-initiated SSO flows, confirming that standard and custom attributes pass correctly for both administrator and community users.
You can now use this same process to set up SAML-based single sign-on for any of your other apps, making sure each one receives the correct standard and custom SAML attributes it needs.
Generation details: cost, quality tiers
Docsie billed 3,000 credits ($2.10) to analyze this 6-minute video at standard quality. The rewrite, template fill and Word/PDF exports were included. The same video at each quality tier:
| Quality | Frames sampled | Credits | Approx. cost |
|---|---|---|---|
| Draft | every 16-30 s | 1,500 | $1.05 |
| Standard (this guide) | every 8-15 s | 3,000 | $2.10 |
| Detailed | every 4-7 s | 6,000 | $4.20 |
| Ultra | every 1-3 s | 12,000 | $8.40 |
Credits priced at $0.70 per 1,000; plans include a monthly allowance. Enterprise customers on on-premise or bring-your-own-model deployments run this on their own inference and pay no per-video credits.
Generated by Docsie Video-to-Docs on 2026-09-14 from a 5-minute video. Screenshots are frames from the source video and belong to their creator, Salesforce Support, whose original is embedded above. If you own this video and want the guide removed or credited differently, contact us and we will act within one business day.