
How to Create a Permission Set in Salesforce
Permission sets let you grant additional object-level security to users for specific, one-off scenarios without creating a new profile. They are useful when you need to extend access to a small group of users—typically between 1 and 10—rather than modifying everyone's profile. For example, in an organization with both sales and service teams, a knowledgeable sales team member may need temporary access to help the service team with a specific case. This guide walks you through how to create a permission set in Salesforce, configure its object and field permissions, and assign it to users.
Video: Permission Sets in Salesforce | How to Create Permission Sets | How to Assign Permission Sets by Salesforce Emily (2021). All credit for the demonstration goes to the creator; watch the original on YouTube. The written guide below was generated from this video by Docsie. Creator? Request a change or removal.
Permission sets let you grant additional object-level security to users for specific, one-off scenarios without creating a new profile. They are useful when you need to extend access to a small group of users—typically between 1 and 10—rather than modifying everyone's profile. For example, in an organization with both sales and service teams, a knowledgeable sales team member may need temporary access to help the service team with a specific case. This guide walks you through how to create a permission set in Salesforce, configure its object and field permissions, and assign it to users.
Prerequisites
Before you begin, make sure you have the following:
- An active Salesforce Lightning environment that you are logged into.
- Administrative privileges to access Setup options.
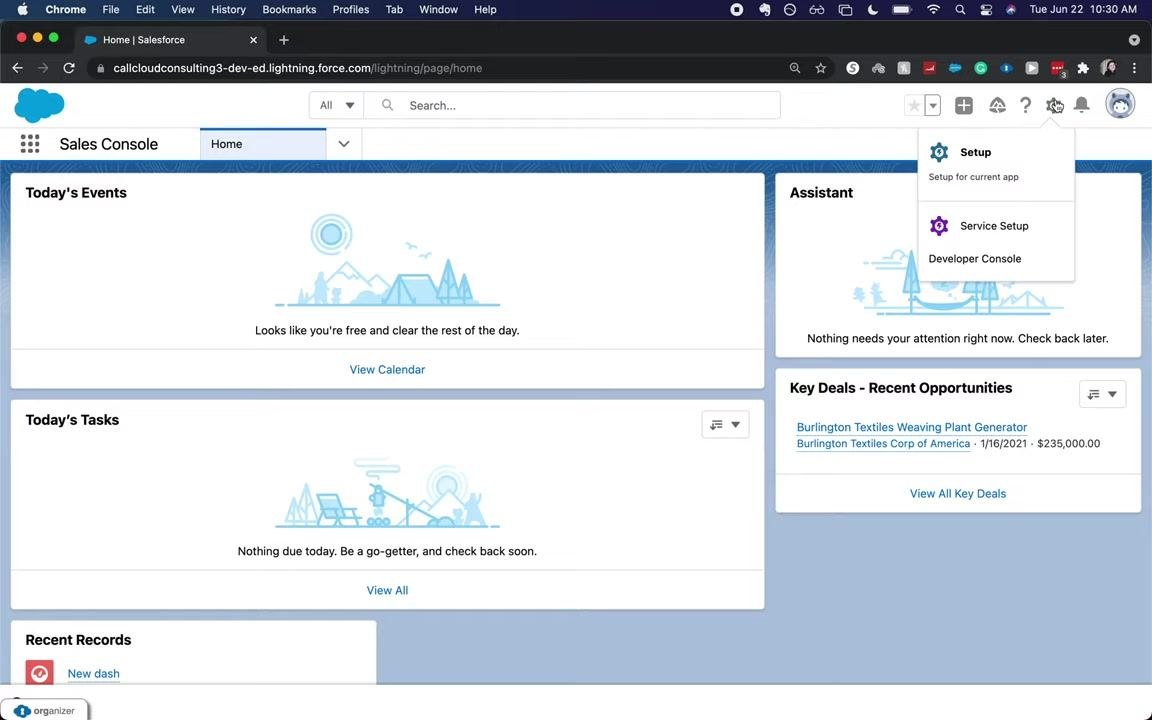
- Access to the Sales Console Home page, which displays panels such as Today's Events, Today's Tasks, Assistant, Key Deals – Recent Opportunities, and Recent Records.
- A top navigation bar showing options like All, Search, and icons for notifications, settings, and your user profile.
Open the Salesforce Setup area
Locate the gear icon in the upper right corner of the Salesforce interface and click it to open the dropdown menu. Select Setup from the dropdown to enter the Salesforce Setup area.
Search for Permission Sets
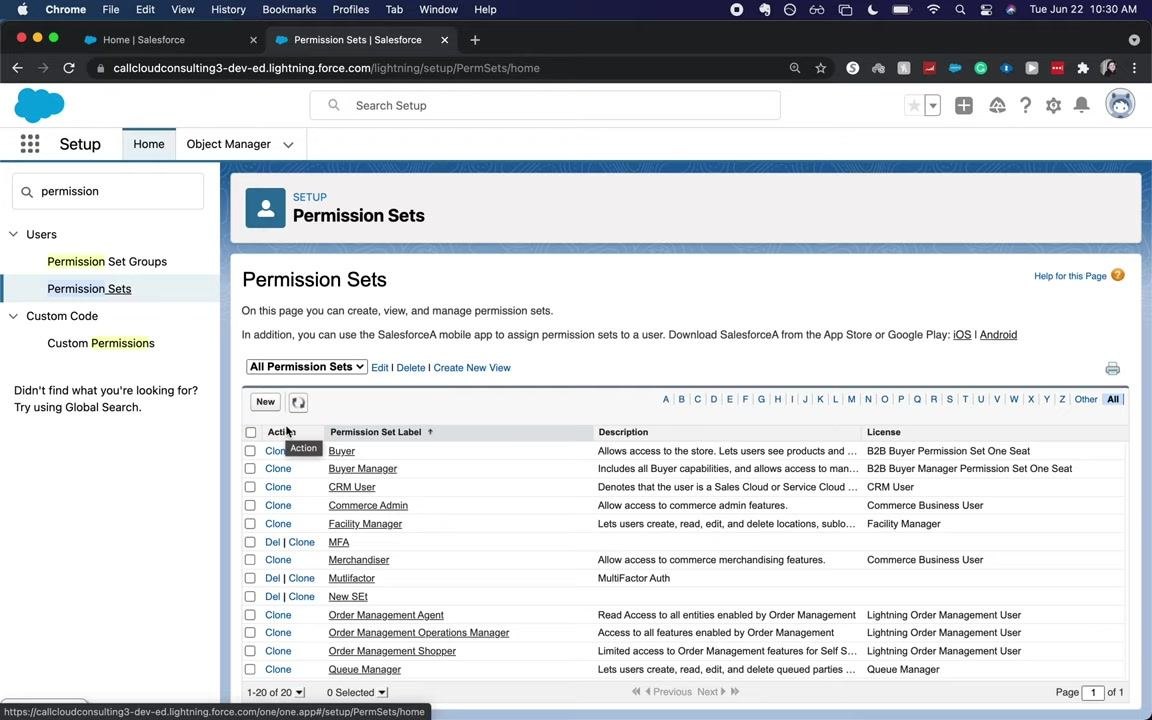
In the Salesforce Setup area, find the Quick Find/Search Setup box on the left sidebar. Type "permission" into the search box, then click Permission Sets under the Users section.
Start creating a new permission set
On the Permission Sets page, click the New button at the top of the list to begin creating your permission set.
Enter the permission set information
Fill in the following fields:
- Label: Enter a name for your permission set (for example, "New").
- API Name: Enter the API name (for example, "New").
- Description: Optional, but recommended for clarity.
- Session Activation Required: Check this box if you want users assigned to this permission set to reactivate their session.
- License: Select the appropriate license for the users who will use this permission set. Leave it as --None-- unless you want to restrict it to a specific license, such as Chatter Free User, Partner User, or Sales User.
Save the permission set
Click Save to create the new permission set.
Review the Permission Set Overview page
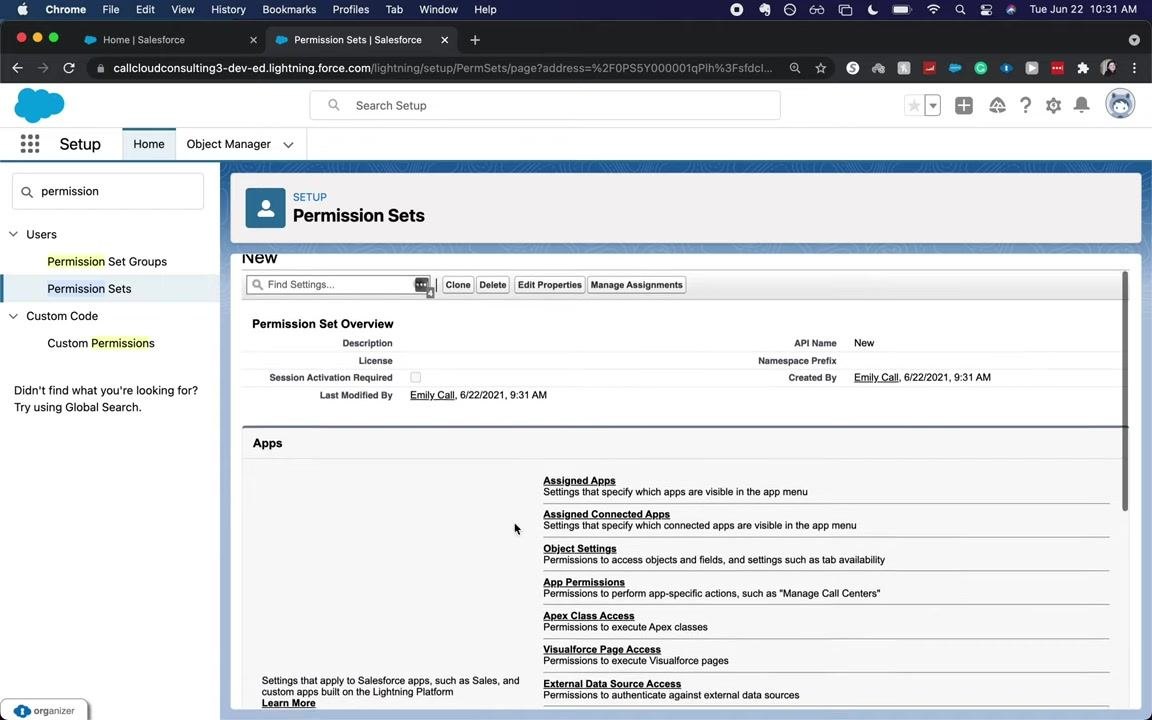
After saving, you land on the Permission Set Overview page. Here you can see your permission set's details, including:
- Label and API Name
- Session Activation Required status
- Created By and Last Modified By information
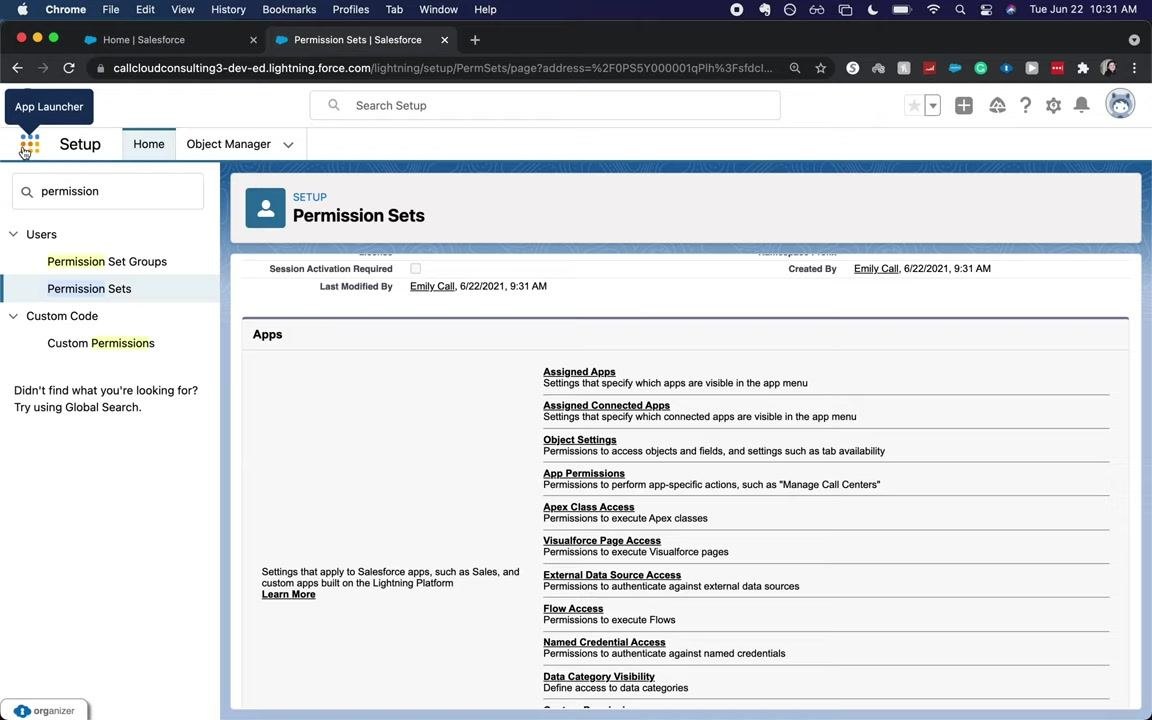
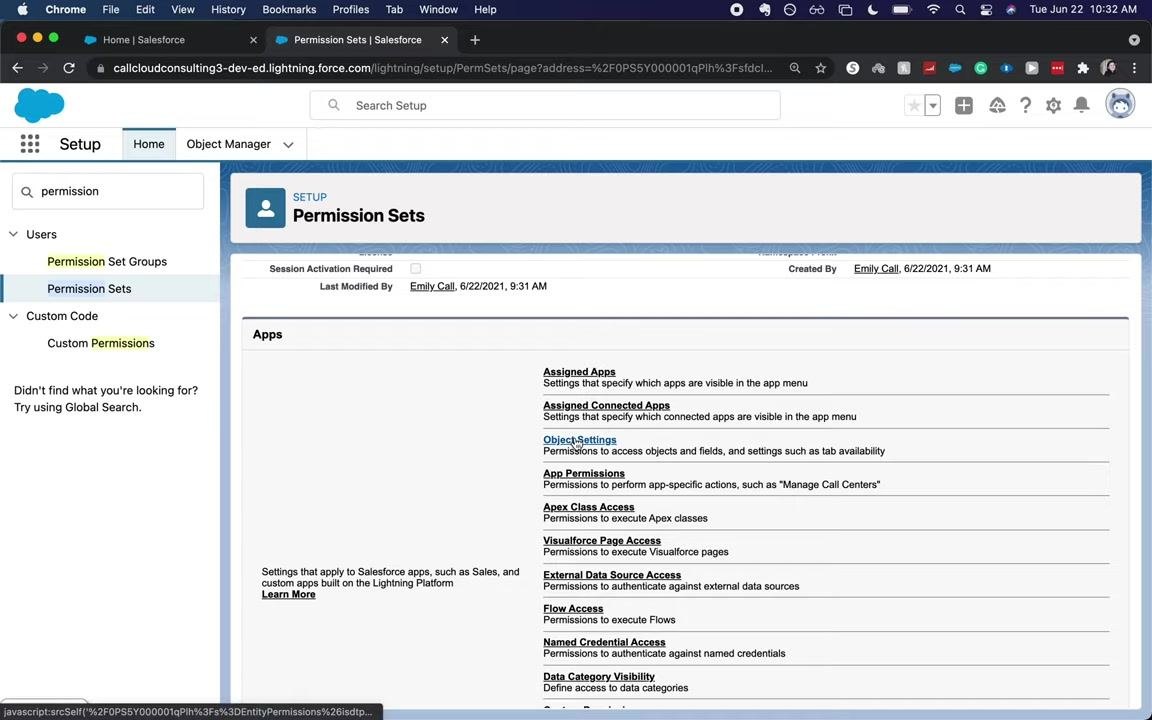
The main section also lists configuration categories, including Assigned Apps, Assigned Connected Apps, Object Settings, App Permissions, Apex Class Access, Visualforce Page Access, External Data Source Access, Flow Access, Named Credential Access, and Data Category Visibility.
The Assigned Apps section lets you specify which apps are visible in the app menu for users assigned this permission set. For example, you might assign the Sales Console app for sales users or the Service Console app for service users. Keep in mind that permission sets are meant for one-off scenarios that grant additional access beyond what a user's profile already provides.
The Assigned Connected Apps section works similarly, letting you specify which connected apps are visible in the app menu for users with this permission set. You can also explore additional sections such as Object Settings, App Permissions, and Apex Class Access to further customize the permission set as needed.
Open Object Settings
From the Permission Set Overview page, click Object Settings to manage permissions for Salesforce objects.
View the list of objects
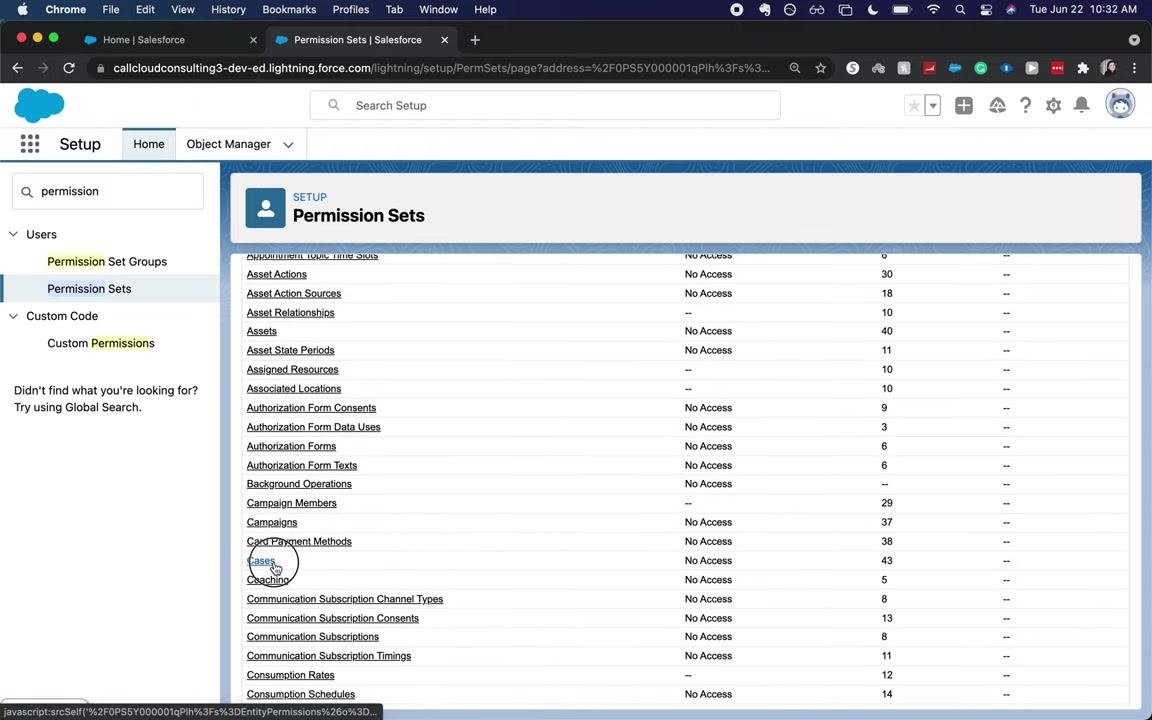
You will see a list of all objects in Salesforce, each showing its current permission status (for example, "No Access"). Scroll through the list to find the object you want to configure—in this example, Cases.
Select the object to configure
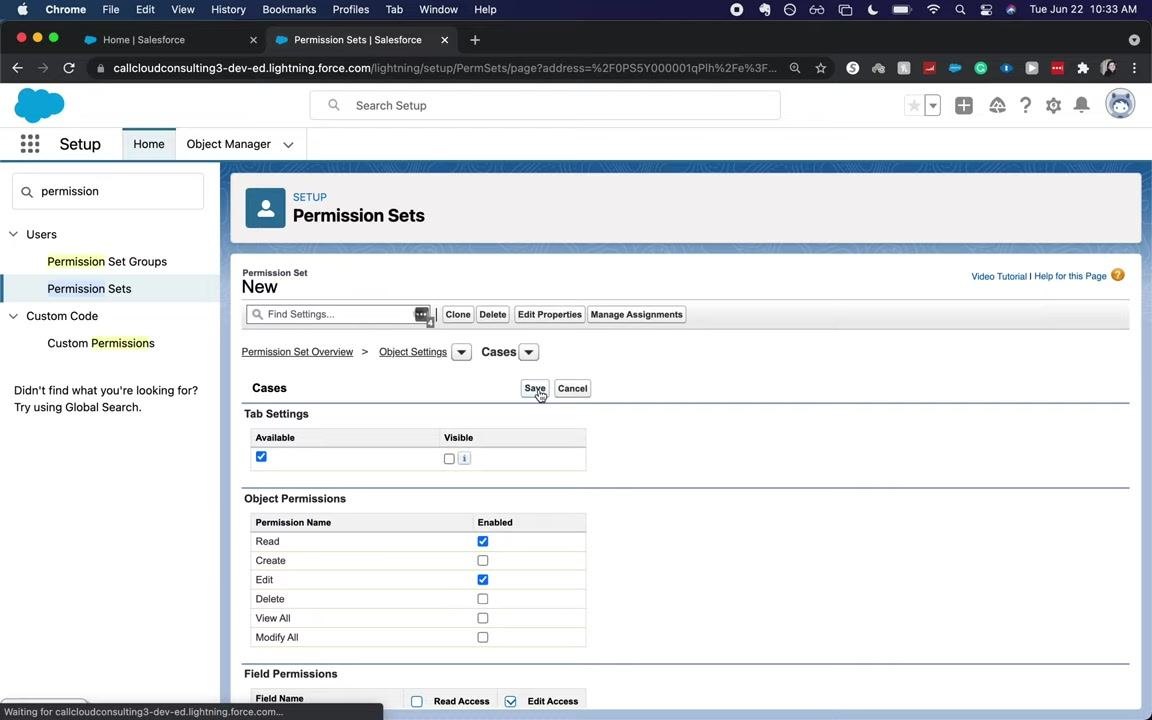
Click Cases in the object list to open its permission settings.
Set tab settings for the object
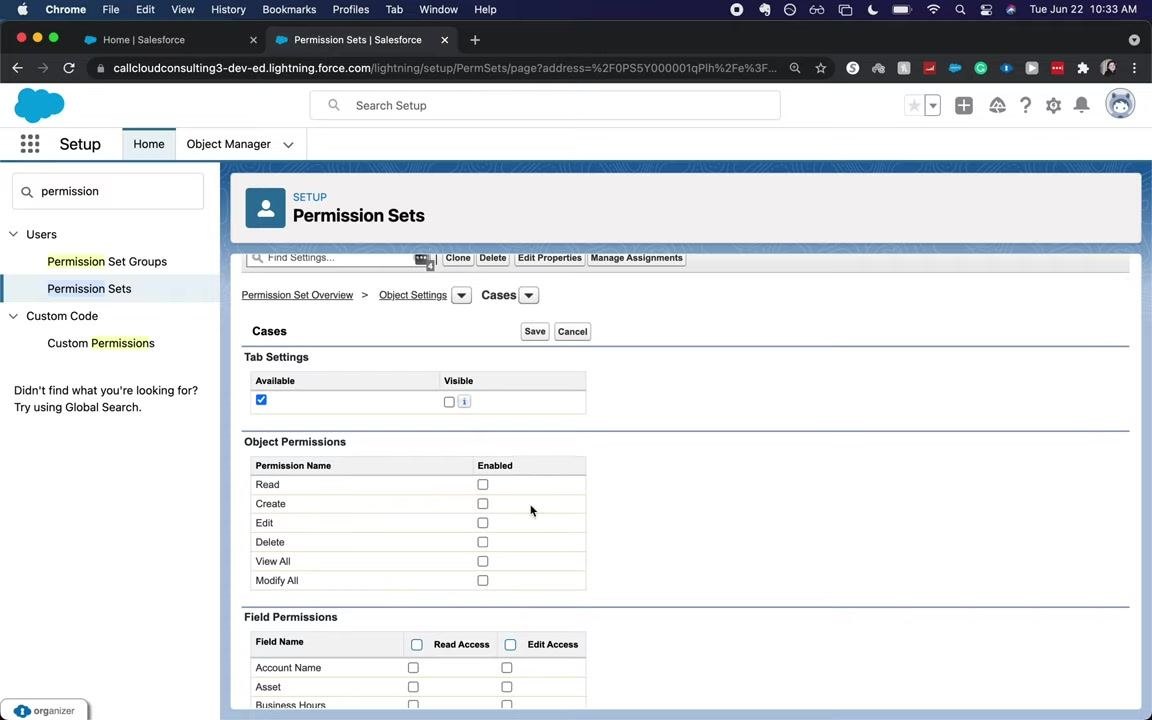
Under Tab Settings, check the Available box to make the Cases tab available to users assigned this permission set. Optionally, check the Visible box if you want the tab to be visible by default.
Configure object permissions
Under Object Permissions, select the permissions you want to grant:
- Check Read to allow users to view cases.
- Check Edit to allow users to modify cases.
- Leave Create and Delete unchecked if you do not want users to create or delete cases.
- Avoid selecting View All or Modify All unless you want users to have full access to all records of this object.
Set field-level permissions
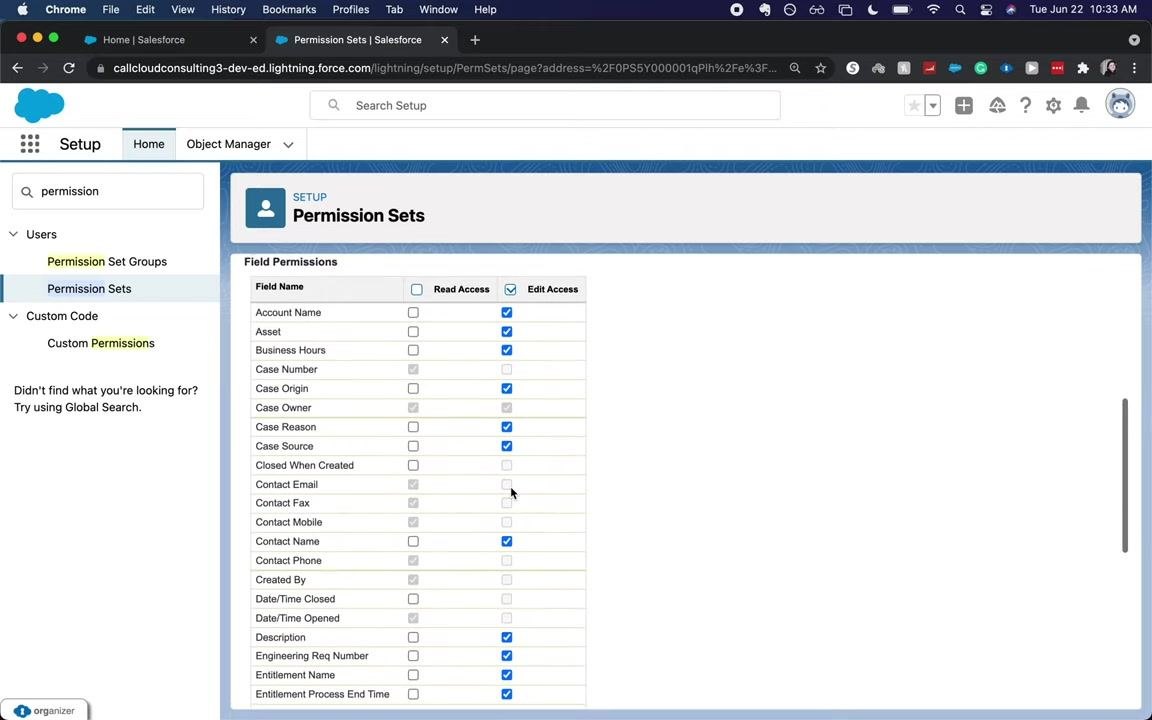
Scroll down to the Field Permissions section. For each field, check Read Access to allow users to view the field, and Edit Access to allow users to modify it. In this example, fields such as "Case Number," "Case Origin," and "Case Reason" have both Read and Edit Access enabled.
Save object and field permissions
After configuring the desired permissions, click Save at the top or bottom of the page to apply your changes.
Review the permission set's app-level details
Navigate back to the Permission Sets page and select your permission set from the left sidebar under Users. The overview displays fields such as Description, License, API Name, Namespace Prefix, Session Activation Required, Last Modified By, and Created By. The Apps section lists categories including Assigned Apps, Assigned Connected Apps, Object Settings, App Permissions, Apex Class Access, Visualforce Page Access, and External Data Source Access.
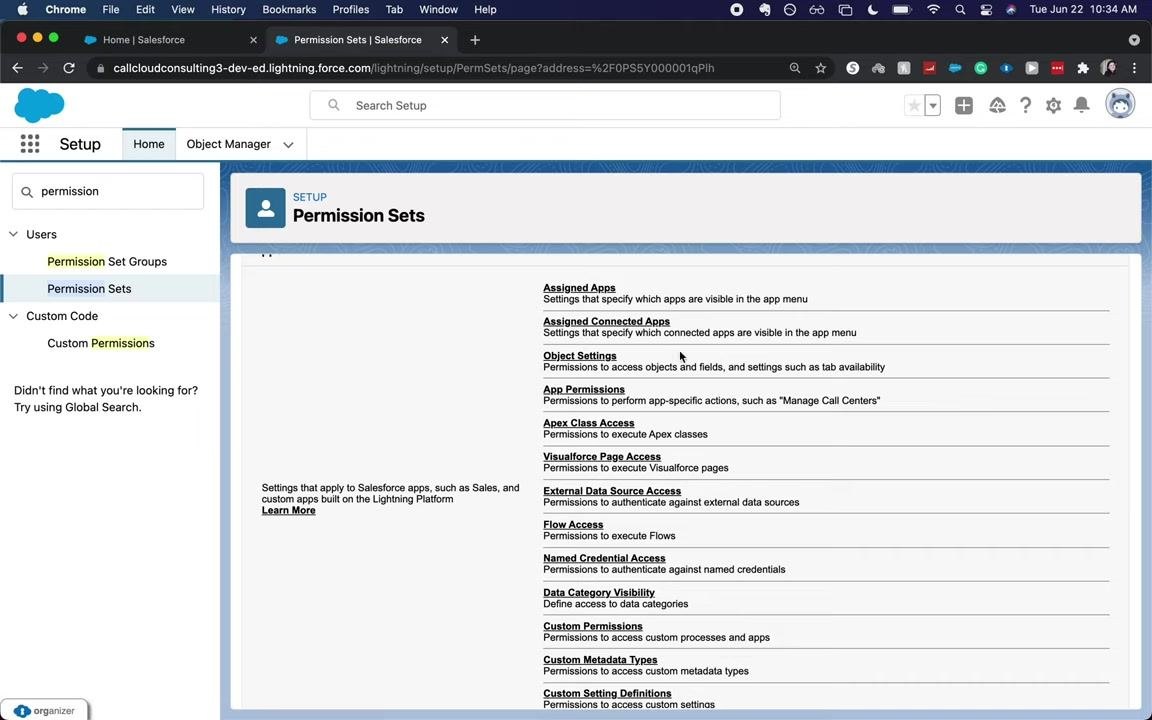
Review the available permission categories
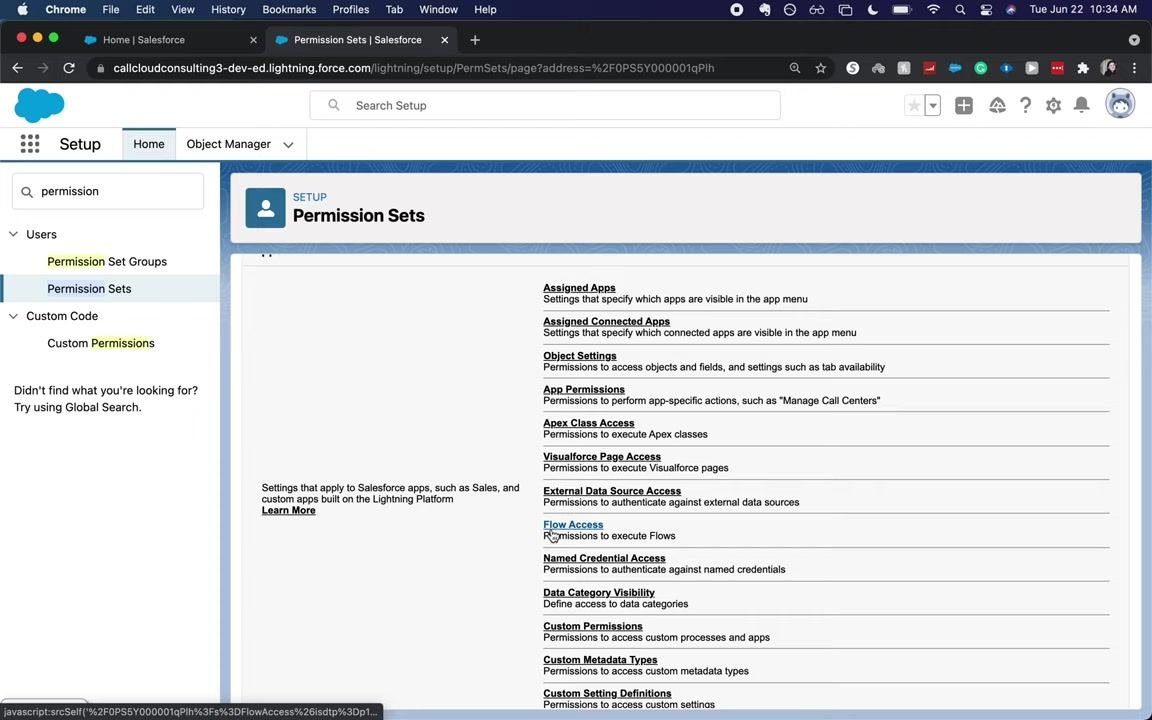
Each category in the permission set serves a specific purpose:
- Assigned Apps: Specifies which apps are visible in the app menu.
- Assigned Connected Apps: Specifies which connected apps are visible in the app menu.
- Object Settings: Controls access to objects and fields, and settings such as tab availability.
- App Permissions: Grants permission to perform app-specific actions, such as "Manage Call Centers."
- Apex Class Access: Grants permission to execute Apex classes.
- Visualforce Page Access: Grants permission to execute Visualforce pages.
- External Data Source Access: Grants permission to authenticate against external data sources.
- Flow Access: Grants permission to execute Flows.
- Named Credential Access: Grants permission to authenticate against named credentials.
- Data Category Visibility: Defines access to data categories.
- Custom Permissions: Grants access to custom processes and apps.
- Custom Metadata Types: Grants access to custom metadata types.
- Custom Setting Definitions: Grants access to custom settings.
If your organization has a highly customized setup, use custom permissions to grant access to specific features or processes that standard permissions do not cover.
Explore system permissions and service providers
In addition to the categories above, you can configure:
- System Permissions: Permissions that apply across all apps, such as "Modify All Data."
- Service Providers: Permissions that let users switch to other websites using single sign-on.
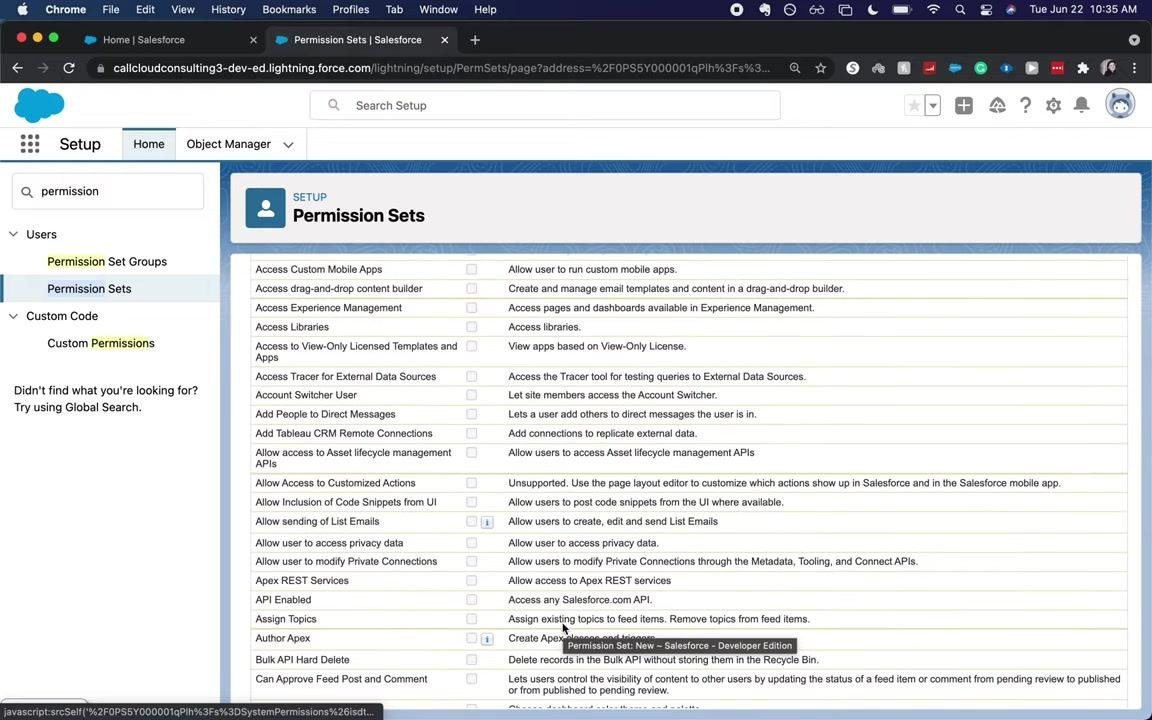
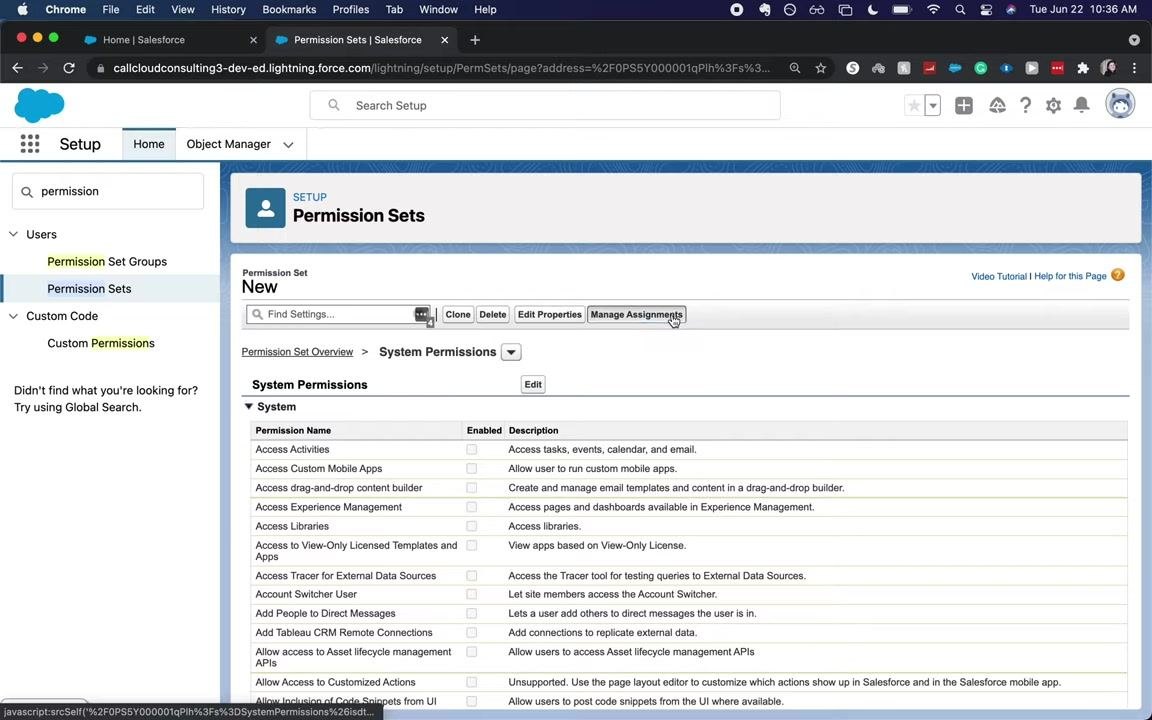
Review the system permissions list
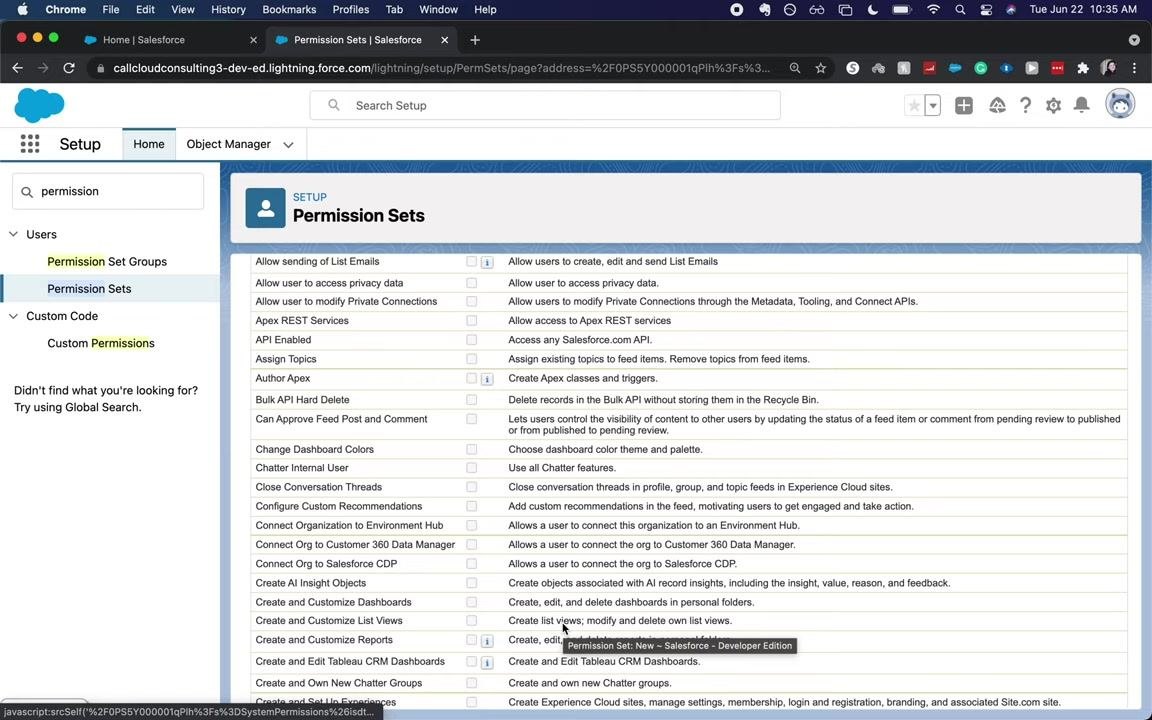
The system permissions list includes a checkbox for each permission, letting you enable or disable it for the permission set. Examples visible in this list include Access Custom Mobile Apps, Access Drag-and-Drop Content Builder, Access Experience Management, Access Libraries, Access to View-Only Licensed Templates and Apps, Access Tracer for External Data Sources, Account Switcher User, Add People to Direct Messages, Add Tableau CRM Remote Connections, Allow Access to Asset Lifecycle Management APIs, Allow Access to Customized Actions, Allow Inclusion of Code Snippets from UI, Allow Sending of List Emails, Allow User to Access Privacy Data, Allow User to Modify Private Connections, Apex REST Services, API Enabled, Assign Topics, Author Apex, Bulk API Hard Delete, and Can Approve Feed Post and Comment.
Scroll through the extended system permissions
As you continue scrolling, you will find additional permissions such as Change Dashboard Colors, Chatter Internal User, Close Conversation Threads, Configure Custom Recommendations, Connect Organization to Environment Hub, Connect Org to Customer 360 Data Manager, Connect Org to Salesforce CDP, Create and Customize Dashboards, Create and Customize List Views, Create and Customize Reports, Create and Edit Tableau CRM Dashboards, Create and Own New Chatter Groups, and Create and Set Up Experiences.
Continue reviewing and enabling system permissions
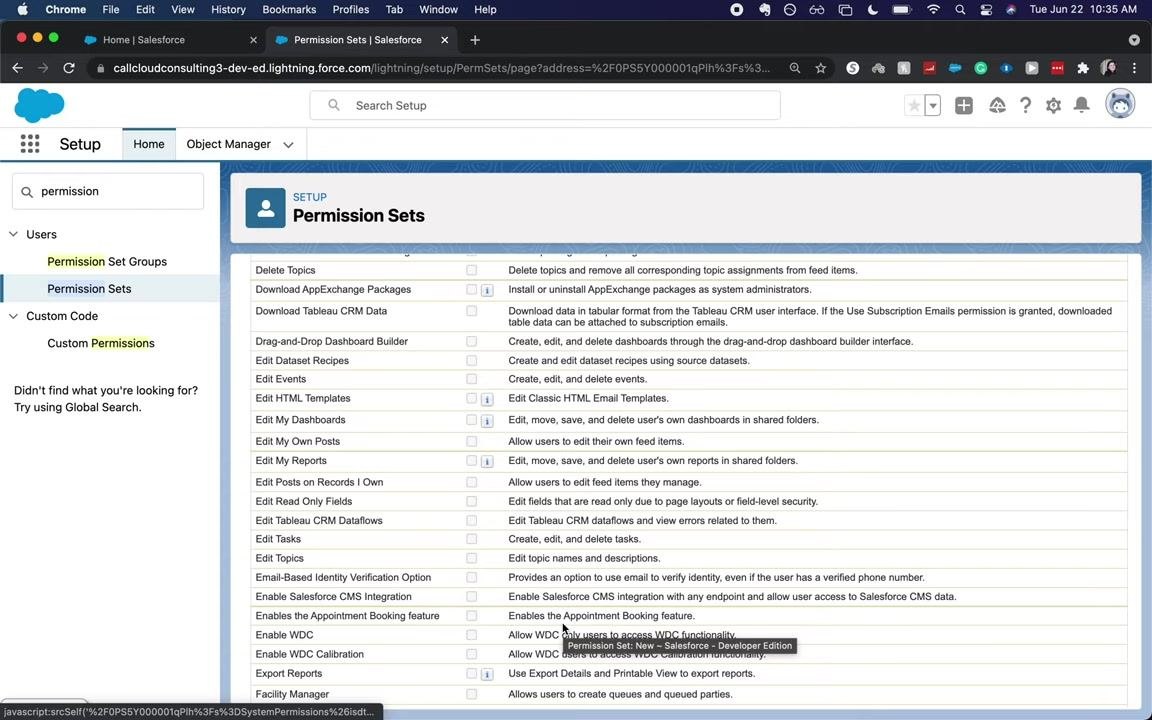
The system permissions list is scrollable, with each permission accompanied by a checkbox and description. Notable examples include:
- Delete Topics: Delete topics and remove all corresponding topic assignments from feed items.
- Download AppExchange Packages: Install or uninstall AppExchange packages as system administrators.
- Download Tableau CRM Data: Download data in tabular format from the Tableau CRM user interface.
- Drag-and-Drop Dashboard Builder: Create, edit, and delete dashboards through the drag-and-drop dashboard builder interface.
- Edit Dataset Recipes: Create and edit dataset recipes using source datasets.
- Edit Events: Create, edit, and delete events.
- Edit HTML Templates: Edit Classic HTML Email Templates.
- Edit My Dashboards: Edit, move, save, and delete your own dashboards in shared folders.
- Edit My Own Posts: Edit your own feed items.
- Edit My Reports: Edit, move, save, and delete your own reports in shared folders.
- Edit Posts on Records I Own: Edit feed items you manage.
- Edit Read Only Fields: Edit fields that are read-only due to page layouts or field-level security.
- Edit Tableau CRM Dataflows: Edit Tableau CRM dataflows and view related errors.
- Edit Tasks: Create, edit, and delete tasks.
- Edit Topics: Edit topic names and descriptions.
- Email-Based Identity Verification Option: Use email to verify identity, even with a verified phone number on file.
- Enable Salesforce CMS Integration: Enable Salesforce CMS integration with any endpoint and allow user access to Salesforce CMS data.
- Enables the Appointment Booking Feature: Enables the Appointment Booking feature.
- Enable WDC: Allow WDC-only users to access WDC functionality.
- Enable WDC Calibration: Allow WDC-only users to access WDC Calibration functionality.
- Export Reports: Use Export Details and Printable View to export reports.
- Facility Manager: Allows users to create queues and queued parties.
- Files Connect Cloud: Access cloud-based external content sources, such as SharePoint Online.
- Files Connect On-Premises: Access on-premises external content sources, such as SharePoint.
- Give Recognition Badges in Experience Builder Sites: Let members give recognition badges to other members.
- Hide Option to Switch to Salesforce Classic: Always use Lightning Experience by removing the switcher.
- Hide the Seen By List: Increase privacy in a private group by hiding the count and names of those who view its posts.
- Import Custom Objects: Allow non-admin users to import custom objects using Data Import Wizard.
- Insert System Field Values for Chatter Feeds: Set the author or creation date for a Chatter post or comment.
- Invite Customers to Chatter: Invite customers to Chatter.
- Let a User Be Included in Appointments in Salesforce Scheduler: Include a user in appointments in Salesforce Scheduler.
- Lightning Console User: Gives the user access to Lightning console apps.
- Lightning Experience User: Access Lightning Experience and switch between Lightning Experience and Salesforce Classic.
- Manage All Private Reports and Dashboards: Create and edit private reports and dashboards in all other users' private folders (API only).
Review remaining system permissions
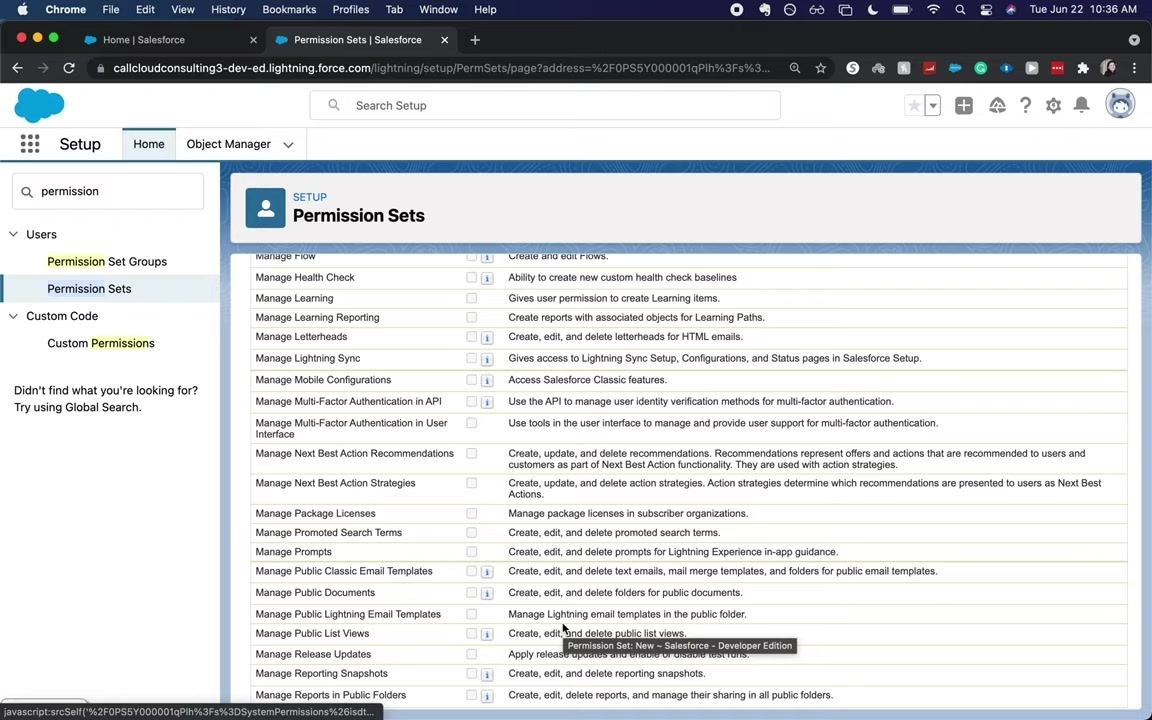
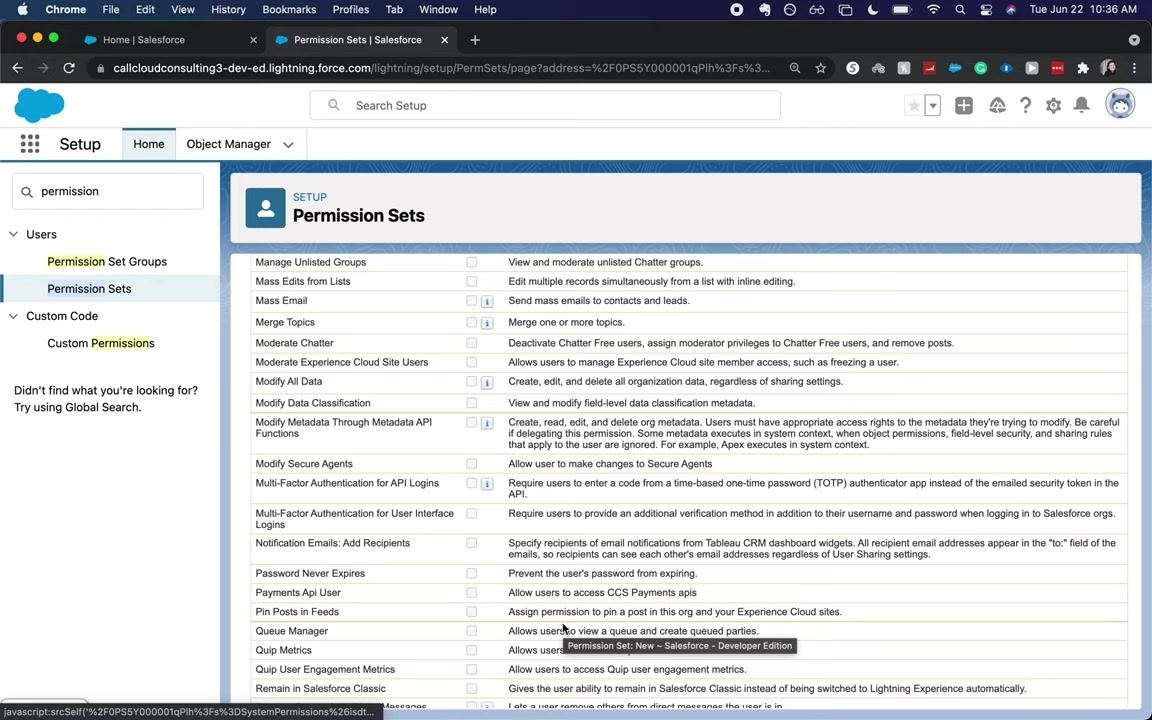
System permissions make up a significant portion of Salesforce administration knowledge. Continue reviewing the available permissions, which include options for managing flows, health checks, learning, Lightning Sync, and multi-factor authentication, to familiarize yourself with what each one controls.
Assign the permission set to users
Click Manage Assignments at the top of the permission set page. On the Assign Users screen, select the checkbox next to the user or users you want to assign the permission set to, then click Assign. Note that only users with the appropriate Salesforce license will appear as assignable.
Review assigned users
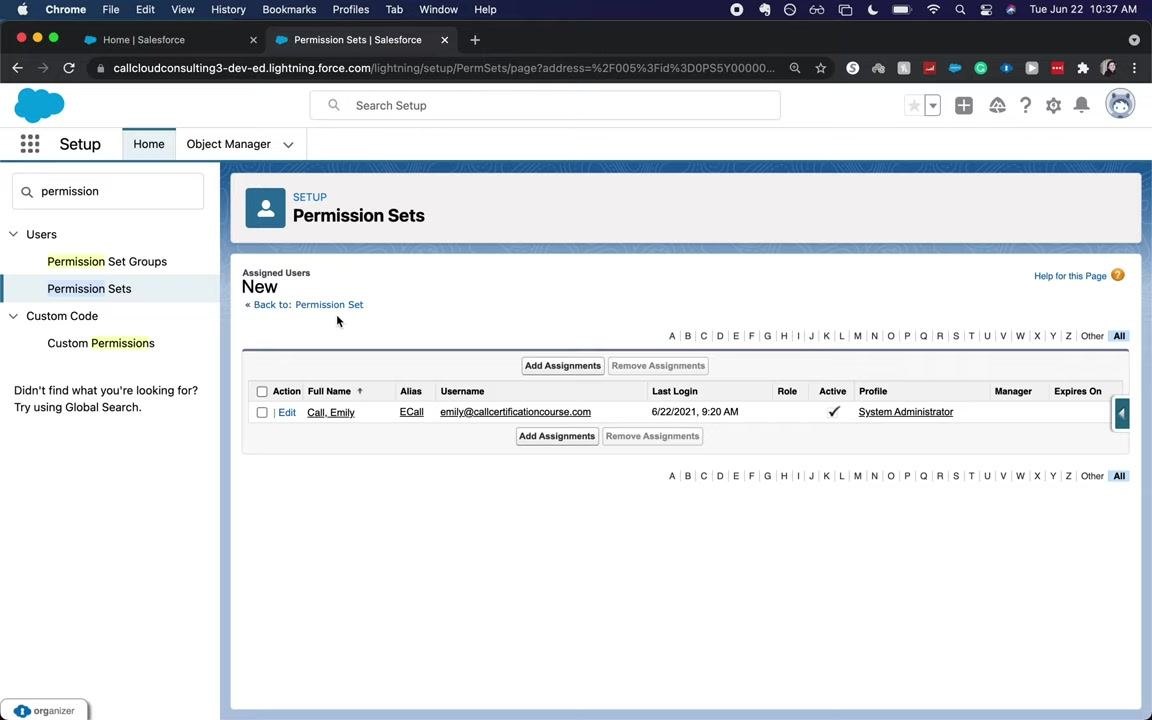
After assignment, the Assigned Users screen displays the users who now have the permission set. You can add or remove assignments from this screen at any time.
Verify assigned user details
On the Permission Sets page, under Assigned Users, confirm that the intended users are listed along with their alias, username, last login date, active status, and profile. Use Add Assignments and Remove Assignments to manage user assignments, or click Edit next to a user's name to modify their assignment details.
Confirm the assignment is complete
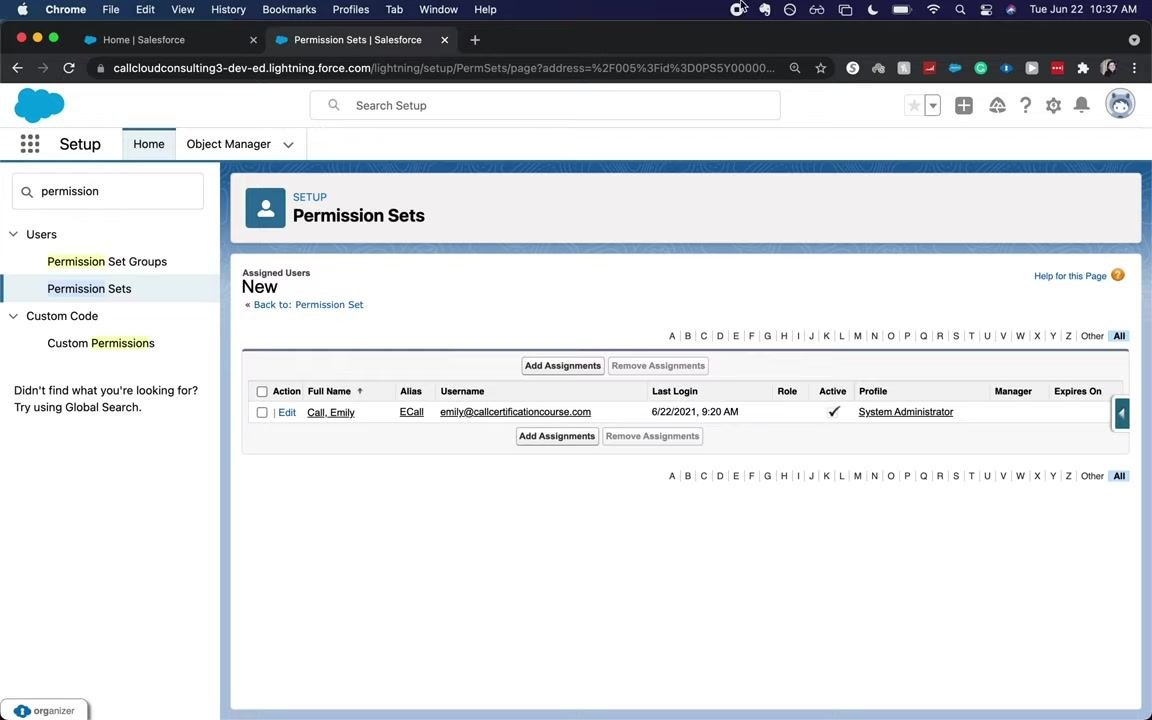
Make sure all intended users appear under Assigned Users for the permission set. If you need to add more users, use Add Assignments. To remove a user, select the checkbox next to their name and click Remove Assignments. Use the alphabetical navigation at the top and bottom of the user list to quickly find users by their first letter.
Summary
You have now learned how to create a permission set in Salesforce, configure its object and field-level permissions, review its available permission categories, and assign it to specific users. Regularly review and update permission set assignments as your team's needs and your Salesforce organization evolve to ensure users retain the correct level of access for their roles.
Generation details: cost, quality tiers
Docsie billed 4,500 credits ($3.15) to analyze this 9-minute video at standard quality. The rewrite, template fill and Word/PDF exports were included. The same video at each quality tier:
| Quality | Frames sampled | Credits | Approx. cost |
|---|---|---|---|
| Draft | every 16-30 s | 2,250 | $1.57 |
| Standard (this guide) | every 8-15 s | 4,500 | $3.15 |
| Detailed | every 4-7 s | 9,000 | $6.30 |
| Ultra | every 1-3 s | 18,000 | $12.60 |
Credits priced at $0.70 per 1,000; plans include a monthly allowance. Enterprise customers on on-premise or bring-your-own-model deployments run this on their own inference and pay no per-video credits.
Generated by Docsie Video-to-Docs on 2026-09-14 from a 8-minute video. Screenshots are frames from the source video and belong to their creator, Salesforce Emily, whose original is embedded above. If you own this video and want the guide removed or credited differently, contact us and we will act within one business day.