
How to Change Direct Deposit in Workday
This guide walks you through viewing your current payment elections in Workday, adding a new bank account, allocating a fixed amount of your pay to that account, and confirming that your changes have been saved successfully.
Video: Workday Payment Elections by Information Technology Services (2023). All credit for the demonstration goes to the creator; watch the original on YouTube. The written guide below was generated from this video by Docsie. Creator? Request a change or removal.
This guide walks you through viewing your current payment elections in Workday, adding a new bank account, allocating a fixed amount of your pay to that account, and confirming that your changes have been saved successfully.
Prerequisites
- You must be logged in to Workday as an employee.
- Access to the Payment Elections report (note that access to certain pay types and payment elections may vary by organization, though you should always have access to regular payments).
- Your bank account details, including routing transit number and account number (a sample check can help you locate these).
Viewing your current payment elections
-
Log in to Workday as an employee.
-
Navigate to the Payment Elections report to view your current payment elections.
- This report shows how your payments are distributed (for example, by direct deposit, cheque, or a combination of methods).
- The available options may be limited by your organization's payment rules.
- If you try to exceed the allowable number of payment elections, Workday displays a warning message.
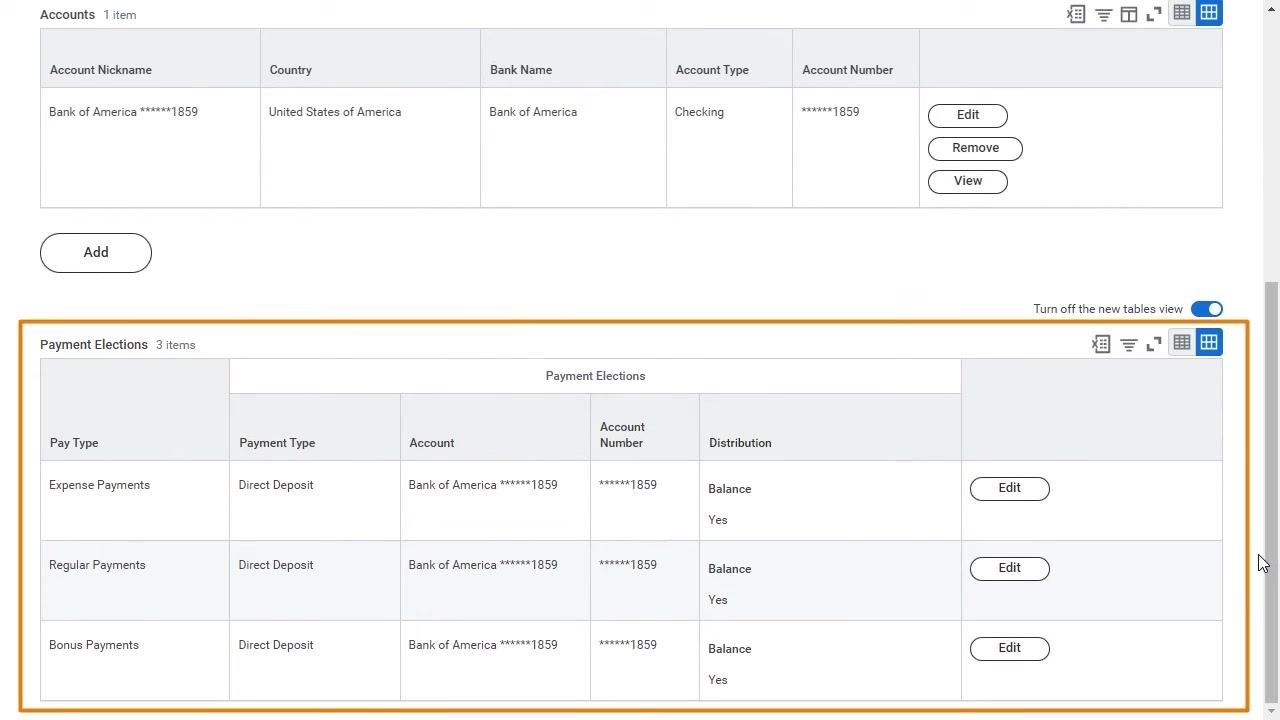
- Review your current payment elections:
- Under the Accounts section, check the details for each account, such as:
- Account Nickname: Bank of America **1859
- Country: United States of America
- Bank Name: Bank of America
- Account Type: Checking
- Account Number: **1859
- In the Payment Elections section, review:
- Pay Type: Expense Payments, Regular Payments, Bonus Payments
- Payment Type: Direct Deposit
- Account: Bank of America **1859
- Account Number: **1859
- Distribution: Balance (Yes)
- Use the Edit button to modify an existing election.
- Under the Accounts section, check the details for each account, such as:
Adding a new bank account
-
To add a new bank account, click the Add button under the Accounts section.
-
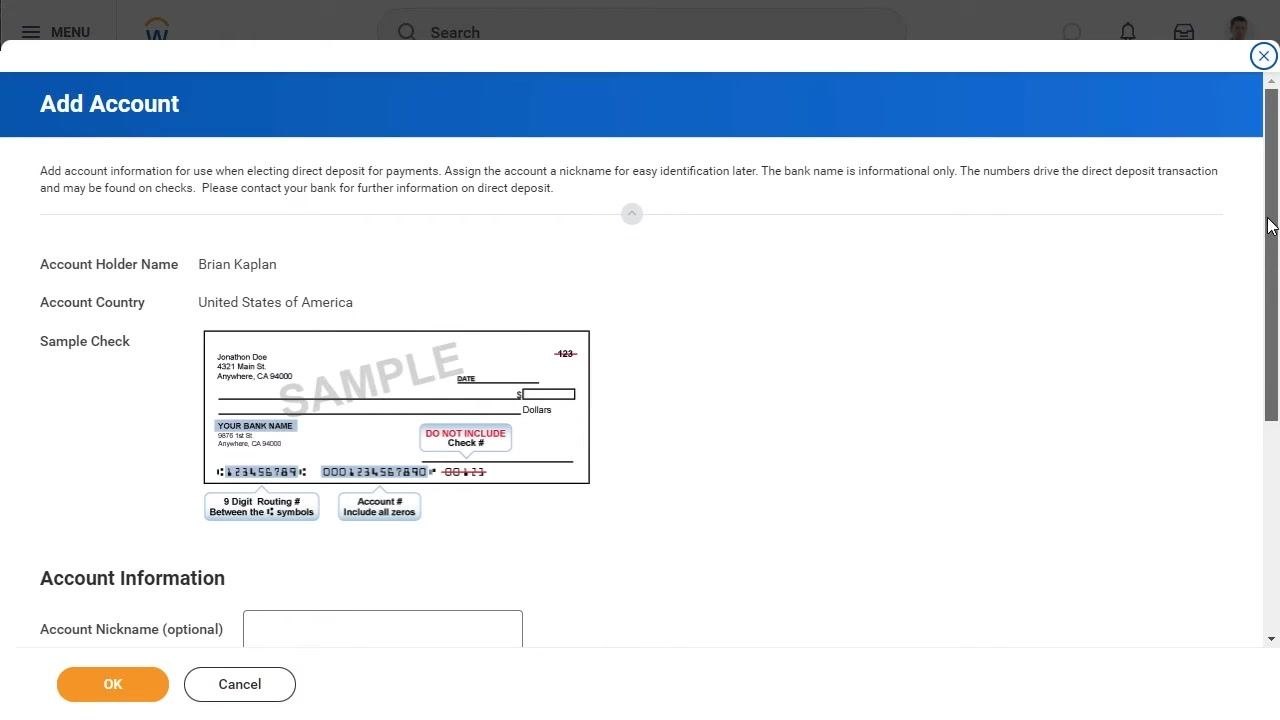
In the Add Account window, fill in all required account information.
- Account Holder Name and Account Country are auto-filled (for example, Brian Kaplan and United States of America).
- Refer to the sample check image in the window for guidance on locating your routing and account numbers.
-
Enter the following details in the Account Information section:
- Account Nickname (optional): New Bank Account
- Routing Transit Number: 121000358
- Bank Name: First Bank
- Bank Identification Code: leave blank if not applicable
- Account Type: select Checking or Savings (for example, Checking)
- Account Number: 12345678
-
Workday validates the routing transit number but does not validate the account number, so double-check that it is entered correctly.
-
Click OK to save the new bank account, or Cancel to discard your changes.
- Confirm that your new bank account appears in the Accounts section of the Payment Elections page.
- A confirmation message, "Your changes have been saved," appears at the top of the screen.
- The new account (for example, "New Bank Account," First Bank, Checking, **5678) is now listed alongside your existing accounts.
Modifying payment elections and allocating pay to a new bank account
-
To modify your payment elections, click Edit next to the "Regular Payments" row in the Payment Elections section.
-
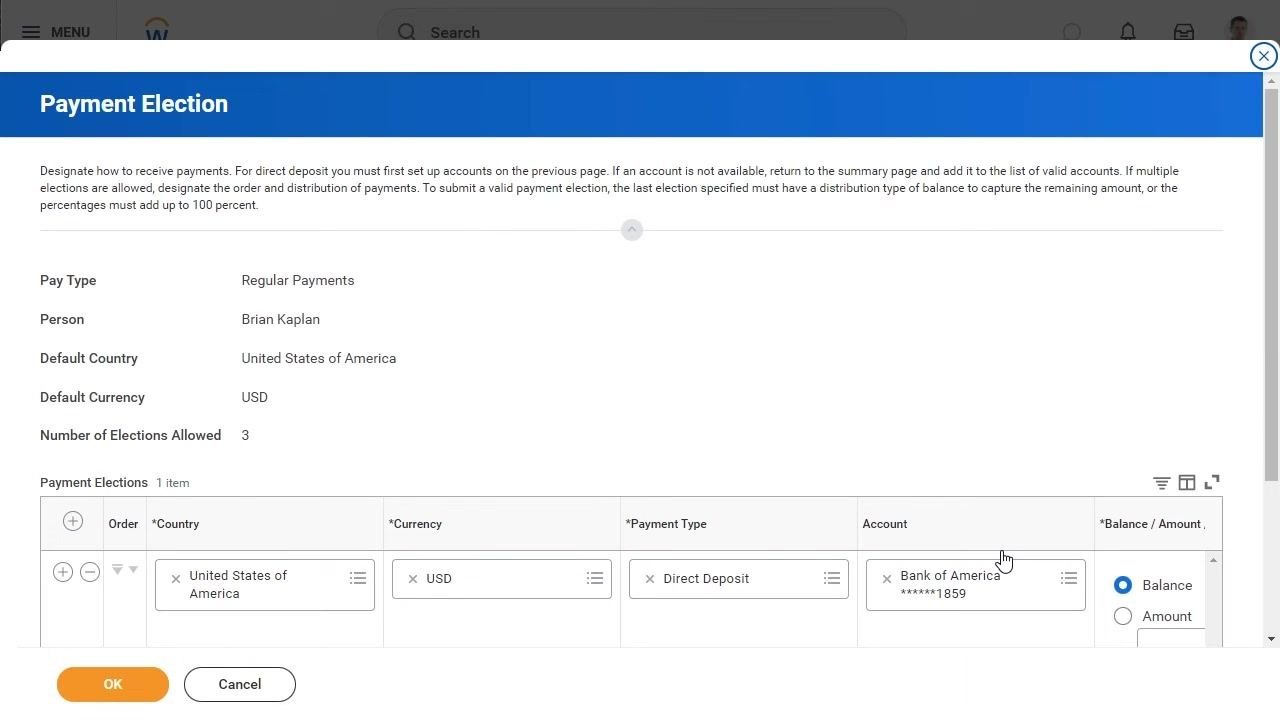
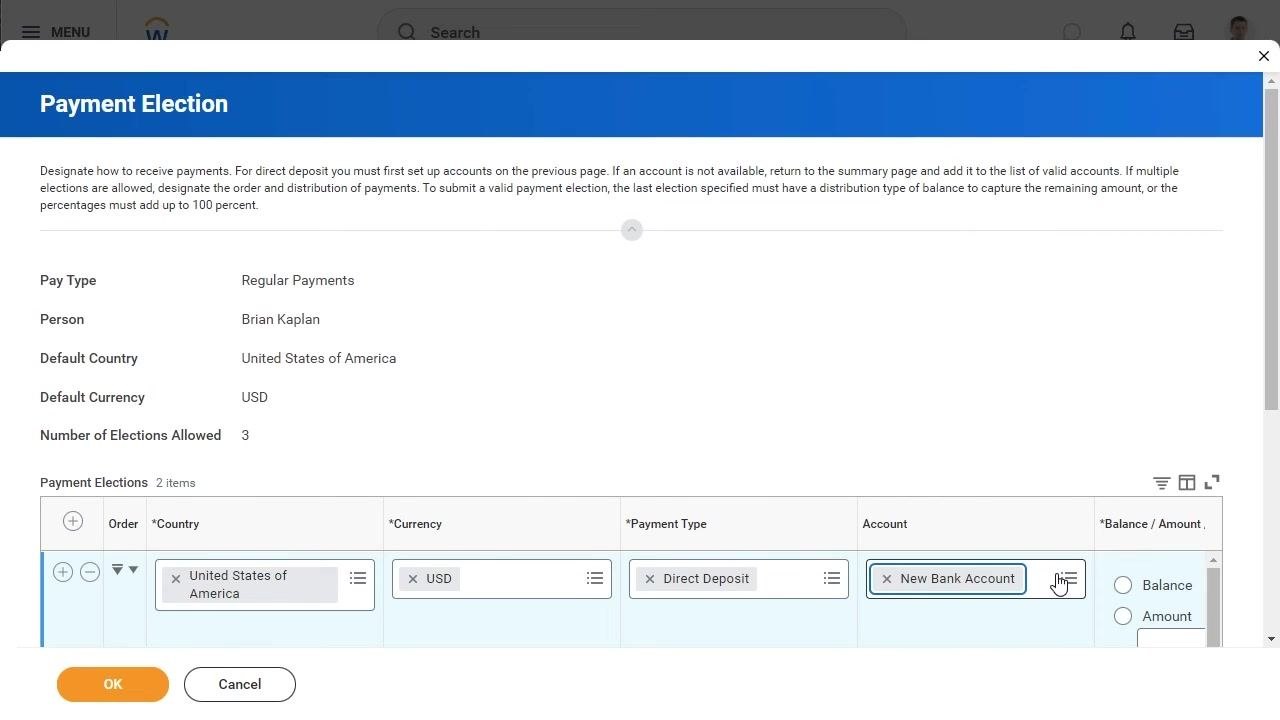
In the Payment Election window, review your current payment elections.
- The window displays your pay type (for example, Regular Payments), your name, default country, default currency, and the number of elections allowed (for example, 3).
- Existing elections are listed with country, currency, payment type, account, and distribution type (for example, Balance).
-
To add a new payment election, such as allocating a fixed dollar amount to your new bank account, click the Add Row (plus sign) icon in the Payment Elections section.
- A new editable row appears for you to configure the election.
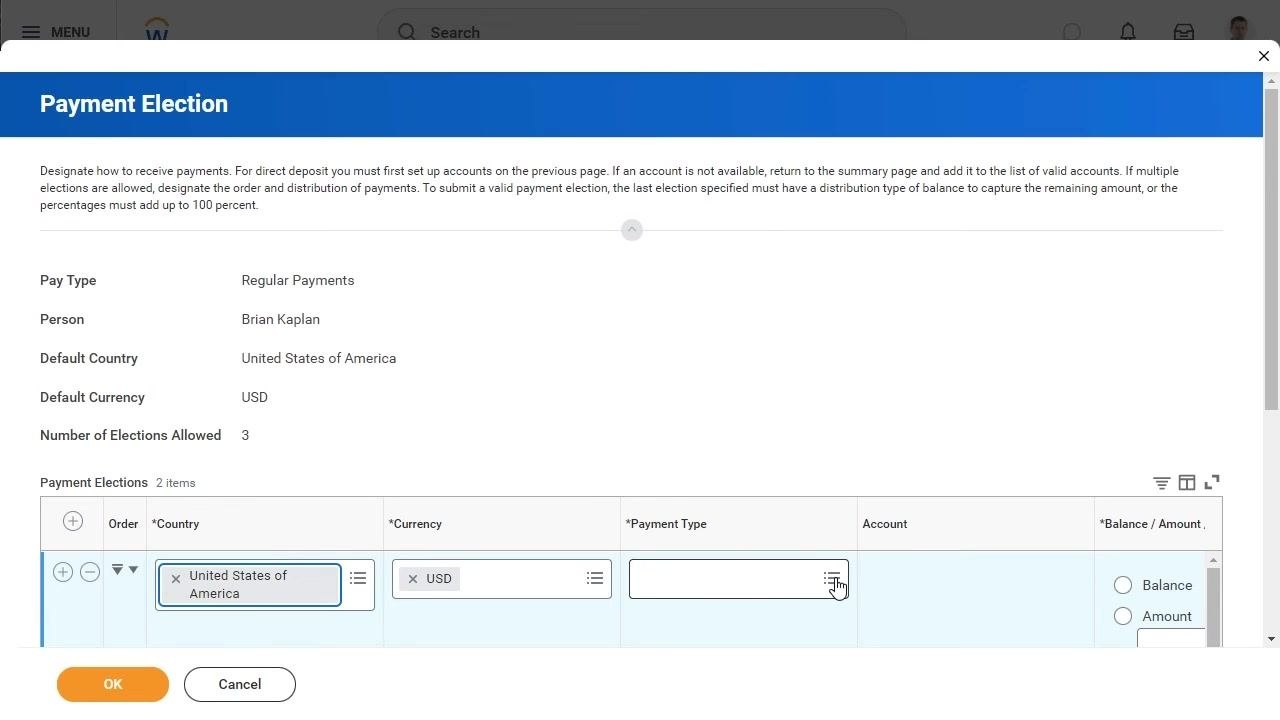
- In the new row, enter the following details:
- Country: United States of America
- Currency: USD (defaults based on country)
- Payment Type: select "Direct Deposit"
- Account: select your newly added bank account (for example, "New Bank Account")
-
Specify the distribution for the new election:
- Select Amount as the distribution type.
- Enter the fixed dollar amount you want to allocate to the new bank account (for example, $500).
- Any remaining pay is automatically allocated to the original account (for example, Bank of America **1859) with the distribution type set to Balance**.
-
Review your payment elections to confirm the total distribution is correct.
- The sum of all elections must account for 100% of your pay (fixed amount plus balance).
- You cannot delete a bank account if it is still used in a payment election.
-
Click OK to save your updated payment elections, or Cancel to discard your changes.
Reviewing payment elections and completing the process
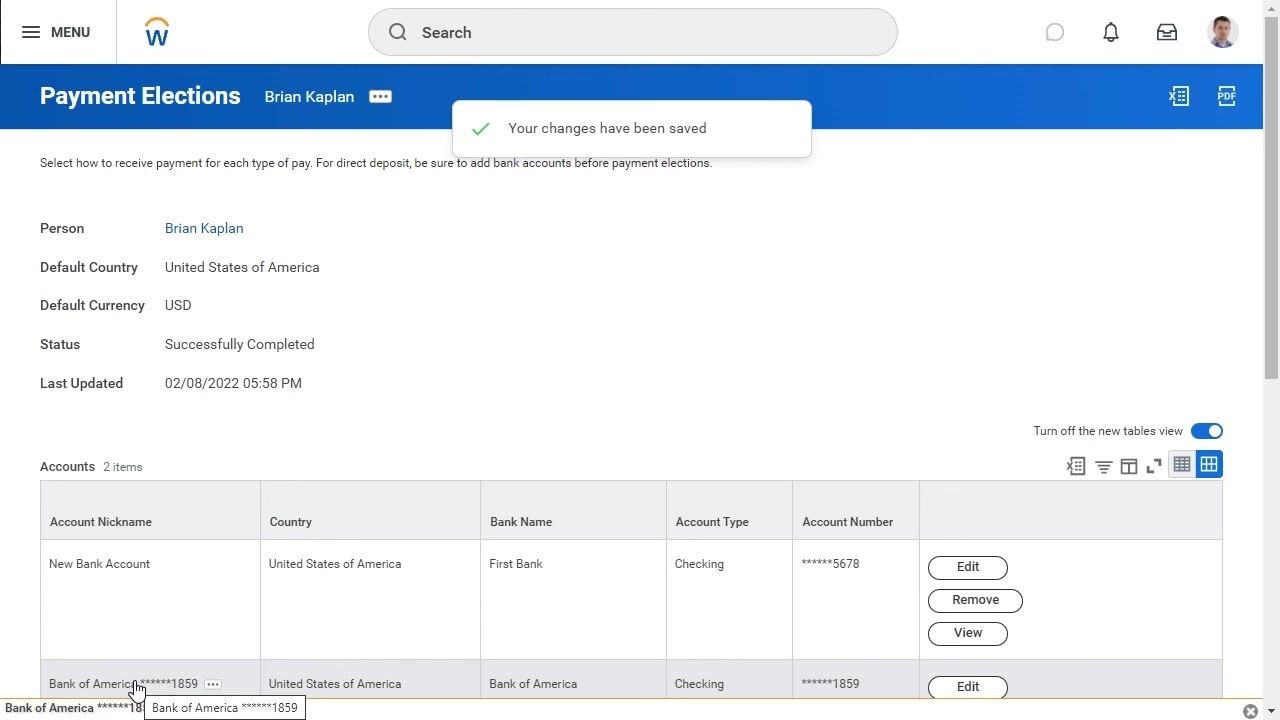
- Review your bank accounts and payment election details on the Payment Elections summary page.
- Confirm that the Status shows "Successfully Completed."
- Verify the Last Updated date and time to ensure your recent changes are reflected.
- Check the Accounts section for all linked bank accounts, including:
- Account Nickname (for example, "New Bank Account," "Bank of America **1859")
- Country (for example, United States of America)
- Bank Name (for example, First Bank, Bank of America)
- Account Type (for example, Checking)
- Account Number (last four digits shown for security)
- Use the Edit, Remove, or View buttons to manage each account as needed.
-
Scroll down to the Payment Elections section to review how your pay is distributed.
- Confirm each Pay Type (for example, Expense Payments, Regular Payments, Bonus Payments).
- Check the Payment Type (for example, Direct Deposit).
- Verify the Account and Account Number for each election.
- Review the Distribution column to confirm:
- Fixed amounts (for example, $500.00) are allocated to the correct account.
- Remaining balances are set to the appropriate account.
- Use the Edit button if further changes are needed.
-
Confirm that your payment election submission is complete.
- Look for the confirmation message "Your changes have been saved" at the top of the page.
- Ensure all details match your intended allocations.
Summary
By following these steps, you have viewed and managed your payment elections in Workday, added a new bank account, allocated a fixed amount of pay to it, and confirmed that the remainder of your pay is distributed according to your preferences and organizational rules.
What's next
For additional support or to revisit this process, refer to your organization's Workday resources or contact your HR/payroll department.
Generation details: cost, quality tiers
Docsie billed 2,000 credits ($1.40) to analyze this 4-minute video at standard quality. The rewrite, template fill and Word/PDF exports were included. The same video at each quality tier:
| Quality | Frames sampled | Credits | Approx. cost |
|---|---|---|---|
| Draft | every 16-30 s | 1,000 | $0.70 |
| Standard (this guide) | every 8-15 s | 2,000 | $1.40 |
| Detailed | every 4-7 s | 4,000 | $2.80 |
| Ultra | every 1-3 s | 8,000 | $5.60 |
Credits priced at $0.70 per 1,000; plans include a monthly allowance. Enterprise customers on on-premise or bring-your-own-model deployments run this on their own inference and pay no per-video credits.
Generated by Docsie Video-to-Docs on 2026-09-08 from a 3-minute video. Screenshots are frames from the source video and belong to their creator, Information Technology Services, whose original is embedded above. If you own this video and want the guide removed or credited differently, contact us and we will act within one business day.