
How to Post a Goods Receipt in SAP MIGO
This guide walks you through the complete Goods Receipt (GR) process in SAP, from understanding the concept to posting the document and verifying the resulting material and accounting documents. Goods Receipt is the process of confirming that materials ordered in a purchase order have been received at a plant or warehouse.
Video: Goods Receipt In SAP | MIGO SAP | MIGO Transaction In SAP by My Support Solutions (2019). All credit for the demonstration goes to the creator; watch the original on YouTube. The written guide below was generated from this video by Docsie. Creator? Request a change or removal.
This guide walks you through the complete Goods Receipt (GR) process in SAP, from understanding the concept to posting the document and verifying the resulting material and accounting documents. Goods Receipt is the process of confirming that materials ordered in a purchase order have been received at a plant or warehouse.
Prerequisites
Before you begin, make sure you have the following information ready:
- Purchase Order (PO) Number: e.g., 4500017231
- Vendor name: e.g., ABC Vendor / C.E.B. BERLIN
- Material code: e.g., 100-100
- Quantity ordered: e.g., 10 pieces
- Plant code: e.g., 1000
- Access to the SAP Easy Access screen
Understanding the goods receipt process
A Goods Receipt confirms that materials ordered on a purchase order have arrived at the specified plant or warehouse. In a typical scenario:
- The company raises a purchase order with a vendor.
- The vendor dispatches the ordered material to the plant.
- Upon arrival, plant personnel check the quality and quantity of the received goods.
- After verification, plant personnel create a Goods Receipt Note (GRN) in SAP.
- The GRN confirms that the materials listed in the purchase order have been received at the specified plant.
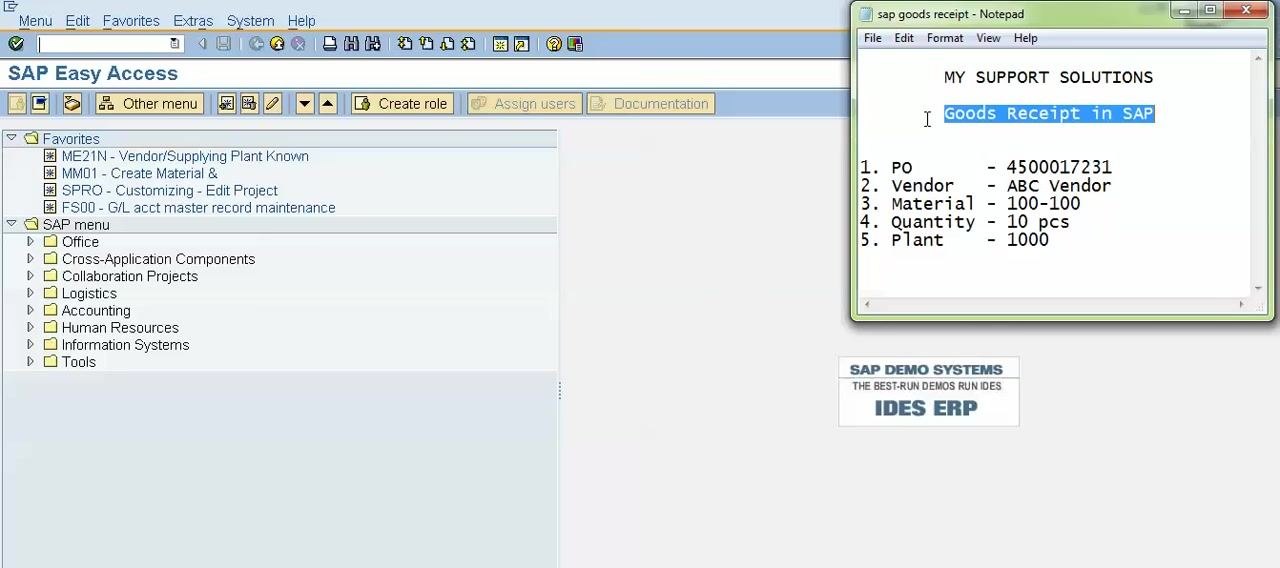
For reference, this guide uses the following example data:
- PO Number: 4500017231
- Vendor: ABC Vendor
- Material: 100-100
- Quantity: 10 pcs
- Plant: 1000
Once the GRN is created, SAP automatically generates two documents:
- Material Document: Records the movement of materials.
- Accounting Document: Records the financial impact of the goods receipt.
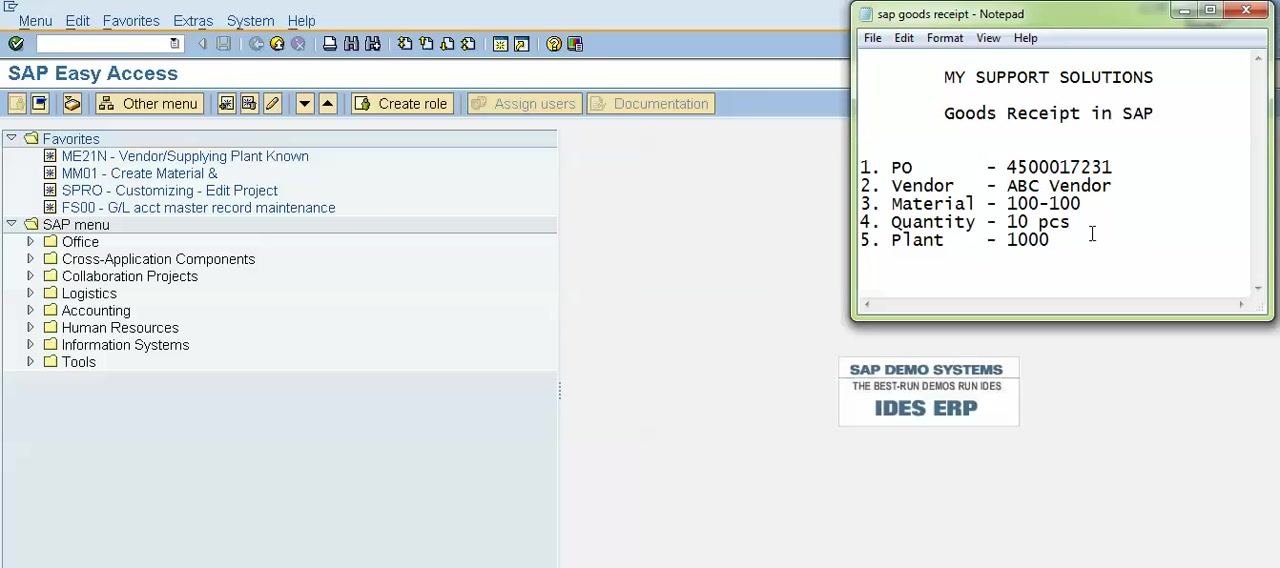
Open the SAP Easy Access screen
Make sure you are on the SAP Easy Access screen and have your purchase order details on hand for reference.
Start the goods receipt transaction
Enter transaction code MIGO in the command field on the SAP Easy Access screen and press Enter to begin the goods receipt process.
Select goods receipt against the purchase order
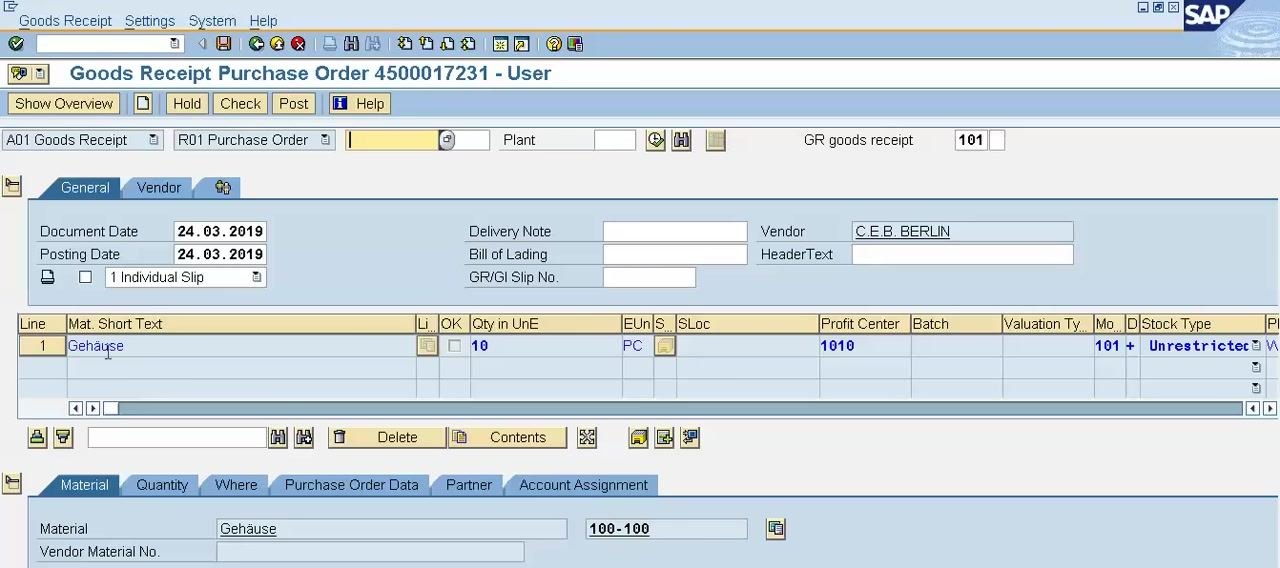
On the MIGO screen, configure the following:
- Action: A01 Goods Receipt
- Reference Document: R01 Purchase Order
Enter your Purchase Order Number (e.g., 4500017231) in the corresponding field, and confirm that the Movement Type is set to 101 (Goods Receipt for Purchase Order). Movement Type 101 is the standard type used for goods receipt against a purchase order.
Review the displayed purchase order contents
Press Enter after entering the purchase order number. SAP displays the contents of the purchase order, including:
- Material: 100-100 (Short Text: Gehäuse)
- Quantity: 10 (in PC – pieces)
- Vendor: C.E.B. BERLIN (per system master data)
- Profit Center: 1010
- Stock Type: Unrestricted
- Movement Type: 101
- Document Date: 24.03.2019
- Posting Date: 24.03.2019
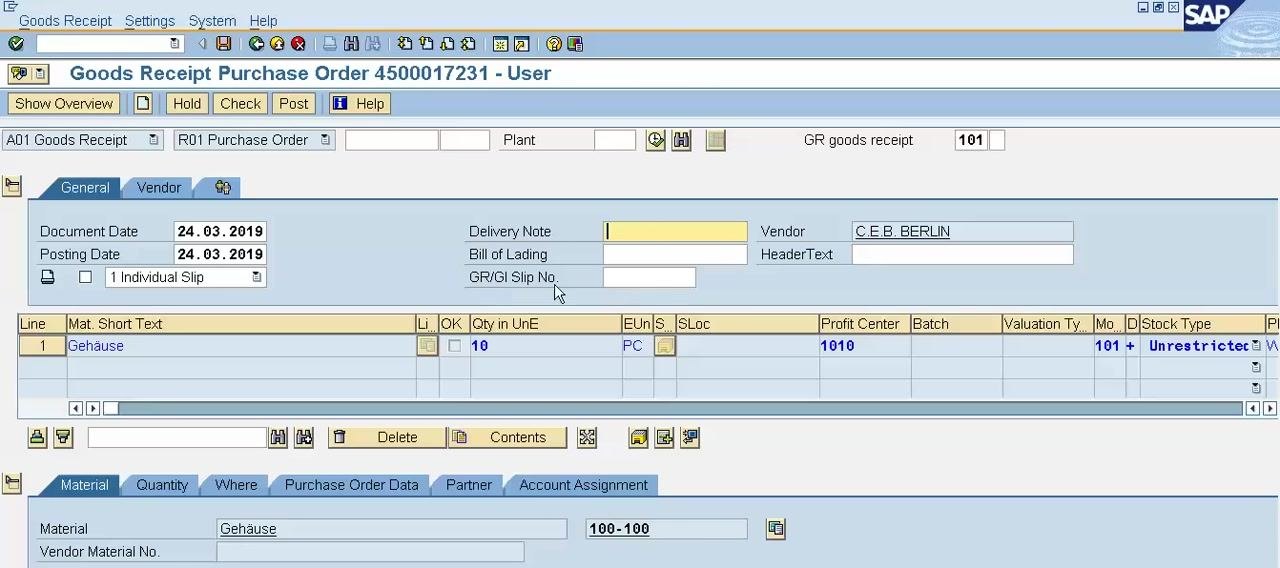
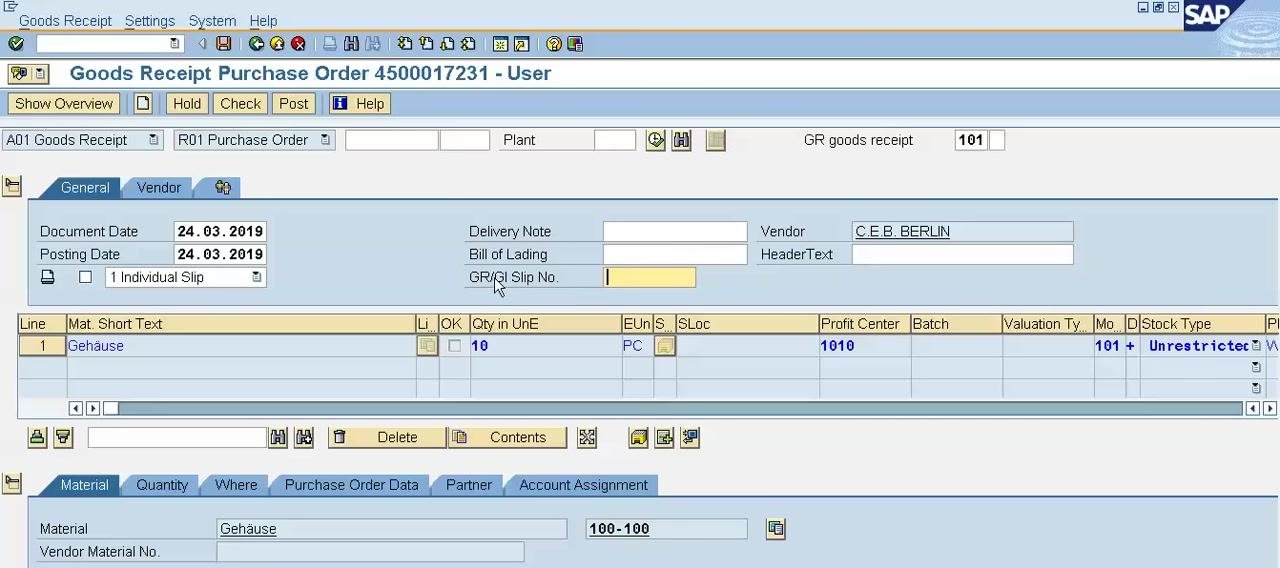
Enter delivery note and shipment references
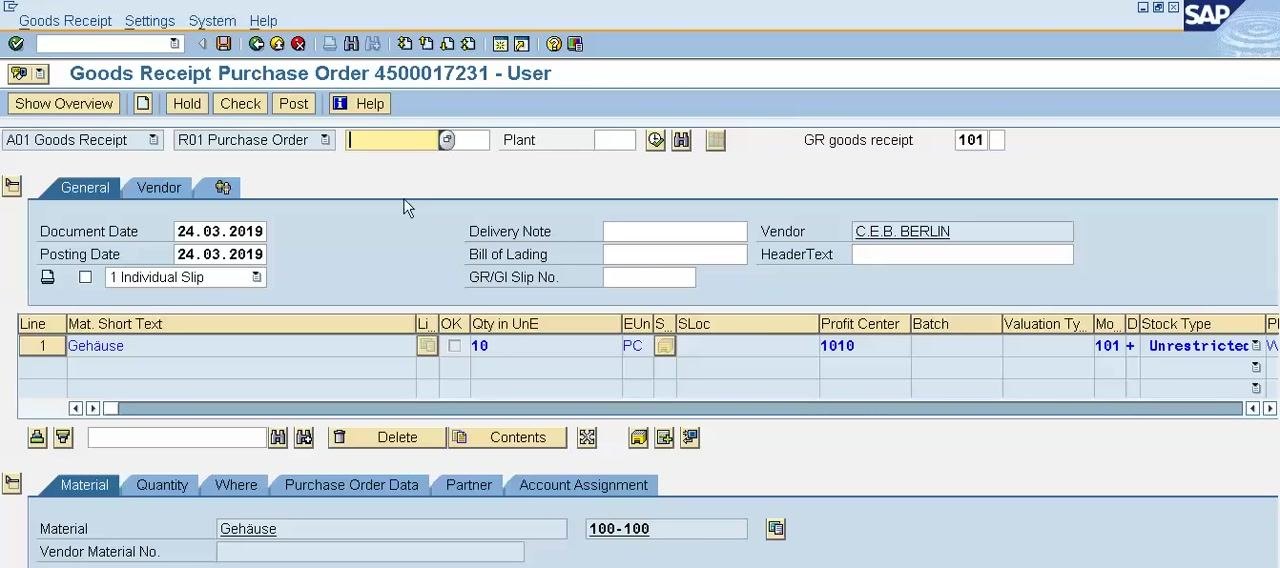
In the Delivery Note field, enter the vendor's delivery challan or note number as provided with the shipment.
Depending on the vendor and your local requirements, you can also fill in these optional fields:
- Bill of Lading: For import (foreign) vendors, enter the Bill of Lading document number. For domestic vendors, enter the LR (Lorry Receipt) number or docket number.
- GR/GI Slip No.: Enter the Goods Receipt/Goods Issue slip number if required by your country's regulations. This field is mandatory only in certain countries.
- Header Text: Add additional notes if your organization requires them.
The vendor name (e.g., C.E.B. BERLIN) and other PO details remain visible for reference.
Review and adjust the received quantity
Click the Quantity tab at the bottom of the screen. In the Qty in Unit of Entry field, enter the actual quantity received:
- If you received the full quantity as per the PO (e.g., 10 PC), leave the value unchanged.
- If you received a different quantity (e.g., 9 PC), update the field accordingly.
You can also update the Qty in SKU and Qty in Delivery Note fields if required.
Specify the storage location and goods recipient
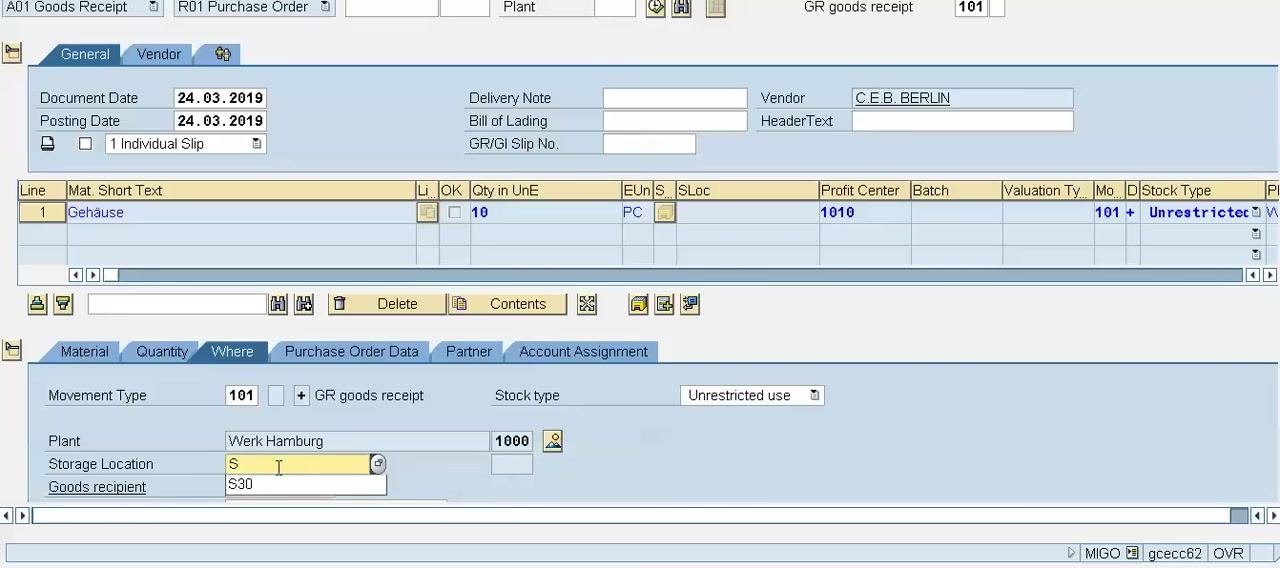
Click the Where tab. In the Storage Location field, enter the code for the physical location where the material will be stored within your plant:
- If the storage location was already specified in the purchase order, this field may be pre-filled.
- If not, enter it manually (e.g., S10).
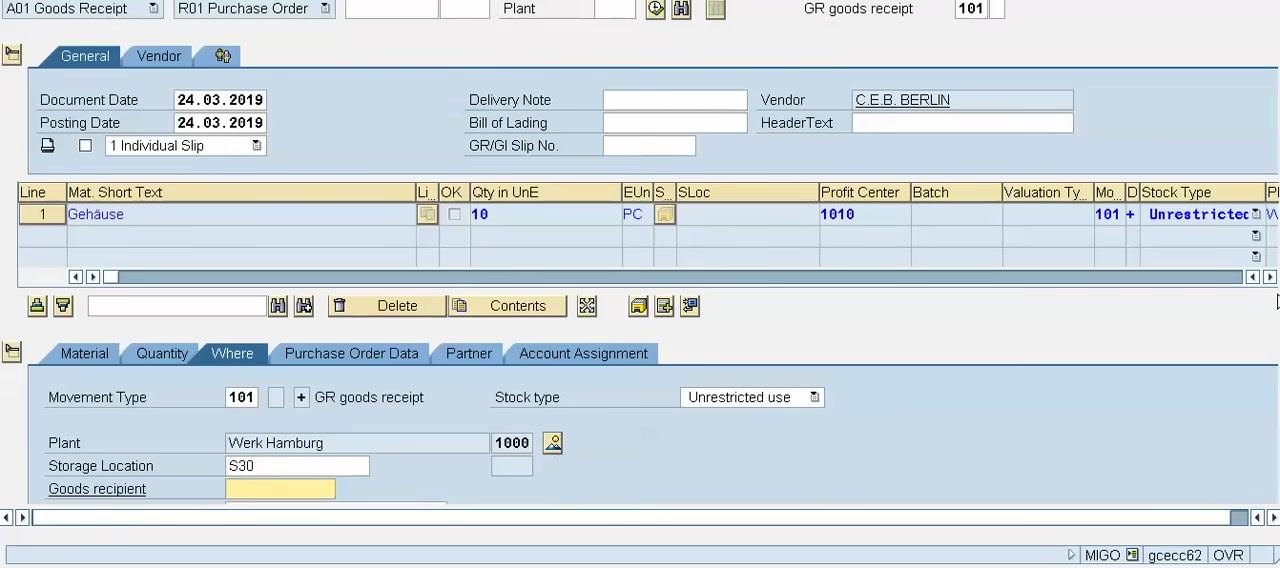
In the Goods recipient field, enter the name or code of the person or department receiving the goods (e.g., S30). Confirm that the Plant field is correctly set (e.g., Werk Hamburg, code 1000), and that Movement Type is 101 with Stock type set to Unrestricted use.
Verify the storage location entry
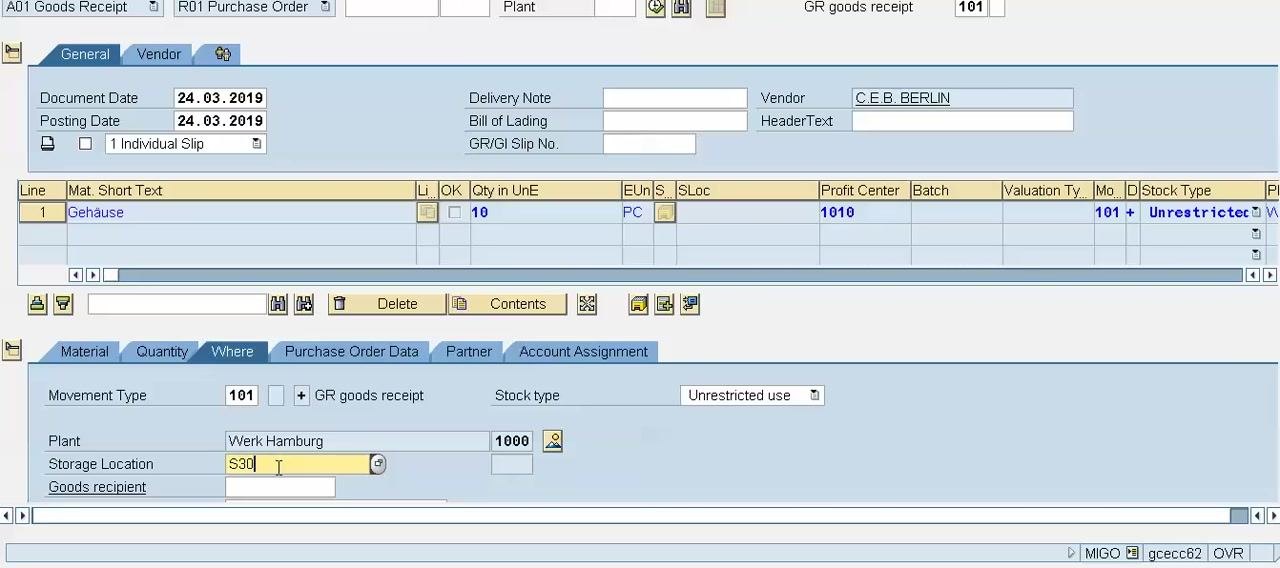
Review the Storage Location field in the Where tab:
- If the storage location (e.g., S30) is already specified in the purchase order, you do not need to re-enter it.
- If the field is empty and your process requires it, enter the appropriate storage location code.
Confirm that the Plant field is set to Werk Hamburg with code 1000, Movement Type is 101, and Stock type is Unrestricted use. Double-check all entries for accuracy before proceeding.
Enter the goods recipient name
In the Where tab, locate the Goods recipient field and enter the name of the person who will receive or unload the goods — typically the individual responsible for handling the delivery within the company. Leave the field blank if not specified, or enter the appropriate name per your company's process.
Verify and set the stock type
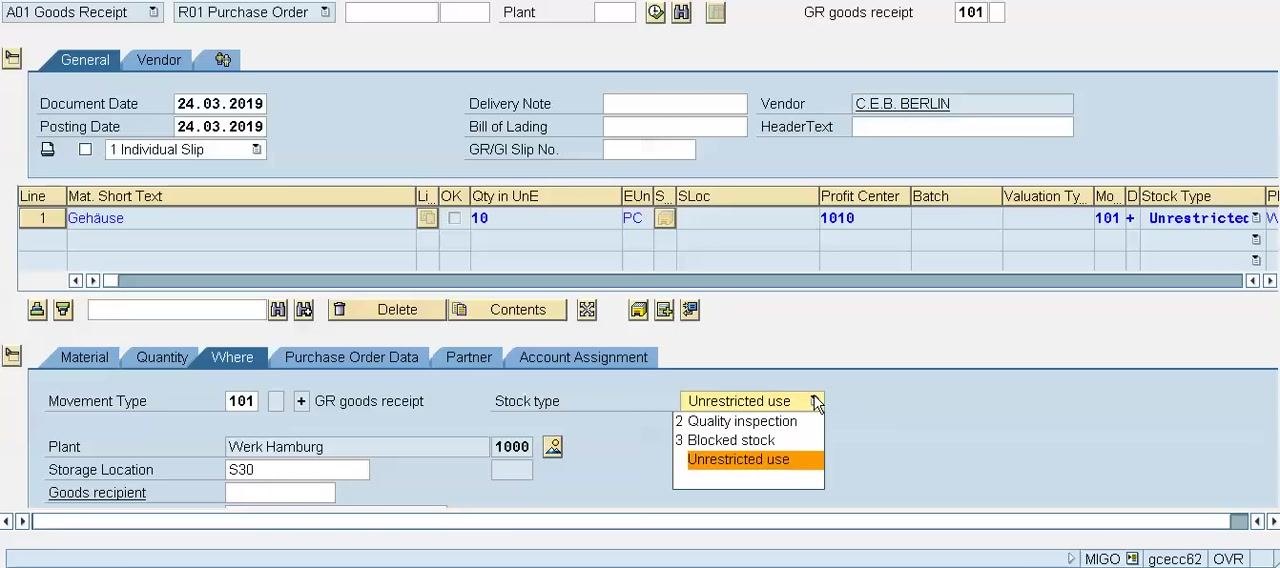
The Stock type field defaults to Unrestricted use, meaning the goods are available for immediate use or sale. If required, click the dropdown in the Stock type field to select a different option:
- Unrestricted use
- Quality inspection
- Blocked stock
Choose the stock type that matches your requirements.
Set a valid storage location
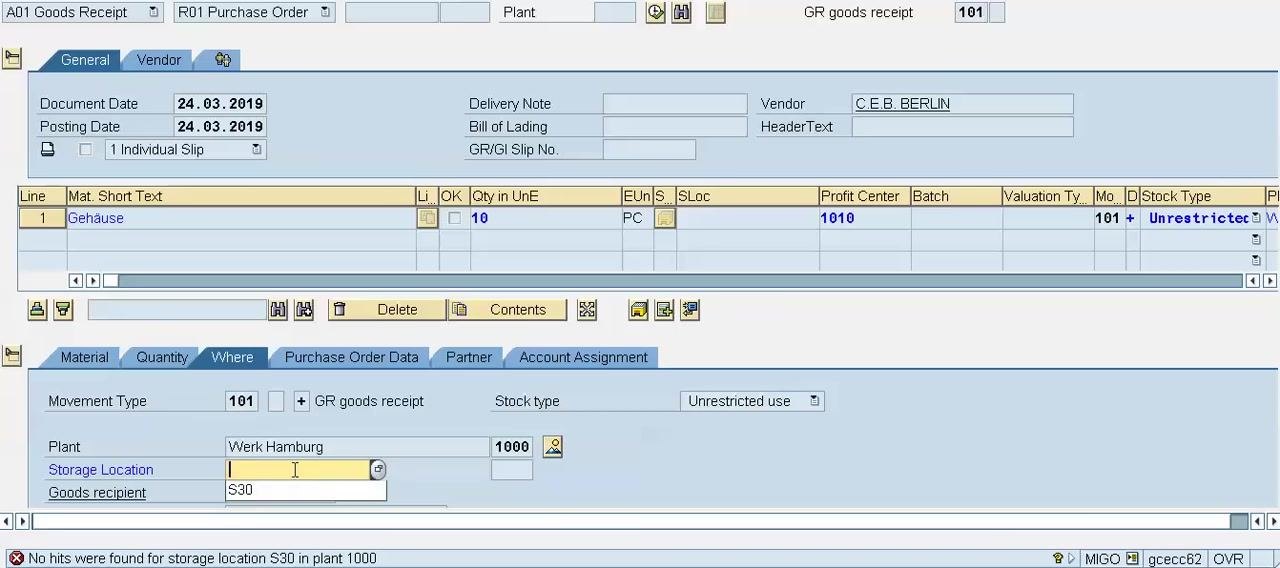
In the Where tab, locate the Storage Location field and enter the correct storage location code. If you enter an invalid code (e.g., S30), SAP displays a message such as: "No hits were found for storage location S30 in plant 1000." Use the dropdown to select a valid storage location, such as 0001.
Review and adjust the goods receipt quantity
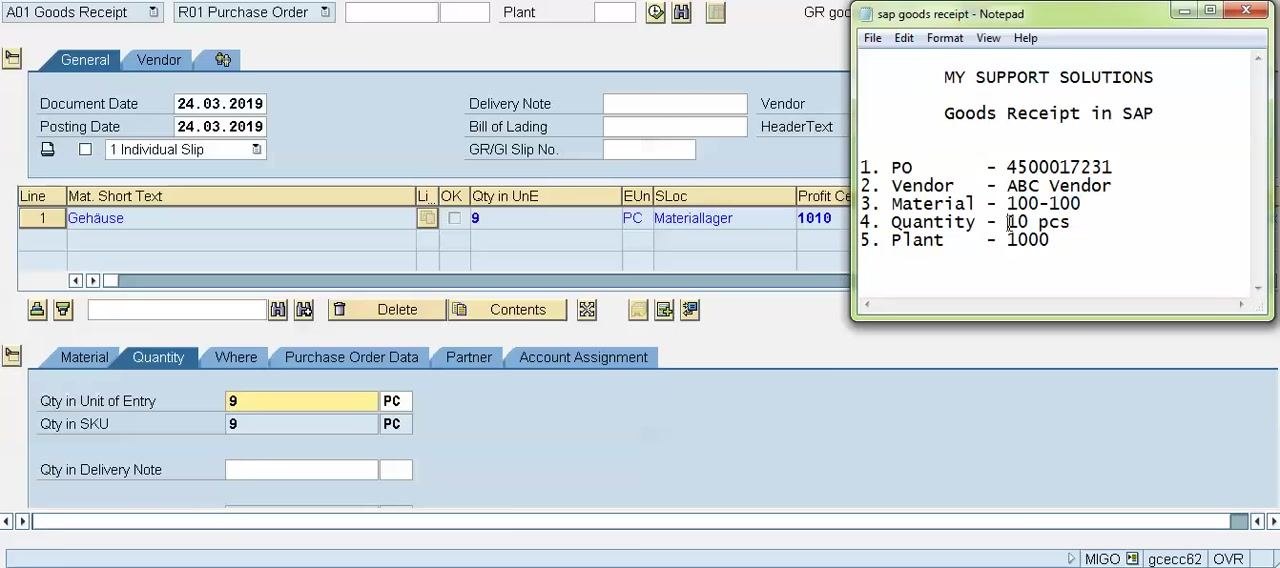
Switch to the Quantity tab and enter the actual quantity received in the Qty in Unit of Entry and Qty in SKU fields. For example, if the purchase order was for 10 pieces but only 9 were received, enter "9" in both fields. SAP will treat the purchase order as still open for the remaining quantity unless you mark the delivery as complete.
Set the delivery completed indicator (if applicable)
Go to the Purchase Order Data tab and locate the Delivery Completed indicator. If you want SAP to treat the purchase order as fully received — even though the quantity received is less than ordered — set this indicator. This prevents the system from expecting further goods receipts for this order.
Review the purchase order data
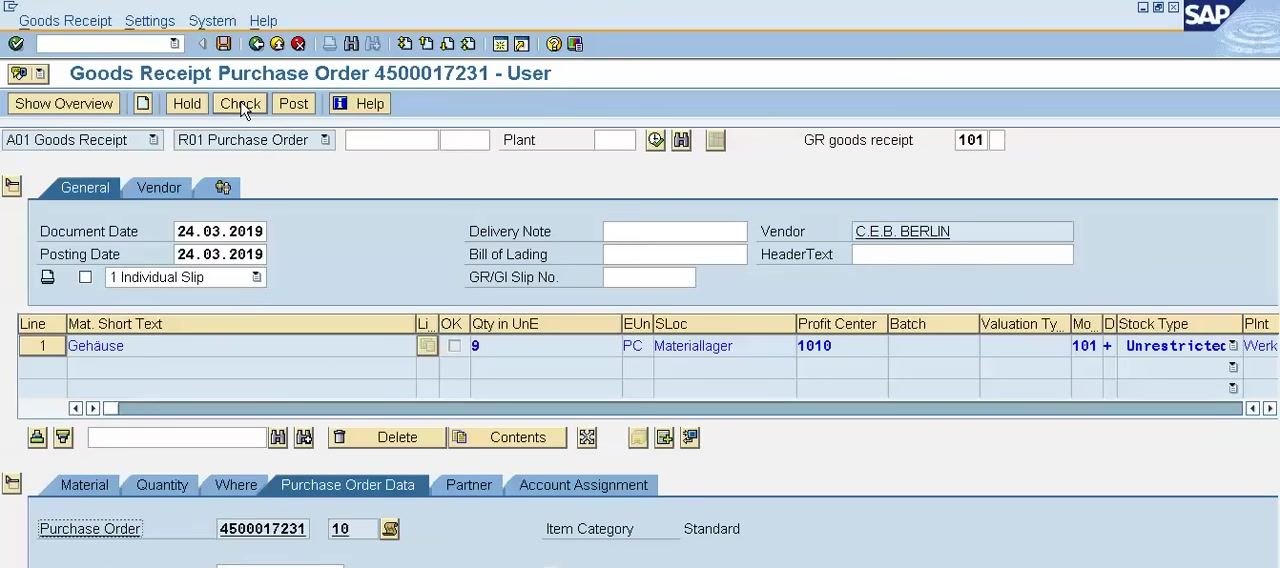
In the Purchase Order Data tab, confirm the following:
- The Purchase Order field shows the correct PO number: 4500017231.
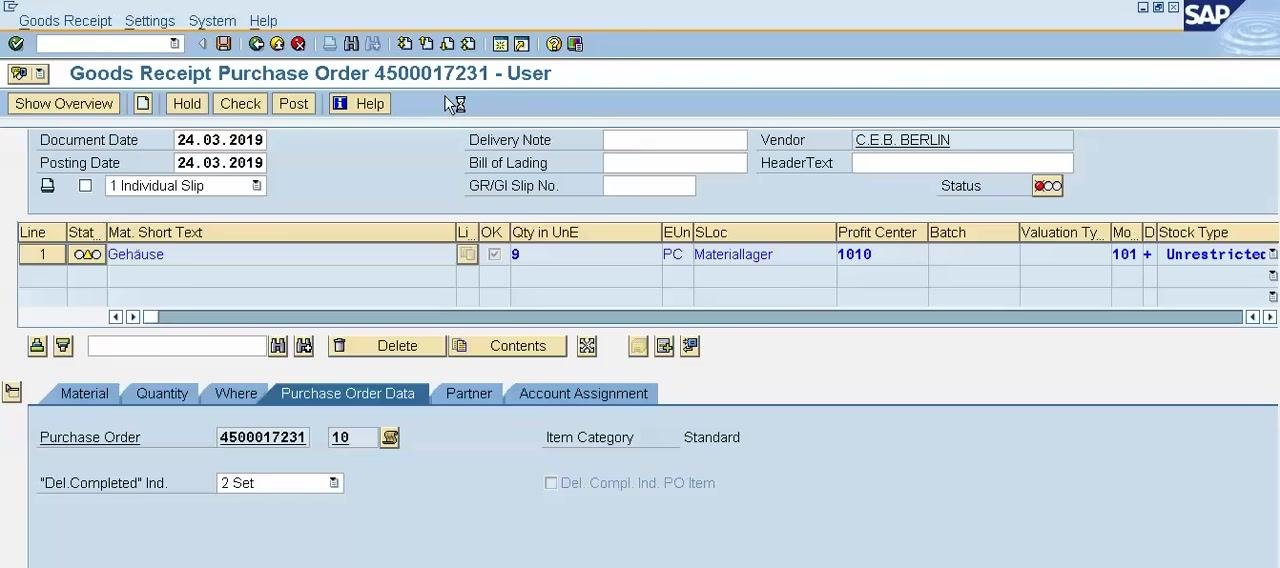
- The Del. Completed Ind. field is set to 2 Set, indicating the delivery is considered complete even though the full quantity was not received.
- The Item Category is Standard.
- The Qty in UnE (Quantity in Unit of Entry) is 9.
- The SLoc (Storage Location) is Materiallager, and the Profit Center is 1010.
Confirm the item is marked OK
In the item overview section, make sure the checkbox under the OK column is selected for the relevant line item. This indicates the item is ready for processing. If it is not already checked, click the checkbox to select it.
Validate the document
Click the Check button at the top of the screen. This prompts SAP to validate the entered data and display any warnings or informational messages.
Review system messages
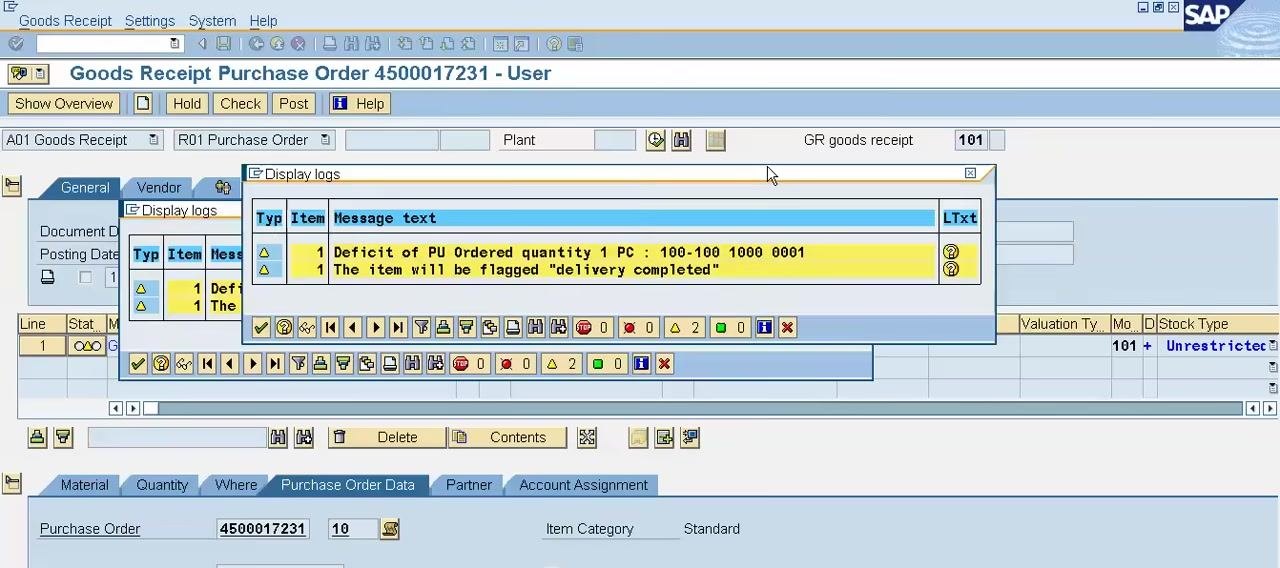
After clicking Check, a Display logs window appears with important messages:
- Deficit of PU Ordered quantity 1 PC: Indicates that the purchase order was for 10 pieces, but only 9 are being received.
- The item will be flagged 'delivery completed': Confirms that SAP will treat the order as complete despite the shortfall.
Carefully read these messages to understand any discrepancies or warnings before proceeding.
If the messages are informational and require no further action, close the Display logs window to proceed.
Post the goods receipt document
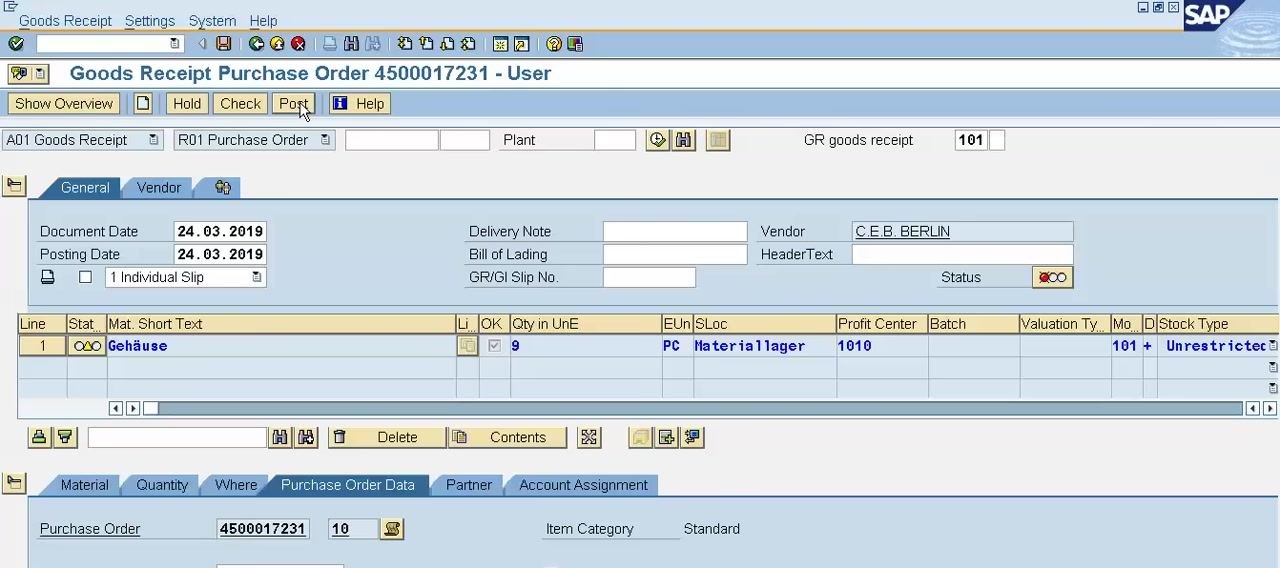
Once all data is verified and warnings are acknowledged, click the Post button at the top of the screen. This finalizes the goods receipt and triggers SAP to generate the necessary documents.
Upon posting, SAP creates two types of documents:
- Material Document: Records the physical movement of goods into inventory.
- Accounting Document: Records the financial impact of the goods receipt in the company's accounts.
Verify the posted goods receipt screen
After posting, SAP returns to the main Goods Receipt Purchase Order screen, displaying the purchase order number (4500017231), vendor (C.E.B. BERLIN), and item details (Material: Gehäuse, Quantity: 9 PC, Storage Location: Materiallager, Profit Center: 1010). The Purchase Order Data tab remains visible, confirming the Del. Completed Ind. is set to 2 Set.
Access the material document
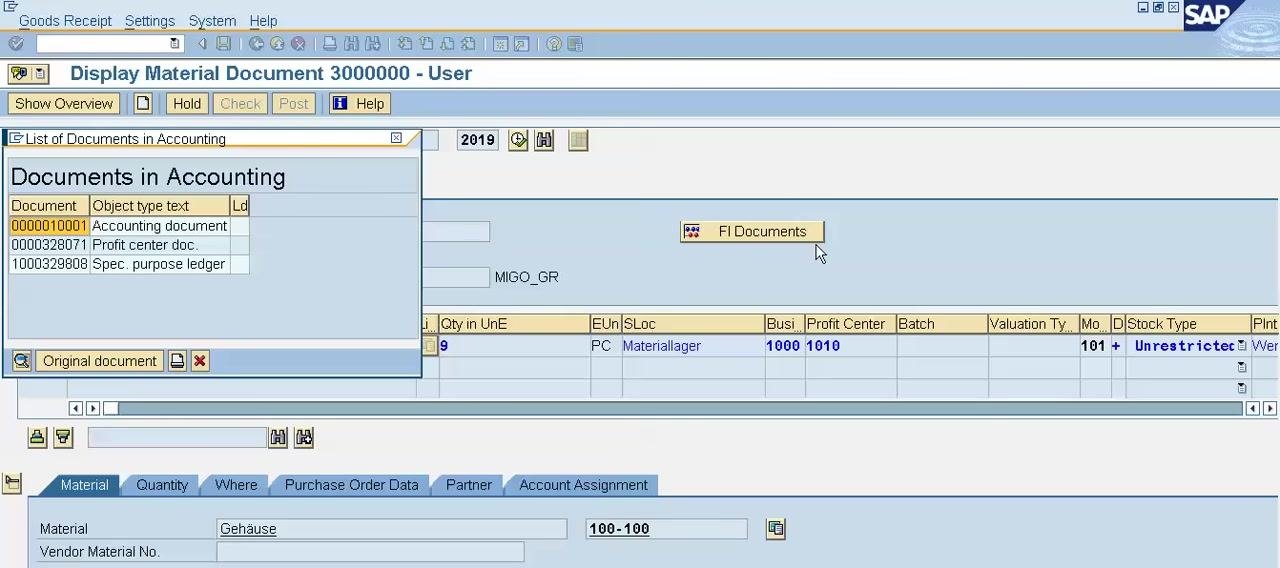
SAP automatically displays the Display Material Document screen for the newly created material document (e.g., 3000000). This screen shows the material (Gehäuse), quantity (9 PC), storage location (Materiallager), profit center (1010), document year (2019), and movement type (101 – Unrestricted).
View the associated accounting documents
Click the FI Documents button to view the financial documents linked to the material document. A pop-up window titled Documents in Accounting appears, listing all related accounting entries, such as:
- 0000110001: Accounting document
- 0000328071: Profit center document
- 1000329808: Special purpose ledger
Each document is categorized by its object type text for easy identification.
Ensure that all expected documents (material and accounting) appear in the list. If needed, click any document number to view its details or the original document for further verification.
Summary
By following these steps, you have:
- Understood the purpose and flow of the Goods Receipt process in SAP.
- Used transaction code MIGO to process a goods receipt against a purchase order.
- Entered delivery references, adjusted received quantities, and specified storage locations.
- Validated and posted the goods receipt document.
- Verified that both the Material Document and Accounting Document were generated correctly.
This confirms that the goods receipt has been successfully posted and all related documents have been generated in SAP, ensuring both inventory and financial records are up to date.
Generation details: cost, quality tiers
Docsie billed 4,500 credits ($3.15) to analyze this 9-minute video at standard quality. The rewrite, template fill and Word/PDF exports were included. The same video at each quality tier:
| Quality | Frames sampled | Credits | Approx. cost |
|---|---|---|---|
| Draft | every 16-30 s | 2,250 | $1.57 |
| Standard (this guide) | every 8-15 s | 4,500 | $3.15 |
| Detailed | every 4-7 s | 9,000 | $6.30 |
| Ultra | every 1-3 s | 18,000 | $12.60 |
Credits priced at $0.70 per 1,000; plans include a monthly allowance. Enterprise customers on on-premise or bring-your-own-model deployments run this on their own inference and pay no per-video credits.
Generated by Docsie Video-to-Docs on 2026-09-08 from a 8-minute video. Screenshots are frames from the source video and belong to their creator, My Support Solutions, whose original is embedded above. If you own this video and want the guide removed or credited differently, contact us and we will act within one business day.